background image

English

Reference

E-37

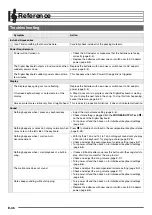
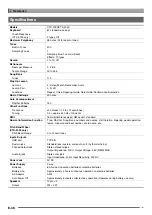
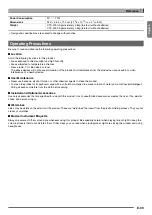
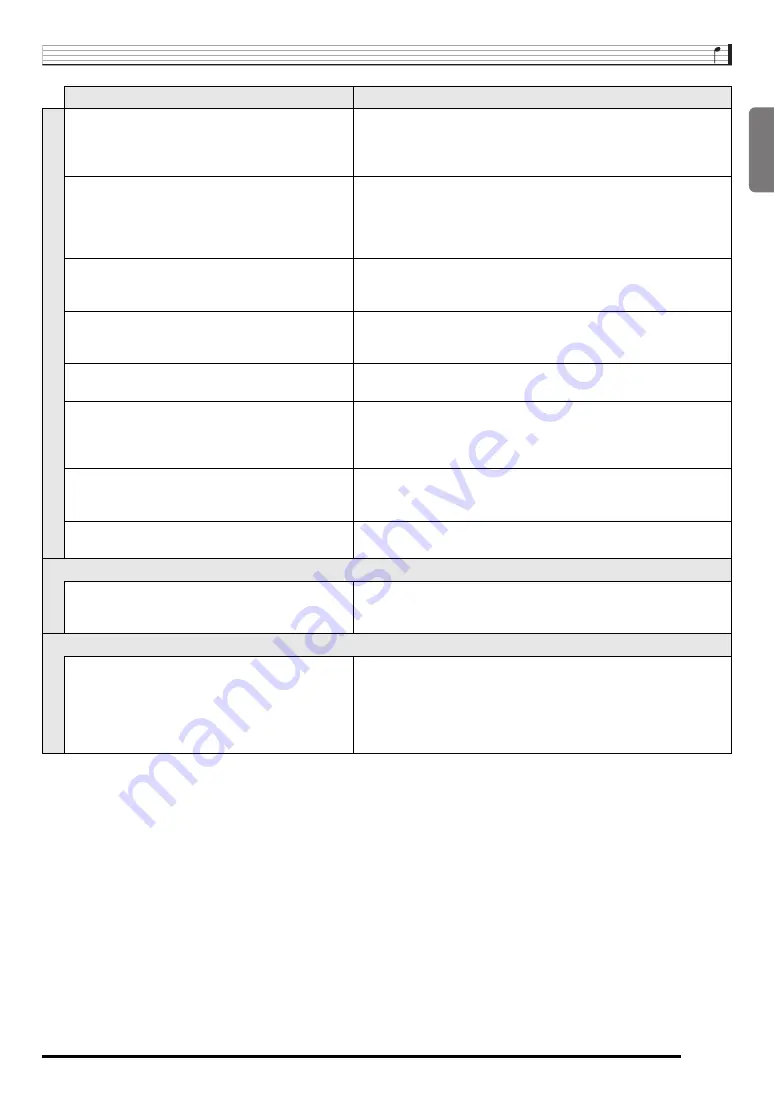
Some notes are cut off while they are playing.

Notes are cut off whenever the number of notes being sounded 
exceeds the maximum polyphony value of 48 (24 for some tones). 
This does not indicate malfunction. See “Maximum Polyphony” in the 
“Tone List” in the separate “Appendix”.

The volume or tone setting I made has changed.

• Adjust the main volume setting (page E-6).
• Turn power off and then back on to initialize all keyboard settings 

(page E-6).

• Replace the batteries with new ones or switch over to AC adaptor 

power (page E-5).

Output volume does not change even though is 
change my keyboard touch (CTK-3000 only).

• Change the Touch Response setting (page E-7).
• Turn power off and then back on to initialize all keyboard settings 

(page E-6).

In certain keyboard ranges, the volume and tone 
quality sound are slightly different from those in other 
keyboard ranges.

This is due to system limitations. It does not indicate malfunction.

With some tones, octaves do not change at the far 
ends of the keyboard.

This is due to system limitations. It does not indicate malfunction.

The pitch of the notes does not match other 
accompanying instruments or sounds strange when 
played long with other instruments.

• Check and adjust the transpose (page E-11) and tuning settings 

(page E-11).

• Turn power off and then back on to initialize all keyboard settings 

(page E-6).

The reverb of notes seems to change suddenly.

• Check and adjust the reverb setting (page E-10).
• Turn power off and then back on to initialize all keyboard settings 

(page E-6).

Sounds I sampled were deleted.

Sampled data is deleted whenever keyboard power is turned off (page 
E-13).

Operation

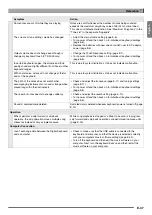
When I perform a skip forward or skip back 
operation, the skip operation moves multiple song 
measures instead of only a single measure.

While song playback is stopped or a Step Up Lesson is in progress, 
skip forward and skip back operations are performed in phrase units 
(page E-16).

Computer Connection

I can’t exchange data between the Digital Keyboard 
and a computer.

• Check to make sure that the USB cable is connected to the 

keyboard and computer, and that the device is selected correctly 
with your computer’s music software settings (page E-32).

• Turn off the keyboard and then exit the music software on your 

computer. Next, turn the keyboard back on and then restart the 
music software on your computer.

Symptom

Action

Содержание CTK-2000

Страница 1: ...encia futura Please keep all information for future reference Precauciones de seguridad Antes de intentar usar el teclado asegúrese de leer las Precauciones de seguridad separadas Safety Precautions Before trying to use the keyboard be sure to read the separate Safety Precautions English Español ...

Страница 2: ...y one or more of the following measures Reorient or relocate the receiving antenna Increase the separation between the equipment and receiver Connect the equipment into an outlet on a circuit different from that to which the receiver is connected Consult the dealer or an experienced radio TV technician for help FCC WARNING Changes or modifications not expressly approved by the party responsible fo...

Страница 3: ...board Play E 19 Phrases E 19 Step Up Lesson Flow E 19 Selecting the Song Phrase and Part You Want to Practice E 20 Lessons 1 2 and 3 E 21 Lesson Settings E 22 Using Auto Step Up Lesson E 23 Music Challenge Keyboard Game E 25 Using Auto Accompaniment E 27 Playing the Rhythm Part Only E 27 Playing All Parts E 28 Using Auto Accompaniment Effectively E 30 Using One Touch Preset E 31 Connecting Externa...

Страница 4: ... refers to the CTK 2000 CTK 3000 Illustrations in this User s Guide show the CTK 3000 In this manual buttons and other controllers are identified using the numbers shown below 1 bn 7 8 9 bm bk bl 6 bo bp bq br bs bt ck cl cm 2 3 4 5 cn co cp cq cr cn ct dk cs ...

Страница 5: ... 28 34 bm TEMPO buttons E 8 17 31 bn Number buttons buttons E 4 bo SONG BANK button E 15 17 20 bp RHYTHM ONE TOUCH PRESET button E 9 27 31 bq TONE button E 6 9 br LISTEN button E 21 bs WATCH button E 21 bt REMEMBER button E 22 ck NEXT button E 20 cl AUTO button E 23 cm MUSIC CHALLENGE button E 25 cn Speakers co Song Bank list cp Rhythm list cq Display cr Tone list cs PITCH BEND wheel CTK 3000 only...

Страница 6: ...ayed Each press of 3 cycles through the available parameters 3 When the parameter you want is displayed use bn 10 key to change its setting The parameter setting will disappear from the upper left area of the screen if you do not perform any operation for some time The tone and other parameters revert to their initial defaults whenever you turn on power page E 6 Using the 10 key Pad bn Number Butt...

Страница 7: ...you to prepare six commercially available AA size batteries Do not use oxyride batteries or any other nickel based batteries 1 Open the battery cover on the bottom of the Digital Keyboard 2 Load six AA size batteries into the battery compartment Make sure the positive and negative ends of the batteries are facing as shown in the illustration 3 Insert the tabs of the battery cover into the holes on...

Страница 8: ...g a concert etc 1 While holding down bq turn on power Auto Power Off will be disabled Using headphones cuts off output from the built in speakers which means you can practice playing even late at night without disturbing others Be sure to turn down the volume level before connecting headphones Headphones do not come with the Digital Keyboard Use commercially available headphones See page E 1 for i...

Страница 9: ...rovides you with key touch that is the next best thing to an acoustic piano Note volume changes automatically in accordance with key press speed Use the procedure below to control how much the volume of played notes change in accordance with playing speed Select the setting that best matches your playing style 1 Press 3 a number of times until Touch appears on the display page E 4 2 Use bn 10 key ...

Страница 10: ...e are in each measure Use the following procedure to change the tempo of the metronome 1 Press bm Use y slower and t faster to change the tempo setting Holding down either button changes the setting at high speed Pressing y and t at the same time will initialize the tempo setting in accordance with the currently selected song or rhythm Pressing bm causes the tempo value to flash on the display Whi...

Страница 11: ... enter the tone number Specify three digits for the tone number Example To select 001 enter 0 3 0 3 1 When one of the drum sets is selected tone numbers 395 through 400 each keyboard key is assigned a different percussion sound 3 Try playing something on the keyboard The tone of the instrument you selected will sound 1 Press bp and bq at the same time This selects the grand piano tone Settings bq ...

Страница 12: ...n 10 key and keys to select the pedal effect you want The following shows the available pedal effects Using Reverb Off oFF Turns off reverb 1 to 10 The larger the number selected the longer the reverb duration R e v e r b R e v e r b Indicator disappears when reverb is turned off Using a Pedal Connecting a Pedal Unit Selecting the Pedal Effect Sustain SUS Sustains notes played while the pedal is d...

Страница 13: ...othly upwards and downwards This technique makes it possible to produce effects that are similar to sounds produced when bending notes on a saxophone or electric guitar 1 While playing a note on the keyboard rotate the pitch bend wheel on the left of the keyboard upwards or downwards The amount the note bends depends on how much you rotate the pitch bend wheel Do not have the pitch bend wheel rota...

Страница 14: ...e Digital Keyboard before connecting them Sampled sounds are recorded in monaural 1 Turn the volume levels of the external device and Digital Keyboard down 2 Turn on the external device and then the Digital Keyboard 3 Press 4 This enters record standby 4 Output the sound from the external device The Digital Keyboard will start sampling automatically and stop after one second What you sample is sto...

Страница 15: ...d to tone number 401 Selecting a tone will play the sampled sound in a loop along with the applicable effect as described below Turning off power clears sampled data Starting a Sampling Operation Manually C4 S m p l A u t o Applying Effects to a Sampled Sound Effect Name Description 402 Loop 1 Loops the sampled sound 403 Loop 2 Loops the sample sound and raises the pitch of the resonating sound wh...

Страница 16: ...7 The rhythm sounds in accordance with the drum assign type you selected in step 2 If the rhythm does not include a bass drum and snare drum the sampled sound will not sound while Type 1 is selected Rhythm numbers 140 and 142 to 150 do not use percussive instruments so the sampled sound does not sound when these rhythm numbers are selected Using a Sampled Sound in a Rhythm Drum Assign Off oFF Samp...

Страница 17: ...er song while demo playback is in progress use bn 10 key and keys to enter the song number you want page E 4 This will cause demo playback to jump to the song whose number you entered You cannot use bn 10 key number buttons to select a song 3 To stop demo playback press bk Demo playback continues until you stop it by pressing bk Use the procedure below to play back one of the built in songs You ca...

Страница 18: ... page E 20 Skip Back 1 Press 7 This skips song playback back to the previous measure Each press of 7 skips back one measure Holding down 7 skips back at high speed until you release it Pressing 7 while song playback is stopped performs lesson function phrase skip back page E 20 You can use the procedure in this section to repeat particular measures for practice playing along until you master it Yo...

Страница 19: ...se bn 10 key to change it The tempo value will stop flashing if you do not perform any operation for a short while Changing the song number will return the song to its original default tempo Use the following procedure to adjust the balance between the volume of what you play on the keyboard and song playback volume 1 Press 3 a number of times until Song Vol appears on the display page E 4 2 Use t...

Страница 20: ...nt to turn off Each press of bl cycles through the settings shown below 2 Press bk This starts playback in accordance with the setting you selected in step 1 During playback with one part turned off only the notes of the part that is turned off are shown on the display Turning Off the Part of One Hand for Practice Part Select Right hand part off Left hand part off Both hand parts off Both hand par...

Страница 21: ...h practice of the right hand part left hand part and both hand parts for each phrase of a song Master all of the phrases and you master the song bk bk 3 3 bn bn 8 8 7 7 6 6 bl bl bt bt bs bs br br ck ck cl cl bo bo Phrases Song start Song end Phrase 1 Phrase 2 Phrase 3 Final Phrase Step Up Lesson Flow Phrase 1 Right Hand Lesson 1 2 3 Left Hand Lesson 1 2 3 Both Hand Lesson 1 2 3 4 Repeat the above...

Страница 22: ... Phrase Appears when you select a phrase when a lesson starts etc Note that certain phrases will cause Wait to appear instead of Phrase Wait Appears when the lesson starts with an intro or fill in phrase that is not included in the phrases to be practiced Play toll advance automatically to the next phrase after the un included phrase plays so wait until then to start playing on the keyboard NextPh...

Страница 23: ...ns provided on the display and by voice fingering guide During this lesson the display shows the key you need to press next Voice fingering guide uses a simulate voice to announce which finger you should use 3 To stop Lesson 2 press bs or bk If you complete Lesson 2 play to the end a score that rates your play appears on the screen Lessons 1 2 and 3 Lesson 1 Listen to the song Lesson 2 Watch how t...

Страница 24: ...s 1 2 and 3 1 Press 6 This disables phrase repeat play Use the following procedure to turn off voice fingering guide which tells you which finger to use to play each note in Lesson 2 and Lesson 3 1 Press 3 a number of times until Speak appears on the display page E 4 2 Press the bn 10 key key to select the OFF setting Lesson 3 Remember what you learned as you play Lesson 3 Guidance Press the keybo...

Страница 25: ...uto Step Up Lesson the Digital Keyboard advances through each lesson automatically 1 Select the song and part you want to practice page E 15 2 Press cl Listen to the first phrase in Lesson 1 In Lesson 1 the sample phrase is played only once before advancing to Lesson 2 3 Auto Step Up Lesson stops automatically after you are able to get through all of the lessons successfully In Lesson 2 and Lesson...

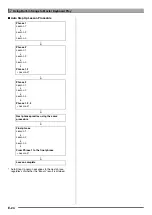
Страница 26: ...e Bravo result is attained Phrase 1 Lesson 1 4 Lesson 2 4 Lesson 3 4 Phrase 2 Lesson 1 4 Lesson 2 4 Lesson 3 4 Phrase 1 2 Lesson 3 4 Phrase 3 Lesson 1 4 Lesson 2 4 Lesson 3 4 Phrase 1 2 3 Lesson 3 4 Next phrase practice using the same procedure 4 Final phrase Lesson 1 4 Lesson 2 4 Lesson 3 4 From Phrase 1 to the final phrase Lesson 3 4 Lesson complete ...

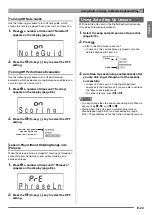
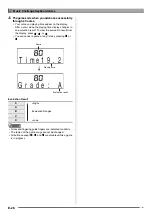
Страница 27: ...the indicated finger as quickly as possible This causes the on screen keyboard key to go out to let you know that you cleared the first note The next on screen keyboard key starts to flash so get ready to press the next key The time it takes you to press the keyboard key after the on screen key lights appears on the display Unit 0 1 sec The shorter the time the higher your score Pressing a keyboar...

Страница 28: ...esult To clear the evaluation result from the display press bo bp or bq You can cancel a game at any time by pressing cm or bk Evaluation Result Notes and fingering guide fingers are indicated randomly The tempo of the game songs cannot be changed All buttons except 1 bk and cm are disabled while a game is in progress S High A B Evaluation Ranges C D Low T i m e 1 9 2 G r a d e A Score Playing tim...

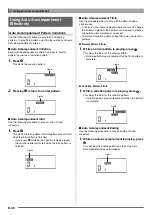
Страница 29: ...ompaniment Your Digital Keyboard comes with a variety of built in rhythms including 8 beat and waltz Use the following procedure to play the basic rhythm part 1 Press bp 2 Use bn 10 key to select the rhythm number you want See the separate Appendix for information about individual rhythms You also can find out rhythm numbers using the rhythm groups printed on the Digital Keyboard s console 3 Press...

Страница 30: ...soon as a chord is played see Using Synchro Start on page E 31 You can select from among the following five chord input modes FINGERED 1 FINGERED 2 FINGERED 3 CASIO CHORD FULL RANGE CHORD 1 Hold down bl until the chord input mode selection screen appears on the display 2 Use the bn 10 key and keys to select the chord input mode you want For information about each chord input mode see the separate ...

Страница 31: ...Type Example Major Chords Letters above the accompaniment keyboard indicate the chord assigned to each key Pressing a single accompaniment area key in the CASIO CHORD mode will play the major chord whose name is marked above the key All of the accompaniment area keys that are marked with the same chord name play exactly the same chord C C Major Minor Chords To play a minor chord press the accompan...

Страница 32: ...n during a performance A fill in is a short phrase played where you want to change the mood of a piece A fill in pattern can be used to create a link between two melodies or an accent Normal and variation patterns have their own unique fill in patterns Normal Pattern Fill in 1 While a normal pattern is playing press 7 This plays the fill in for the normal pattern Normal pattern play will resume af...

Страница 33: ...he tempo value is flashing you also can use bn 10 key to change it If you do not perform any operation for after the tempo setting screen appears the display will return to the screen displayed before you pressed bm Use the following procedure to adjust the balance between what you are playing on the keyboard and the volume of the Auto Accompaniment 1 Press 3 a number of times until AcompVol appea...

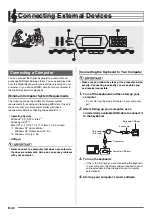
Страница 34: ...so can cause problems with your computer Make sure you follow the steps of the procedure below exactly Connecting incorrectly can make data send and receive impossible 1 Turn off the keyboard and then start up your computer Do not start up the music software on your computer yet 2 After starting up your computer use a commercially available USB cable to connect it to the keyboard 3 Turn on the key...

Страница 35: ...he channel you want for sending Digital Keyboard data to a computer 1 Press 3 a number of times until Keybd Ch appears on the display page E 4 2 Use the bn 10 key and keys to change the keyboard channel The navigate channels can be used to display only the notes of a particular channel part as on screen guide information from among the note information of a tune sent from the computer Specifying t...

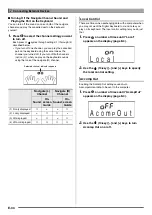
Страница 36: ... R channel There are times when exchanging data with a computer when you may not want the Digital Keyboard to sound notes you play on its keyboard The local control setting lets you do just that 1 Press 3 a number of times until Local appears on the display page E 4 2 Use the bn 10 key and keys to specify the local control setting Enabling the Accomp Out setting causes Auto Accompaniment data to b...

Страница 37: ...ed from external audio equipment lower the keyboard s volume setting Connection requires commercially available connecting cords supplied by you The connecting cords should have a stereo mini plug on one end and a plug that matches the configuration of the external device on the other end Turn off the keyboard when making connections After connecting turn down the keyboard and external device volu...

Страница 38: ...in volume setting page E 6 Check if something is plugged into the PHONES OUTPUT jack dn on the back of the Digital Keyboard Turn power off and then back on to initialize all keyboard settings page E 6 Nothing happens or notes do not play normally when I play notes on the left side of the keyboard Press bl to disable chord input in the accompaniment keyboard area page E 28 Nothing happens when I st...

Страница 39: ...e pitch of the notes does not match other accompanying instruments or sounds strange when played long with other instruments Check and adjust the transpose page E 11 and tuning settings page E 11 Turn power off and then back on to initialize all keyboard settings page E 6 The reverb of notes seems to change suddenly Check and adjust the reverb setting page E 10 Turn power off and then back on to i...

Страница 40: ... MIDI 16 multi timbre received GM Level 1 standard Musical Information Function Tone Rhythm Song Bank numbers and names staff notation fingering pedal operation tempo measure and beat number chord name etc Pitch Bend Wheel CTK 3000 only Pitch Bend Range 0 to 12 semitones Inputs Outputs USB port TYPE B Sustain jack Standard jack sustain sostenuto soft rhythm start stop Phones Output jack Stereo sta...

Страница 41: ...l excess moisture from the cloth before wiping Included and Optional Accessories Use only accessories that are specified for use with this product Use of unauthorized accessories creates the risk of fire electric shock and personal injury Weld Lines Lines may be visible on the exterior of the product These are weld lines that result from the plastic molding process They are not cracks or scratches...

Страница 42: ... THE STRAW 045 JAMAICA FAREWELL EVENT 046 SILENT NIGHT 047 WE WISH YOU A MERRY CHRISTMAS 048 JINGLE BELLS 049 JOY TO THE WORLD 050 O CHRISTMAS TREE PIANO CLASSICS 051 MARY HAD A LITTLE LAMB 052 LE CYGNE FROM LE CARNAVAL DES ANIMAUX 053 JE TE VEUX 054 SONATA op 13 PATÉTIQUE 2nd Mov 055 HEIDENRÖSLEIN 056 AIR FROM SUITE no 3 057 SPRING FROM THE FOUR SEASONS 058 HABANERA FROM CARMEN 059 BRINDISI FROM ...

Страница 43: ... Reference E 41 Chord Chart m M C D E F G A B C D b D E b F G b G A b A B b dim m7 5 M7 7 m7 dim7 Chord Type Root C D E F G A B C D b D E b F G b G A b A B b sus4 aug add9 7 5 7sus4 m add9 mM7 Chord Type Root ...

Страница 44: ...O Key s Ch s Velocity X 9nH v 0 100 CTK 2000 1 127 CTK 3000 O 9nH v O 9nH v 1 127 X 9nH v 0 8nH V Note ON Note OFF Mode Mode 3 X Mode 3 X Default Messages Altered 0 32 1 6 38 7 10 11 64 Bank select Modulation Data entry Volume Pan Expression Hold 1 Models CTK 2000 CTK 3000 Version 1 0 O X X CTK 2000 O CTK 3000 2 O O X O 4 O O O O O O O MSB only 3 no relation sin relación MIDI Implementation Chart ...

Страница 45: ...Messages Master Fine Tuning Master Coarse Tuning Reverb Time 6 Universal System Exclusive Messages GM System On Off Master Fine Tuning Master Coarse Tuning Reverb Time For details about footnotes 2 3 5 6 see MIDI Implementation at http world casio com 1 Depende del tono 2 RPN Sensibilidad a la inflexión de altura tonal sólo CTK 3000 3 RPN Sensibilidad a la inflexión de altura tonal afinación preci...

Страница 46: ... 3000ES1B F This recycle mark indicates that the packaging conforms to the environmental protection legislation in Germany Esta marca de reciclaje indica que el empaquetado se ajusta a la legislación de protección ambiental en Alemania ...

Отзывы: