INTRODUCTION
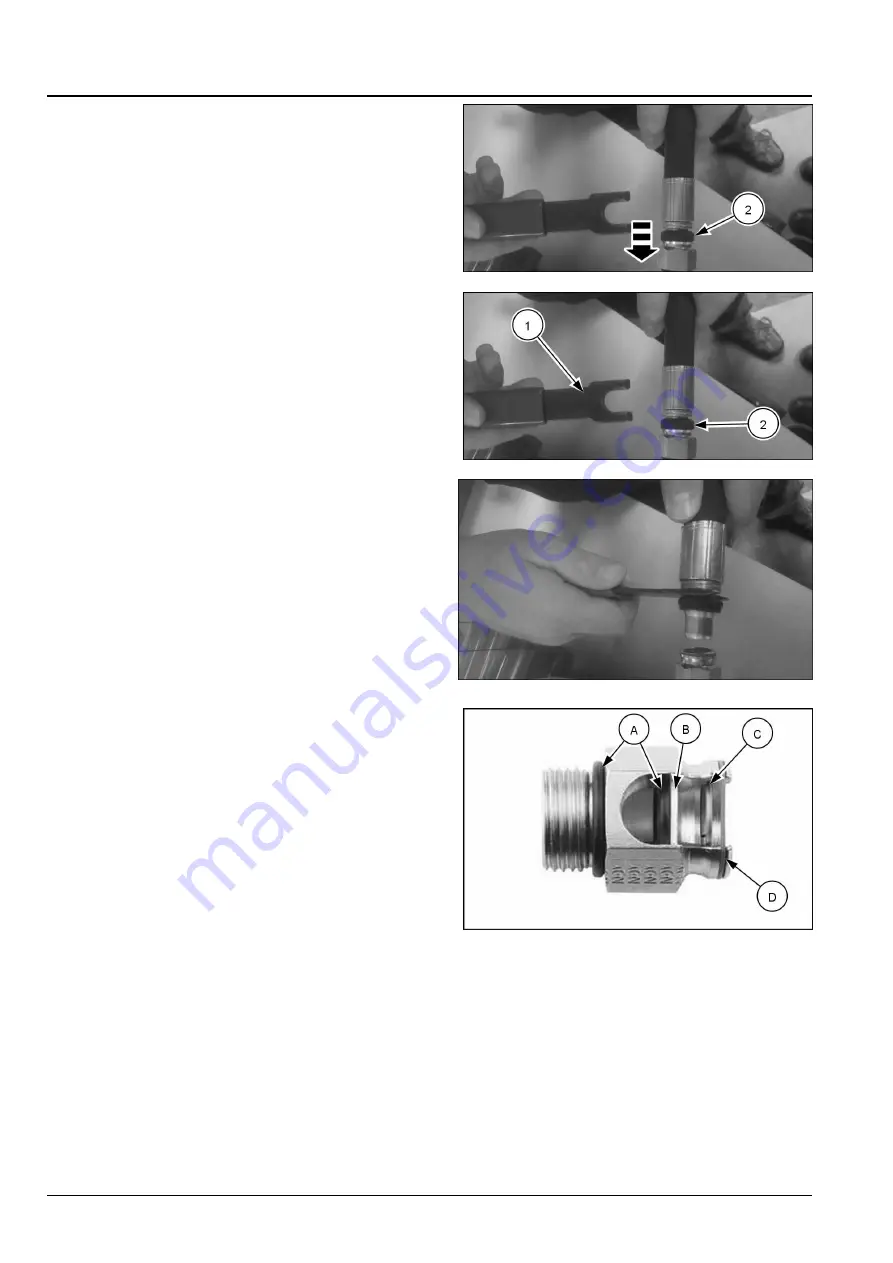
STC® disassembly action
NOTICE:
Do not use the disconnect tool to pry on the
parts. Prying can result in damage. Insert the tool straight
into the connection. The proper connection and discon-
nection of
STC®
parts is outlined later in this section.
1. Release pressure from the hydraulic system prior to
disconnecting components.
2. Some fluid may still be in the system. Minimize fluid
loss by draining the fluid from system components
prior to disconnection.
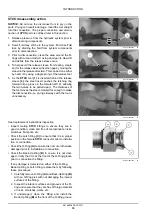
3. Prior to disconnection, clean the area around the fit-
tings with a clean cloth, Or using an airgun to blow dirt
and debris from the release sleeve area.
4. To help avoid the release sleeve from tearing, create
an (for the release sleeve) insertion gap by moving the
sleeve in the release direction. This can be done either
by hand or by using a single prong of the release tool.
5. As the
STC®
tool
(1)
is inserted behind the release
sleeve
(2)
, the steel insert pushes the latching ring
forward into a groove in the female half I.D., allowing
the two halves to be pulled apart. The thickness of
the tool moves the sleeve forward far enough to make
the disconnection, so prying sideways with the tool is
unnecessary
RAIL17TLB0465AA
10
RAIL17TLB0465AA
11
RAIL17TLB0467AA
12
Seal replacement instructions inspection
• Inspect mating
STC®
fittings to ensure they are in
good condition, clean and free of contaminants, nicks,
scratches, flat spots, etc.
• Check the Latch Ring
(C)
to ensure that it is in proper
position in the female
STC®
connector prior to installa-
tion or connection.
• Check the O-Ring
(A)
to ensure it is not cut or otherwise
damaged prior to installation or connection.
• Check the Back-Up Ring
(B)
to ensure it is not dam-
aged. Verify that it is at the front of the O-Ring groove
prior to connection the fitting.
RAIL17TLB0016AA
13
• If any damage is detected on either of the O-Ring,
Back-Up Ring or Latch Ring, replace them by following
these procedures:
1. Carefully remove O-Ring
(A)
and Back-Up Ring
(B)
with an O-Ring pick with out damaging the interior
surfaces of the fitting.
2. Inspect the interior surfaces and grooves of the fit-
ting and ensure that they are free of foreign material
or nicks, scratches, dents, etc.
3. If undamaged, clean the fitting and install the
Back-Up Ring
(B)
at the front of the O-Ring groove.
48194558 20/10/2017
66

