UNPACKING AND INSTALLATION (continued)
6
INSTALLATION
Counter-Top Models
Tools Needed:
NSF approved food grade silicone, level
1. Place the cabinet in an area where the ambient air temperature is constant and
at least 70°F (21°C). Make sure the countertop is fixed, level and strong
enough to support the weight of the cabinet and it is at the proper counter
height for convenient use.
2. Verify that the unit is level. The unit must be within 0.5° of level. Use shims to
level the unit, if necessary.
3. Apply NSF-approved sealant around the edge of the unit and the countertop to
seal it in place.
Floor Models
Tools Needed:
power drill, concrete screws, anchors, level
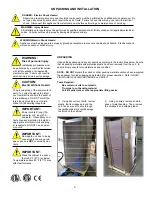
3) Using an appropriate device, such as
forklift or pallet jack, lift the unit off of the
pallet, remove the pallet, and then lower
the cabinet to the ground.
4) Move the cabinet to the desired location.
5) Lock the front two casters to hold the
cabinet in place.
Appliance should be thoroughly cleaned be-
fore use. See CLEANING INSTRUCTIONS,
page 16.
INSTALLATION CLEAR-
ANCES:
Allow at least 2”
ventilation gap at the top,
sides and rear of the cabi-
net. Allow at least 36” clearance at
the front of the cabinet. Pass through
cabinets require 36” at the front and
rear of the cabinet.
Before using, familiarize
yourself with the
appliance controls. Read
entire manual before operating
this cabinet.
1
2
3
4
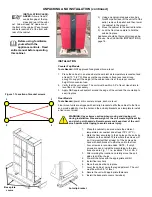
Figure 1.1 Location of bracket screws
Floor mount units are shipped with anti-slip brackets to affix the cabinet to the floor
and provide stability. Use the holes on the anti-slip brackets as a template to install
a floor mount model.
WARNING: Use extreme caution when moving and tipping unit
during installation. Size and weight of the unit create significant tip
and pinch point hazards. Remain aware and keep clear of the unit/
pinch points while tipping to avoid serious injury.
1. Place the cabinet in an area where the ambient
temperature is constant and at least 70°F (21°C).
2. Mark the floor according to the 4 holes on the anti-slip
brackets on the cabinet. This is where the screws will
go. It is important that at least 2 of the 4 screws be
used with each bracket to affix the unit to the floor.
Four screws are recommended. NOTE: If only 2
screws are used, install them according to the loca-
tions shown in Fig. 1.1, i.e. locations 1 & 4 or 2 & 3
3. After marking the locations, carefully move the unit
aside to drill floor holes
4. Pre-drill the holes with the appropriate drill bit
5. Install floor anchors
6. Move the cabinet back in place
7. Level the cabinet, using the leg adjustment. The unit
must be within 0.5° of level.
8. Secure the unit with appropriate fasteners
9. Install the base plate covers (included)
Anti-slip bracket
Base plate
covers

