6
Mounting Rudder and
Elevator
1.
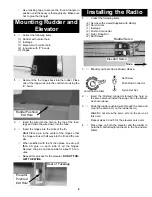
Collect the following items:
(1) Rudder with control horn
(1) fuselage
(1) Elevator with control horn
(2) long wire with “Z” bends
(7) Hinges
1.
Remount the the hinges back into the rudder. Place
one of the long wires onto the control horn using the
“Z” bend.
Use masking tape to secure the fin and triangle in
position until the epoxy is thoroughly dry. Make sure
not to glue the triangle!
Rudder Pushrod
Exit Hole
Elevator
Pushrod
Exit Hole
Rear of Fuselage
Installing the Radio
1.
Collect the following items:
(2) Servos with screws(Supplied with Radio)
(2) Servo Arms
(1) fuselage
(2) Pushrod connector
(2) Nylon Snap Nut
(2) Set Screws
2.
Insert the wire into the hole on the top of the fuse-
lage and slide the wire down into the tube.
3.
Insert the hinges into the slots of the fin.
Hint:
Place a pin in the center of the hinge so that
the hinge will insert half way into the fin and the rud-
der.
When satisfied with the fit then place one drop of
thin
CA glue on each side of all the hinges.
Remove the pins and set aside for about 10 min-
utes.
Repeat this process for the elevator.
DO NOT FOR-
GET THE WIRE.
Nose
1.
Mount your servos as shown above.
2.
Insert the Pushrod connector through the hole on
the servo arm and install the snap nut on the bottom
as shown above.
3.
Slide the rudder pushrod wire through the hole and
mount the servo arm on the rudder servo.
Hint:
Do not screw the servo arm on the servo at
this time.
Repeat steps 2 and 3 for the elevator servo arm.
4.
Place tape on both the elevator and the rudder to
hold them both straight and level to the fin and sta-
bilizer.
Rudder Servo
Elevator Servo
Set Screw
Push Rod Connector
Nylon Set Nut
Cut Off Extra Arms
Содержание Gentle Lady ARF
Страница 14: ......

