5
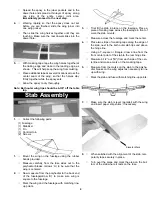
Remove the stab from the fuse and, working 1/4"
inside the drawn lines, carefully remove the cover-
ing from the bottom of the stab. BE CAREFUL TO
AVOID CUTTING THE WOOD
Mark the center of the elevator and remove the ele-
vator from the stab
9.
Spread epoxy on both the bottom of the stab and
the stab platform of the fuse.
Replace the stab on the platform and, after again
checking the alignment of the stab to the wing, allow
the epoxy to dry thoroughly.
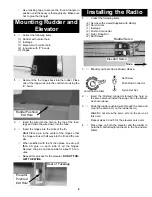
1.
Collect the following items:
(1) Fin
(1) fuselage
(1) Control Horn
(2) Screws
2.
Slide the fin mounting posts into the top of the stab.
Check the fit. The fin should fit easily into each slot
and should stand upright by itself. Enlarge the
holes, if necessary.
3.
As shown above, mark where the fin touches the
fuselage.
Fin Assembly
4.
With the rudder sitting on the fin, as shown, place
the horn on the bottom of the rudder.
Mark the holes.
Drill the holes for the control horn.
Again using two machine screws, secure the control
horn to the rudder.
4.
Place the control horn on the bottom of the elevator
over the center mark you made.
Mark the screw hole locations.
Drill the holes for the control horn.
Using two machine screws, secure the control horn
to the elevator.
Remove the rudder from the fin and set to the side.
TAKING CARE NOT TO CUT INTO THE WOOD
STRUCTURE UNDERNEATH
, and working inside
the drawn lines, carefully remove the covering
where the fin mounts on the fuse and stab.
Stab
Fin
Fuselage
5.
Remount the fin on the fuse and, using a 90º trian-
gle, make sure the fin is perpendicular to the stab.
When satisfied with the fit, remove fin and mix up a
couple of spoonfuls of epoxy.
Apply a
THIN
, even coat of epoxy on the bottom of
the fin and along both sides of the fin mounting
posts. Avoid too much glue, which will squeeze out
from underneath the fin.
Mount the fin on the fuse and place the triangle
against the fin to make sure it is perpendicular.
Содержание Gentle Lady ARF
Страница 14: ......

