9
With everything installed, mount the wing and carefully
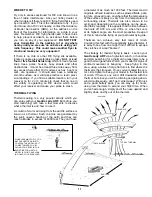
check the Center of Gravity (CG). One way is to perch the
model on the thumb and forefinger of your left hand (if
you’re right handed), while steadying the model with the
other. A much better way is to use a balancing set-up,
which can be made with a couple of 1/4” dowels with
rounded tops, spaced just enough apart to clear the fuse.
Mark the desired CG on the underside of the wing, and
then set the model on the dowels at that location. Add
weight if necessary for balance. The least weight is
needed when added as far forward or back as possible.
DO NOT attempt to fly the model with the CG EVEN
SLIGHTLY BEHIND the rearmost recommended
position.
Before going to the field to fly,
with batteries fully
charged, turn on receiver and transmitter and actuate all
controls many times until you are satisfied with all
functions.
Prior to the beginning of each day’s flying,
make a
range check of your equipment in accordance with the
manufacturer’s instructions in general, with antenna
collapsed, you should have at least 100 feet range on the
ground. To check this, set the model facing away from
you, turn on both the transmitter and receiver switches, and
walk away while transmitting signals. Watch to see that no
signals are missed until you are at least 100 feet away. Do
not attempt any flights unless the equipment works perfectly.
Be careful not to use your transmitter when someone
else on the field is flying or testing on the same frequency.
RADIO CHECK
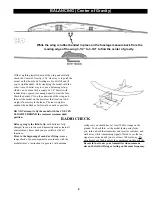
BALANCING ( Center of Gravity)
While the wing is rubber banded in place on the fuselage measure back from the
leading edge of the wing 3-1/2” to 3-3/4” to find the center of gravity.
Содержание Gentle Lady ARF
Страница 14: ......

