background image

IMPORTANT! 

Installation of the Turbo 550 motor and

a typical radio system is described in this booklet.

Depending on the equipment you are using, you may

not be able to follow exactly these instructions. Follow

the installation instructions included with your equip-

ment or seek help from your local hobby dealer.

Before beginning, make sure that each of the following

items have been completed:

1. Model is fully covered and painted, if required.

2. All control surfaces are hinged in place.

3. The tail assembly is glued solidly to the fuse.

4. The stab and rudder pushrods are complete.

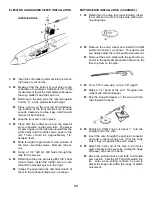
CONTROL HORN INSTALLATION

1.

‡

Refer to the fuse side view on the plan to deter-

mine the location of the rudder control horn.

‡

Tack-glue the control horn on the correct side

of the rudder.

‡

Drill through the holes in the control horn and

then mount the nut plate on the other side of

the rudder, using 2-56 x 1/2” machine screws.

Trim the screws flush with the nut plate.

2.

‡

Again referriing to the plan, and following the

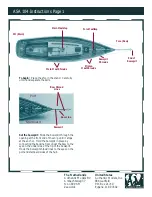
TYPICAL RADIO EQUIPMENT LOCATION

RADIO INSTALLATION

same general procedures, determine the loca-

tion for the elevator control horn and mount it

in place.

PUSHROD INSTALLATION

1.

‡

Take a 2-foot piece of string and tape it to the

17” elevator pushrod at both ends.  This string

will be used later to help thread the antenna

through the fuse.

2.

‡

Starting in the radio compartment, insert the

threaded-rod end of the pushrod through the

fuselage to the rear opening. Allow approxi-

mately 2” of wire to stick out.

3.

‡

Holding the pushrod wire with a pliers, twist a

mini-snap onto the threaded rod, so that the

rod can be seen in the center of the snap link.

4.

‡

Connect the mini-snap to the elevator control

horn.

5.

‡

Install the rudder pushrod in the same manner.

6.

‡

Tape the front ends of the rudder and elevator

pushrods near the battery hatch opening, so

that they will be out of the way.

32

CONTROL
HORNS

MINI-SNAPS
(CLEVISES)

ELEVATOR
PUSHROD

RUDDER
PUSHROD

RADIO
BATERY
PACK

RECEIVER

(RX)

ON/OF
SWITCH.

MOTOR
SERVO

ELEVATOR
SERVO

RUDDER 
SERVO

Содержание Electra

Страница 1: ...tended for persons under 16 years old Keep this kit out of the reach of younger children as it contains parts that could be dangerous A radio con trolled model is capable of causing serious bodily injury and property damage It is the buyer s responsibility to build this kit correctly and to properly install the motor radio and all other equipment Test and fly the finished model only in the presenc...

Страница 2: ...24 x 60 ELECTRIC DRILL 1 16 DRILL BIT ALLEN WRENCH 050 FOR 4 SOCKET SET SCREW SMALL SCREWDRIVER 1 8 BLADE TIP MASKING TAPE SMALL PLIERS COVERING IRON OR SMALL HOUSEHOLD IRON HEAT GUN OPTIONAL 10 30 60 90 DRAFTING TRIANGLE LIMITED WARRANTY Carl Goldberg Products Ltd takes pride in the care and attention given to the manufacture of its model airplane kits The company warrants replacement of any mate...

Страница 3: ... slight deviations in the outline or size will not noticeably affect flight performance Because the fuselage plugs together and is self aligning it is not built directly over the plan As you assemble the fuse lage you will find the plan helpful in identifying parts and how things fit together IDENTIFYING PARTS Parts for the wing are bundled together likewise parts for the tail assembly are also gr...

Страница 4: ...lets take even longer to dry because there is a thick layer To speed up such slow drying joints use JET SET an accelerator for all brands of CA glue JET SET bridges greater gaps speeds up slow bonds and provides strong glue joint fillets Epoxy glues come in two parts which need to be mixed before using When buying epoxy check to see how long the glue takes to set We recommend either JET 6 MINUTE E...

Страница 5: ...you use a geared or cobalt motor refer to the manufacturer s recommendations on props BATTERY CHARGERS Many different battery chargers are available and most work quite well For the best advice see your local hobby dealer If there isn t one nearby here is a brief description of the various types of chargers and how they work Some chargers use 12 volts such as in a car battery and some use 120 volt...

Страница 6: ...to assist in the removal of parts from the sheet Sometimes a little trimming and sanding can improve parts where desired Save scrap until the model is completed in case a part is missing or damaged Also scrap is used in some building steps BASIC STRUCTURE END VIEW OF STRIP WOOD PARTS BASSWOOD BALSA 6 MAIN SPAR REAR SPAR INBOARD PANEL OUTBOARD PANEL CENTER SHEETING CANOPY 3 16 DOWEL BATTERY HATCH N...

Страница 7: ...1 16x 3 x 24 2 REQ D SHEET 4013 1 16x 3 x 24 2 REQ D SHEET 4014 1 8 x 2 1 4 x13 2 REQ D BEVELING MOTOR TOOL WING GAUGE SWITCH MOUNT SHEET 4004 5 64 x 2 7 8 x 18 FUSELAGE SIDE DOUBLER 2 REQ D 7 STAB TIPS WING TAIL GUSSETS STAB CENTER PLATFORM DORSAL FIN STAB L E JOINER FIN BOTTOM FUSE REAR TOP FORMER D STAB PLATFORM FUSE REAR BOTTOM OUTBOARD PANEL L E SHEETING MID CENTER SHEETING INBOARD PANEL L E ...

Страница 8: ...e airfoil shaped piece that connects the leading edge spars and trailing edge of the wing together and holds them in shape GLOSSARY OF MODELING TERMS RETRACTS devices for extending and retracting the wheels on command ROLL tilting of the plane as viewed from the front con trolled by the ailerons RUDDER the moveable vertical tail of the plane which controls yaw RX radio receiver the portion of the ...

Страница 9: ...ng and gluing the stab tips the L E joiner the center platform and additional 3 16 x 3 8 balsa sticks in place as shown above 4 Still working over the plan and using the tech nique shown above cut 5 64 x 3 16 balsa sticks to form stab trussing Trim carefully to size so that each truss fits in place without forcing SAVE THE SCRAP MATERIAL When satisfied with the fit glue in place 5 Glue the gussets...

Страница 10: ...e stab Again using the centerline marker mark a cen terline along the entire leading edge of both the elevator and the rudder 12 Using an awl or similar tool make a pilot hole at the hinge locations on the fin and the stab Move the stab T E close to the edge of the table and using 1 16 scrap ply as a shim make sure the T E is level and steady Carefully drill 1 16 holes for the hinges as shown abov...

Страница 11: ... strip to the handle taking care to keep it square Then glue the wide strip to the handle and the narrow strip When the glue has dried cut a strip of 100 200 grit sandpaper to size and tack cement the sandpaper to the tool as shown 17 Tape the T E of the elevator to the work surface Using the beveling tool sand the L E to the centerline Then turn the parts over and bevel the other side Repeat this...

Страница 12: ...PT 4600 2 INBOARD T E LONG PT 4688 2 OUTBOARD T E SHORT PT 4689 2 INBOARD L E LONG PT 4690 2 OUTBOARD L E SHORT PT 4691 2 INBOARD MAIN SPAR Bass PT 4692 2 OUTBOARD MAIN SPAR PT 4694 2 INBOARD REAR SPAR Bass PT 4855 2 OUTBOARD REAR SPAR balsa PT 4874 1 3 4 X 38 NYLON FABRIC PT 9524 1 1 x 6 ALUMINUM STRIP PT 1390 2 Working over the RIGHT INBOARD PANEL of the plan place a 1 4 x 13 32 basswood spar ma...

Страница 13: ...g care to make sure that the grain of the sheeting will run parrallel to the spars L E and T E cut three 3 1 4 pieces from a 1 16 x 3 x 24 balsa sheet 8 Slide one piece of sheeting forward until it just touches the L E Gently holding the sheet in position mark the spar location on both of the rear corners of the sheet 3 Align the notches in the wing trailing edge T E with those shown on the plan U...

Страница 14: ...the sheeting so that when the piece is laid flat it just fits between the L E and the spar Following the same procedure trim and fit two more sheeting pieces for the bottom center section Fit the first sheeting piece between the spars and holding it flat to the building board Super Jet the edges to the spars Install the other two sheeting pieces in the same manner 9 Position ribs 2 3 and 4 making ...

Страница 15: ...nels together and make cer tain the wing structures butt evenly at the poly hedral joint If adjustments are needed take the panels apart and rework the grooves slight ly When satisfied with the fit of the joint glue the metal parts in place H With the wing panels plugged together posi tion the new 6 ribs at the polyhedral joint The ribs should be tilted slightly toward the out board panel so that ...

Страница 16: ...gauge stamped A must be up Hold the gauges firmly in place by tack cement ing clothespins etc Carefully inspect the panel joint to make sure all of the end pieces of the inboard panel fit tightly to those of the outboard panel If one part pro trudes too much sand slightly for a better fit WARNING always sand just a little at a time so that you do not remove too much wood You may find it helpful to...

Страница 17: ... the dihedral gauges at the outermost rib 5 position IMPORTANT The ends stamped B must be up Examine the center joint for good fit and align ment of the L E the spars the joiners and the T E Adjust as necessary sanding slightly to make the pieces fit together Temporarily install the clamps to hold the join ers tight on the spars When satisfied with the fit pin the wings togeth er 24 Remove the cla...

Страница 18: ...for the other aluminum piece IMPORTANT The following procedure must be done in a WELL VENTILATED AREA 25 When the glue has dried remove all clamps from the spars Cut three 3 1 4 pieces of bottom sheeting from the remainder of the 1 16 balsa sheeting Trim to fit between the spars just as was done in Step 7 When satisfied with the fit glue in place Glue the L E the bottom sheets and the T E together...

Страница 19: ...plastic wrap Starting with the bottom of the wing apply a squiggle of glue along the wing joint and lay the nylon strip over it Rub the glue thoroughly into the nylon strip Continue applying the nylon strip around the L E across the top of the wing around the T E and finally overlapping where you started on the wing bottom Unless you have made the removable wing tip option repeat the above procedu...

Страница 20: ...MOTOR MOUNT PT 1665 2 10 THREADED ROD PT 1272 1 CLEAR CANOPY PT 1628 1 2 x 3 16 SHOULDER SCREW PT 1105 Remove the die cut fuse parts and lightly sand any rough edges Place the fuse section of the plan over the building board and protect with waxed paper 2 Match the beveled corner edges of the hatch tongue with the hatch corner Note the vent hole positions When aligned glue the tongue to the hatch ...

Страница 21: ...and Former D as shown above Turn Form er C over and glue the die cut D C Sht 4011 1 16 ply doubler flush with the bottom edge 6 Lay out the fuselage as shown so that there is a left and a right side Temporarily position the front and rear dou blers on each fuse side to check for fit Making sure all holes are aligned and edges are flush glue the front doublers to the fuse sides Next glue the rear d...

Страница 22: ...Former A in place and allow to dry Spread the fuse front apart and with the dou bler strips facing toward the front of the model plug Former B into the holes in the fuse sides Now with the doubler strips facing thr rear of the plane insert Former C NOTE The v cut tops of the formers face in toward each other 9 Working over the plan pin the balsa bottom rear sheet in position Spread the fuse sides ...

Страница 23: ...readed shaft exposed to engage the fastener Test for fit 15 Position the plastic motor mount so that approximately 1 1 2 protrudes in from of Former A Using either Super Jet or Jet Epoxy glue to Former A and the rear motor mount Allow to dry NOTE The motor mount is offset to compensate for motor torque and to help the plane fly straight 17 Temporarily install the wing dowels in the fuse Rubberband...

Страница 24: ...ecess 1 long at one end of each 1 4 sq x 17 7 8 balsa pushrod Drill a 1 16 diameter x 1 4 deep hole at the end of the recess in both pushrods Glue the threaded rods into the balsa pushrods as shown When the assembly is dry taper by sanding and round the balsa ends of each pushrod where it meets the threaded rod Bind the rod balsa joint with strong thread coat with Super Jet and allow to dry 21 Ref...

Страница 25: ...MODEL IMPORTANT Before starting it s a good idea to do a lay out of the covering pieces you will need to cut from the covering rolls so that you make efficient use of your material You can draw patterns on UltraCote s paper backing BE SURE TO LEAVE EXTRA MATE RIAL 1 to several inches around all pieces so you will have plenty of covering to go around the edges of each section Generally one first co...

Страница 26: ...he wing tip will rise up about 1 4 from the flat surface COVERING THE FUSELAGE For added realism the cabin interior may be painted now before the pieces are covered Use UltraPaint or even auto primer Cut pieces of covering for the fuse bottom sides and top Again make sure the pieces are large enough to allow for overlap COVERING THE TAIL Cover all tail components the stabilizer the elevator the fi...

Страница 27: ...way from the decal at the fold location Using a scissors cut the backing along the bubble removing about a 1 wide strip of backing Carefully position the decal on the model and working from the center out rub the decal down while peeling off the backing APPLYING DECALS FINAL ASSEMBLY 1 Gather the various covered elements of the model as well as the wing dowels and if you choose any materials for t...

Страница 28: ...our kit Refer to the inside cover of this manual for materials needed Follow these steps ONLY if you want to install a landing wheel in your models Otherwise contin ue with information on your Turbo 550 motor 1 Referring to the fuse side view on the plan for location drill a 3 32 dia hole straight up through the fuse bottom into the center of the plastic motor mount 2 Using 3 32 wire shape the lan...

Страница 29: ...energy as its work load is increased This means for example that if the prop hits your hand it not only smacks you at high speed it also draws more battery power to overcome the added load Therefore the impact force and injury are increased It is extremely important that you are aware of these dangers and take precautions to prevent acci dentally switching on the motor This is especially important...

Страница 30: ... hole through the fuse side and mount the switch 5 Using a scissors carefully remove excess plastic from the base of the cowl Using a sharp hobby knife rather than the scis sors cut motor and vent holes Do not try to force the knife since it could slip and damage either the part or you Instead make a series of light cuts each a little deeper than the last 6 Referring to the fuse side view on the p...

Страница 31: ...nd press until all pins are seated Install the prop spinner assembly on the motor shaft and securely tighten the set screw with a 050 Allen wrench 9 Align the cowl behind the spinner backplate assembly allowing about 1 8 clearance Holding the cowl in this position install 2 x 3 8 sheet metal screws at the cowl mounting holes When finished remove screws and apply a few drops of Super Jet to harden ...

Страница 32: ... the screws flush with the nut plate 2 Again referriing to the plan and following the TYPICAL RADIO EQUIPMENT LOCATION RADIO INSTALLATION same general procedures determine the loca tion for the elevator control horn and mount it in place PUSHROD INSTALLATION 1 Take a 2 foot piece of string and tape it to the 17 elevator pushrod at both ends This string will be used later to help thread the antenna...

Страница 33: ...ator servo on the right Untape the pushrod wires and attach each of them to the corresponding servo as shown 2 Remove the servo wheel and install the CGM pushrod connector as shown This device lets you easily adjust the motor pushrod movement Remount the servo wheel with the pushrod con nector in the approximate position shown on the fuse top view on the plan 3 From 1 16 scrap wire cut a 2 1 8 len...

Страница 34: ... antenna wire to the string that was previously threaded through the fuse lage Then use the string to gently pull the antenna out the rear opening of the fuse 4 Gather together all excess lengths of servo wires and tape down 5 Apply ON OFF decals to the outside of the fuse at the switch location 1 First read and follow the instructions that came with your radio The above sketches illustrate the ba...

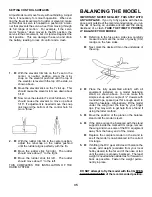
Страница 35: ...LANCING THE MODEL IMPORTANT NEVER NEGLECT THIS STEP WITH ANY AIRPLANE If you try to fly a plane with the bal ance point outside of the recommended range you run the risk of having an unstable aircraft and the strong likelihood of a crash TAKE THE TIME TO PROPER LY BALANCE YOUR MODEL 1 Referring to the fuse plan side view carefully measure and mark the center of gravity CG randge on the fuse sides ...

Страница 36: ...battery the temperature rises quickly and there is potential for EXPLOSION or at least battery damage Figure B There are numerous ways to prevent this How you charge depends on the type of charger you use IMPORTANT ALWAYS ALLOW THE BATTERY TO COOL BEFORE CHARGING TYPES OF CHARGERS Basic Charger with a Timer To prevent an over charge you must know how full the battery is A new or nearly empty batte...

Страница 37: ...n and free from fuel residue and dirt Battery condition and RF output should be monitored and the system should be aligned and tuned annually Do not trans port under vibration such as on the floor of a car with out cushioning RECEIVERS Receivers must be vibration free When installing in the aircraft wrap them in a minimum of soft foam rubber not plastic foam Keep well clear of all cables and batte...

Страница 38: ...me While the motor is running make sure the control surfaces do not jitter or move until you com mand them and that the motor switch also responds properly to your command With transmitter and receiver switched on hand launch the model directly into the wind Gently correct the flight path as necessary If any adjustments are need ed to maintain straight and level flight get experienced help to move...

Страница 39: ...ch over some tall grass Facing INTO the wind hold the transmitter in one hand the model in the other and raise it above your head The wings should be level and the nose point ing straight ahead not slightly up Imagine that you are gliding it towards a spot about 50 feet ahead DO NOT throw the model UP It s a natural tendency but it will make the model stall fall and dive to the ground After checki...

Страница 40: ... and gentle with the wings level 7 A controlled landing into the wind is your prime concern Don t worry about trying to land the As you get used to the controls you probably will notice the model turning somewhat to the left or right or climbing or descending without any stick pressure on your part These tendencies can be corrected in the air by moving the trim tabs on the Tx After landing get an ...

Отзывы: