


to fly a model when it is downwind, and if a mistake is
made, the model will end up further downwind, making
it more difficult to fly back to the field. To compensate
for wind, continue to make upwind turns shallow, but
make the downwind turns a little steeper.
When the plane comes toward you, the steering will
seem reversed. When you give right rudder, the plane
turns to your left, but it is actually turning to
its
right.
With practice, you will soon get used to this. (It’s a
good idea to practice using the controls with the model
sitting on a table before you actually begin flying.)
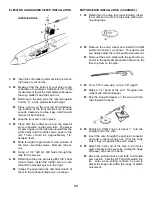
Simply push the stick left or right towards whichever
way the ship is turning. A helpful technique is shown
in the above sketch. You may feel less disoriented and
better able to control the model by facing in the same
direction as the plane is flying and looking over your
shoulder.
LANDING
4.
Continue your pattern and try to determine how
much longer the model will glide. Start planning for
the landing. With the power off, you will get used to the
model’s glide.
5.
Try to plan your approach so that the
model is about 100 feet high and ready to complete
the downwind portion of your pattern.
6.
Continue
making a shallow turn, bringing the plane around until
you have it pointed directly into the wind. Be patient
and keep your glide steady and gentle, with the wings
level.
7.
A controlled landing into the wind is your
prime concern. Don’t worry about trying to land the
As you get used to the controls, you probably will
notice the model turning somewhat to the left or right,
or climbing or descending, without any stick pressure
on your part. These tendencies can be corrected in the
air by moving the trim tabs on the Tx. After landing, get
an experienced flier to help adjust the setting of the
rudder or elevator by adjusting the mini-snaps (clevis-
es). If the wing or other structures have become
warped, it is best to discontinue flying and take the
model home to straighten it.
If flying with a 2-channel system, when the battery
begins to run out, the model will start a gradual
descent. If flying a 3-channel system, it’s good to have
a helper to let you know when you have been flying for
about four minutes. Then you can turn the motor off
and have about one or two minutes of battery power
left. If you are not happy with your first approach, you
will then be able to restart the motor and set up anoth-
er pass.
model near you when you are first learning to fly. It is
better to walk a few blocks to recover a whole airplane
than to pick up pieces at your feet! Just before the
model is ready to touch down, you can add just a
touch of back stick pressure to “flare” the landing.
Retrieve your plane and switch off first the transmitter
and then the receiver.
Take things slow and easy and you’ll be able to enjoy
flying your Electra for years to come.
40
7
6
5
4