Carestream CS 7200 Скачать руководство пользователя страница 79

CS 7200 User & Installation Guide (6M0940)_Ed04

75

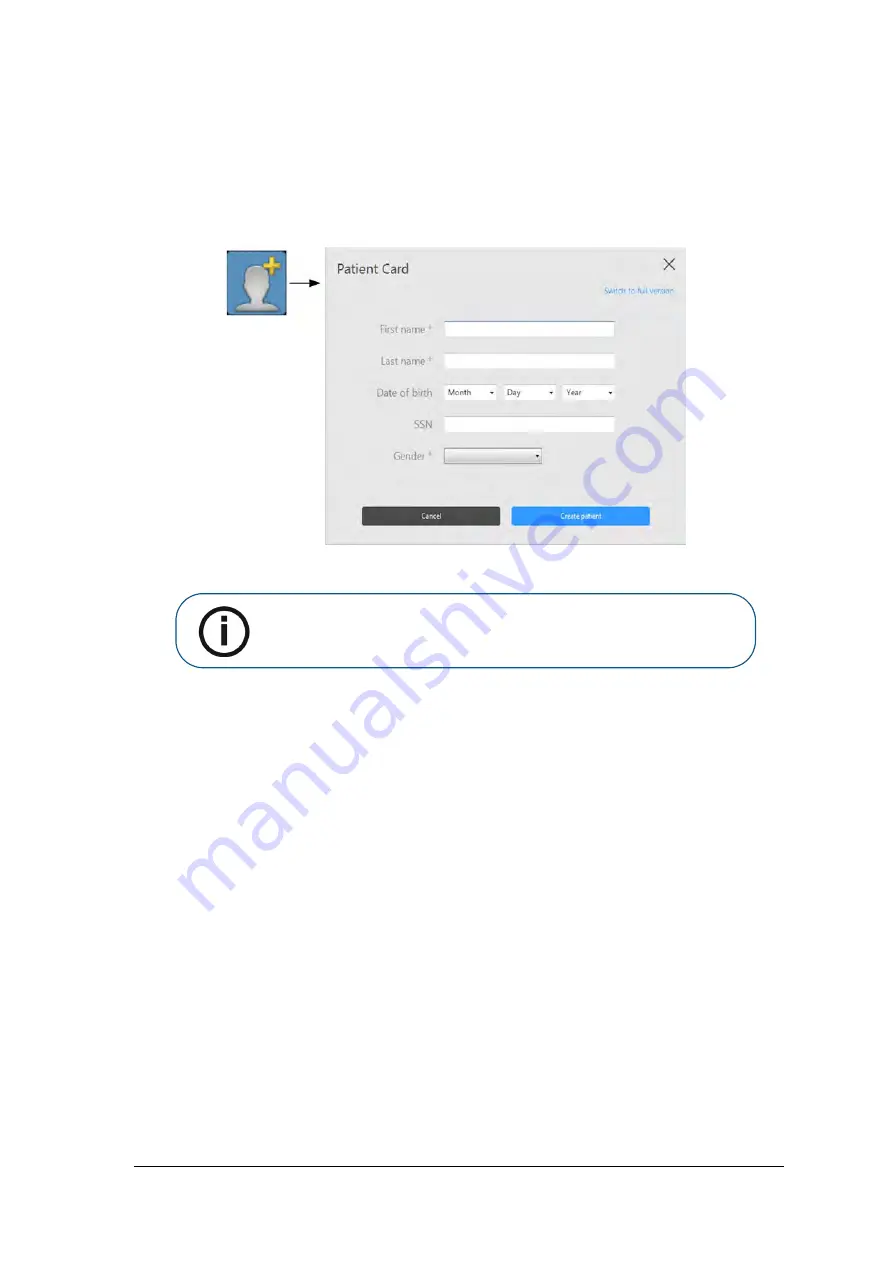
Create a New Patient Card

To create a new patient card, follow the below steps:

1. In the 

Patient Browser

 toolbar, click the 

Create New Patient Card

 button. 

The 

Patient Card 

window is displayed:

2. In the 

Patient Card 

window, enter patient information.

3. Click 

Create patient

 to save the patient card.

4. The 

Patient Card

 window closes and the new patient appears in the patient list.

Note:  First Name

Last Name

 and 

Gender

 are mandatory fields. All other 

fields are optional. Grayed out fields are not editable.

Содержание CS 7200

Страница 1: ...User and Installation Guide CS 7200...

Страница 2: ...order of a dentist or physician This document is originally written in English Manual Name CS 7200 User and Installation Guide Part Number 6M0940 Revision Number 04 Print Date 2017 05 Important Read...

Страница 3: ...00 11 Connecting Cables 11 CS Imaging Software Installation 13 CS 7200 Drivers Installation 18 License Activation 24 CS 7200 Post Installation Test 28 Adapt Filtering Options 29 Access Adapt Library 2...

Страница 4: ...7 Tools Tab 58 About Tab 60 Changing Scan Resolution 61 Chapter 6 Maintenance Chapter 7 Troubleshooting Quick Troubleshooting 65 Indication LEDs Statuses 65 8 Appendix Offline License Activation 69 Cr...

Страница 5: ...indicate potential risk to personnel or equipment WARNING Warns you to avoid injury to yourself or others by following the safety instructions precisely CAUTION Alerts you to a condition that might c...

Страница 6: ...2 Chapter 1 Conventions in this Guide...

Страница 7: ...es the imaging plate and ejects it The imaging plate is ready for re use The exam acquisition s scanned image is sent to the Dental Imaging Software on the workstation Using the Dental Imaging Softwar...

Страница 8: ...aging plates Figure 1 CS 7200 Front View 1 On Off switch Turn scanner On press for 1 second Shut down the scanner press for 2 seconds to reset the scanner run BIT The scanner remains turned on press f...

Страница 9: ...200 User and Installation Guide 6M0940 _Ed04 5 Figure 2 CS 7200 Back View Figure 3 Cables Compartment in detail 1 Base 2 Cables compartment 3 Cover 1 Power supply inlet 2 USB port 3 Cable Compartment...

Страница 10: ...d Type 2 Fast Blinking yellow no driver Type 3 Constant yellow no UltraLite or scanner is not ready Blinking Cyan Plate is fully loaded Take out envelope Beeps twice sync with light Green Insert plate...

Страница 11: ...e side The active side of the imaging plate includes an orientation c mark with a dot inside to facilitate positioning protocols within the patients mouth The inactive side has a printed dot that corr...

Страница 12: ...ion The transparent side allows you to see the dot while the opaque side protects the active side of the inserted imaging plate from image degradation Figure 4 Hygienic Sheath front view 1 Adhesive st...

Страница 13: ...imal results it is recommended that the light level in the room is approximately 500 lux normal light conditions to minimize the imaging plates exposure to light Unit dimensions and Space Requirements...

Страница 14: ...specified in the CS 7200 Safety Regulatory Technical Specification Guide Electrical Installation Specifications Power Supply 100 V AC 240 V AC 0 8 0 4 A Frequency 50 60 Hz UPS online recommended 700...

Страница 15: ...ter describes how to connect the Power Supply and USB cables to CS 7200 1 Install the power supply adaptor on power supply as shown below 2 Remove the cable compartment cover Note CS 7200 must be powe...

Страница 16: ...re the cable in its place 4 Connect the USB cable to the dedicated connector in the cable compartment and route the cable as shown on the below image to secure the cable in its place 5 Close the cable...

Страница 17: ...2 The Installer Language dialog box is displayed Select the required language and click OK to continue NOTE Before installing CS Imaging Software check that The computer meets the minimum computer sy...

Страница 18: ...14 Chapter 3 Setting Up CS 7200 3 The Welcome screen is displayed Click Next to continue 4 The License Agreement screen is displayed Click I Agree to continue the installation...

Страница 19: ...nstallation folder or leave the default location and click Next 6 Select the components to install and then click Install Patient file is selected by default You can deselect it if you do not want the...

Страница 20: ...16 Chapter 3 Setting Up CS 7200 Click Yes only if you use Practice Management Software 8 The Installing wizard screen is displayed Let the installation process run automatically...

Страница 21: ...d04 17 The Installation Complete screen is displayed when the installation is finished 9 Select Reboot now to complete the installation and then click Finish After the computer is restarted proceed to...

Страница 22: ...river Software DVD ROM into the DVD ROM drive 2 Wait for the installation program to start 3 Select language from the list on the upper right side of the Installation Wizard window Note If the install...

Страница 23: ...ation Guide 6M0940 _Ed04 19 4 Click Run Installation Wizard to continue the installation 5 Minimum system requirements are verified and the status of each checked item is displayed Click Next to conti...

Страница 24: ...Acquisition window click Install to install the required plug ins on your computer Note If a red X mark appears next to one of the items click Help to view the description of the problem Then make su...

Страница 25: ...The Welcome window is displayed Click Next to continue the installation process 8 The Destination Folder window is displayed Click Next if you accept the default destination folder or browse to choos...

Страница 26: ...22 Chapter 3 Setting Up CS 7200 9 Wait until the system installs the software 10 The New Scanner Files window is displayed Click Next to continue without updating the scanner files...

Страница 27: ...n Guide 6M0940 _Ed04 23 11 The Installation Wizard Completed window is displayed Click Finish to finish the installation 12 On the Finish tab click Finish to complete the installation 13 Perform Licen...

Страница 28: ...n a license activation for the purchased scanner should be performed 1 After the installation is complete the license activation message appears Click Next to continue 2 If the scanner is not connecte...

Страница 29: ...t click Create a new user account and follow the link to the Carestream License Registration site 5 On the Product Activation and Registration page fill in the sign in details 6 Select the product typ...

Страница 30: ...ed verification code and click Continue 9 In the Online License Activation window enter the license key received with the scanner select the license check box and click Activate 10 After the license a...

Страница 31: ...CS 7200 User Installation Guide 6M0940 _Ed04 27 11 Click Finish to finish the installation process...

Страница 32: ...ayed in the CS Imaging Software 1 Start the CS Imaging Software and select or create test patient See Starting the Imaging Software on page 42 2 Expose a plate size 2 with a metal object such as coin...

Страница 33: ...Adapt Library 1 Click Modify favorite to change the preferable look that will be applied after the scan 2 The gallery of the available looks is displayed at the bottom of the screen 3 Click Apply at...

Страница 34: ...t of the new look by using Brightness and Contrast sliders Use the zoom slider to zoom in or out certain areas of the image Action Description Favorite Click to add the selected look to the favorites...

Страница 35: ...djusting the new look 5 Click Create to create a new modified look and add it to the frames gallery Modify the Exisiting Customized Look 1 Select the frame to be customized 2 Hover with the mouse poin...

Страница 36: ...5 If you close the CS Adapt Library screen without saving the performed actions the following dialog box appears 6 Click OK if you really want to exit without saving chnages or click Cancel to return...

Страница 37: ...ide 6M0940 _Ed04 33 Delete Existing Filter 1 Select the frame to be customized 2 Hover with the mouse pointer over the selelcted frame 3 Click Delete 4 In the Delete Filter dialog box that appears cli...

Страница 38: ...34 Chapter 3 Setting Up CS 7200...

Страница 39: ...e Acquisition Overview You can acquire individual images using the CS Imaging Software Figure 5 CS Imaging Software with Active CS 7200 Scanner Connected Full Mouth Series FMS Image Acquisition Overvi...

Страница 40: ...ng Software Online Help Dental arch Highlights the acquisition zone FMS template Displays frame templates for acquisition Green highlight Frame ready for new acquisition Blue highlight Frame in the re...

Страница 41: ...d pure white to green leaving other shades unchanged Negative Displays the image as a photo negative Colors 1 Maps pure black to blue and pure white to red Colors 2 Maps middle gray to orange and leav...

Страница 42: ...dentinal junctions and roots produces brighter images Adapt OptimizedContrastEndo Enhances contrast at the canals and roots Sharpness filter click to apply sharpnes filter on the image Highlight click...

Страница 43: ...the anotations Pseudo 3D click to display gray scale levels as height values Relief filter click to enhabce the outlines of the shapes in an image by displaying the image in relief mode Isodensity do...

Страница 44: ...ng Window D Patient Card information on the selected patient E Image Management Tools import export and print functions F Patient History displays the list of available patients G Patient List display...

Страница 45: ...ing the imaging window See Starting the Imaging Software on page 42 2 Inserting the Imaging Plate into a hygienic sheath and sealing it See Preparing the Imaging Plates on page 43 3 Positioning exposi...

Страница 46: ...earch field H start typing to search for a patient card To create a new patient record Click the Create New Patient Card button alongside the search field to create a new patient card For more details...

Страница 47: ...o the imaging plate s size number is seen through the transparent side of the hygienic sheath and the orientation mark visible in the bottom corner A Important Use only CS 7200 intraoral imaging plate...

Страница 48: ...f the plate Performing the X rays Perform the required X rays according to your clinical procedure It is recommended to continue using X ray positioning techniques and tools to ensure the resulting im...

Страница 49: ...tter 7mA tube length 30 cm recommended exposure time s recommended exposure time s Upper jaw 60kV 70kV 60kV 70kV incisors 0 1 0 08 0 2 0 16 pre molars 0 125 0 1 0 25 0 2 molars 0 16 0 125 0 32 0 25 Lo...

Страница 50: ...e 5 Position yourself either two meters behind the X ray generator or outside the room 6 Trigger the X ray with the remote switch of the X ray generator 7 Remove the CS 7200 imaging plate from the mou...

Страница 51: ...ic sheath after each patient see the CS 7200 Safety Regulatory and Technical Specifications User Guide 6K9678 Scanning Imaging Plate 1 Move to the CS 7200 scanner and make sure the plate size selector...

Страница 52: ...starts scanning The indication LED is blinking green during the process and the Preview window appears showing the scan progress When the scan is complete the imaging plate is erased and then ejected...

Страница 53: ...y The ideal image quality is when the indicator of the quality of exposure is a full green bar in the Control Panel Avoid under exposed or over exposed images indicated by a partial or full red bar Un...

Страница 54: ...uisition of FMS images follow these steps 1 Access the Dental Imaging Software See Starting the Imaging Software on page 42 2 Click the Use a format button in the Imaging Window toolbar to access the...

Страница 55: ...st frame for scan is highlighted in green 4 Select an appropriate positioner for the region of interest and the size of the plate 5 Prepare all imaging plates required for completing FMS template See...

Страница 56: ...ht Table 4 Exposure times Parameter DC emitter 7mA tube length 20 cm DC emitter 7mA tube length 30 cm recommended exposure time s recommended exposure time s Upper jaw 60kV 70kV 60kV 70kV incisors 0 1...

Страница 57: ...ing Plate on page 47 The next frame to be scanned is always highlighted in green on the displayed FMS format 3 Check the image quality The ideal image quality is when the indicator of the quality of e...

Страница 58: ...to retake images after the FMS template acquisition is complete follow these steps 1 Click the frame for which you want to retake images The selected frame is highlighted in green 2 Using the mouse c...

Страница 59: ...55 3 Close the CS 7200 window with the image to be relaced The image is deleted from the template 4 Perform a scan again 5 After the scan is complete the new image appears in the FMS template 6 Close...

Страница 60: ...Imaging Software main tool bar click the CS 7200 Configuration icon The CS 7200 window appears 2 Click Erase Plate The following dialog box appears 3 Load the late into the scanner 4 Wait until the e...

Страница 61: ...es window contains three tabs Settings Tools About Settings Tab The Settings tab enables user to change the scanner preferences 1 DICOM Character Sets select from th list of the available options 2 De...

Страница 62: ...ing steps 1 Start the Dental Imaging Software 2 Open the file of the patient whose images you want to retrieve 3 On the Dental Imaging Software main tool bar click the CS 7200 Configuration icon The C...

Страница 63: ...he retrieved images are displayed The image highlighted in orange is displayed in the preview area next to the list 6 Seelect the required images from the list by selecting the check box next to each...

Страница 64: ...ages 7 Click Restore to restore the selected image to the currently opened patient About Tab Open the about tab to view scanner information that includes firmware hardware and software versions serial...

Страница 65: ...ing Scan Resolution To chnage scan resolution perform the following steps 1 On the Dental Imaging Software main tool bar click the CS 7200 Configuration icon The CS 7200 window appears 2 Select the de...

Страница 66: ...62 Chapter 5 Acquiring Images...

Страница 67: ...CS 7200 User and Installation Guide 6M0940 _Ed04 63 6 Maintenance For all maintenance information refer to CS 7200 Technical Specifications Safety and Regulatory Guide...

Страница 68: ...64 Chapter 6 Maintenance...

Страница 69: ...e CS 7200 LED status and sound notification and or by an error message that appears on screen When the system functions properly the LED is green If the LED color is yellow or red it indicates an exis...

Страница 70: ...smooth and requires some force to apply The hygienic sheath is partially sealed Make sure the hygienic sheath is fully open before loading the plate Scanner returns to home position before the loading...

Страница 71: ...emove the service tray and remove the plate Attach the insertion panel Click OK to close the error message Perform a scan LED indicator blinks red Error code 9021 9022 9023 Scanner hardware malfunctio...

Страница 72: ...indicator is steady red Error beeps are sounded when loading a plate Plate was loaded upside down or diagonally Retrieve the plate and load the plate properly LED indicator blinks red Error code 9090...

Страница 73: ...nternet you need to acquire license activation code from another device that is connected to the internet The following sequence takes place when the license activation is performed offline 1 After th...

Страница 74: ...70 Chapter 8 Appendix 4 The Offline License Activation window appears 5 Go to https cs licensing staging carestreamdental com Licensing and sign in or create an account if you do not have one...

Страница 75: ...rd page 7 Fill in all required details and click Continue at the bottom of the page 8 After filling in all details an account is created and an email is sent to the provided email address 9 Open the r...

Страница 76: ...er type in the serial number that appears on the Data Plate label located on the bottom of the scanner License Key type in the license key that appears on the post card received with the scanner User...

Страница 77: ...User Installation Guide 6M0940 _Ed04 73 14 On the Activation Complete page copy the displayed activation code 15 Paste the copied activation code into the Offline License Activation window and click A...

Страница 78: ...Appendix 16 After the license activation is complete click Exit to close the Offline License Activation window You are returned to the CS 7200 Installation Wizard 17 Click Finish to finish the install...

Страница 79: ...ate New Patient Card button The Patient Card window is displayed 2 In the Patient Card window enter patient information 3 Click Create patient to save the patient card 4 The Patient Card window closes...

Страница 80: ...76 Chapter 8 Appendix...

Страница 81: ...CS 7200 User Installation Guide 6M0940 _Ed04 77...

Страница 82: ...78 Chapter 8 Appendix...

Страница 83: ...Le Neptune 1 rue Galil e 93192 Noisy Le Grand France Importer for European Union Carestream Health Netherlands B V Bramenberg 12 3755 BZ Eemnes The Netherlands Representante no Brasil Carestream do Br...

Страница 84: ...80 Chapter 9 Contact Information...

Страница 85: ...es List of Consumables P N Description Qty 1067495 Hygienic Sheaths 0 200 Pcs 1067503 Hygienic Sheaths 1 200 Pcs 1067511 Hygienic Sheaths 2 200 Pcs 1067545 Imaging Plate 0 4 Pcs 1067552 Imaging Plate...

Страница 86: ...82 Chapter 10 List of Consumables...

Страница 87: ...No Changed Chapters File Name Notes 2015 03 6M0940 CS 7200 User and Installation Guide First Release 2015 06 6M0940 Added table to the Consumables List CS 7200 User and Installation Guide Revision 2...

Страница 88: ...Inc 2017 For more information visit www carestreamdental com To give documentation feedback visit www carestreamdental com documentationfeedback Carestream Dental A Division of Carestream Health Inc...

Отзывы: