background image

183

IT

5

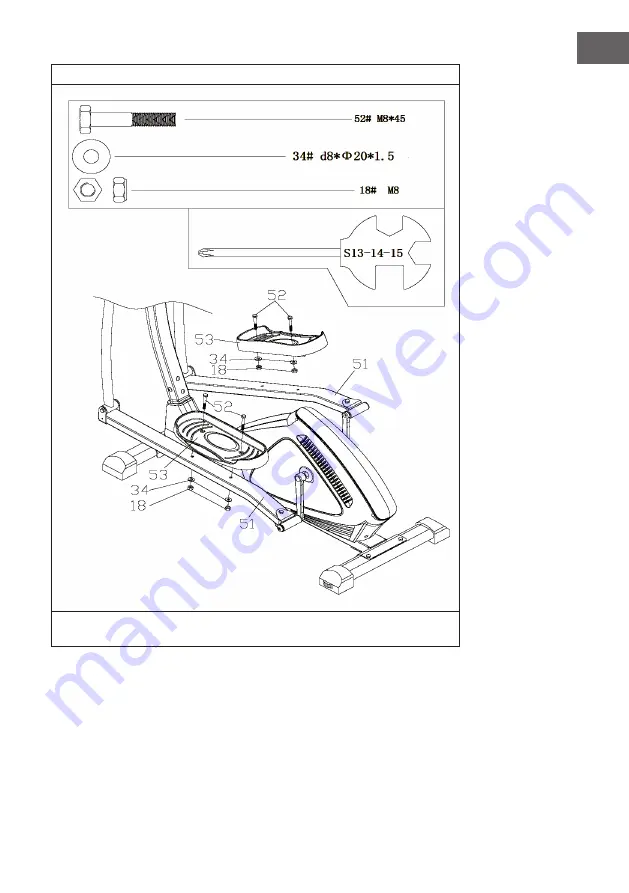
Montare i pedali (53) con viti (52), rondelle (34) e dadi in nylon (18) ai tubi del pedale 
(51).

Содержание 10032829

Страница 1: ...10032829 Helix Track ...

Страница 2: ......

Страница 3: ...ungsanleitung und weitere Informationen rund um das Produkt zu erhalten INHALTSVERZEICHNIS Sicherheitshinweise 4 Teileübersicht 6 Zusammenbau 11 Cardiotraining im Überblick 20 Aufwärmung vor dem Training 23 Konsole und Tastenfunktionen 26 Training per KINOMAP App 31 Pflege und Wartung 43 Hinweise zur Entsorgung 44 Hersteller 44 TECHNISCHE DATEN Artikelnummer 10032829 Stromversorgung 220 240 V 50 6...

Страница 4: ...wie beispielsweise an Pools etc Der Sicherheitsabstand rund um das Gerät muss mindestens 0 5 Meter betragen Konsultieren Sie vor der Verwendung der Trainingsprogramme zwingend einen Arzt um feststellen zu lassen ob Sie körperliche oder gesundheitliche Probleme haben welche durch die Verwendung des Geräts ein Risiko für Ihre Gesundheit und Sicherheit darstellen könnten oder Sie daran hindern das Ge...

Страница 5: ...ende Hebetechniken und suchen Sie sich gegebenenfalls Hilfe einer weiteren Person Alle beweglichen Geräteteile z B Pedale Handgriffe Sattel etc müssen wöchentlich gewartet werden Überprüfen Sie diese vor jeder Verwendung Sollte etwas kaputt oder lose sein reparieren oder fixieren Sie das entsprechende Teil sofort Fahren Sie erst dann mit der Verwendung des Geräts fort wenn Sie den guten Ausgangszu...

Страница 6: ...6 DE TEILEÜBERSICHT ...

Страница 7: ...7 DE ...

Страница 8: ...2 58 Unterlegscheibe D16 2 19 Schraube M8x20 2 59 Buchse Ø24xØ20xØ16 1 4 20 Unterlegscheibe D8xØ32x2 2 60 Federscheibe 1 2 2 21 Buchse Ø32xØ19x28 II 4 61 Nylonmutter M10 2 22 Unterlegscheibe D9 2 62 Nylon Mutter 1 2 L 1 23 Buchse Ø32xØ19x65 4 63 Endkappe S19 2 24 Buchse Ø14xØ8 5x60 III 2 64 Pedalscharnierbolzen 1 2 R 1 25 Buchse Ø32xØ15x20 I 4 65 Nylonmutter 1 2 R 1 26 L R Unterer Lenker 2 66 Kurb...

Страница 9: ... 1 101 Magnet 4 86 Mutter M10x1 0 1 102 Schraube 6x16 2 87 Schraubengruppe 2 103 Nylonmutter M6 4 88 Mutter M10x1xH5 1 104 Schraube M6x20 4 89 Lager 2 105 Achse 1 90 Schwungrad 1 106 Schraube M5 10 4 91 Zugfeder 1 107 Sensorleitung 1 92 Kurbel R 1 108 Mutter M12 1 93 Lager 2 Maulschlüssel S17 19 1 94 Achse 1 Inbusschlüssel S6 1 95 Federscheibe d6 2 Maulschlüssel S13 14 15 1 96 Scheibe d6xØ12x1 2 K...

Страница 10: ...10 DE ...

Страница 11: ...11 DE ZUSAMMENBAU 1 Befestigen Sie den vorderen 41 und den hinteren Stabilisator 46 mit Schrauben 39 und Unterlegscheiben 34 am Hauptrahmen 38 ...

Страница 12: ...12 DE 2 Befestigen Sie die Sensorleitung 29 und 37 mit Schrauben 35 und Unterlegscheiben 34 am Hauptrahmen 38 Hinweis Ziehen Sie die Schraube 35 und Unterlegscheiben 34 erst nach Schritt 3 fest ...

Страница 13: ...13 DE 3 Befestigen Sie den unteren Lenker 26 L R mit Schrauben 19 Unterlegscheiben 10 und Federscheiben 10 am vorderen Pfosten 33 ...

Страница 14: ...r Pedalkurbel 66 67 Montieren Sie das Pedalrohr 51 mit Unterlegscheiben 60 und Nylonmuttern 62 65 Hinweis Vergewissern Sie sich dass die mit R gekennzeichnete rechte Pedalschraube 67 am rechten Kurbelarm befestigt und im Uhrzeigersinn angezogen ist Die mit L gekennzeichnete linke Pedalscharnierschraube 60 wird am linken Kurbelarm befestigt und gegen den Uhrzeigersinn angezogen ...

Страница 15: ...15 DE 5 Montieren Sie die Pedale 53 mit Schrauben 52 Unterlegscheiben 34 und Nylonmuttern 18 an den Pedalrohren 51 ...

Страница 16: ...16 DE 6 Befestigen Sie den Lenker 2 L R mit Schrauben 16 Unterlegscheiben 17 und Nylonmuttern 18 am unteren Lenker 26 L R und ziehen Sie sie fest ...

Страница 17: ...17 DE 7 Befestigen Sie den mittleren Lenker 6 mit Schrauben 11 und Federscheiben 10 am vorderen Pfosten 33 Setzen Sie die Schrauben 11 und die Lenkerabdeckung 12 ein und ziehen Sie die Schrauben fest ...

Страница 18: ...18 DE 8 Befestigen Sie die Lenkerabdeckungen 15 A B und 27 A B mit Schraube 14 am unteren Lenkerrohr 26 L R Befestigen Sie die Pedalrohrabdeckung 48 49 mit Schrauben 47 am Pedalrohr 51 ...

Страница 19: ...ren Kabel 29 und dem Griffkabel 13 Befestigen Sie den Computer 1 mit der Schrauben 28 am vorderen Pfosten 33 Schließen Sie zum Schluss das Netzteil an Hinweis Stellen sie sicher dass sie alle Schrauben und Muttern gut angezogen sind bevor sie mit dem Training beginnen ...

Страница 20: ...ehenden Trainingsergebnisse Ein optimales Training beinhaltet eine Aufwärmphase 1 eine intensivere Cardio Trainingsphase 2 sowie die abschließende Erholungsphase 3 Wenn Sie Fortschritte machen oder Kalorien verbrennen wollen sollten Sie diese 3 Phasen durchlaufen und so mindestens 20 30 Minuten auf dem Ergometer trainieren 1 Aufwärmphase Beginnen Sie Ihr Training immer mit einem geringen Wiedersta...

Страница 21: ...winnen Die anaerobe Energiegewinnung ist zwar in kleinem Umfang auch aktiv aber nur so weit als alle dadurch produzierte Milchsäure gleichzeitig wieder abgebaut werden kann In diesem aeroben Trainingsbereich sollten Sie den Großteil Ihres Trainings absolvieren Wenn Sie die Belastung weiter steigern dann kommen Sie irgendwann an eine Grenze an der die auf Sauerstoff basierte Energiegewinnung nicht ...

Страница 22: ...ng durchführen Essen und Trinken Trinken Sie vor während und nach dem Training Trinken Sie während des Trainings mindestens 2 Schluck Wasser 10 bis 20 cl alle 10 15 Minuten Wenn Ihr Training länger als 1 Stunde dauert sollten Sie ein Sportgetränk trinken um dem Körper vor dem Dehydrieren beim Sport zu schützen Für ein optimales Cardio Training ist eine angepasste Ernährung sowohl vor als auch nach...

Страница 23: ...n Sie diese Übung und stimmen sich über ein spezifisches Aufwärmtraining mit Ihrem Arzt bzw Fitnesstrainer ab Jede Bewegung sollte einige Wiederholungen erfahren rechts und links sodass Sie entspannt ins Cardiotraining starten können Nehmen Sie sich für die folgende CapitalSports Trainingsroutine etwa 5 Minuten Zeit 1 Kopf neigen langsam abwechselnd von vor und zurück sowie von rechts nach links I...

Страница 24: ...ckt nach oben Verbleiben Sie in dieser Position jeweils einige Sekunden pro Seite 4 Stellen sie sich auf ein Bein und halten den Spann mit der Hand Hier mobilisieren Sie ihr Fußgelenk und strecken den Oberschenkel leicht Stützen Sie sich gegebenfalls ab um Ihr Gleichgewicht zu halten Verbleiben Sie auf einem Bein und drehen das Fußgelenk nun kreisförmig in beide Richtungen ...

Страница 25: ... sich mit gebeugten Beinen so hin dass die Fußsohlen sich berühren Federn Sie leicht mit den Knien Hierbei mobilisieren Sie neben den Fußgelenken die gesamte äußere Oberschenkelpartie Halten Sie hierbei die Fußgelenke bei gestrecktem Rücken 7 Beugen Sie sich sitzend und mit gestreckten Beinen nach vorne Versuchen Sie die Fußknöchel zu halten und sich weiter zu den Zehenspitzen vorzutasten ...

Страница 26: ... Energiesparmodus wenn das Gerät nicht verwendet und kein Puls aufgezeichnet wird Drücken Sie eine beliebige Taste um den Energiesparmodus zu beenden USB Ladeanschluss Training beginnen beenden Wenn Sie diese Taste für 2 Sekunden drücken und halten werden alle nutzerbezogenen Daten gelöscht Zurück zum Hauptmenü während der Werteeinstellung oder des Stoppmodus Herzfrequenz und Erholungsstatus runte...

Страница 27: ...H oder RUNTER um den Widerstand einzustellen Drücken Sie die Taste START STOP um das Training zu unterbrechen Drücken Sie RESET um zum Hauptmenü zurückzukehren Einsteiger Modus Beginner Drücken Sie HOCH oder RUNTER um das Trainingsprogramm auszuwählen Wählen Sie den Einsteiger Modus Beginner und drücken Sie die Taste MODE um ihn aufzurufen Drücken Sie HOCH oder RUNTER um die Zeit einzustellen Drüc...

Страница 28: ...cken Sie die Taste START STOP um das Training zu unterbrechen Drücken Sie RESET um zum Hauptmenü zurückzukehren Sportlicher Modus Sporty Drücken Sie HOCH oder RUNTER um das Trainingsprogramm auszuwählen Wählen Sie den Sportlichen Modus Sporty und drücken Sie MODE um ihn aufzurufen Drücken Sie HOCH oder RUNTER um die Zeit einzustellen Drücken Sie die Taste START STOP um das Training zu starten Drüc...

Страница 29: ...u starten oder zu stoppen Drücken Sie RESET um zum Hauptmenü zurückzukehren Watt Modus Watt Drücken Sie HOCH oder RUNTER um das Trainingsprogramm auszuwählen Wählen Sie den WATT Modus Watt und drücken Sie MODE um ihn aufzurufen Drücken Sie HOCH oder RUNTER um die WATT Zahl einzustellen Die Standardeinstellung ist 120 Drücken Sie HOCH oder RUNTER um die Zeit einzustellen Drücken Sie die Taste START...

Страница 30: ...ro Minute Bereich 0 999 WATT Im Watt Modus erhält das Gerät einen voreingestellten Watt Wert aufrecht einstellbarer Bereich 0 350 MANUAL Training im manuellen Modus PROGRAM Auswahl zwischen den Programmen Anfänger Fortgeschritten und Sportlich CARDIO Trainingsmodus mit der Zielherzfrequenz iConsole und App Aktivieren Sie auf Ihrem Tablet BT suchen Sie in der Liste nach dem Gerät und drücken Sie au...

Страница 31: ...ower Modus verwenden Schließen Sie Ihre kompatiblen Geräte direkt an Alternativ können Sie auch die Kamera verwenden die Ihnen einen optischen Trittfrequenz Schritt oder Ruderschlagsensor bietet Nehmen Sie an unseren Multiplayer Sessions teil und versuchen Sie der Erste im Ziel zu sein Konto anlegen Wenn Sie KINOMAP verwenden möchten müssen Sie sich zuerst mit Ihrem KINOMAP Konto verbinden Wenn Si...

Страница 32: ...e eingeben Hinweis zum Abonnement Sie können den Dienst auch auf der Grundlage eines monatlichen oder jährlichen Abonnements abonnieren wodurch Sie Zugang zu erweiterten Funktionen erhalten Gehen Sie zu Einstellungen abonnieren Nach der Aktivierung sehen Sie Ihr Abonnement auf Mein Abo Verbindung mit dem Trainingsgerät herstellen So verbinden Sie das Gerät mit der KINOMAP App 1 Gehen Sie zum Menü ...

Страница 33: ...Funktion Vorschau der Daten können Sie die vom Gerät gesendeten Daten sofort sehen Diese Funktion ist besonders nützlich wenn Sie Probleme beim Starten einer Aktivität haben Je nach Ausstattung muss die App davon einige Werte erhalten ...

Страница 34: ... Es gibt eine Filterfunktion um sicherzustellen dass Sie Zugriff auf die gesuchten Videos erhalten Featured popular most viewed most recent duration distance incline Für jedes Video können Sie relevante Informationen sehen seinen Namen den Mitwirkenden der das Video veröffentlicht hat Land Dauer Entfernung Durchschnitt der positiven Steigung durchschnittliche Geschwindigkeit ...

Страница 35: ...st erstellt wurden Jede Playlist hat ein bestimmtes Thema um z B 30 Minuten zu trainieren oder ein Land zu besuchen Sie können Ihren Fortschritt auf jeder Wiedergabeliste und jedem Video das sie erstellt verfolgen Momentan können Sie Ihre Playlisten nicht direkt aus der App heraus verwalten ...

Страница 36: ...36 DE Trainingsbeginn Wählen Sie das Video aus auf dem Sie trainieren möchten Wählen Sie den Modus in dem Sie trainieren möchten Beginnen Sie einfach mit dem Treten um das Training zu beginnen ...

Страница 37: ...lzunehmen und um auf Websites von Drittanbietern wie Strava mit vollständigen Koordinaten und einer Karte Ihrer virtuellen Fahrt zu exportieren Entdeckungsmodus Das Video wird mit der Originalgeschwindigkeit abgespielt und pausiert wenn Ihre Geschwindigkeit 0 erreicht Was auch immer Ihre Leistung ist die Framerate wird nicht verändert Aber Sie werden immer noch sehen ob Sie eine gute Leistung erbr...

Страница 38: ...ortige Trittfrequenz Die Entfernung Ihre Kartenposition wird mit dem Video synchronisiert Die Registerkarte Rangliste ist nur im Mehrspieler Modus verfügbar Abszisse Höhe in Metern Ordinate Entfernung im KM im Challenge Modus Dauer in Sekunden im Discovery Modus Widerstand einstellen Gänge Auf dem Bildschirm erhalten Sie Anweisungen wie Sie den Widerstand entsprechend dem Höhenprofil Höhe einstell...

Страница 39: ...fach auf zu treten oder benutzen Sie die Pause Taste in der Ecke des Trainings Klicken Sie auf die Schaltfläche Sitzung fortsetzen um ein unerreichtes Training fortzusetzen Wenn Sie diese Aktivität beenden möchten bestätigen Sie einfach durch Tippen auf Speichern und beenden Profiltraining ...

Страница 40: ...gbar ist Sie haben die Wahl zwischen zwei Modi abhängig von Ihrem Gerät Widerstand Sie definieren eine Widerstandsstufe und wir senden die Anweisungen an den Heimtrainer unabhängig von der produzierten Leistung Soll Leistung Sie definieren eine Soll Leistung und der Widerstand ändert sich automatisch damit Sie sie erzeugen Wenn Sie eine orangefarbene Linie sehen bedeutet das dass Sie sich in der N...

Страница 41: ... und der Distanz Klicken Sie auf ein bestimmtes Training um alle Informationen zu erhalten Sie können auch die Seite http www kinomap com myactivities aufrufen Ihr Trainingsprotokoll enthält eine Karte eine Zusammenfassung und eine Reihe detaillierter Diagramme die Ihre bisherige Geschwindigkeit Leistung Trittfrequenz und Herzfrequenz anzeigen Beachten Sie dass das Trainingsprotokoll automatisch a...

Страница 42: ...hgeführt Sie können auch eine geografische Suche durchführen Wählen Sie im Hauptmenü Karte Sie können alle verfügbaren Videos erkunden indem Sie auf Publics Playlists oder Alle Videos klicken Einstellungen Benutzer Einstellungen Gehen Sie zum Menü Einstellungen und stellen Sie Ihre Benutzerdaten ein einschließlich Einheiten Größe Gewicht Geburtstag Geschlecht und Frontbereich Diese Informationen b...

Страница 43: ... auf Schäden und Abnutzungen überprüft wird beispielsweise an Handgriffen Pedalen Sattel etc Es ist essentiell dass beschädigte Geräteteile ersetzt werden und das Gerät erst nach erfolgter Reparatur wieder verwendet wird Überprüfen Sie regelmäßig ob Schrauben und Muttern richtig fixiert sind Fetten Sie bewegliche Geräteteile regelmäßig ein Achten Sie insbesondere auf Komponenten welche besonders a...

Страница 44: ... Sie Altgeräte nicht über den Hausmüll Durch die regelkonforme Entsorgung der Altgeräte werden Umwelt und die Gesundheit ihrer Mitmenschen vor möglichen negativen Konsequenzen geschützt Materialrecycling hilft den Verbrauch von Rohstoffen zu verringern Das Produkt enthält Batterien die der Europäischen Richtlinie 2006 66 EG unterliegen und nicht mit dem normalen Hausmüll entsorgt werden dürfen Bit...

Страница 45: ...atest user mannual and other information about the product CONTENT Safety Instructions 46 Parts Overview 48 Assembly 53 Overview of Cardio Training 62 Warming Up before a Workout 65 Panel Operation 68 Training via KINOMAP App 73 Care and Maintenance 85 Hints on Disposal 86 TECHNICAL DATA Item number 10032829 Power supply 220 240 V 50 60 Hz DECLARATION OF CONFORMITY Producer Chal Tec GmbH Wallstraß...

Страница 46: ... areas such as swimming pool sauna etc For safety space the equipment must have at least 0 5 meter of free space all around it Before starting any exercise program you must consult your doctor to determine if you have any physical or health conditions that could create a risk to your health and safety or prevent you from using the equipment properly Your doctor s advice is essential if you are tak...

Страница 47: ... injure your back always use proper lifting techniques and or seek assistance if necessary All moveable accessories e g pedal handlebar saddle etc require weekly maintenance Check them before use every time If anything broken or loose please fix them immediately You may continue using them only after they return to good conditions Pay attention to the absence of a free wheel system which will caus...

Страница 48: ...48 EN PARTS OVERVIEW ...

Страница 49: ...49 EN ...

Страница 50: ...1 18 Nylon nut M8 12 58 Waveform washer D16 2 19 Bolt M8x20 2 59 Bushing Ø24x20xØ16 1 4 20 Washer D8xØ32x2 2 60 Spring washer 1 2 2 21 Bushing Ø32xØ19x28 II 4 61 Nylon nut M10 2 22 Waveform washer D9 2 62 Nylon nut 1 2 L 1 23 Bushing Ø32xØ19x65 4 63 End cap S19 2 24 Bushing Ø14xØ8 5x60 III 2 64 Pedal Hinge Bolt 1 2 R 1 25 Bushing Ø32xØ14x20 I 4 65 Nylon nut 1 2 R 1 26 L R Lower handlebar 2 66 Cran...

Страница 51: ...ank L 1 101 Magnet 4 86 Nut M10x1 0 1 102 Bolt 6x16 2 87 Bolt group 2 103 Nylon nut M6 4 88 Nut M10x1xH5 1 104 Bolt M6x20 4 89 Bearing 2 105 Axle 1 90 Flywheel 1 106 Bolt M5 10 4 91 Tension spring 1 107 Sensor wire 1 92 Crank R 1 108 Nut M12 1 93 Bearing 2 Open end wrench S17 19 1 94 Axle 1 Allen wrench S6 1 95 Spring washer d6 2 Cross open end wrench S13 14 15 1 96 Washer d6xØ12x1 2 Hardware Pack...

Страница 52: ...52 EN ...

Страница 53: ...53 EN ASSEMBLY 1 Attach the Front Stabilizer 41 and Rear Stabilizer 46 to the Main Frame 38 with Bolts 39 and Washers 34 ...

Страница 54: ...54 EN 2 Connect the Sensor wire 29 and 37 fix the Upright Post 33 with the Main Frame 38 with Bolts 35 and Washers 34 Note Tighten the Bolts 35 and Washers 34 after the STEP 3 ...

Страница 55: ...55 EN 3 Fix the Lower Handlebar 26 L R to the Upright Post 33 with Bolts 19 Washers 10 and Spring washers 10 ...

Страница 56: ...6 67 by Pedal Hinge Bolt 57 64 Install the Pedal Tube 51 with Washers 60 and Nylon Nuts 62 65 Note be sure the right pedal Hinge bolt 67 marked R is attached to the right crank arm and tightened in the clockwise direction The Left Pedal Hinge Bolt 60 marked L is attached to the left crank arm and tightened in the anticlockwise direction ...

Страница 57: ...57 EN 5 Install the Pedals 53 on the Pedal tubes 51 with Bolts 52 Washers 34 and Nylon Nuts 18 ...

Страница 58: ...58 EN 6 Fix the Handlebar 2 L R to the Lower Handlebar 26 L R with Carriage Bolts 16 Arc Washers 17 and Nylon Nuts 18 and tighten these ...

Страница 59: ...59 EN 7 Attach the Middle Handlebar 6 to the Upright Post 33 with Bolts 11 and Spring Washers 10 Insert and tighten the Bolts 11 and the Handlebar plastic Cover 12 ...

Страница 60: ...60 EN 8 Attach the Handlebar Cover 15 A B and 27 A B to the Lower Handlebar Tube 26L R with Bolts 14 Attach the Pedal Tube Cover 48 49 to the Pedal Tube 51 with Bolts 47 ...

Страница 61: ...uter Line 1b and 1a with Middle Wire 29 and Handle Wire 13 Fix the Computer 1 to the Upright Post 33 with Screws 28 Finally connect the power adapter Note Make sure that all bolts and nuts are tight before starting the workout ...

Страница 62: ...ted results An optimal training session includes 1 a warm up phase 2 an intensive cardio training phase and finally 3 a cool down phase If you want to progress or burn calories you should go through these 3 phases as well as exercise for at least 20 30 minutes on the ergometer 1 Warm up Phase Always start your training session with a low resistance level A warm up phase of 5 10 minutes is importan...

Страница 63: ...acilitate energy production At the same time the anaerobic production of energy is also active but only to a small extent The lactic acid produced in this process can be broken down to produce energy Most of your training should be aerobic training If you continue to increase the intensity you will eventually come to the threshold where aerobic energy production is no longer able to increase its o...

Страница 64: ...r by doing a more demanding interval training Eating and Drinking Drink before during and after training Drink at least 2 sips of water 10 to 20 cl every 10 15 minutes during a training session If your workout lasts for more than 1 hour you should drink a sports drink to protect the body from dehydration while training For optimal cardio training suitable nutrition before and after any physical ac...

Страница 65: ...d consult your doctor or fitness instructor about suitable warm up movements Each movement should be repeated right and left so that you can start the cardio training relaxed Take about 5 minutes to do the following CapitalSports training routine 1 Nod the head slowly then alternating turn the head to look to the right to left Then mobilize the shoulders by making a circular motion with them ...

Страница 66: ...ed upward Stay in this position for a few seconds on each side 4 Stand on one leg and hold the instep of the other leg with your hand While in this position mobilize your ankle so as to stretch the thigh slightly If necessary hold on to something to keep your balance Then Stand on one leg and draw a circle in both directions clockwise and counterclockwise with the ankle ...

Страница 67: ...your back straight Sit with your legs bent so that the soles of your feet touch Slightly flap the knees by moving the knees up and down while keeping the feet on the floor Hold your ankles and keep your back straight 7 While seated stretch forward towards your toes Try to keep the legs and back straight and reach for the tips of your toes ...

Страница 68: ...or pulse input console will enter into power saving mode Press any key may wake the console up USB charging port Start or stop workout Hold on pressing for 2 seconds Computer will reboot and start from user setting Reverse to main menu during presetting workout value or stop mode Test heart rate and recovery status Down 1 Up 1 Mode Test body fat and BMI ...

Страница 69: ...rm Press START STOP keys to start workout Press UP or DOWN to adjust load level Press START STOP keys to pause workout Press RESET to reverse to main menu Beginner Mode Press UP or DOWN to select workout program choose Beginner mode and press Mode to enter Press UP or DOWN to preset TIME Press START STOP key to start workout Press UP or DOWN to adjust load level Press START STOP key to pause worko...

Страница 70: ...P or DOWN to adjust load level Press START STOP key to pause workout Press RESET to reverse to main menu Sporty Mode Press UP or DOWN to select workout program choose Sporty mode and press Mode to enter Press UP or DOWN to preset TIME Press START STOP key to start workout Press UP or DOWN to adjust load level Press START STOP key to pause workout Press RESET to reverse to main menu ...

Страница 71: ... Press START STOP key to start or stop workout Press RESET to reverse to main menu Watt Mode Press UP or DOWN to select workout program choose WATT and press Mode to enter Press UP or DOWN to preset WATT target Default is 120 Press UP or DOWN to preset TIME Press START STOP key to start workout Press UP or DOWN to adjust Watt level Press START STOP key to pause workout Press RESET to reverse to ma...

Страница 72: ...er preset target pulse RPM Rotation per minute Range 0 999 WATT In Watt Program mode computer will remain preset watt value setting range 0 350 MANUAL Manual mode workout PROGRAM Beginner Advance and Sporty PROGRAM selection CARDIO Target HR training mode iConsole App Turn on BT on tablet search for console device and press connect password 0000 Turn on iconsole app on tablet and start workout wit...

Страница 73: ...l in the resistance or in the power mode You can connect your compatible devices directly Alternatively you can use the camera that provides you with an optical pedal step or stroke sensor Join our multiplayer training sessions and try to be the first to finish Create an Account If you want to use Kinomap you must first connect to your Kinomap account If you have successfully registered you can st...

Страница 74: ...an subscribe to the service on a monthly basis or as an annual subscription which will provide you with access to advanced features Go to Subscribe Settings After the activation you will see your subscription at My subscription Connecting to the Training Machine How to connect the device with the KINOMAP app 1 Go to the Equipment menu 2 Add new devices with the button 3 Select your device type fro...

Страница 75: ...review feature lets you instantly see the data sent by the device This feature is especially useful if you have trouble committing when you start a new activity In accordance with the configuration the app will receive some values ...

Страница 76: ...filter function to ensure that you find the videos you wish to train to featured popular most viewed most recent duration distance incline among others For each video the following relevant information is available name contributor who posted the video country duration distance average of positive slope and average speed ...

Страница 77: ... Kinomap or the users of Kinomap themselves Each playlist has a specific theme such as a 30 minute training session or visiting a country You can track your progress on any playlist and any video Currently you cannot manage your playlists directly on the app ...

Страница 78: ...78 EN Beginning of Training Select the video you would like to train to Choose the mode in which you would like to train Just start pedaling to start training ...

Страница 79: ...s such as indoor challenges and to export a map complete with coordinates of your virtual ride to third party sites such as Strava Discovery Mode The video plays at its original speed and pauses when your speed reaches 0 Whatever your performance the frame rate will not change But you will still see if you perform well by looking at the energy performance data Note that the data that can be export...

Страница 80: ... The instant pedal frequency The distance Your position on the map is synchronized with the video The tab Ranking List is only available in the multiplayer mode Abscissa height in meters Ordinate distance in the KM in the challenge mode Duration in seconds in the discovery mode Setting the Resistance Gears On the screen you will find instructions on how to set the resistance according to the altit...

Страница 81: ... pause or stop exercising just stop pedaling or use the pause button in the corner Click the Resume Session button to continue the training session If you want to stop completely simply confirm by tapping on Save and Exit Profile Training ...

Страница 82: ...can choose between two modes depending on your device Resistance You define the resistance level and we send this information to the exercise bike regardless of the power produced Target Power You define a target power and the resistance automatically changes to generate it If you see an orange line it means that you are near your target The other way around the orange line means that you are movi...

Страница 83: ...out the duration and the distance Click on a specific training session to see all of the information You can also visit http www kinomap com myactivities Your activity history contains a map a summary and a series of detailed graphs that show your current speed power cadence and heart rate Note that the activity history can be automatically exported to various platforms such as RunKeeper Strava or...

Страница 84: ...haracters an auto complete search will be performed You can also perform a geographic search Choose Map in the main menu You can explore all available videos by clicking Public Playlists or All Videos Settings User Settings Go to the Settings menu and input your user details including your size weight birthday and sex This information affects the speed calculation External Display Follow the instr...

Страница 85: ...ed if it is regularly examined for damage and or wear and tear e g handle bar pedals and seat etc It is vital that any faulty parts are replaced and the it is not used until completed repaired Regularly check that the elements fastened with nuts and bolts are correctly tightened Remember regularly to grease moving parts Special attention to the component most of them are susceptible to wear like b...

Страница 86: ...al negative consequences for the environment and human health which could otherwise be caused by inappropriate waste handling of this product For more detailled information about recycling of this product please contact your local council or your household waste disposal service Your product contains batteries covered by the European Directive 2006 66 EC which cannot be disposed of with normal hou...

Страница 87: ... más reciente y otra información sobre el producto ÍNDICE DE CONTENIDOS Indicaciones de seguridad 88 Piezas 90 Montaje 95 Calentamiento antes del entrenamiento 107 Consola y funciones de los botones 110 Entrenamiento con la app kinomap 115 Cuidado y mantenimiento 127 Retirada del aparato 128 DATOS TÉCNICOS Número de artículo 10032829 Suministro eléctrico 220 240 V 50 60 Hz DECLARACIÓN DE CONFORMID...

Страница 88: ...enga una distancia de seguridad de 0 5 metros con el resto de los objetos Antes de iniciar el entrenamiento en el aparato se recomienda realizar un reconocimiento médico para determinar si tiene algún problema físico o de salud que puede suponer un riesgo para su salud o seguridad o impedir que pueda utilizar correctamente el aparato El consejo de su médico es esencial si toma medicamentos que afe...

Страница 89: ...ario Todas las piezas móviles p ej pedales manillar sillín etc deben tener un mantenimiento semanal Examínelos antes de cada uso del aparato Si una pieza está rota o suelta deberá repararla de inmediato Vuelva a utilizar el aparato cuando se encuentre en perfecto estado Tenga en cuenta que el aparato no tiene ningún sistema de rueda libre por lo que existe riesgo de accidente con un uso inadecuado...

Страница 90: ...90 ES PIEZAS ...

Страница 91: ...91 ES ...

Страница 92: ... 2 I 1 18 Tuerca de nilón M8 12 58 Arandela D16 2 19 Tornillo M8x20 2 59 Cojinete Ø24xØ20xØ16 1 4 20 Arandela D8xØ32x2 2 60 Arandela de muelle 1 2 2 21 Cojinete Ø32xØ19x28 II 4 61 Tuerca de nilón M10 2 22 Arandela D9 2 62 Tuerca de nilón 1 2 I 1 23 Cojinete Ø32xØ19x65 4 63 Tapón S19 2 24 Cojinete Ø14xØ8 5x60 III 2 64 Perno de charnela para pedal 1 2 D 1 25 Cojinete Ø32xØ15x20 I 4 65 Tuerca de niló...

Страница 93: ...I 1 101 Imán 4 86 Tuerca M10x1 0 1 102 Tornillo 6x16 2 87 Set de tornillos 2 103 Tuerca de nilón M6 4 88 Tuerca M10x1xH5 1 104 Tornillo M6x20 4 89 Cojinete 2 105 Eje 1 90 Plato 1 106 Tornillo M5 10 4 91 Resorte de tracción 1 107 Cableado del sensor 1 92 Manivela D 1 108 Tuerca M12 1 93 Cojinete 2 Llave de boca S17 19 1 94 Eje 1 LLave Allen S6 1 95 Arandela de muelle d6 2 Llave de boca S13 14 15 1 ...

Страница 94: ...94 ES ...

Страница 95: ...95 ES MONTAJE 1 Monte el estabilizador delantero 41 y el estabilizador trasero 46 en la estructura principal 38 con los tornillos 39 y las arandelas 34 ...

Страница 96: ...96 ES 2 Fije el cableado del sensor 29 y 37 en la estructura principal 38 con los tornillos 35 y las arandelas 34 Atención Atornille completamente los tornillos 35 y las arandelas 34 después de paso 3 ...

Страница 97: ...97 ES 3 Monte el manillar inferior 26 I D en el poste delantero 33 con la ayuda de los tornillos 19 las arandelas 10 y las arandelas de muelle 10 ...

Страница 98: ...nela 57 64 Atornille la barra de pedales 51 con las arandelas 60 y las tuercas de nilón 62 65 Atención Asegúrese de que el tornillo de pedal derecho 67 marcado con R se monte en la biela derecha y se atornille girando en el sentido de las agujas del reloj El tornillo de pedal izquierdo 60 marcado con L se monte en la biela izquierda y se atornilla en el sentido contrario a las agujas del reloj ...

Страница 99: ...99 ES 5 Atornille los pedales 53 con los tornillos 52 las arandelas 34 y las tuercas de nilón 18 a las barras de pedales 51 ...

Страница 100: ...100 ES 6 Fije el manillar 2 I D al manillar inferior 26 I D con los tornillos 16 las arandelas 17 y las tuercas de nilón 18 ...

Страница 101: ...101 ES 7 Monte el manillar central 6 en el poste delantero 33 con la ayuda de los tornillos 11 y arandelas de muelle 10 Inserte los tornillos 11 y la cubierta del manillar 12 y atorníllelos ...

Страница 102: ...102 ES 8 Monte las cubiertas del manillar 15 A B y 27 A B en la barra del manillar 26 I D con los tornillos 14 Fije la cubierta del manillar 48 49 en la barra de pedales 51 con los tornillos 47 ...

Страница 103: ...y el cable del manillar 13 Monte el ordenador 1 en el poste delantero 33 con la ayuda de los tornillos 28 Finalmente conecte el aparato a la toma de corriente Atención Asegúrese de que todos los tornillos y tuercas están bien atornillados antes de iniciar el entrenamiento ...

Страница 104: ...el entrenamiento y los resultados del mismo Un entrenamiento óptimo incluye una fase de calentamiento 1 una fase intensiva de cardio 2 y una fase de recuperación final 3 Si hace progresos o quiere quemar calorías debe realizar estas 3 fases y entrenarse como mínimo durante 20 30 minutos en el ergómetro 1 Fase de calentamiento Comience su entrenamiento con una resistencia reducida Es importante rea...

Страница 105: ...cción de energía aeróbica La obtención de energía anaeróbica es también activa a pequeña escala pero solo hasta cierto punto pues el ácido láctico producido en este proceso puede extraerse para producir energía Gran parte de su ejercicio debe consistir en un tipo de entrenamiento aeróbico Si continúa aumentando la carga llegará en algún momento a un límite donde su obtención de energía por oxígeno...

Страница 106: ... por intervalos exigente Comida y bebida Beba antes durante y después del entrenamiento Durante el entrenamiento beba al menos 2 sorbos de agua 10 a 20 cl cada 10 15 minutos Si su entrenamiento dura más de 1 hora debe beberse una botella de deporte completa para proteger al cuerpo de la deshidratación durante la sesión Para un entrenamiento de cardio óptimo es muy importante una alimentación adecu...

Страница 107: ...cio y planifique un entrenamiento de calentamiento específico con su médico o entrenador Cada movimiento debe realizarse varias veces a derecha e izquierda para que pueda comenzar de manera relajada en el entrenamiento de cardio Tómese unos 5 minutos de tiempo para las siguientes rutinas de entrenamiento de CapitalSports 1 Incline la cabeza lentamente hacia delante y atrás así como hacia la derech...

Страница 108: ...ia arriba A continuación inclínese a la izquierda Quédese en esta posición durante unos segundos en cada lado 4 Párese sobre una pierna y agarre el empeine con una mano En esta pose mueva el tobillo y estire ligeramente el muslo De ser necesario apóyese en algo para no perder el equilibrio Permanezca sobre una pierna y mueva el tobillo haciendo círculos en ambas direcciones ...

Страница 109: ...ase con las piernas dobladas de manera que las plantas de los pies se toquen Mueva ligeramente las rodillas En esta posición moviliza tanto los tobillos como los muslos Agarre los tobillos manteniendo la espalda recta 7 Inclínese hacia adelante en posición sentada y con las piernas estiradas Intente agarrar los tobillos y luego llegar hasta los dedos del pie ...

Страница 110: ...e energía si el aparato no se utiliza y no se detecta el ritmo cardiaco Pulse cualquier botón para finalizar el modo de ahorro de energía Cable de carga USB Iniciar finalizar entrenamiento Si mantiene pulsado este botón durante 2 segundos se eliminarán todos los datos del usuario Regresar al menú principal durante la configuración de valores o el modo reposo Frecuencia cardiaca y estado de recuper...

Страница 111: ...ulse los botones AUMENTAR o DISMINUIR para elegir la resistencia Pulse START STOP para interrumpir el entrenamiento Pulse el botón RESET para volver al menú principal Modo Principiante Beginner Pulse los botones AUMENTAR o DISMINUIR para elegir el programa de entrenamiento Elija el modo Principiante Beginner y pulse el botón MODE para seleccionarlo Pulse el botón AUMENTAR o DISMINUIR para ajustar ...

Страница 112: ...tencia Pulse START STOP para interrumpir el entrenamiento Pulse el botón RESET para volver al menú principal Modo Atleta Sporty Pulse los botones AUMENTAR o DISMINUIR para elegir el programa de entrenamiento Elija el modo Atleta Sporty y pulse el botón MODE para seleccionarlo Pulse el botón AUMENTAR o DISMINUIR para ajustar el tiempo Pulse START STOP para empezar el entrenamiento Pulse los botones...

Страница 113: ...usar el entrenamiento Pulse el botón RESET para volver al menú principal Modo Vatios Watt Pulse los botones AUMENTAR o DISMINUIR para elegir el programa de entrenamiento Elija el modo Vatios Watt y pulse el botón MODE para seleccionarlo Pulse el botón AUMENTAR o DISMINUIR para configurar el número de vatios la configuración por defecto es 120 Pulse el botón AUMENTAR o DISMINUIR para ajustar el tie...

Страница 114: ...do RPM Rotación por minuto 0 999 VATIOS En el programa de vatios contiene el valor en vatios predeterminado parámetros ajustables 0 350 MANUAL Entrenamiento en modo manual PROGRAM Seleccionar entre los programas principiante avanzado y deportista CARDIO Modo de entrenamiento con frecuencia cardiaca objetivo iConsole y App Active en su tablet el BT busque en la lista el dispositivo y pulse para con...

Страница 115: ...en resistencia o en modo potencia Conecte directamente sus dispositivos compatibles Como alternativa también puede utilizar la cámara que le ofrece un sensor óptico de frecuencia de palada de pedaleo o de paso Participe en nuestras sesiones de multijugador e intente llegar el primero a la meta Crear cuenta Si desea utilizar el KINOMAP debe conectarse primero con su cuenta KINOMAP Cuando se haya re...

Страница 116: ...ación posteriormente Introducir código de activación Indicaciones sobre la suscripción Puede suscribirse al servicio en periodicidad mensual o anual obteniendo así acceso a funciones avanzadas Vaya a Ajustes de suscripción Tras la activación verá su suscripción en Mi suscripción Establecer conexión con el aparato de entrenamiento Cómo conectar el aparato a la app KINOMAP 1 Vaya al menú Equipo 2 Añ...

Страница 117: ...ión Previsualización de los datos puede ver enseguida los datos enviados por el aparato Esta función es especialmente útil si tiene problemas a la hora de iniciar una actividad En función del equipamiento la app recibirá los valores correspondientes ...

Страница 118: ...e con ellos durante el entrenamiento Existe una función de filtro para garantizar que accede a los vídeos buscados Featured popular most viewed most recent duration distance incline Para cada vídeo puede ver información relevante su nombre el creador quien ha publicado el vídeo país duración distancia media de la pendiente positiva velocidad media ...

Страница 119: ...do creado Cada lista de reproducción tiene un tema determinado como entrenamiento de 30 min o visita de un país Puede realizar el seguimiento de sus avances en todas las listas de reproducción y en cada vídeo que cree En estos momentos no puede administrar las listas de reproducción directamente desde la app ...

Страница 120: ...120 ES Comienzo del entrenamiento Seleccione el vídeo en el que desea entrenarse Seleccione el modo en el que desea entrenarse Comience caminando o pedaleando para iniciar el entrenamiento ...

Страница 121: ...y para exportar un mapa completo de su recorrido virtual junto con sus coordenadas a páginas web de terceros como Strava Modo descubrimiento El vídeo se reproduce a velocidad original y se pausa cuando su velocidad es 0 Independientemente de su rendimiento la tasa de fotogramas no se modifica Pero todavía puede ver si tiene un buen ritmo consultando el rendimiento de energía registrada en la app T...

Страница 122: ...a de paso actual La distancia La posición del mapa se sincroniza con el vídeo La pestaña Lista de ranking solo está disponible en modo multijugador Eje de abscisas Altura en metros Eje de ordenadas Distancia en km en modo reto Duración en segundos en modo descubrimiento Regular resistencia marchas En el monitor recibirá instrucciones de cómo ajustar la resistencia en función del perfil de altura a...

Страница 123: ...de correr pedalear o utilice la tecla Pause situada en la esquina de la unidad de entrenamiento Haga clic en la interfaz Continuar sesión para continuar con un entrenamiento inacabado Si desea finalizar esa actividad confirme pulsando en Guardar y finalizar Perfil de entrenamiento ...

Страница 124: ...n está disponible para su equipo Puede elegir entre dos modos dependiendo del aparato Resistencia Usted define el nivel de resistencia y nosotros enviamos las instrucciones al aparato de entrenamiento independientemente de la potencia producida Potencia objetivo Usted define una potencia objetivo y la resistencia se modifica automáticamente para que la logre Si ve la línea de color naranja quiere ...

Страница 125: ...amiento su duración y distancia Haga clic en una sesión determinada para obtener toda la información También puede visitar la página http www kinomap com myactivities Su historial de entrenamiento contiene un mapa un resumen y una serie de diagramas detallados de su velocidad rendimiento frecuencia de paso y frecuencia cardiaca hasta el momento Tenga en cuenta que el historial de entrenamiento pue...

Страница 126: ...utocompletado automático También puede realizar una búsqueda geográfica Seleccione mapa en el menú principal Puede obtener todos los vídeos disponibles haciendo clic en Publics Playlists o Todos los vídeos Ajustes Configuración de usuario Acceda al menú Ajustes y ajuste sus datos de usuario incluidos sus datos personales altura peso fecha de nacimiento y sexo Esta información influye en el cálculo...

Страница 127: ... si este se limpia regularmente y se inspecciona para detectar daños o desgastes p ej en pedales manillares sillín etc Es indispensable sustituir las piezas dañadas y utilizar el aparato solo cuando se haya finalizado dicha reparación Compruebe habitualmente si los tornillos y las tuercas están bien fijados Engrase todas las piezas móviles Controle especialmente todos los componentes que tiendan a...

Страница 128: ... de la basura doméstica Una retirada de aparatos conforme a las leyes contribuye a proteger el medio ambiente y a las personas a su alrededor frente a posibles consecuencias perjudiciales para la salud El reciclaje ayuda a reducir el consumo de materias primas Este producto contiene pilas que según la Normativa europea 2006 66 EG no deben ser arrojadas al cubo de la basura común Infórmese sobre la...

Страница 129: ...ploi et à d autres informations concernant le produit SOMMAIRE Indicaciones de seguridad 130 Aperçu des pièces détachées 132 Assemblage 137 Aperçu de l entrainement cardio 146 Échauffement avant l entrainement 149 Console et fonctions des touches 152 Entrainement avec l appli kinomap 157 Entretien et maintenance 169 Conseils pour le recyclage 170 FICHE TECHNIQUE Numéro d article 10032829 Alimentat...

Страница 130: ...enga una distancia de seguridad de 0 5 metros con el resto de los objetos Antes de iniciar el entrenamiento en el aparato se recomienda realizar un reconocimiento médico para determinar si tiene algún problema físico o de salud que puede suponer un riesgo para su salud o seguridad o impedir que pueda utilizar correctamente el aparato El consejo de su médico es esencial si toma medicamentos que afe...

Страница 131: ...ario Todas las piezas móviles p ej pedales manillar sillín etc deben tener un mantenimiento semanal Examínelos antes de cada uso del aparato Si una pieza está rota o suelta deberá repararla de inmediato Vuelva a utilizar el aparato cuando se encuentre en perfecto estado Tenga en cuenta que el aparato no tiene ningún sistema de rueda libre por lo que existe riesgo de accidente con un uso inadecuado...

Страница 132: ...132 FR APERÇU DES PIÈCES DÉTACHÉES ...

Страница 133: ...133 FR ...

Страница 134: ...1 2 L 1 18 Ecrou en nylon M8 12 58 Rondelle D16 2 19 Vis M8x20 2 59 Manchon Ø24xØ20xØ16 1 4 20 Rondelle D8xØ32x2 2 60 Rondelle ressort 1 2 2 21 Manchon Ø32xØ19x28 II 4 61 Ecrou en nylon M10 2 22 Rondelle D9 2 62 Ecrou en nylon 1 2 L 1 23 Manchon Ø32xØ19x65 4 63 Embout S19 2 24 Manchon Ø14xØ8 5x60 III 2 64 Vis de charnière de pédale 1 2 R 1 25 Manchon Ø32xØ15x20 I 4 65 Ecrou en nylon 1 2 R 1 26 L R...

Страница 135: ... 1 85 Manivelle L 1 101 Magnet 4 86 Ecrou M10x1 0 1 102 Vis 6x16 2 87 Groupe de vis 2 103 Ecrou en nylon M6 4 88 Ecrou M10x1xH5 1 104 Vis M6x20 4 89 Roulement 2 105 Axe 1 90 Volant d inertie 1 106 Vis M5 10 4 91 Ressort de traction 1 107 Ligne du capteur 1 92 Manivelle R 1 108 Ecrou M12 1 93 Roulement 2 Clé plate S17 19 1 94 Axe 1 Clé Allen S6 1 95 Rondelle ressort d6 2 Clé plate S13 14 15 1 96 Ro...

Страница 136: ...136 FR ...

Страница 137: ...137 FR ASSEMBLAGE 1 Fixez le stabilisateur avant 41 et le stabilisateur arrière 46 au cadre principal 38 avec des vis 39 et rondelles 34 ...

Страница 138: ...138 FR 2 Fixez les câbles du capteur 29 et 37 au cadre principal 38 à l aide des vis 35 et des rondelles 34 Remarque Serrez la vis 35 et les rondelles 34 seulement après l étape 3 ...

Страница 139: ...139 FR 3 Attachez le guidon inférieur 26 L R au montant avant 33 avec les vis 19 les rondelles 10 et les rondelles ressorts 10 ...

Страница 140: ...vis de la charnière de la pédale 57 64 Montez le tube de la pédale 51 avec les rondelles 60 et les écrous en nylon 62 65 Remarque Assurez vous que la vis de la pédale droite 67 marquée R est attachée au bras de manivelle droit et serrée dans le sens des aiguilles d une montre La vis de charnière de pédale gauche 60 marquée L est fixée au bras de manivelle gauche et serrée dans le sens antihoraire ...

Страница 141: ...141 FR 5 Monter les pédales 53 avec les vis 52 les rondelles 34 et les écrous en nylon 18 sur les tubes de pédales 51 ...

Страница 142: ...142 FR 6 Attachez le guidon 2 G D au guidon inférieur 26 L R avec les vis 16 les rondelles 17 et les écrous en nylon 18 et serrez les ...

Страница 143: ...143 FR 7 Attachez le guidon central 6 au montant avant 33 à l aide des vis 11 et des rondelles ressorts 10 Installez les vis 11 et le cache du guidon 12 et serrez les vis ...

Страница 144: ...144 FR 8 Fixez les caches du guidon 15 A B et 27 A B au tube inférieur du guidon 26 L R à l aide de vis 14 Fixez le cache du tube de pédale 48 49 sur le tube de pédale 51 ...

Страница 145: ...le central 29 et au câble de la poignée 13 Fixez le compteur 1 au montant avant 33 à l aide des vis 28 Enfin branchez l adaptateur d alimentation Remarque Vérifiez que vous avez bien serré tous les écrous et boulons avant de commencer à faire de l exercice ...

Страница 146: ...ement comprend une phase d échauffement 1 une phase plus intense d entraînement cardio 2 et une phase finale de récupération 3 Si vous voulez progresser ou brûler des calories vous devez passer par ces 3 phases et vous entraîner pendant au moins 20 30 minutes sur l ergomètre 1 Phase d échauffement Commencez toujours votre entraînement avec une faible résistance La période d échauffement de 5 10 mi...

Страница 147: ...n utilisant l oxygène de la production d énergie aérobie La production anaérobie est également active à petite échelle mais seulement dans la mesure où tout l acide lactique qu elle produit peut être dégradé en même temps Vous devriez passer la majeure partie de votre entraînement dans cette zone aérobie Si vous continuez à augmenter la charge alors vous finirez par arriver à une limite à partir d...

Страница 148: ...u en suivant un entraînement par intervalles plus exigeant Manger et boire Buvez avant pendant et après l exercice Pendant l entraînement buvez au moins 2 gorgées d eau 10 à 20 cl toutes les 10 15 minutes Si votre entraînement dure plus d une heure prenez une boisson pour sportifs afin de protéger le corps de la déshydratation pendant l exercice Pour un entraînement cardio optimal une bonne alimen...

Страница 149: ... exercice et convenez avec votre médecin ou votre coach de fitness d une méthode d échauffement spécifique Chaque mouvement doit en principe être répété plusieurs fois à droite et à gauche afin que vous puissiez commencer le cardio training de façon détendue Prenez environ 5 minutes pour effectuer la séquence d entraînement CapitalSports suivante 1 Inclinez la tête sur le côté en alternant lenteme...

Страница 150: ... hanches un bras tendu vers le haut Restez dans cette position une seconde de chaque côté 4 Tenez vous sur une jambe et tenez le cou de pied avec votre main Cela vous fait mobiliser votre cheville et étirer légèrement la cuisse Si nécessaire appuyez vous pour garder votre équilibre Restez sur une jambe et faites tourner la cheville en cercle dans les deux sens ...

Страница 151: ...e sich mit gebeugten Beinen so hin dass die Fußsohlen sich berühren Federn Sie leicht mit den Knien Hierbei mobilisieren Sie neben den Fußgelenken die gesamte äußere Oberschenkelpartie Halten Sie hierbei die Fußgelenke bei gestrecktem Rücken 7 Beugen Sie sich sitzend und mit gestreckten Beinen nach vorne Versuchen Sie die Fußknöchel zu halten und sich weiter zu den Zehenspitzen vorzutasten ...

Страница 152: ...pulsation n est détectée Appuyez sur n importe quelle touche pour quitter le mode d économie d énergie Port de charge USB Débuter terminer l entraînement Si vous maintenez ce bouton pendant 2 secondes toutes les données relatives à l utilisateur seront supprimées Retour au menuprincipalpendantleréglage delavaleuroulemodestop Retour au menu principal pendant le réglage des valeurs ou en mode stop F...

Страница 153: ...ent Appuyez sur HAUT ou BAS pour régler la résistance Appuyez sur le bouton START STOP pour interrompre l entraînement Appuyez sur RESET pour revenir au menu principal Mode débutant Beginner Appuyez sur HAUT ou BAS pour sélectionner le programme d exercices Sélectionnez le mode Débutant Beginner et appuyez sur la touche MODE pour y accéder Appuyez sur HAUT ou BAS pour régler l heure Appuyez sur la...

Страница 154: ...ur la touche START STOP pour interrompre l entraînement Apuyez sur RESET pour retourner au menu principal Mode sportif Sporty Appuyez sur HAUT ou BAS pour sélectionner le programme d exercices Sélectionnez le mode Sporty et appuyez sur MODE pour y accéder Appuyez sur HAUT ou BAS pour régler l heure Appuyez sur le bouton START STOP pour commencer l entraînement Appuyez sur HAUT ou BAS pour régler l...

Страница 155: ...marrer ou arrêter l entraînement Appuyez sur RESET pour revenir au menu principal Mode watts Watt Appuyez sur HAUT ou BAS pour sélectionner le programme d exercices Sélectionnez le mode Watt Watts et appuyez sur MODE pour l entrer Appuyez sur HAUT ou BAS pour régler le nombre de Watts la valeur par défaut est 120 Appuyez sur HAUT ou BAS pour régler l heure Appuyez sur le bouton START STOP pour com...

Страница 156: ...ble RPM Tours par minute Plage de mesure 0 999 WATT Dans le programme Watt l appareil maintient une valeur prédéfinie plage de mesure réglable 0 350 MANUAL Entraînement en mode manuel PROGRAM Sélection entre les programmes débutant avancé et sportif CARDIO Mode d entraînement avec objectif de fréquence cardiaque iConsole et application Activez le BT sur votre tablette recherchez l appareil dans la...

Страница 157: ...otre propre intervalle de résistance ou en mode puissance Connectez vos appareils compatibles directement Vous pouvez également utiliser la caméra qui vous offre un capteur de cadence optique de foulée ou de rameur Rejoignez nos sessions multi joueurs et essayez d être le premier Créer un compte Si vous voulez utiliser KINOMAP vous devez d abord vous connecter à votre compte KINOMAP Si vous vous ê...

Страница 158: ...alement vous abonner au service pour une période mensuelle ou annuelle vous donnant accès à des fonctionnalités avancées Allez dans les Paramètres d abonnement Après avoir saisi le code d activation vous pouvez consulter votre abonnement dans mon abonnement Établissement de la connexion avec l appareil d exercice Voici comment connecter votre appareil avec l appli KINOMAP 1 Rendez vous dans le men...

Страница 159: ...prévisualisation des données vous pouvez visualiser immédiatement les données envoyées par l appareil Cette fonction est particulièrement utile si vous avez des difficultés au démarrage d une activité Selon l équipement l application reçoit certaines valeurs ...

Страница 160: ...nt votre séance Une fonction de filtrage vous assure que vous avez bien accès aux vidéos que vous recherchez plébiscité populaire le plus vu le plus récent la durée la distance l inclinaison Pour chaque vidéo vous pouvez voir les informations pertinentes son titre le contributeur qui a posté la vidéo le pays la durée la distance la moyenne de la pente positive la vitesse moyenne ...

Страница 161: ...les utilisateurs eux mêmes Chaque playlist a un thème spécifique par exemple 30 minutes pour s entraîner ou visiter un pays Vous pouvez suivre votre progression sur n importe quelle playlist et n importe quelle vidéo créée Pour l instant vous ne pouvez pas gérer vos playlists directement depuis l application ...

Страница 162: ...62 FR Début de l entraînement Sélectionnez la vidéo sur laquelle vous voulez vous entraîner Choisissez le mode dans lequel vous voulez entraîner Commencez simplement à pédaler pour débuter l entraînement ...

Страница 163: ...door et pour exporter vers des sites tiers tels que Strava avec les coordonnées complètes et une carte de votre trajet virtuel Mode découverte La vidéo est lue à sa vitesse d origine et fait une pause si votre vitesse descend à 0 Quelle que soit votre performance la fréquence d images ne changera pas Mais vous verrez toujours si vous réussissez bien en regardant la performance énergétique mesurée ...

Страница 164: ...nce de foulée instantanée La distance Votre position sur la carte est synchronisée avec la vidéo L onglet Classement est uniquement disponible en mode multijoueur Abscisses hauteur en mètres Ordonnées Distance en Km en mode Challenge Durée en secondes en mode Discovery Réglage de la résistance vitesses Sur l écran vous trouverez des instructions pour régler la résistance en fonction du profil d al...

Страница 165: ...ez simplement de pédaler ou utilisez le bouton pause dans le coin de l entraînement Cliquez sur le bouton Reprendre la session pour continuer une séance non terminée Si vous souhaitez quitter cette activité confirmez simplement en appuyant sur enregistrer et quitter Profil d entraînement ...

Страница 166: ...disponible pour votre appareil Vous pouvez choisir entre deux modes en fonction de votre appareil Résistance Vous définissez un niveau de résistance et nous envoyons les indications au hometrainer indépendamment de la puissance produite Puissance cible Vous définissez une puissance cible et la résistance change automatiquement pour y correspondre Si vous apercevez une ligne orange cela signifie qu...

Страница 167: ...e et la distance Cliquez sur une séance spécifique pour obtenir toutes les informations Vous pouvez également visiter http www kinomap com myactivities Votre historique d exercices contient une carte un résumé et une série de graphiques détaillés qui indiquent votre vitesse actuelle votre puissance votre cadence et votre fréquence cardiaque Notez que le journal d entraînement peut être automatique...

Страница 168: ...utomatique lance une recherche Vous pouvez également effectuer une recherche géographique Sélectionnez Carte dans le menu principal Vous pouvez explorer toutes les vidéos disponibles en cliquant sur Publics Playlists ou All Videos Réglages Réglages personnalisés Allez dans le menu Paramètres et définissez vos données utilisateur y compris les unités la taille le poids l âge et le sexe Cette inform...

Страница 169: ...le bon état et le niveau d usure de l appareil sont régulièrement vérifiés par exemple les poignées les pédales la selle etc Il est essentiel de remplacer les pièces endommagées de l appareil et de ne réutiliser l appareil qu après réparation Vérifiez régulièrement que les vis et les écrous sont correctement serrés Lubrifiez les pièces mobiles régulièrement Portez une attention particulière aux co...

Страница 170: ...roduits avec les ordures ménagères Le respect des règles de recyclage des vieux produits aide à la protection de l environnement et de la santé de votre entourage contre les conséquences négatives possibles Le recyclage des matériaux aide à réduire l utilisation des matières premières Ce produit contient des piles qui sont soumises à la directive européenne 2006 66 CE selon laquelle elles ne doive...

Страница 171: ...nuale d uso più attuale e per ricevere informazioni sul prodotto INDICE Avvertenze di sicurezza 172 Descrizione del dispositivo 174 Montaggio 179 Descrizione dell allenamento cardio 188 Riscaldamento prima dell allenamento 191 Consolle e tasti funzione 194 Allenamento tramite kinomap app 199 Pulizia e manutenzione 211 Smaltimento 212 DATI TECNICI Articolo numero 10032829 Alimentazione 220 240 V 50...

Страница 172: ... ad es vicino a piscine ecc La distanza di sicurezza intorno al dispositivo deve essere di almeno 0 5 metri Prima di iniziare il programma di allenamento consultare assolutamente un medico per assicurarsi di non avere problemi fisici o di salute che potrebbero rappresentare un rischio per il vostro benessere o la vostra sicurezza attraverso l uso del dispositivo o che potrebbero impedire il corret...

Страница 173: ... tecnica di sollevamento appropriata e in caso chiedere l aiuto di un altra persona Tutti i componenti mobili ad es pedali impugnature sella ecc devono essere manutenuti settimanalmente Controllarli prima di ogni utilizzo Se qualcosa dovesse essere allentato o rotto procedere immediatamente alla riparazione o al fissaggio Utilizzare il dispositivo solo dopo aver ristabilito la condizione ottimale ...

Страница 174: ...174 IT DESCRIZIONE DEL DISPOSITIVO ...

Страница 175: ...175 IT ...

Страница 176: ...ullone cerniera del pedale L 1 18 Dado in nylon M8 12 58 Rondella D16 2 19 Vite M8x20 2 59 Boccola Ø24x Ø 20x Ø 16 1 4 20 Rondella D8xØ32x2 2 60 Rosetta elastica 2 21 Boccola Ø32xØ19x28 II 4 61 Dado in nylon M10 2 22 Rondella D9 2 62 Dado in nylon L 1 23 Boccola Ø32xØ19x65 4 63 Calotta terminale S19 2 24 Boccola Ø14xØ8 5x60 III 2 64 Bullone cerniera del pedale R 1 25 Boccola Ø32xØ15x20 I 4 65 Dado...

Страница 177: ...ivella L 1 101 Magnete 4 86 Dado snello M10x1 0 1 102 Vite 6x16 2 87 Gruppo viti 2 103 Dado in nylon 4 88 Dado M10x1xH5 1 104 Vite M6x20 4 89 Cuscinetto 2 105 Asse 1 90 Volano 1 106 ViteM5 10 4 91 Molla di trazione 1 107 Cavo sensore 1 92 Pedivella R 1 108 Dado M12 1 93 Cuscinetto 2 Chiave inglese S17 19 1 94 Asse 1 Chiave a brugola S6 1 95 Rosetta elastica d6 2 Chiave inglese S13 14 15 1 96 Ronde...

Страница 178: ...178 IT ...

Страница 179: ...179 IT MONTAGGIO 1 Fissare lo stabilizzatore anteriore 41 e posteriore 46 con viti 39 e rondelle 34 al telaio principale 38 ...

Страница 180: ...180 IT 2 Fissare il cavo centrale 29 e il cavo del sensore 37 con viti 35 e rondelle 34 al telaio principale 38 Avvertenza stringere viti 35 e rondelle 37 solo dopo il 3 passaggio ...

Страница 181: ...181 IT 3 Fissare il manubrio inferiore 26 L R con viti 19 rondelle 10 e rosette elastiche 10 al pilastro anteriore 33 ...

Страница 182: ...cerniere del pedale 57 64 con la pedivella 66 67 Montare il tubo del pedale 51 con rondelle 60 e dadi in nylon 62 65 Avvertenza assicurarsi di fissare la vite del pedale destro 67 marcata con R alla pedivella destra ruotando in senso orario La vite della cerniera del pedale 60 sinistro marcata con L viene fissata alla pedivella destra in senso antiorario ...

Страница 183: ...183 IT 5 Montare i pedali 53 con viti 52 rondelle 34 e dadi in nylon 18 ai tubi del pedale 51 ...

Страница 184: ...184 IT 6 Fissare il manubrio 2 L R con viti 16 rondelle 17 e dadi in nylon 18 al manubrio inferiore 26 L R e stringere saldamente ...

Страница 185: ...185 IT 7 Fissare il manubrio centrale 6 con viti 11 e rosette elastiche 10 al pilastro anteriore 33 Inserire le viti 11 e la copertura del manubrio 12 e stringere saldamente ...

Страница 186: ...186 IT 8 Fissare le coperture del manubrio 15 A B e 27 A B con viti 14 al tubo del manubrio inferiore 26 L R Fissare la copertura del tubo del pedale 48 49 con viti 47 al tubo del pedale 51 ...

Страница 187: ...con il cavo centrale 29 e il cavo dell impugnatura 13 Fissare il computer 1 con le viti 28 al pilastro anteriore 33 Infine collegare il trasformatore Avvertenza prima di iniziare l allenamento assicurarsi che tutte le viti e i dadi siano ben stretti ...

Страница 188: ...amento e per i risultati ad esso collegati Un allenamento ottimale comprende una fase di riscaldamento 1 una fase di allenamento cardio più intensa 2 e la fase di recupero finale 3 Per fare progressi o bruciare calorie eseguire queste 3 fasi e allenarsi sull ergometro per almeno 20 30 minuti 1 Fase di riscaldamento Iniziare sempre l allenamento con una resistenza bassa Un periodo di riscaldamento ...

Страница 189: ...e anche la produzione di energia anaerobica sia attiva lo è solo in minima parte L acido lattico prodotto in questo processo può essere scomposto per produrre energia La maggior parte dell allenamento si dovrebbe completare nella fase di allenamento aerobico Se si aumenta ulteriormente l intensità si raggiunge un limite nel quale l energia aerobica non sarà più in grado di aumentare la sua produzi...

Страница 190: ...gnativo Mangiare e bere Bere prima durante e dopo l allenamento Bere almeno 2 sorsi d acqua 10 20 cl ogni 10 15 minuti durante l allenamento Se l allenamento dura più di 1 ora si consiglia di bere uno sport drink per idratarsi durante gli esercizi Per un allenamento cardio ottimale è molto importante seguire un alimentazione adeguata sia prima che dopo l attività fisica Prima dell allenamento è pr...

Страница 191: ...olori saltare l esercizio in questione e concordare un riscaldamento specifico con il medico o il personal trainer Ogni movimento deve essere ripetuto diverse volte a destra e a sinistra in modo da poter realizzare un allenamento cardio in modo rilassato Calcolare circa 5 minuti per la seguente routine di allenamento CapitalSports 1 Muovere lentamente la testa alternativamente avanti indietro a de...

Страница 192: ...io disteso verso l alto Mantenere la posizione per qualche secondo per ogni lato 4 Posizionarsi su una sola gamba e mantenere in tensione con la mano In questo modo si mobilizza la caviglia e si distende leggermente la coscia Se necessario trovare un appoggio per mantenere l equilibrio Restare su una sola gamba e ruotare la caviglia in entrambe le direzioni eseguendo movimenti circolari ...

Страница 193: ...ia Sedersi con le gambe piegate in modo che le suole dei piedi si tocchino Molleggiare delicatamente con le ginocchia In questo modo si mobilizzano le caviglie e la parte esterna delle cosce Impugnare le caviglie e mantenere la schiena diritta 7 Sedersi e piegarsi in avanti con le gambe distese Cercare di mantenere la presa sul malleolo e di allungarsi progressivamente oltre la punta dei piedi ...

Страница 194: ...cardiaco il dispositivo passa in modalità di risparmio energetico Premere un tasto a piacere per terminare la modalità di risparmio energetico Connessione di carica USB Iniziare concludere l allenamento Premendo questo tasto per 2 secondi vengono cancellati tutti i dati relativi all utilizzatore Tornare al menu durante l impostazione dei valori o della modalità stop Frequenza cardiaca e stato del ...

Страница 195: ... l allenamento Premere UP e DOWN per regolare il livello di resistenza Per fare una pausa premere START STOP Premere RESET per tornare al menu principale Modalità principiante Beginner Premere UP e DOWN per selezionare il programma di allenamento selezionare la modalità principiante Beginner e premere MODE per confermare Premere UP e DOWN per impostare il tempo Premere START STOP per iniziare l al...

Страница 196: ... livello di resistenza Per fare una pausa premere START STOP Premere RESET per tornare al menu principale Modalità sportivo Sporty Premere UP e DOWN per selezionare il programma di allenamento selezionare la modalità sportivo Sporty e premere MODE per confermare Premere UP e DOWN per impostare il tempo Premere START STOP per iniziare l allenamento Premere UP e DOWN per regolare il livello di resis...

Страница 197: ...TOP per iniziare o arrestare l allenamento Premere RESET per tornare al menu principale Modalità Watt Watt Premere UP e DOWN per selezionare il programma di allenamento selezionare la modalità Watt Watt e confermare con MODE Premere UP e DOWN per impostare il livello di Watt da raggiungere l impostazione standard è 120 Premere UP o DOWN per impostare la durata Premere START STOP per iniziare l all...

Страница 198: ...ere RPM Rotazioni al minuto Intervallo 0 999 WATT Nel programma Watt il dispositivo mantiene un valore Watt impostato in precedenza intervallo impostabile 0 350 MANUAL Allenamento in modalità manuale PROGRAM Scelta tra i programmi Principiante Esperto e Sportivo CARDIO Modalità di allenamento con frequenza cardiaca da raggiungere iConsole App Attivare il BT sul tablet cercare il dispositivo nell e...

Страница 199: ...za o potenza Collegare direttamente i dispositivi compatibili In alternativa è possibile utilizzare la fotocamera che offre un sensore ottico della frequenza di pedalata del passo o della corsa L utente può partecipare alle sessioni multiplayer cercando di raggiungere per primo il traguardo Creare un account Per utilizzare KINOMAP è necessario per prima cosa connettersi con il proprio account KINO...

Страница 200: ...di attivazione Nota per l abbonamento è possibile abbonarsi al servizio anche su base mensile o annuale ottenendo l accesso a funzioni avanzate Andare su Subscribe Settings Dopo l attivazione si vedrà il proprio abbonamento su My subscription Collegamento al dispositivo Come collegare il dispositivo all App KINOMAP 1 Andare nel menu Equipment 2 Aggiungere nuovi dispositivi con il tasto 3 Seleziona...

Страница 201: ...Preview è possibile visualizzare immediatamente i dati inviati dal dispositivo Questa funzione è particolarmente utile in caso di problemi con l inizio di una nuova attività L applicazione riceverà alcuni di questi valori in base alla configurazione ...

Страница 202: ...sponibile una funzione di filtro per essere certi di accedere ai video che si stanno cercando featured popular most viewed most recent duration distance incline Per ogni video si possono vedere le informazioni rilevanti il nome i collaboratori che hanno pubblicato il video il paese la durata la distanza la media della pendenza positiva la velocità media ...

Страница 203: ...nomap o dagli utenti stessi Ogni playlist ha un tema specifico ad esempio per allenarsi per 30 minuti o per visitare un paese È possibile seguire i propri progressi su qualsiasi playlist o video creato Al momento non è possibile gestire le playlist direttamente dall app ...

Страница 204: ...204 IT Iniziare l allenamento Selezionare il video con il quale ci si vuole allenare Selezionare la modalità con la quale ci si vuole allenare Iniziare a pedalare per iniziare l allenamento ...

Страница 205: ...tà per partecipare a sfide indoor ed esportare il viaggio virtuale su siti web come Strava con coordinate complete e con mappa Modalità Discovery il video verrà riprodotto alla velocità originale e messo in pausa quando la velocità raggiunge lo 0 Qualunque sia la performance il frame rate non cambia ma si vedrà ancora se si ottengono buoni risultati Tenere presente che l esportazione su siti web d...

Страница 206: ...La frequenza della pedalata istantanea La distanza La posizione della mappa è sincronizzata con il video Il tab Ranking List è disponibile solo in modalità multiplayer Ascissa altezza in metri Ordinata distanza in KM in modalità sfida Durata in secondi in modalità Discovery Regolare resistenza andatura Sul display si trovano istruzioni su come regolare la resistenza in base al profilo di altitudin...

Страница 207: ...allenamento è sufficiente interrompere la pedalata o utilizzare il tasto di pausa nell angolo Fare clic sul tasto Resume session per continuare un allenamento non raggiunto Se si desidera terminare questa attività è sufficiente confermare toccando Save and Exit Profilo allenamento ...

Страница 208: ...sponibile È possibile scegliere tra due modalità a seconda del dispositivo Resistenza l utente definisce un livello di resistenza e le istruzioni vengono inviate al dispositivo indipendentemente dalla potenza prodotta Potenza target l utente definisce una potenza da raggiungere e la resistenza cambia automaticamente in modo da poterla produrre Se si vede una linea arancione significa che si è vici...

Страница 209: ...a Fare clic su un allenamento specifico per ottenere tutte le informazioni È inoltre possibile visitare la pagina http www kinomap com myactivities Il registro dell allenamento include una mappa un riepilogo e una serie di grafici dettagliati che mostrano la velocità la potenza la frequenza della pedalata e la frequenza cardiaca correnti Si noti che il registro degli allenamenti può essere esporta...

Страница 210: ...ita una ricerca automatica È anche possibile eseguire una ricerca geografica Selezionare Map dal menu principale È possibile sfogliare tutti i video disponibili cliccando su Public playlist o All video Impostazioni Impostazioni utente Andare nel menu Impostazioni e impostare i dati utente tra cui taglia altezza peso compleanno e sesso Queste informazioni servono per il calcolo della velocità Displ...

Страница 211: ... regolarmente che non presenti danni o segni di usura ad es su maniglie pedali sedile ecc È essenziale che le parti danneggiate del dispositivo vengano sostituite e che questo non venga riutilizzato fino a quando non è stato riparato Controllare regolarmente che le viti e i dadi siano fissati correttamente Lubrificare regolarmente le parti mobili Prestare attenzione ai componenti particolarmente s...

Страница 212: ...ti domestici Grazie al corretto smaltimento dei vecchi dispositivi si proteggono il pianeta e la salute delle persone da possibili conseguenze negative Il riciclo di materiali aiuta a ridurre il consumo di materie prime Il prodotto contiene batterie che sono soggette alla direttiva europea 2006 66 EG e non possono essere smaltite con i normali rifiuti domestici Preghiamo di informarvi sulle regola...

Страница 213: ......

Страница 214: ......

Страница 215: ......

Страница 216: ......

Отзывы: