background image

Detail Settings

3

Detail Settings

c

Note

If you are using PPP, take care when entering the phone number. Also, when

Primarily Call(PPP) is selected, the VB150 will continue calling to the

specified phone number. Be mindful of phone charges that apply when using

Primarily Call(PPP).

If you have selected Primarily Call(PPP), appropriate settings must also be

made on the receiving PC.

If you are using PPP to connect to Windows RAS Server , MS-CHAP cannot

be used for authentication.

Turn the VB150 off before you insert a modem card.

40

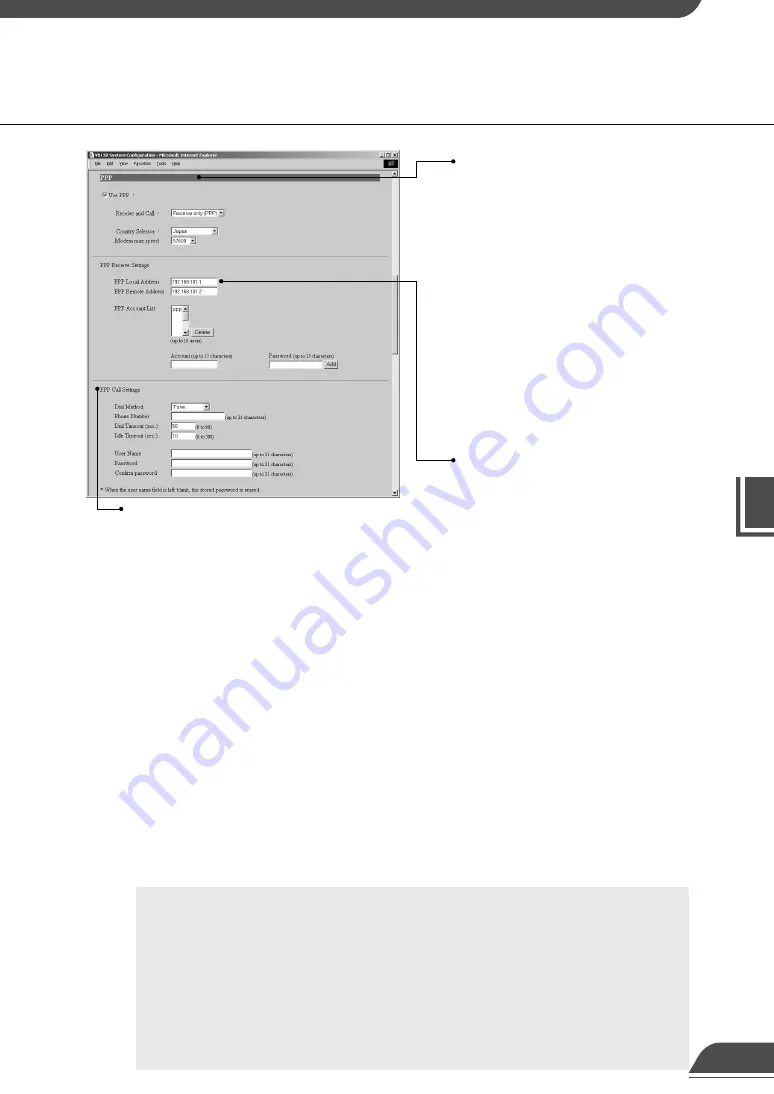
PPP

“Use PPP”
Tick this option to allow PPP connections 
using a modem cards.

“Receive and Call”
If Receive only (PPP) is selected, PPP 
connection will be established by 
incoming call, and if Primarily Call (PPP) 
is selected, PPP connection will be 
established by outgoing call.

“Country Selector”
When the global modem is used, select 
the country where the VB150 will be used. 
This setting is ignored if the global modem 
is not used.

“Modem max speed”
Select the maximum baud rate as the limit 
on the modem speed. Normally, there is no 
need to change this setting. Set a low speed 
when the line condition is poor.

“PPP Local Address”
Sets the local address. If PPP connection 
is established by incoming call, this 
address is set for the VB150 side.

“PPP Remote Address”
Sets the remote address. If PPP 
connection is established by incoming 
call, this address is set for the viewer PC 
or router side.

“PPP Account List”
PPP connection is only permitted to 
accounts with combinations of a name 
and a password that match those included 
in this list. (Passwords are not displayed in 
the list.) If you select an account and click 
the “Delete” button, the combination of a 
account name and a password is removed 
from the list. Up to 

10

  accounts can be 

registered on the list.

“Add PPP Account”
Use this to add account and password 
combinations to the PPP account list. 
Enter the account name and password, 
and click the “Add” button. The account 
name can be up to 15 characters including 
alphanumeric characters, underscores 
and hyphens. Passwords can consist of up 
to 15 ASCII text characters  (space or 
printable characters).

Specify the following settings when Primary call (PPP) 
is selected in the “Receive and Call”. 

“Dial Method”
Select the type of line to be used when PPP 
connection is established by outgoing call.

“Phone Number”
Set the phone number to be dialed when PPP 
connection is established by outgoing call.
Example: 0312345678

“Dial Timeout”
Sets an upper limit on the time you wait for a 
connection when PPP connection is established by 
outgoing call.

“Idle Timeout”
Sets the disconnection time (amount of time that the 
VB150 can remain connected to the network without 
communication) when PPP connection is established 
by outgoing call.

“User Name”
Enter the user name to be used when PPP connection 
is established by outgoing call.

“Password”
Enter the password to be used when PPP connection 
is established by outgoing call.

“Confirm password”
Re-enter the password you entered above to confirm 
the password.

Содержание VB150

Страница 1: ... Appendix VB Administration Tools NETWORK CAMERA SERVER User s Manual Please read this user s manual carefully before operation Be sure to read the aSafe Use of Equipment section before using this equipment Store this manual in a readily accessible location for future reference E ENGLISH ...

Страница 2: ... Canon accepts no liability for any results arising from the operation of this product Trademark Notices Canon and Canon logo are registered trademarks of Canon Inc Microsoft and Windows are registered trademarks of Microsoft Corporation in the United States and other countries Windows is legally recognized as Microsoft Windows Operating System Java and all Java based marks are trademarks or regis...

Страница 3: ...F APEX E pdf Picture Recording User s Guide in PDF HPEX E pdf Guide to Creating Web Pages for Video Distribution in PDF VIEWER E pdf Viewer software users manual Vbfiles complete built in file system The VB150 package contains the following items If any of these items is missing please contact the retailer from which you purchased the product 1 2 3 4 VB150 Introd uction Be fore Us ing the VB 150 S...

Страница 4: ...tely 21 Compatible Cameras Sold separately 21 Compatible Networks 22 Compatible PC Cards Sold separately 22 Compatible Cables Sold separately 22 System Components and Their Operation 23 Chapter 2 Setting Up the VB150 Setup Workflow 27 1 Connecting the camera 29 2 Initializing the VB150 30 3 Checking operation 33 Chapter 3 Detail Settings Detail Settings 35 Accessing the Settings Title Page 35 Sett...

Страница 5: ...etection Setting Tool Display Screen 83 Specifying the Motion Detection Function Settings 85 Setting the Frame Rate 90 Log Viewer 91 Downloading Log Files 91 Viewing the Log 91 Admin Viewer 94 Starting Up Admin Viewer 94 Operating External Devices 95 Enabling Disabling View Restrictions 96 Operating a Camera 97 Appendix Troubleshooting 103 Specifications 105 External Device I O Terminals 106 Syste...

Страница 6: ...erver 47 Appendix Error Messages 54 Index 57 Picture Recording User s Guide APEX E pdf Using the Still Picture Recording Function Linked to an External Device 1 Using the Still Picture Recording Function with a Predetermined Schedule 3 Using the Motion Detection Function with a Predetermined Schedule 5 Viewing and Distributing Recorded Pictures 8 Using VBCollector 13 Guide to Creating Web Pages fo...

Страница 7: ...e the user should refer to this manual are indicated by the d icon accompanied by the relevant page number User s Manual This document Picture Recording User s Guide APEX E pdf This guide describes how to create a dedicated Web page for distributing live video using the VB150 Sections where the user should refer to this manual are indicated by the d icon accompanied by the relevant page number Thi...

Страница 8: ...rd the number and other vital information here and retain this book as a permanent record of your purchase to aid identification in case of theft Date of Purchase Dealer Purchased from Dealer Address Dealer Phone No Model No VB150 Serial No MAC Address a WARNING TO REDUCE THE RISK OF ELECTRIC SHOCK DO NOT EXPOSE THIS EQUIPMENT TO RAIN OR MOISTURE a CAUTION TO REDUCE THE RISK OF ELECTRIC SHOCK AND ...

Страница 9: ... more of the following measures Reorient or relocate the receiving antenna Increase the separation between the equipment and receiver Connect the equipment into an outlet on a circuit different from that to which the receiver is connected Consult the dealer or an experienced radio TV technician for help Use of shielded cable is required to comply with class B limits in Subpart B of Part 15 of FCC ...

Страница 10: ... and cart combination should be moved with care Quick stops excessive force and uneven surfaces may cause the equipment and cart combination to overturn 9 Power Sources The PA V16 AC adapter should be operated only from the type of power source indicated on the marking label If you are not sure of the type of power supply to your home consult your equipment dealer or local power company 10 Polariz...

Страница 11: ...ll power sources including batteries and refer servicing to qualified service personnel under the following conditions a When the power supply cord or plug is damaged b If any liquid has been spilled onto or objects have fallen into the equipment c If the equipment has been exposed to rain or water d If the equipment does not operate normally even if you follow the operating instructions Adjust on...

Страница 12: ...ject falls into the equipment The equipment is damaged in some way 23 Please observe the following when using the equipment Failure to do so can result in a fire or electric shock Do not use flammable sprays near the equipment Do not subject the equipment to strong impacts 12 11 ...

Страница 13: ... 3 Wipe with a dry cloth 4 When you have finished plug the AC adapter back in to the wall outlet Icons Used in This User s Manual Indicates important information that must be observed or actions that are prohibited during an operation These notes must be read to prevent possible faults or damage to the equipment Indicates supplementary information or a reference to an operation Users are advised t...

Страница 14: ...13 ...

Страница 15: ...e VB150 This chapter contains information that you should read before using the VB150 It also describes the features of the VB150 the system overview the operating environment and the name and functions of the system components ...

Страница 16: ...r for Java These viewers can be used to freely control the angle pan and tilt and the zoom magnification of cameras installed in a remote location enabling viewing videos with plenty of ambiance Compatible with the Communication Cameras VC C50i VC C50iR new function of firmware Ver 1 1 In addition to being compatible with the previous VC C4 VC C4R and NU 700 it is now also compatible with the new ...

Страница 17: ...in FTP server Web page data can be sent from a remote location as a file FTP Easy setting and administration Since the VB150 provides settings pages that utilize the Web you can use a PC and Web browser to make settings and perform administrative tasks remotely without going to the location where the VB150 is installed The VB Administration Tools can be used to create panorama pictures view logs a...

Страница 18: ... Line Router L A N VC C4 COMMUNICA TIONCAMERA f 4 64mm 1 1 4 2 8 Video Distributor Video Recipient Capable of distributing live video controlling cameras and modifying settings via the Internet or an intranet VB150 VB150 VB150 Video recorded pictures and picture data Camera control requests and camera server settings Distributes video and picture data via a LAN VC C50i VC C50iR and VC C4 VC C4R VC...

Страница 19: ... Monitors images from multiple cameras at the same time Viewer Software Built into the VB150 Viewer for Java Controls camera angle zoom etc and monitors camera images Viewer Software Supplied Viewer for PC Controls camera angle zoom etc and monitors camera images 18 d The manual for the viewer software Viewer for PC Viewer for Java is provided on the supplied CD ROM VIEWER E pdf Viewer Software Us...

Страница 20: ...ernet Explorer 6 0 SP1 or later Operating System Web Browser Must be installed from the supplied CD ROM P 63 The manual for the viewer software is on the supplied CD ROM VIEWER E pdf Although Ver 3 3 or earlier viewers can be used some of the features are different Therefore we recommend you to use the latest version On Macintosh computers some of the features of Ver 1 2 viewer are not available V...

Страница 21: ... color Hard Disk Sound 1024 768 with 16 bit color A high performance video card is desirable With PCI video cards display performance may be reduced 1GB RAM or greater For more than 16 Camera Servers 1GB or greater required Audio playback support is necessary for event notification alert sounds Display Multipoint Recording Software for Monitoring Use Sold separately Videos distributed from VB150 c...

Страница 22: ...cation Camera VC C50i PC CPU Pentium III 600 MHz or better RAM 128 MB or better Hard disk capacity 50 Mbytes or better MV 20 MB or better LE Windows Me Windows 2000 SP1 or later Windows XP Operating System Microsoft Internet Explorer 5 0 or later required Web Browser XGA 1024 768 or better 16 bit color display or better Display Viewer Software for Monitoring Use Sold separately If WebView Livescop...

Страница 23: ...r camera control P 2 is also available in lengths other than the ones provided Also note that the supplied RS 232C cable for camera control cannot be used for the VC C50i VC C50iR and NU 700 For further information contact your Canon dealer Compatible Networks 10Base T 100Base TX Ethernet auto negotiation Wireless LAN using an operation confirmed wireless LAN card Public Switched Telephone Network...

Страница 24: ...ng access lit orange 100 LED Shows the Ethernet 100 10 operation mode 100Base TX lit green 10Base T off Tx Lnk LED Shows the Ethernet transmission status Normal connection lit green During transmission lit orange Col Rx LED Shows the Ethernet receiving status Receiving lit green Collision lit orange e Tip When you turn the VB150 power on the power LED glows orange for several seconds and then turn...

Страница 25: ...tton with a pointed object and as you plug the AC adapter into the wall outlet P 112 100 10 BT Ethernet connector 100Base TX 10Base T auto negotiation Camera control connector CC1 CC2 RS 232C with one touch lock Video input sockets V1 V2 RCA pin jack Video input sockets V3 V4 BNC connector e Tip The video cable supplied with the Canon Communication Camera VC C4 VC C4R is compatible with the RCA pi...

Страница 26: ...25 ...

Страница 27: ...Chapter 2 Setting Up the VB150 This chapter describes how to connect up the equipment in the system how to specify the basic system settings and how to check that the camera image is displayed correctly ...

Страница 28: ...ra can be controlled Connecting the camera 1 VC C4 COMMUNICATIONCAMERA f 4 64mm 1 1 4 2 8 VC C4 COMMUNICAT IONCAMERA f 4 64mm 1 1 4 2 8 VC C4 COMMUNICAT IONCAMERA f 4 64mm 1 1 4 2 8 Dc In 13V In Out 100 10BT CC1 RS232C Video In Ethernet CC2 V1 V2 V3 V4 Slot A Slot B 1 2 2 1 A B A B VC C4 COMMUNICATIONCAMERA f 4 64mm 1 1 4 2 8 Initializing the VB150 2 Connect the cameras to the VB150 using the cabl...

Страница 29: ...Setting Up the VB150 2 Checking operation 3 Access the VB150 from a Web browser Display the video from the top page of the camera server and check that video is displayed properly P 33 28 ...

Страница 30: ...he VB150 The RS 232C cables are connected to the CC1 and CC2 port on the VB150 and the video cables are connected to V1 and V2 In this way one camera is connected to CC1 V1 and the other to CC2 V2 The video cable is supplied with the VC C4 VC C4R When using the VC C50i VC C50iR please purchase a separate cable 29 c Note The video cable supplied with the Canon Communication Camera VC C4 VC C4R is c...

Страница 31: ...ck the VB Initial Setup Tool VBSetup exe to launch the program Wall Outlet AC cable AC adapter VB150 If the VB150 will not be used for some time unplug the AC adapter from the wall outlet The VB150 has no power switch To turn the VB150 off and on unplug the AC adapter When you unplug the AC adapter from the wall outlet wait at least 5 seconds and then plug the AC adapter into the wall outlet Be su...

Страница 32: ...f them are displayed Select a MAC address to be used for initial setup by clicking on it then click the Initial Setup button When the Initial Setup dialog box appears enter the user name and password set as the factory defaults User Name root Password VB150 Then enter the IP address and subnet mask you want to set for the VB150 If you want to specify a default gateway address enable the Set the de...

Страница 33: ...ubnet mask and default gateway address settings If 20 minutes or more passes after the VB150 is turned on the VB150 stops sending requests for IP addresses allocation and they cannot be detected using this tool If this occurs restart the VB150 VBSetup exe can only be used for the Ethernet settings Use the Network Settings page for the wireless LAN PPP and PPPoE settings P 39 41 To restore the fact...

Страница 34: ... VB150 appears URL http IP address Click the Using Viewer for Java button and check that the video is displayed properly Example of Viewer for Java e Tip The Using Viewer for PC on the top page must be installed before use P 19 dViewer Software User s Manual P 26 We recommend that you create a panorama picture P 67 Operation checking is now complete The picture displayed in the viewer is an exampl...

Страница 35: ...apter 3 Detail Settings This chapter describes the method for specifying detailed settings The VB Administration Tools described in Chapter 4 provide a convenient way to set view restrictions and presets ...

Страница 36: ...e path component can be changed at any time on the System Settings page P 37 The various settings on the VB150 are specified by using a browser to access Web pages on the VB150 You begin by accessing the Settings Title Page Settings Title Page 35 You are now asked for your user name and password In the factory default settings the user name is root and the password is VB150 Enter these settings Th...

Страница 37: ...nges are discarded and returns to its previous values If no settings have been changed these 2 buttons are not displayed Clicking on the titles displays each setting pages Settings Title Page for VB150 Settings Title Page From this settings title page you can move to each settings pages and confirm the changes to the settings write the changes to the VB150 memory and perform restarts c Note Do not...

Страница 38: ...must be matched to the time when the button is clicked Others Device Name Sets the device name The device name is used as the subject in log mail P 58 as a message body parameter specification in picture mail P 49 and is used in MV 2 1 MV Manual P 23 The device name can consist of up to 31 alphanumeric characters and can include underscores and hyphens Example If Tokyo showroom is set as the devic...

Страница 39: ...y address in the Default Route field P 41 Contact the network administrator for the IP address subnet mask and default gateway address settings Network Settings Page Use this page to specify the settings for connecting to an Ethernet Wireless LAN PPP or PPPoE network For a LAN connection specify Ethernet settings and for a wireless LAN connection specify wireless LAN settings For connection made w...

Страница 40: ...same encryption keys Select 64 bit or 128 bit as the Key Length used enter the encryption key and then select the key to be used for transmission in the Default key Contact the network administrator for the IP address subnet mask and encryption settings Match the WEP to the hexadecimal setting for the communications access point Only hexadecimal values can be entered on the VB150 If a wireless LAN...

Страница 41: ...ter side PPP Account List PPP connection is only permitted to accounts with combinations of a name and a password that match those included in this list Passwords are not displayed in the list If you select an account and click the Delete button the combination of a account name and a password is removed from the list Up to 10 accounts can be registered on the list Add PPP Account Use this to add ...

Страница 42: ... a gateway address if you are using a router on an Ethernet or wireless LAN network Connection Keeping When this is selected an ICMP Echo packet is transmitted periodically to a specified address in order to maintain the network connection Send packet regularly Tick this check box to enable this function Target Address Specify where the packet should be sent Interval min In minutes from 1 to 60 sp...

Страница 43: ...s used and the settings below are enabled Camera Name Used in the camera selection box on the viewers This setting is required Wide Converter Always select Used when a wide angle converter for VC C50i VC C4 is mounted on the camera Video Capture Size The available settings are 640 240 320 240 and 160 120 Video Quality Enter a value between 1 and 99 The greater the value the better the quality Howe...

Страница 44: ...dministration Tools P 77 Pan Sets the pan position of the camera Tilt Sets the tilt position of the camera Zoom Sets the value for the camera s angle of zoom Brightness Sets the target value for the camera s auto exposure feature Select Brighter if the picture is too dark due to backlight or other factors View Restriction If you tick the Apply view restriction option the settings below are enabled...

Страница 45: ... connected to 2 camera control connectors In cascade connections if an abnormality occurs with the first camera in the connection control for all other cameras in the cascade may not work normally Detail Settings VC C4 COMMUNICATIO NCAMERA f 4 64mm 1 1 4 2 8 VC C4 COMMUNICATIO NCAMERA f 4 64mm 1 1 4 2 8 VC C4 COMMUNICATIO NCAMERA f 4 64mm 1 1 4 2 8 VC C4 COMMUNICATIO NCAMERA f 4 64mm 1 1 4 2 8 1 2...

Страница 46: ...100 to 100 Controllable range Angle Tilt control range 30 to 90 Zoom control range with wide converter 3 7 to 47 4 6 to 61 Horizontal video capture range with wide converter 124 to 124 131 to 131 Pan control range 170 to 170 Controllable range Angle Tilt control range 90 to 10 Horizontal video capture range 180 to 180 Vertical video capture range 108 to 28 Zoom control range 3 7 to 47 Pan control ...

Страница 47: ...eyond the permitted range Consequently the angle of movement is automatically reduced CO MM UN ICA TIO N CA ME RA f 4 6 4 m m 1 1 4 2 8 CO MM UN ICA TIO N CA ME RA f 4 6 4 m m 1 1 4 2 8 Zoom out wide angle Automatically pans COMMUNICATION CAMERA f 4 6 4 m m 1 1 4 2 8 COMMUNICATION CAMERA f 4 6 4 m m 1 1 4 2 8 COMMUN ICATION CAMERA f 4 6 4 m m 1 1 4 2 8 Captured range Restricted range of visibility...

Страница 48: ...he value for the camera s angle of zoom Brightness Sets the target value for the camera s auto exposure feature Select Brighter if the picture is too dark due to backlight or other factors Preset Settings Page Use this page to specify the settings for preset camera positions provided to users Using the VB Administration Tools is a convenient way to set presets P 77 Click the OK button to change th...

Страница 49: ...are deleted Picture Recording and External Device I O Settings Page Use this page to specify the operating condition for the picture recording function Settings on this page can be used to record still pictures in response to inputs from an external device sensor etc and based on a predetermined schedule up to 30 000 pictures c Note Still pictures are recorded on a flash memory card sold separatel...

Страница 50: ...ice settings P 50 and Mail settings P 57 With picture recording triggered by schedule P 52 recorded pictures cannot be sent as Picture Mail Reason for shot number 1 external device input 1 2 external device input 2 129 Motion detection n Reason for shot text External Device Input Name External Device Input 1 2 if omitted Motion detection N Parameter Description Values For undefined characters the ...

Страница 51: ... to Home 4 or Preset 1 to Preset 8 Send recorded pictures by e mail You need to make Mail settings P 57 Output to External Device 1 2 Tick this check box when you want to control output to an external device Keep in mind that output to an external device may not always be possible from Admin Viewer or WebView Livescope MV Ver 2 0 2 1 Delay following OFF event sec When controlling output to an exte...

Страница 52: ...nt recording for an ON event Fixed at 1 sec intervals 4 to 0 B Post event recording for an ON event Fixed at 1 sec intervals 0 to 10 C Recording between ON event and OFF event exclude B and D D Pre event recording for an OFF event Fixed at 1 sec intervals 4 to 0 E Post event recording for an OFF event Fixed at 1 sec intervals 0 to 10 For A and D recording is controlled to the pre event recording t...

Страница 53: ...etition options at start time Picture recording and output to the external device after the Start Time is repeated at the number of times specified in Repetition interval min and No of repetitions Specify No of repetitions between 1 and 60 at the interval Specify Repetition interval min between 1 and 10 minutes Click the OK button to change the settings To discard the changes click the Cancel butt...

Страница 54: ... this list to WebView Livescope When this is selected the list is applied to the host that can access the WebView Livescope server Use this when you want to restrict access from the Viewer for PC or Viewer for Java etc Apply this list to HTTP server When this is selected the list is applied to the host that can access the HTTP server In this case control extends also to the Viewer for Java etc Use...

Страница 55: ...osts If the entry obtained begins with access is denied If not access is authorized Redundant or contradictory entries included in the list are automatically deleted If the given address does not belong to any of the entries access is authorized Listing Guidelines If the list of authorized and restricted hosts contains an error access that was originally permitted may subsequently be denied To avo...

Страница 56: ... 0 20 Access from hosts with IP addresses from 172 20 0 0 to 172 20 0 20 is prohibited except for the hosts with addresses between 172 20 0 10 and 172 20 0 15 from which access is permitted c Note If you do not make a list access is permitted to all hosts If the list provided prohibits access for all hosts the Host Restriction function is disabled and access is permitted to all hosts To prohibit a...

Страница 57: ...um is 10Mbps and enter an integer of 0 to 10Mbps 0 is limitless Maximum View Time sec Sets the maximum time the client can view video using the viewer Enter a value between 0 and 65535 A setting of 0 disables the time limitation Maximum Camera Control Time sec Sets the maximum time for which camera control privileges can be maintained under the viewer Enter a value between 1 and 3600 Camera Stabil...

Страница 58: ...2 addresses the remaining fields can be left blank Use DNS Update Register the host name when operating the VB150 with Auto Setting DHCP P 38 Mail Recorded pictures and log messages are emailed to the specified recipient address via the specified mail forwarding server using the SMTP Mail Server Host Specifies the SMTP server Sender s From Mail Address Specifies the mail sender Recipient Mail Addr...

Страница 59: ... size is specified in Maximum Log File Size and if the log file exceeds the specified size back up files named log 0 are created Only the number of back up log files that are specified in Maximum Log File Number N 1 will remain These will be listed in the order log 0 log 1 log N For example if Maximum Log File Number is set to 10 files named log 0 log 1 log 9 will be created in the same directory ...

Страница 60: ...ent of that memory card erased files etc on another PC Deletion of recorded pictures Deletes pictures recorded on a card Specify the delete criteria below and then click the Delete button Time Select the period of time following the recording of the pictures after which the pictures are deleted Event Select whether the pictures to be deleted are those where recording was performed in response to i...

Страница 61: ... in order to create panoramas set view restrictions make presets set motion detections view logs and use the Admin Viewer Although view restriction and preset settings can be made following the procedures described in Chapter 3 the VB Administration Tools makes it easier to adjust these settings ...

Страница 62: ...ma Creation Tool View Restriction Tool Preset Setting Tool Motion Detection Setting Tool Log Viewer and Admin Viewer applications Operations such as setting the VB150 or viewing pictures from a remote location with special privileges checking operating status or obtaining logs are easily performed through the Internet or Intranet Privileged viewing and operation VB150 VC C4 COMMUNICA TIONCAMERA f ...

Страница 63: ...le referring to panorama previews Log Viewer P 91 This tool enables viewing of operation status logs that are output to the VB150 Admin Viewer P 94 This tool has a special privileges function aimed at administrators of the VB150 Use it when setting presets view restrictions etc Motion Detection Setting Tool P 82 This is a tool for specifying the Motion Detection function settings It allows you to ...

Страница 64: ...the CD ROM drive Double click AdmSetup exe on the CD ROM to start up the installer Click the Next button 2 Specify the target directory for the installation and click the Next button If you have no special directory preference just click Next 3 Specify the menu name to be registered in the Program menu of the Start button then click Next 4 Check the settings and items you have selected thus far an...

Страница 65: ... installing VB Administration Tools VB Administration Tools Ver 1 0 1 1 WebView Livescope Helper Viewer Ver 3 1 or earlier WebView Livescope Camera Server WebView Livescope Manager WebView Livescope MV Manager Ver 1 0 WebView Livescope MV Station Ver 1 0 When installation is complete two icons are created on the desktop VB Admin Tools and Admin Viewer 64 Also When Program WebView Livescope is sele...

Страница 66: ... VB150 is to pass through a proxy server Host Name Specify the host name or IP address of the proxy server Port Enter the port number of the proxy server The default setting is 8080 Use HTTP Proxy Server Click to automatically gather proxy server information set in Internet Explorer Starting Up VB Administration Tools VB Administration Tools can be started up using the icon created on the desktop ...

Страница 67: ... Setting Tool Motion Detection Setting Tool and Log Viewer and Admin Viewer can be started up from the Startup Panel by clicking on each button 3 e Tip The Panorama Creation Tool View Restriction Tool Preset Setting Tool and Motion Detection Setting Tool cannot be started up simultaneously Log Viewer and Admin Viewer can be started up at the same time If the connection to the VB150 is made through...

Страница 68: ... to take and create panorama pictures of the camera connected to the VB150 After being created the panorama picture can be viewed when accessed from the viewer The Panorama Creation Tool is used to take and create panorama pictures and save them in the VB150 Without a panorama picture With a panorama picture 67 ...

Страница 69: ...ra Selection box In this selection box cameras for capturing panorama pictures can be changed or selected from the cameras connected to the VB150 2 3 4 5 6 7 8 10 6 1 7 9 8 9 10 Camera model and captured date display The model of camera currently connected and the date the panorama picture was captured if one was captured are displayed here Panorama picture display Shows the panorama picture that ...

Страница 70: ...To Capture In the Camera Selection box select the camera to be used for capturing select the AE lock position and whether or not to use backlight adjustment then click the Capture button The following dialog appears when NU 700 P 21 is used The capturing process takes approximately 5 minutes in Quick Mode and 30 minutes in High quality Mode 2 Capturing starts To stop capturing while it is in progr...

Страница 71: ...choose Update Panorama Image from the Server menu When the panorama picture is updated the VB150 automatically restarts and the connection with VB Administration Tools is cut A dialog box asking whether or not to reconnect to the VB150 appears after the VB150 restarts Since reconnection occurs when OK is clicked it is possible to continue capturing and updating panorama pictures with a different c...

Страница 72: ... can be retrieved from picture files or saved as picture files To retrieve a picture file and use it for a panorama picture choose Open from the File menu When the dialog box appears select the picture file you want to use To save a captured panorama picture as a picture file choose Save from the File menu When the dialog box appears select the folder where the file is to be saved and enter the fi...

Страница 73: ...et using mouse operations such as dragging while viewing the panorama picture Setting the viewing area with the View Restriction Tool For example in cases where you want to set restrictions on zoom or a portion of the field of view when videos are dis tributed live or in other such instances theView Restriction Tool lets you easily set view restrictions Only the range set in the view restriction i...

Страница 74: ...eview Displays the panorama picture of the camera currently selected with this tool The frames that reproduce the values of all the view restriction settings are displayed on the panorama picture These frames can be displayed when Apply the view restriction is selected The view restrictions can be set by dragging the mouse to change the shapes of the frames View Restriction Preview frames Pan Tilt...

Страница 75: ...Get Value button Telephoto Value for the telephoto limit of the view restriction The zoom value of the selected camera angle is obtained using the Get Value button Wide angle Value for the wide angle limit of the view restriction The zoom value of the selected camera angle is obtained using the Get Value button Apply button Sends to the VB150 the current view restriction settings edited with this ...

Страница 76: ... values will be saved to the VB150 2 Setting View Restrictions To Make Settings From the Camera Selection box select the camera to be set and select Apply the view restriction Set the view restrictions by using the mouse to move or change the shape of the Pan Tilt Preview Frame red Telephoto Preview Frame yellow and Wide angle Preview Frame green displayed on the panorama picture When enlarging or...

Страница 77: ...ghtly different from the actual picture after the view restrictions have been set please check to be sure the viewer is correctly reflecting the view restrictions in the actual picture In this event since Admin Viewer normally operates the camera irrespective of the view restriction settings please choose View Restriction ON from the Privilege menu P 96 When you want to clear the view restriction ...

Страница 78: ...y way to set the preset functions of the VB150 Settings can be made using simple mouse operations such as clicking and dragging while referring to the panorama picture You can also set the home position with this tool Setting presets using the Preset Setting Tool Reflecting preset settings to the viewer 77 ...

Страница 79: ...eset settings can be used by the viewer When this is checked presets are used for picture recording only when it is not checked presets can be used not only for picture recording but for the viewer as well If you selected Home in the Preset Selection box this setting will be grayed out setting not possible Panorama Preview Displays the panorama picture of the camera currently selected with this to...

Страница 80: ...eved as camera parameters Apply button Sends to the VB150 the current preset settings edited with this tool You can go to the next preset settings by clicking this Apply button At this stage the edited settings are not yet saved to the VB150 Be sure to click the Save Settings button to save the settings to the VB150 Preview button Reflects the specified camera parameters to the Preset Preview fram...

Страница 81: ... on the panorama picture to move or change its shape and set the preset Alternatively you can click at a spot on the picture to make the center of the frame move to that point 1 Changing Settings from the Preset Preview Frame The Preset Preview frame on the panorama picture can be used to set presets Preset Setting Tool 80 To Make Settings From the Preset Selection box select the preset to be set ...

Страница 82: ...nnot be used in the Viewer for PC In the Viewer for Java use of the presets can be disabled by changing the LiveApplet parameters and disabling the Preset Selection box display 3 Click the Apply button Check the Status List to be sure the values were applied correctly Then when the Save Settings button is clicked the values will be saved to the VB150 2 Use Admin Viewer to move the camera angle to ...

Страница 83: ...r the Motion Detection Function which records pictures sends data to external devices and records data in the log when there is a change to all or part of the video image resulting from objects moving around This tool allows you to monitor the image from the camera while you set the area of motion detection set the detection sensitivity and specify the actions performed when motion is detected Ref...

Страница 84: ...h between cameras Video display area Displays and controls the camera image Camera control privileges can be acquired using the Start Control button the pan and tilt scroll bars the zoom scroll bar and the backlight compensation button and the camera can be controlled in the same way as a normal viewer It also displays the location where this tool will look for motion Motion detection area frame T...

Страница 85: ...8 while selecting High limits the available sensitivity range to 129 to 256 Detection indicator Shows the Area Ratio and the status of the variations in the image This indicator provides a guide for checking the motion detection settings Area Ratio scroll bar Dragging the Area Ratio scroll bar sets the proportion of the preset motion detection area dotted frame that is occupied by the area in whic...

Страница 86: ...on detection Set the schedule and then enable motion detection according to that schedule To Make Settings Select the Enable motion detection checkbox Click the Always detect motion radio button to select it To Make Settings Select the schedule you want to set in the Schedule selection box and then select Enable this schedule Set the starting and ending times 2 Select the Enable motion detection c...

Страница 87: ...ules with the same detection settings Sensitivity Area Ratio Duration is to copy and paste the settings using Copy Motion Detection Parameters and Paste Motion Detection Parameters in the Edit menu Setting the detection location and area 1 Select the registered preset name in the Detection preset selection box The available presets must be registered beforehand using the Preset Setting Tool P 77 T...

Страница 88: ... the amount of motion required before the red rectangle is displayed while monitoring the actual image When the variation occurs in the image the detection indicator shows the following Green The area of the change was smaller than the specified area ratio Yellow The area of the change equalled or exceeded the specified area ratio If all the detection conditions are satisfied and motion is detecte...

Страница 89: ... occurs in the image exceeds the specified area ratio dragging the button on the Duration scroll bar sets the time limit for which such motion must continue before it is regarded as detected motion The available settings are 0 to 5 seconds Also if motion is detected but the area becomes less than the area ratio the motion detected status is maintained for the duration set here To Make Settings 1 2...

Страница 90: ...status of the server option is selected external device and log output and picture recording are not performed e Tip When the VB150 Motion Detection Function is enabled the processing load on the VB150 is high Consequently the video distribution frame rate may be slower than when the function is disabled Also because the video distribution frame rate may be further slowed when the data is sent via...

Страница 91: ...ol Select the Enable frame rate setting checkbox and set a value between 0 5 and 30 0 fps as the Frame rate The Update frame rate display every setting determines the frequency with which the frame rate shown in the Status bar is updated Set an interval between 1 and 10 seconds 2 To Make Settings Select Options in the View menu 1 Click the Save Settings button Check the Status bar to determine whe...

Страница 92: ... it To retrieve a list of log files choose Download from the File menu To abort the download while it is in progress click Cancel in the dialog box 2 When the list is retrieved a list of log files appears in the dialog box Select the log file you want to view by clicking on it then click the Download button and the selected file will be downloaded To abort the download while it is in progress clic...

Страница 93: ...ion is displayed Information level Warning level Date Time The date and time when the log was generated is displayed Message Log messages are displayed Error level Unknown 92 Saving a log to a file opening a saved file You can save a displayed log to a file You can save the log you are currently viewing to a file by choosing Save from the File menu To view a log file you have saved previously spec...

Страница 94: ...codes start with A0 will be displayed Date Time Specify Start Date Time Logs generated after the specified date and time can be displayed by selecting this item and entering a date and time Specify End Date Time Logs generated before the specified date and time can be displayed by selecting this item and entering a date and time e Tip Application HTTP Server Driver and System correspond to the Log...

Страница 95: ...viewer is provided on the supplied CD ROM VIEWER E pdf About the special privileges of administrators Since Admin Viewer has more special privileges than the Viewer for PC and Viewer for Java please keep in mind the following points when using Admin Viewer Since connection time is unlimited please exit the viewer after viewing When camera control privileges have been obtained Admin Viewer forcibly...

Страница 96: ... click OK 2 Displaying and saving the external device input status The external device input and motion detection statuses can be displayed and when required saved as a log To Set External Device Input Choose External Device Input from the Privilege menu 1 A message appears in the event a change occurs in the external device input status or when motion is detected c Note If the Admin Viewer window...

Страница 97: ...on Detect dialog box appears and the external device input and motion detection statuses are displayed To save this content as a log click Save then specify a file name and where it should be saved To clear the content in the display click Clear To close the dialog box click Close 2 The External Device Output dialog box appears The external device output status can be changed using the ON OFF butt...

Страница 98: ...n the Far or Near buttons The Admin Viewer provides camera control methods not available in the Viewer for PC or Viewer for Java Pan Tilt Home buttons Pan and Tilt movements occur in the direction of the arrows on the buttons Operation occurs when the button is held down and stops when it is released The center button is the Home button which when clicked returns the camera to its home position Sp...

Страница 99: ...ab Check to be sure the Use the arrow buttons to control the camera when connected to a VB150 or newer model check box is selected then click OK 2 Set the mouse cursor over the viewer There are eight arrows such as the up arrow at the top of the screen and the down arrow at the bottom of the screen for making changes with the mouse cursor There are also two central buttons plus on the left and min...

Страница 100: ...specified Refer to the User s Manual supplied with the NU 700 for details 2 Controlling VC C50i VC C50iR VC C50i VC C50iR specific features can be used Click the Camera specific features button on the toolbars 1 To Make Settings Manual Exposure Digital Zoom Night Vision and Infrared Light settings can be specified Refer to the manual supplied with the VC C50i VC C50iR for details 2 99 ...

Страница 101: ...ialog box appears click the Camera Control tab Tick Reset exposure and focus settings at disconnecting and then click OK When quitting the Admin Viewer the exposure and focus settings are reset to the initial settings below The exposure setting in the Camera specific features dialog box is reset to automatic exposure The focus setting in the Advanced Camera Control dialog box is reset to the initi...

Страница 102: ...101 ...

Страница 103: ...Appendix ...

Страница 104: ...g as on the viewer PC If you cannot see the video using the Viewer for Java check system settings such as the browser version P 19 Up to date information is provided at the following URL http www canon com webview To view video using the Viewer for PC it must first be installed Please install Viewer for PC after confirming the operating environment P 19 Check whether the video transmission port ha...

Страница 105: ...Size P 48 If there is an error in the search results try to recover the index card images index vbi Click on the Rebuild button Rebuilding of recorded picture list on the Administration Tools settings page to recover the index P 59 The wireless LAN card does not work and communication fails If you are using Infrastructure mode check whether the ESS ID specified on the VB150 matches the ESS ID of t...

Страница 106: ...ness shutter speed focus mode view restriction camera control time control queue length VC C50i VC C50iR VC C4 VC C4R and NU 700 Access control password host maximum view time service period number of concurrent connections max 50 Interface Video input Serial port Network PC card slot Display LED 4 NTSC PAL BNC 2 RCA 2 RS 232C 2 mini DIN8 camera control Ethernet 1 RJ45 100Base TX 10Base T auto neg...

Страница 107: ...oller See Picture Recording and External Device I O Settings Page P 48 for information on the settings Connect any sensors and switches to terminals with electrically separate GND terminals and power supplies External Device Output Terminals Out1 Out2 The external device output terminals consist of 2 white terminals Out1 and Out2 Both terminal combinations are peers The Internal controller switche...

Страница 108: ...net Ethernet 10 100Mbps Sample system configuration VC C4 COMMUNICA TIONCAMERA f 4 64mm 1 1 4 2 8 VC C4 COMMUNICA TIONCAMERA f 4 64mm 1 1 4 2 8 VC C4 COMMUNICA TIONCAMERA f 4 64mm 1 1 4 2 8 VB 150 VB 150 System Configuration This system configuration consists of the VB150 with Viewer Software P 19 The Viewer Software consists of the Viewer for PC and the Viewer for Java The Viewer for PC must be i...

Страница 109: ... SMTP server or a Syslog server is required This example shows the VB150 connected in a dialup environment In this configuration video can be accessed by viewers which can dial up to the VB150 using a modem In this situation a modem card must be inserted into the card slot use an operation confirmed modem card PPP Point to Point Protocol is used as the network protocol For information on settings ...

Страница 110: ... as required HTTP WWW SMTP mail Syslog log ISDN leased line ADSL etc Analog line ISDN leased line ADSL etc Internet Router PPPoE ADSL modem VB150 VB150 Sample Internet Environment Configuration This example shows an environment in which the VB150 is connected to the Internet In this case one fixed global address is required for the VB150 See d Guide to Creating Web Pages for Video Distribution P 2...

Страница 111: ...Wireless LAN Environment Configuration This example shows the VB150 connected to a wireless LAN In this configuration you need to insert a wireless LAN card into the VB150 card slot Refer to P 39 for details about the settings Use an operation confirmed wireless LAN card Details are available at the following URL http www canon com webview 110 Sample Network Configurations ...

Страница 112: ...rator Name Server administrator user name P 37 Administrator Password Server administrator password P 37 4 Store the transferred firmware in flash ROM 3 Specify the firmware file to be transferred to the server 5 The completion window appears Visit the following Web site URL http www canon com webview for the latest information on new firmware c Note Do not turn the VB150 off until the completion ...

Страница 113: ... P 59 Click the Restore button to restore all the factory default settings except for the System P 37 and Network P 38 41 settings Note that once this button is clicked the VB150 will restart automatically to restore the settings so that you cannot cancel the process This button can be used when the VB150 is accessible via the network Use this button when you want to restore the settings other tha...

Страница 114: ...her slot But if flash memory cards are inserted in both slots you cannot use both cards at the same time Preparation is complete when the LED on the front of the VB150 changes from green to orange Create the directories Create directories named htdocs and logs for Web page data hereafter referred to as content and log data respectively on the flash memory card You can create the directories using ...

Страница 115: ...Camera Name Wide converter Video Capture size Video Quality Camera control port Cascade Number Item Setting 1 y m d Item setting 2 y m d Wireless LAN Network Mode Channel ESS ID IP address Subnet mask Use Station Authentication EAP MD5 User Name Password Enable WEP Key Length Key 1 4 Default Key Use Ad Hoc 10 ANY 192 168 150 1 255 255 255 0 No check None None No check 64bit 00 Key 1 PPP Receive an...

Страница 116: ...es IP Address Host Name Name Server Address 1 Name Server Address 2 Name Server Address 3 Use DNS Update Host name IP Address Mail Server Host Sender s Mail Address Recipient Mail Address PoP before SMTP User Name Password POP Server Use a dialup connection for sending e mail Syslog Server Host Max Log File Number Max Log File Size Kbytes Log mail collection time Handling of Error Handling of Warn...

Страница 117: ...40 Create the directories 113 D Device name 37 49 Detection indicator 84 87 Dial timeout 40 Dialup 57 DNS 57 Duration 84 86 87 88 E Error code 92 93 ESS ID 39 104 Event 50 51 59 External device 24 48 49 50 51 52 58 59 82 94 95 104 107 F Factory default setting 24 35 37 49 55 59 103 112 113 114 Field of view angle 43 45 47 79 Filter 89 91 93 Firewall 107 Firmware 111 Flash memory card 19 24 48 58 1...

Страница 118: ...iew 73 76 78 81 Panorama Creation Tool 61 67 Parameter 42 47 49 79 81 86 Password 31 35 37 40 53 65 94 103 111 112 PC card 22 23 24 59 93 113 Picture mail 37 49 Picture recording 43 48 50 51 52 59 78 81 82 93 Port number 65 71 Power supply 23 29 30 32 39 103 111 112 PPP 32 40 41 57 108 109 Preset 47 50 52 84 86 104 Preset Setting Tool 62 77 84 Preview 73 75 78 80 Proxy 55 65 89 R RCA pin jack 24 2...

Страница 119: ...put socket 24 42 44 Video quality 42 48 89 103 Video signal 31 42 View restriction 42 43 45 46 72 73 75 78 81 96 View Restriction Tool 62 66 72 View time 56 Viewer for Java 18 19 33 47 53 81 94 103 107 Viewer for PC 18 19 33 47 48 53 81 94 103 107 W Web browser 19 20 33 107 113 WebView Livescope MV LE 18 21 37 42 50 53 64 WEP 39 Wide converter 21 42 45 Wireless LAN 22 24 32 38 39 41 104 110 Z Zoom...

Страница 120: ...h Street N E Calgary Alberta T2E 7K7 CANON CANADA INC MONTRÉAL 5990 Côte de Liesse Montréal Québec H4T 1V7 If you have any questions call the CANON CANADA Customer Information Centre toll free at 1 800 OK CANON 652 2666 Canada only MEXICO CANON MEXICANA S DE R L DE C V Periferco Sur No 4124 Col Ex Rancho de Anzaldo C P 01900 México D F México CENTROY SURAMERICA CANON LATIN AMERICA INC 6505 Blue La...

Отзывы: