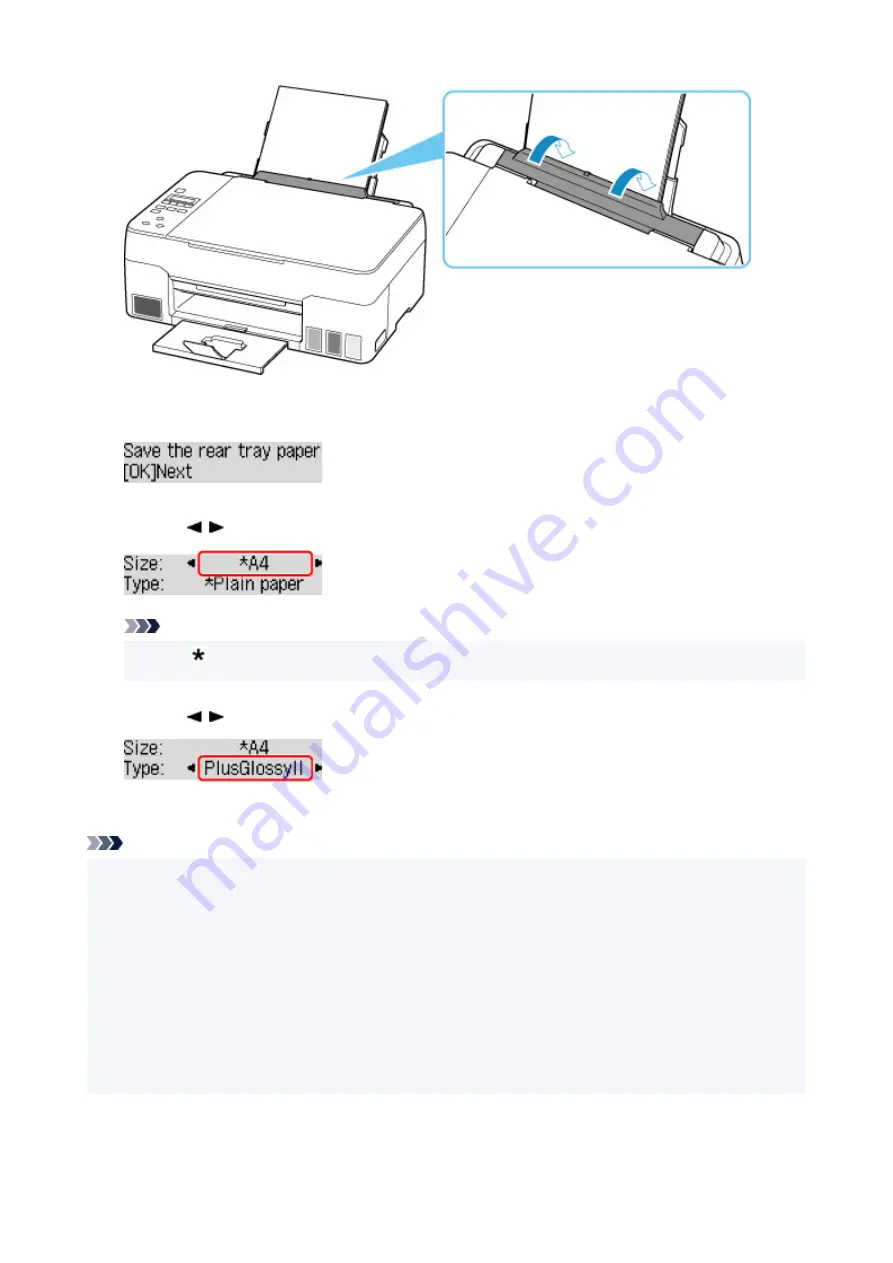
9.
Press the
OK
button.
10.
Use the button to select the size of the loaded paper, then press the
OK
button.
Note
• The (asterisk) on the LCD indicates the current setting.
11.
Use the button to select the type of the loaded paper, then press the
OK
button.
Follow the instructions of any messages displayed to register the paper information.
Note
• There are various types of paper, such as paper with a special surface coating for printing photos at
optimal quality and paper suitable for documents. Each media type has specific preset settings (how ink
is used and sprayed, distance from nozzles, etc.), that allow you to print to that type with optimal image
quality. The wrong paper settings may cause poor printout color quality or scratches on the printed
surface. If you notice blurring or uneven colors, increase the print quality setting and try printing again.
• To prevent incorrect printing, this printer has a function that detects whether the settings for the paper
loaded on the rear tray matches the paper settings. Before printing, make print settings in accordance
with the paper settings. When this function is enabled, an error message is displayed if these settings
do not match to prevent incorrect printing. When this error message is displayed, check and correct the
paper settings.
35
Содержание PIXMA G2020 Series
Страница 1: ...G2020 series Online Manual English ...
Страница 29: ...Handling Paper Originals Ink Tanks etc Loading Paper Loading Originals Refilling Ink Tanks 29 ...
Страница 30: ...Loading Paper Loading Plain Paper Photo Paper Loading Envelopes 30 ...
Страница 40: ...Note Do not load envelopes higher than the load limit mark F 8 Close feed slot cover gently 40 ...
Страница 50: ...50 ...
Страница 51: ...Refilling Ink Tanks Refilling Ink Tanks Checking Ink Level Ink Tips 51 ...
Страница 62: ...Adjusting Print Head Position 62 ...
Страница 79: ...10 Turn the printer on 79 ...
Страница 82: ...Safety Safety Precautions Regulatory Information WEEE EU EEA 82 ...
Страница 107: ...Main Components and Their Use Main Components Power Supply LCD and Operation Panel 107 ...
Страница 108: ...Main Components Front View Rear View Inside View Operation Panel 108 ...
Страница 110: ...I Platen Load an original here 110 ...
Страница 146: ...Information about Paper Supported Media Types Paper Load Limit Unsupported Media Types Handling Paper Print Area 146 ...
Страница 155: ...Printing Printing from Computer Printing Using Operation Panel Using PIXMA MAXIFY Cloud Link Paper Settings 155 ...
Страница 187: ...In such cases take the appropriate action as described Related Topic Canon IJ Status Monitor Description 187 ...
Страница 218: ...Related Topic Canon IJ Status Monitor 218 ...
Страница 220: ...Printing Using Canon Application Software Easy PhotoPrint Editor Guide 220 ...
Страница 224: ...Copying Making Copies Basics Reducing Enlarging Copies Special Copy Menu 224 ...
Страница 229: ...Scanning Scanning from Computer Windows Scanning from Computer macOS Scanning from Operation Panel 229 ...
Страница 233: ...Note To set the applications to integrate with see Settings Dialog Box 233 ...
Страница 246: ...ScanGear Scanner Driver Screens Basic Mode Tab Advanced Mode Tab 246 ...
Страница 263: ...Scanning Tips Positioning Originals Scanning from Computer 263 ...
Страница 279: ...Back of Paper Is Smudged Uneven or Streaked Colors 279 ...
Страница 294: ...Scanning Problems Windows Scanning Problems 294 ...
Страница 295: ...Scanning Problems Scanner Does Not Work ScanGear Scanner Driver Does Not Start 295 ...
Страница 301: ...Scanner Tab 301 ...
Страница 305: ...Installation and Download Problems Failed to MP Drivers Installation Windows 305 ...


