


Select an output size in pixels.
A cropping frame of the selected monitor size will be displayed and the portion within the
cropping frame will be scanned. You can drag the cropping frame to enlarge/reduce it while
maintaining the aspect ratio.
Add/Delete...
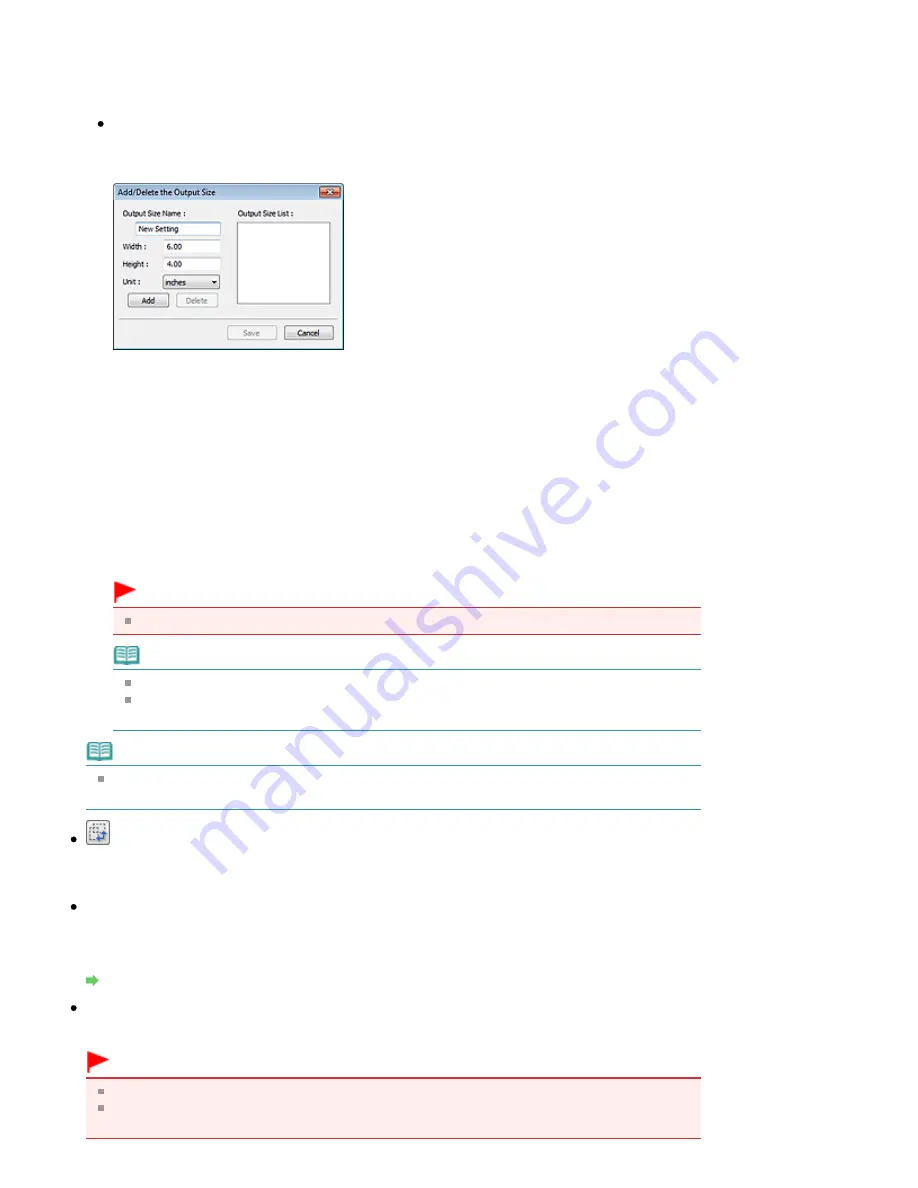
Opens the Add/Delete the Output Size dialog box, in which you can specify custom output sizes.
You can select this option when Destination is Print or Image display.
In the Add/Delete the Output Size dialog box, you can specify multiple output sizes and save
them at one time. Saved items will be registered to the Output Size list and can be selected,
along with the predefined items.
Add
To add a size, enter Output Size Name, Width and Height, then click Add. For Unit, you can
select inches or mm when Destination is Print but you can only select pixels when Destination
is Image display. The name of the added size appears in Output Size List. Click Save to save
the items listed in Output Size List.
Delete
To delete an item, select it in Output Size List and click Delete. Click Save to save the items
listed in Output Size List.
Important
You cannot delete predefined output sizes such as A4 and 1024 x 768 pixels.
Note
Save up to 10 items.
An error message appears when you enter a value outside the setting range. Enter a value
within the setting range.
Note
For details on whether or how the cropping frame is initially displayed on a preview image, see
Cropping Frame on Previewed Images in "
Preview Tab
" (Preferences dialog box).
Invert aspect ratio
This button is available when Output Size is set to anything but Flexible.
Click this button to rotate the cropping frame. Click again to return it to the original orientation.
Adjust cropping frames
You can adjust the scan area within the Preview area.
If an area is not specified, the document will be scanned at the document size (Auto Crop). If an area
is specified, only the portion in the cropping frame will be scanned.
Adjusting Cropping Frames
Image corrections
Allows you to apply corrections to images.
Important
Available functions vary by the document type selected in Select Source.
Auto Document Fix, Fading correction and Backlight correction are available when
Recommended is selected on the Color Settings tab of the Preferences dialog box.
Стор. 530 із 715
Basic Mode Tab
Содержание mp280 series
Страница 33: ...На початок сторінки Стор 33 із 715 Друк веб сторінок Easy WebPrint EX ...
Страница 116: ...Questions and Answers How Can I Move or Copy the Saved File What Is C1 or C4 Page top Стор 116 із 715 Creating an Album ...
Страница 125: ...3 Click Print Note See Help for details on the Print Settings screen Page top Стор 125 із 715 Printing ...
Страница 130: ...Note See Help for details on the Page Setup screen Page top Стор 130 із 715 Selecting the Paper and Layout ...
Страница 134: ...See Help for details on the Edit screen Page top Стор 134 із 715 Editing ...
Страница 136: ...3 Click Print Note See Help for details on the Print Settings screen Page top Стор 136 із 715 Printing ...
Страница 138: ...Page top Стор 138 із 715 Printing Stickers ...
Страница 145: ...See Help for details on the Print Settings screen Page top Стор 145 із 715 Printing ...
Страница 147: ...How Can I Move or Copy the Saved File Page top Стор 147 із 715 Printing Layout ...
Страница 150: ...Page top Стор 150 із 715 Selecting the Paper and Layout ...
Страница 154: ...Page top Стор 154 із 715 Editing ...
Страница 156: ...3 Click Print Note See Help for details on the Print Settings screen Page top Стор 156 із 715 Printing ...
Страница 206: ...Page top Стор 206 із 715 Cropping Photos Photo Print ...
Страница 210: ...Page top Стор 210 із 715 Printing an Index ...
Страница 216: ...Page top Стор 216 із 715 Opening Saved Files ...
Страница 220: ...Page top Стор 220 із 715 Changing Layout ...
Страница 225: ...Page top Стор 225 із 715 Adding Photos ...
Страница 233: ...Page top Стор 233 із 715 Printing Dates on Photos ...
Страница 247: ...Page top Стор 247 із 715 Setting a Page Size and Orientation ...
Страница 254: ...border before printing Page top Стор 254 із 715 Execute Borderless Printing ...
Страница 259: ...Selecting Scaled changes the printable area of the document Page top Стор 259 із 715 Scaled Printing ...
Страница 352: ...7 Save the scanned images Saving Saving as PDF Files Page top Стор 352 із 715 Easy Scanning with Auto Scan ...
Страница 383: ...View Use Window Page top Стор 383 із 715 Classifying Images into Categories ...
Страница 403: ...Related Topic Opening Editing Password protected PDF Files Page top Стор 403 із 715 Setting Passwords for PDF Files ...
Страница 409: ...Page top Стор 409 із 715 Navigation Mode Screen ...
Страница 418: ...Related Topic Easy Scanning with Auto Scan Page top Стор 418 із 715 Auto Scan Screen Scan Import Window ...
Страница 445: ...Page top Стор 445 із 715 Send via E mail Dialog Box ...
Страница 452: ...Page top Стор 452 із 715 Correct Enhance Images Window ...
Страница 465: ...Page top Стор 465 із 715 Scan Settings Dialog Box One click Mode Screen ...
Страница 505: ...Related Topic Auto Scan Mode Tab Page top Стор 505 із 715 Scanning in Auto Scan Mode ...
Страница 534: ...Related Topic Scanning in Basic Mode Page top Стор 534 із 715 Basic Mode Tab ...
Страница 557: ...Page top Стор 557 із 715 Scanner Tab ...
Страница 625: ...На початок сторінки Стор 625 із 715 Кольори роздруківок нечіткі ...
Страница 659: ...Color Settings Tab Page top Стор 659 із 715 Scan Quality Image Displayed on the Monitor Is Poor ...
Страница 699: ...Page top Стор 699 із 715 Installing the MP Drivers ...
Страница 704: ...На початок сторінки Стор 704 із 715 Примітка про від єднання шнура живлення ...
Страница 710: ...Page top Стор 710 із 715 Restrictions on Printer Sharing ...
Страница 713: ...Page top Стор 713 із 715 Using Easy PhotoPrint EX ...


