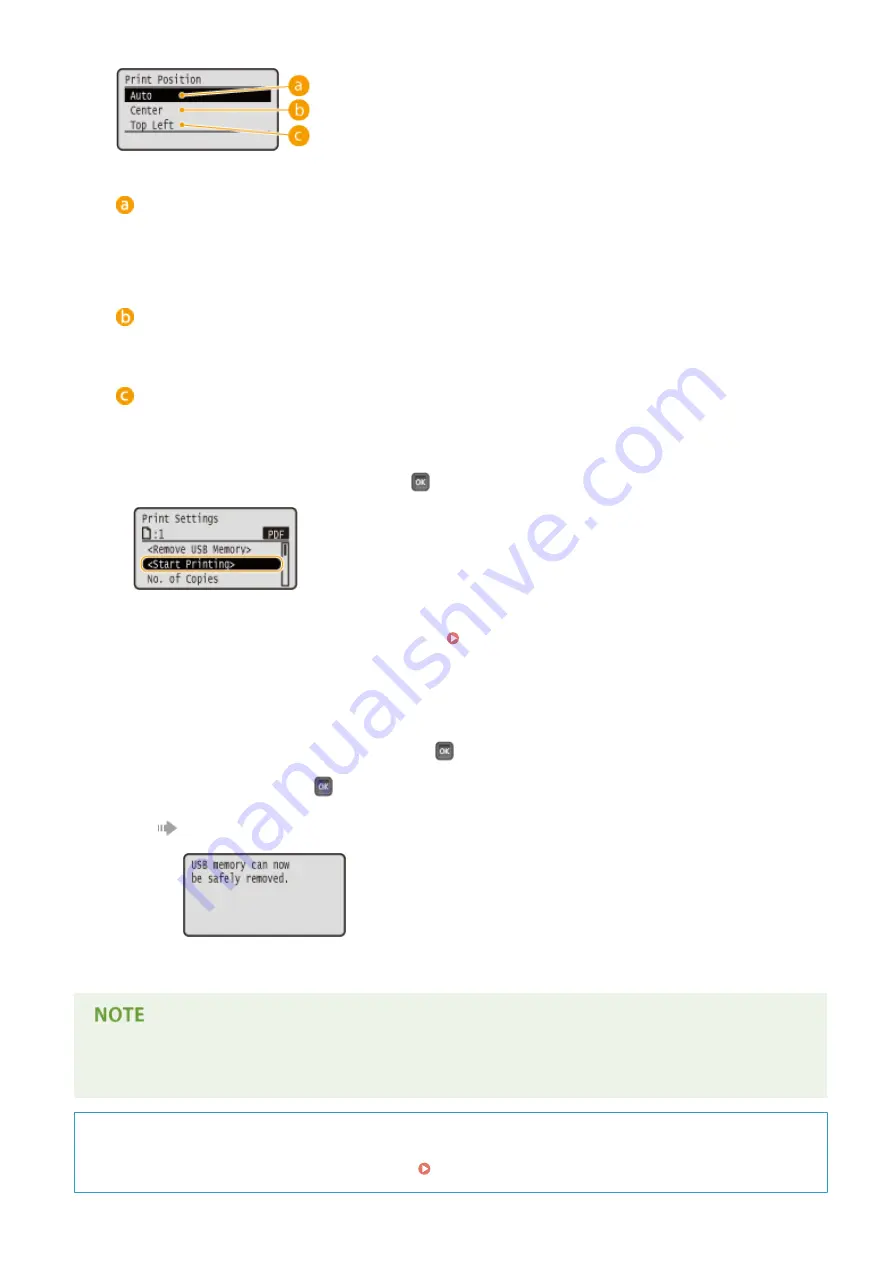
<Auto>
If the TIFF data contains the information that specifies the print position, the image is printed according to
the information, otherwise, it is printed at the center of paper. JPEG data is always printed at the center of
paper.
<Center>
Images are printed at the center of paper.
<Top Left>
Images are printed at the top left.
7
Select <Start Printing>, and press
.
➠
Printing starts.
●
To cancel printing, use the operation panel. Canceling Prints(P. 83)
8
Disconnect the USB memory device.
1
Select <Remove USB Memory>, and press
.
2
Select <Yes>, and press
.
Wait until the message shown below appears.
3
Disconnect the USB memory device.
●
If you select <Sort Files> on the screen in step 1, you can change the order of displaying files when you select
the file to print.
TIPS
If you always want to print with the same settings: Changing Default Settings(P. 116)
Printing a Document
128
Содержание LBP351 Series
Страница 1: ...LBP352x LBP351x User s Guide USRMA 0699 00 2016 05 en Copyright CANON INC 2016 ...
Страница 7: ...Notice 629 Office Locations 633 VI ...
Страница 22: ... Saving Energy This section describes how to reduce power consumption Saving Energy P 67 Basic Operations 15 ...
Страница 84: ...Printing a Document 77 ...
Страница 99: ...LINKS Basic Printing Operations P 78 Printing a Document 92 ...
Страница 107: ...Basic Printing Operations P 78 Printing Borders P 98 Printing Watermarks P 101 Printing a Document 100 ...
Страница 111: ...LINKS Basic Printing Operations P 78 Printing a Document 104 ...
Страница 142: ...LINKS Using the Encrypted Print P 136 Installing an SD Card P 583 Printing a Document 135 ...
Страница 156: ... It may take some time until printing starts LINKS Using Remote UI P 332 Printing a Document 149 ...
Страница 163: ...LINKS Printing without Opening a File Direct Print P 146 Printing a Document 156 ...
Страница 175: ...Can Be Used Conveniently with a Mobile Device 168 ...
Страница 177: ...4 Click Edit 5 Specify the required settings and click OK Can Be Used Conveniently with a Mobile Device 170 ...
Страница 193: ... You can set the IP address manually Setting IP Addresses P 187 LINKS Connecting to a Network P 183 Network 186 ...
Страница 200: ...4 Click Edit in IPv6 Settings 5 Select the Use IPv6 check box and configure the required settings Network 193 ...
Страница 248: ...LINKS Entering Sleep Mode P 68 Network 241 ...
Страница 288: ...Printing a Document Stored in the Machine Stored Job Print P 137 Security 281 ...
Страница 294: ... Functions of the Keys Operation Panel P 24 Security 287 ...
Страница 307: ...3 Click Security IPSec Settings 4 Click IPSec Policy List 5 Click Register IPSec Policy Security 300 ...
Страница 314: ...3 Click Security IPSec Settings 4 Click Edit 5 Select the Use IPSec check box and click OK Security 307 ...
Страница 332: ...Using TLS for Encrypted Communications P 294 Configuring IPSec Settings P 298 Security 325 ...
Страница 342: ...Using Remote UI 335 ...
Страница 357: ...LINKS Remote UI Screens P 336 Using Remote UI 350 ...
Страница 381: ...Paper Source 0X7U 058 See Select Feeder Menu P 453 Setting Menu List 374 ...
Страница 469: ...Troubleshooting 462 ...
Страница 524: ... Initializing Settings If you want to restore the settings see Initializing Settings P 550 Maintenance 517 ...
Страница 533: ...8 Close the top cover Maintenance 526 ...
Страница 551: ...LINKS Utility Menu P 445 Job Menu P 449 Maintenance 544 ...
Страница 554: ... If you want to return the counts of all departments to zero click Clear All Counts OK Maintenance 547 ...
Страница 556: ... The displayed remaining toner level can be used only as a guide and may differ from the actual level Maintenance 549 ...
Страница 562: ...Third Party Software 0X7U 08U Appendix 555 ...
Страница 607: ...Manual Display Settings 0X7U 08W Appendix 600 ...
Страница 632: ...Scalable Fonts PCL Appendix 625 ...
Страница 633: ...Appendix 626 ...
Страница 634: ...Appendix 627 ...
Страница 635: ...OCR Code Scalable Fonts PCL Bitmapped Fonts PCL Appendix 628 ...


