Canon imagePROGRAF W7200 Скачать руководство пользователя страница 99

Installing a Macintosh Connection

29

3-29

6

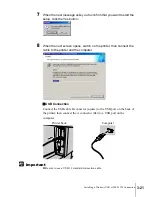
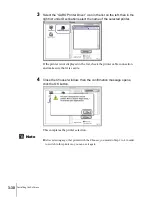
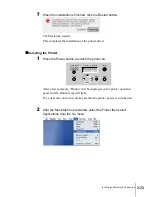
When the installation is finished, click the Restart button.

The Macintosh restarts.

This completes the installation of the printer driver.

T

Selecting the Printer

1

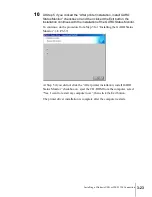
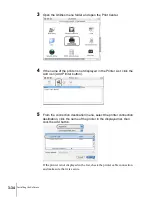
Press the Power button to switch the printer on.

After a few moments, “Online” will be displayed on the printer operation 
panel and the Online lamp will light.

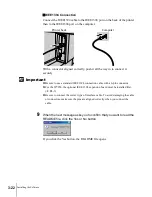
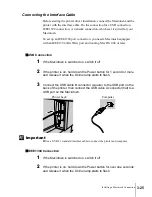
For a network connection, make sure that the printer power is switched on.

2

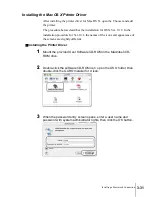
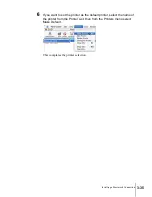
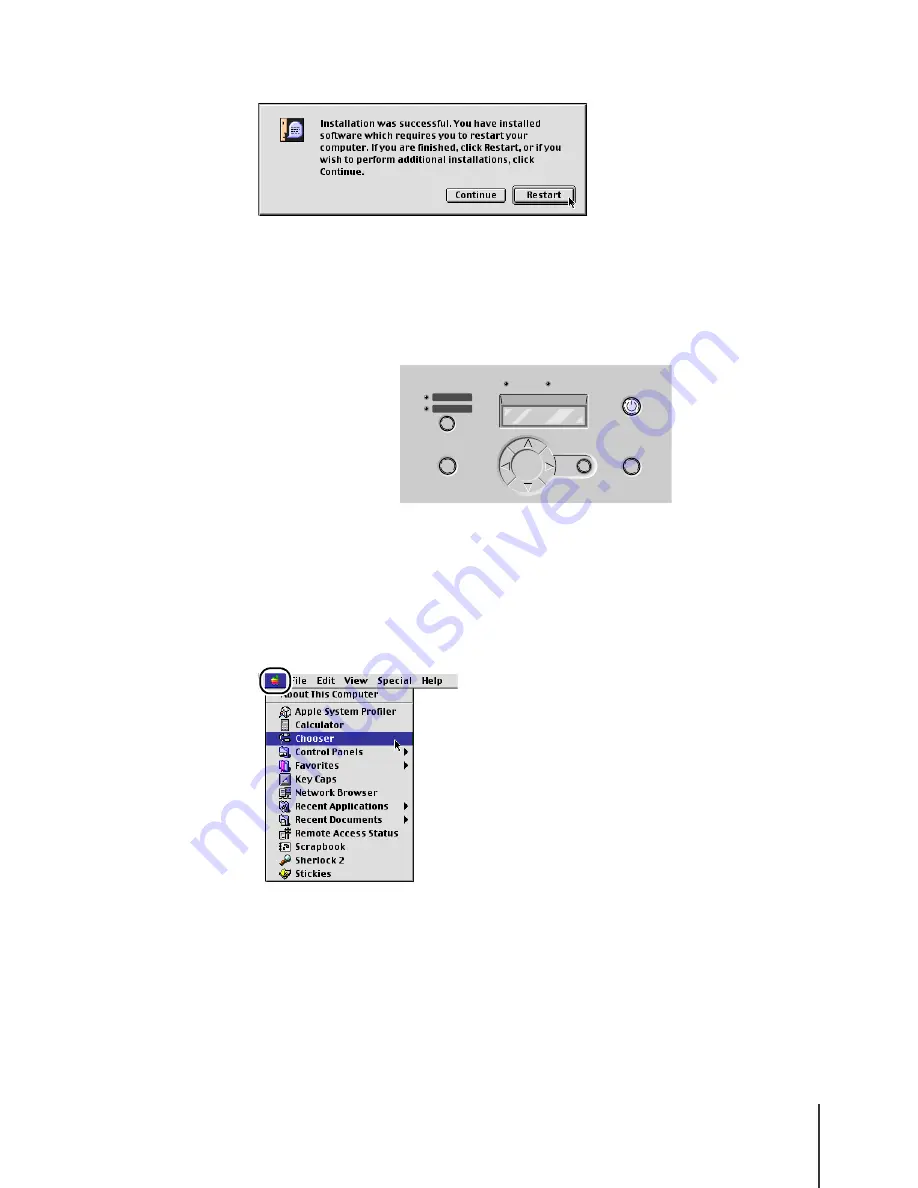
After the Macintosh restarts, select Chooser in the Apple menu.


Содержание imagePROGRAF W7200

Страница 1: ......

Страница 2: ...uthorized Canon representative Canon is not responsible for any damages direct or indirect arising from or related to the use of this printer Trademarks Canon the Canon logo and NetSpot are trademarks...

Страница 3: ...and result in minor injury or serious damage to the printer Always remember and follow the guidelines and advice described under this heading to ensure safe use of the printer z Instructions and guide...

Страница 4: ...is an acronym for Graphic Arts Language with Raster Operations a printer language of creating raster images Legal Notice It is illegal to reproduce currency bills negotiable securities and other docum...

Страница 5: ...rence to radio communications However there is no guarantee that interference will not occur in a particular installation If this equipment does cause harmful interference to radio or television recep...

Страница 6: ...ie et Sciences Canada International ENERGY STAR Program As an ENERGY STAR Partner Canon Inc has determined that this product meets the ENERGY STAR guidelines for energy efficiency The international EN...

Страница 7: ...s printer and do not use this power cord with any other electrical device z To avoid a fire or serious electrical shock caused by a short circuit avoid damaging the AC adapter cord or the power cord N...

Страница 8: ...r on a flat stable surface that is safe from sudden shocks or strong vibrations to ensure that it will not fall z To avoid damage to the printer which could result in a fire or electrical shock place...

Страница 9: ...fire or electrical shock do not use an extension cord z To prevent fire or electrical shock never use a power supply source other than the one rated for the printer in the country where you purchased...

Страница 10: ...or any type of liquid container especially containers of flammable liquids which could fall accidentally into the printer z To avoid possible personal injury never touch the blade of the cutter unit...

Страница 11: ...ling the Output Stacker 1 14 Removing the Packing Material 1 16 3 Connecting the Power Cord 1 20 4 Installing the Printhead 1 21 5 Installing the Ink Tanks 1 27 6 Selecting the Display Language 1 30 7...

Страница 12: ...6 Installing the Printer Driver to Windows 3 17 Installing a Macintosh Connection 3 24 Macintosh Software 3 24 Connecting the Interface Cable 3 25 Installing the Printer Driver for Mac OS 8 6 9 x 3 27...

Страница 13: ...1 Setting Up the Printer This chapter describes the setting methods and procedures from removing it from the packing to adjusting the printing...

Страница 14: ...he Output Stacker Used only with stand or Installing Optional Equipment Media take up unit P 1 14 Option Instructions Removing the Packing Material P 1 16 Installing the IEEE 1394 Expansion Board Only...

Страница 15: ...ase contact the store where you purchased the printer TPrinter Set TStand Set Optional for W7250 Printer Roll holder holder stopper Hex driver Power cord Printhead Ink tanks Bk C PC M PM Y Rail Cleane...

Страница 16: ...th a Setup Guide with copies in different languages The Setup Guide User s Guide and Network Guide may be provided in different languages in PDF format on a Manual CD ROM depending on where the printe...

Страница 17: ...spacious and well ventilated area Space Requirements Make sure that there is sufficient space around the printer as shown below THeight zW7200 zW7250 Include the optional support stand TWidth and Dept...

Страница 18: ...the stand If the W7250 is to be placed on a table go to Setting Up the Printer P 1 9 z Save the box and all packing material You will need them again to pack the stand for moving or shipping if the pr...

Страница 19: ...Important 3 From behind the stand lower stay attach the hex screws x4 4 Grasp the stand at both ends and place it upright z To prevent twisting and damaging the stand do not lift it upright using one...

Страница 20: ...p the Printer 1 8 5 Insert the stand upper stay a into the stand as shown in the illustration 6 Loosely attach the hex screws on the left end x4 and the right end x4 then tighten them to fasten the up...

Страница 21: ...top of the stand Please be aware of which direction the stand is facing when the printer is placed on top of the stand z W7250 Without Stand The printer can be placed directly on a table z The W7200 p...

Страница 22: ...ve or ship the printer TSetting Up the W7200 or W7250 With the Stand The printer is placed on the stand and then attached to the stand with hex screws One hex driver is packed with the printer unit an...

Страница 23: ...lip prevention sheets a under the rear casters 2 Lift the printer by the handles on both sides align the printer a with the stand b then place the printer on the stand Adjust the position of the print...

Страница 24: ...r 1 12 3 From the bottom of the stand support plate attach and tighten two hex screws to both sides of the printer 4 With the embossed sides facing up attach the leg covers to the top left and top rig...

Страница 25: ...all and damage the printer or cause personal injury z To prevent tipping the printer and damaging the printer or causing personal injury never press down or lean on the roll media tray when it is open...

Страница 26: ...output stacker spread the output stacker so the end with the larger area a is at the front and the end with the smaller area b is at the back The side of the output stacker cloth with the fold is the...

Страница 27: ...s of the support brackets on the left and right side Insert the arms completely into the grooves so the arms are diagonal 4 Insert the longest arms of the output stacker into the front grooves of the...

Страница 28: ...Setting Up the Printer 1 16 Removing the Packing Material 1 Remove all tape attached to printer 2 Open the upper cover and remove the tape from the paper release lever...

Страница 29: ...Printer 1 17 3 Raise the paper release lever remove the protective sheet a above the platen then lower the paper release lever 4 Remove the hex screw from the belt stopper then remove the belt stoppe...

Страница 30: ...Setting Up the Printer 1 18 6 Open the tray 7 Remove the tape from the tray and roll media tray 8 Pull on the tray open lever then pull out the roll media tray...

Страница 31: ...attached before the printer can be shipped to another location Fasten the belt stopper at the indicated position for storage z The hex driver will be needed to prepare the printer for shipping Place t...

Страница 32: ...he Power Cord After setting up the printer and connecting the printer and computer follow the procedure below to connect the power cord 1 On the left side of the printer connect the power cord 2 Conne...

Страница 33: ...ow this procedure and the operation panel messages below to install the printhead 1 Press the Power button to switch the printer on After a few seconds Open Upper Cover is displayed 2 Open the upper c...

Страница 34: ...Setting Up the Printer 1 22 3 Remove the tape from the carriage cover and the cutter 4 Raise and open the carriage cover 5 Pull the printhead lock lever completely forward to open it...

Страница 35: ...n in the illustration pull down to remove protective cap 2 c z The nozzles under protective cap 2 c are covered with ink for their protection Handle the printhead carefully to avoid touching these noz...

Страница 36: ...e printhead Discard these items immediately in compliance with local regulations regarding the disposal of such items 8 With the nozzles pointing down and the electrical contacts facing the printer in...

Страница 37: ...until you hear it catch 11 Pull the carriage cover down and forward until you hear it catch Close Upper Cover is displayed 12 Close the upper cover Ins Ink Tank OK is displayed The lock on the right...

Страница 38: ...ight cover by pulling it toward you If something is caught on the right cover you will not be able to open it If you cannot open the right cover an error is displayed Switch the printer off remove the...

Страница 39: ...r To prevent poor print quality always install an ink tank immediately after breaking its seal z To prevent ink stains never drop or shake an ink tank z An ink tank should be used up within six months...

Страница 40: ...ports b or the terminal c of an ink tank 3 With the ink ports pointing down and the label facing in the direction shown in the illustration below insert the ink tank into the ink tank holder z Always...

Страница 41: ...nitialization of the ink starts automatically The ink initialization operation requires about eight minutes to complete As soon as ink filling is completed Load Roll Media is displayed To continue loa...

Страница 42: ...tinue with the English display go to 7 Setting the Roll Media 1 Press the Online button twice to display the MAIN MENU 2 Press or to display System Setup and press 3 Press or to display Language and p...

Страница 43: ...s appear on the print density is too light while printing on one of the media types listed above The Special settings determine in 5 steps the amount of ink used on the surface of the media The higher...

Страница 44: ...out the stand to avoid tipping the printer over and damaging it or causing personal injury never press down or lean on the roll media tray while it is pulled out of the printer z For more details abou...

Страница 45: ...7 Setting the Roll Media 1 33 2 Pull the tray open lever then pull out the roll media tray Load Roll Media is displayed 3 Remove the tape from the roll holder then remove the holder stopper...

Страница 46: ...so to avoid personal injury or damage to the roll always carefully lay a roll flat on a table or other stable flat surface z Insert the roll holder all the way into the roll media until it is tight A...

Страница 47: ...the tray If the roll media is unrolled turn the roll as you set it z When holding the roll holder grip it by the ring To avoid personal injury do not hold it by the shaft z While holding the roll hold...

Страница 48: ...bottom surface of the paper guide has a finish to prevent slipping The roll media must pass over the top of the paper guide before it is inserted 9 Pull out a sufficient amount of roll media to ensur...

Страница 49: ...g down on the center of the roll media turn the roll holder in the direction shown in the illustration below to remove all slack from the media 11 While pressing down on the roll holder pull the roll...

Страница 50: ...ndicated by the arrows to roll the leading edge of the media as far as the paper guide Turn the roll until approximately 1 2 mm of the leading edge of the roll media is visible below the paper guide 1...

Страница 51: ...ly selected then the preparation for the select media begins When preparation for feeding roll media is finished Online is displayed and the printer is ready to print z You must make the appropriate s...

Страница 52: ...larger roll media is set z If you are using a cut sheet make sure at least one sheet of unused A3 paper not the blank side of used paper or larger is set 1 If the printer is off press the Power butto...

Страница 53: ...is ready to print If there are no breaks in the vertical lines of each color the nozzle check pattern is normal Sample Printhead Normal Sample Printhead Abnormal If the nozzle check is abnormal perfo...

Страница 54: ...z You should use the most frequently used media to make the printhead adjustment z If you are using cut sheets make sure at least three sheets of unused A3 paper not the blank sides of used paper or...

Страница 55: ...determine the number of the vertical line that is least conspicuous Press or to display that number then press Enter The selected setting is prefixed with a mark to denote the current value for A Samp...

Страница 56: ...Sample Positioned Correctly 9 Repeat Step 8 for G I on Pattern A to make adjustments 10 Look at J in Pattern A note the position and number of the line with the best alignment press or to select that...

Страница 57: ...f the Roll Media Type selection is incorrect for the roll media set in the printer this could cause poor print quality z Only Cut Sheet should be used with the W7250 without the stand For details abou...

Страница 58: ...Setting M is displayed This M setting is different for each media type 6 Look at Pattern B and determine the number of the vertical line that is least conspicuous Press or to display that number then...

Страница 59: ...Information This chapter describes the printer network settings required when the printer is connected to a TCP IP network or used as a remote UI These settings should be done by the network administ...

Страница 60: ...er to set the printer IP address and network frame type P 2 3 Install on a computer that is connected to the printer through a LAN This cannot be used with a computer where the printer is connected lo...

Страница 61: ...ddress Before printing make sure A3 or larger size paper is set for printing z If you want to save paper to display the MAC address press the Online button on the operation panel MAIN MENU Information...

Страница 62: ...sample below Installing the GARO Device Setup Utility z If you are using Windows XP Windows 2000 or Windows NT 4 0 you must log in as a member of the Administrators group 1 Mount the provided User Sof...

Страница 63: ...3 Follow the instructions on the screen The installation for the GARO Device Setup Utility starts This completes the installation of the GARO Device Setup Utility Setting the Network Information 1 On...

Страница 64: ...the Printer Network Information 2 6 Note 2 Click the Settings button 3 In the MAC Address box enter the MAC address then click the Next button z Enter the MAC address number for Status Print without t...

Страница 65: ...GARO Device Setup Utility 2 7 4 In the IP Address box under TCP IP enter the MAC address assigned to the printer then click the Next button 5 Check the settings then click the Finish button The setti...

Страница 66: ...ateway Use Internet Explorer or another browser to specify the IP address that you set here and by starting the Remote UI you can easily perform the detailed network settings on the computer screen Fo...

Страница 67: ...eration panel 1 If the printer is off press the Power button to switch the printer on After a few seconds Online is displayed in the operation panel and the Online lamp lights 2 Press the Online butto...

Страница 68: ...255 returns to 0 Press to decrease the number by 1 When pressed beyond 0 jumps to 255 The IP address is temporarily saved and the next number is ready to be changed 8 Repeat Step 7 until the IP addres...

Страница 69: ...ressed beyond 0 jumps to 255 The number is temporarily saved and the next number is ready to be changed 12 Repeat Step 11 until the subnet mask allocated for the printer is completed When the entry is...

Страница 70: ...are ready to register the IP address subnet mask and default gateway setting 17 Press once then press or to select Regis Settings then press 18 Press or to select Yes then press Enter If you want to c...

Страница 71: ...3 Installing the Software This chapter describes computer software and settings required to use the computer Do the installation procedure on all the computers...

Страница 72: ...with Windows XP Windows 2000 Windows Me Windows 98 Windows 95 and Windows NT 4 0 The printer driver is on the provided User Software CD ROM P 3 8 TLPR Port This must be installed if you intend to pri...

Страница 73: ...stem software required to connect to a TCP IP network is installed when the printer driver is installed Just install the printer driver now P 3 8 Windows NT 4 0 The operating system software required...

Страница 74: ...rm whether the required software has been installed on the desktop click the Start button click Control Panel open Network then check the list on the Configuration sheet If TCP IP is listed just insta...

Страница 75: ...printer to a network make the connection between the printer LAN port and a network HUB 1 Connect the LAN cable to the LAN port Thread the cable through the cable guide on the back of the printer 2 Th...

Страница 76: ...is switched off switch it on Is the LAN cable connected securely Confirm that the LAN cable connectors are clicked and locked in place securely Is the LAN cable defective Connect another LAN cable and...

Страница 77: ...Network Connection 3 7 Note z In order to use the HUB spanning tree function you must set the DIP SW b on the back of the printer Communication Method Dip Switch Settings Spanning Tree Function Use Sp...

Страница 78: ...s XP you must log in as a member of the Administrators group 1 Mount the provided User Software CD ROM in the CD ROM drive z If the AutoPlay function is switched off double click the My Computer icon...

Страница 79: ...that an older version of a USB or IEEE1394 driver is installed in your system If you see this message click the OK button to return to the Setup Menu then select Uninstall Old USB IEEE 1394 Driver to...

Страница 80: ...ecommended P 3 36 z If your computer is using Windows NT 4 0 Windows 2000 or Windows XP and the printer driver for the W7200 or W7250 is already installed the next screen opens If you are adding a new...

Страница 81: ...on then click the Add Delete button again z If the printer is still not listed after doing the procedure above then do the procedure below to install the port manually 1 On the Add Delete Printers fo...

Страница 82: ...then click the Settings button 9 Under Port to Add select Standard TCP IP Port for Windows XP or Windows 2000 or select Canon LPR Port for Windows Me Windows 98 Windows 95 or select LPR Port for Wind...

Страница 83: ...3 13 7 From the Printer List select the printer that you want to install then click the Add the Printer List for Driver Installation button 8 Confirm the name of the printer in the Printer List for Dr...

Страница 84: ...ame and IP address in the list then click the Next button 10 Confirm the content of the Printer List for Driver Installation then click the Start button 11 When the next message asks you to confirm th...

Страница 85: ...itor checkbox on and then clicked the Exit button the installation continues with the installation of the GARO Status Monitor To continue do the procedure from Step 3 for Installing the GARO Status Mo...

Страница 86: ...quired for printing from Windows This must be installed on every computer that will use the printer The printer driver is used not only for basic operation of the printer you can also use the driver f...

Страница 87: ...00 1394a standard OHC I The connection may not operate correctly with any other type slot z If your are using Windows 2000 or Windows XP you must log in as a member of the Administrators group z Do no...

Страница 88: ...r version of a USB or IEEE1394 driver is installed in your system If you see this message click the OK button to return to the Setup Menu then select Uninstall Old USB IEEE 1394 Driver to uninstall th...

Страница 89: ...ation will continue with the installation of the GARO Status Monitor Clicking this checkbox on to install the GARO Status Monitor is recommended P 3 36 6 Connect either USB Port Connection or IEEE1394...

Страница 90: ...ersion of a printer driver for the W7200 or W7250 is installed Click the OK button to open the next screen If you are using Windows Me or Windows 98 Add Printers is not displayed In that case you must...

Страница 91: ...button 8 When the next screen opens switch on the printer then connect the cable to the printer and the computer TUSB Connection Connect the USB cable B connector square to the USB port on the back o...

Страница 92: ...sure to use a standard IEEE1394 connection cable with a 6 pin connector z For the W7250 the optional IEEE 1394 expansion board must be installed first P 4 3 z Be sure to connect the correct type of i...

Страница 93: ...th the installation of the GARO Status Monitor To continue do the procedure from Step 3 for Installing the GARO Status Monitor P 3 37 At Step 5 if you did not click the After printer installation inst...

Страница 94: ...ed for printing from a Macintosh This must be installed on every computer that will use the printer The printer driver is used not only for basic operation of the printer you can also use the driver f...

Страница 95: ...r TUSB Connection 1 If the Macintosh is switched on switch it off 2 If the printer is on hold down the Power button for 1 second or more and release it when the Online lamp starts to flash 3 Connect t...

Страница 96: ...z For the IEEE 1394 interface cable use an IEEE 1394 Ver 2 0 standard cable with a 6 pin connector z For the W7250 the optional IEEE 1394 expansion board must be installed first P 4 3 TNetwork Connec...

Страница 97: ...ng the Printer Driver for Mac OS 8 6 9 x After installing the printer driver for Mac OS 8 6 9 x open the Chooser and select the printer z If you are using a USB or IEEE1394 connection install the prin...

Страница 98: ...ead the CANON SOFTWARE LICENCE AGREEMENT then click the Accept button 4 Click the Install button 5 When the message prompts you to confirm that all other software has been shut down click the Continue...

Страница 99: ...llation of the printer driver TSelecting the Printer 1 Press the Power button to switch the printer on After a few moments Online will be displayed on the printer operation panel and the Online lamp w...

Страница 100: ...nter If the printer is not displayed in the list check the printer cable connection and make sure that it is secure 4 Close the Chooser window then the confirmation message opens click the OK button T...

Страница 101: ...tion procedure for Ver 10 1 the names of the icons and appearance of the screens are slightly different TInstalling the Printer Driver 1 Mount the provided User Software CD ROM in the Macintosh CD ROM...

Страница 102: ...ead the CANON SOFTWARE LICENCE AGREEMENT then click the Accept button 5 Click the Install button 6 When the message prompts you to confirm that all other software has been shut down click the Continue...

Страница 103: ...rinter driver TSelecting the Printer 1 Press the Power button to switch the printer on After a few moments Online will be displayed on the printer operation panel and the Online lamp will light For a...

Страница 104: ...ed in the Printer List click the Add icon Add Printer button 5 From the connection destination menu select the printer connection destination click the name of the printer in the displayed list then c...

Страница 105: ...intosh Connection 3 35 6 If you want to set the printer as the default printer select the name of the printer from the Printer List then from the Printers menu select Make Default This completes the p...

Страница 106: ...g procedure to install the GARO Status Monitor z If you are using Windows XP Windows 2000 or Windows NT 4 0 you must log in as a member of the Administrators group 1 Mount the provided User Software C...

Страница 107: ...37 3 Read the message on the Welcome to the InstallShield Wizard for GARO Status Monitor screen then click the Next button 4 Read the end user license agreement and if you agree with the terms of the...

Страница 108: ...ion Location screen confirm the name of the folder for the installation destination then click the Next button 6 On the Confirm Installation screen check the settings and make sure that they are corre...

Страница 109: ...my computer now is selected then press the Finish button When the computer is restarted installation is complete If Refer to Readme File Now is displayed on the screen press the Finish button to close...

Страница 110: ...atically when a print job starts or when a printer error occurs Perform the following procedure when you need to check the status of the printer immediately 1 On the desktop click the Start button poi...

Страница 111: ...the Option menu to set when the GARO Status Monitor is to be displayed Select the items on the menu and click the desired checkboxes on The default settings include Only On Printing and Display Statu...

Страница 112: ...Installing the Software 3 42...

Страница 113: ...4 Other Important Information This chapter provides additional reference material and index for use of the printer...

Страница 114: ...server computer TDevice Status Extension Software that allows you to manage print jobs and display information about the printer using your own Web browser on Windows XP or Windows 2000 with IIS Inter...

Страница 115: ...rocedure touch a metal surface to discharge any accumulated static electricity on your body z During this installation procedure do not touch a video monitor or any other type of electrical equipment...

Страница 116: ...inside the slot then insert it Firmly press the IEEE 1394 expansion board into the slot until the metal frame fits in the grooves completely 5 Use the two screws to fasten the IEEE 1394 expansion boar...

Страница 117: ...ping the printer at an angle or standing it on end is unavoidable during moving or shipping contact a service center or the dealer where you purchased the printer 1 If the printer is off press the Pow...

Страница 118: ...atically If the right cover does not open completely open it manually 6 Open the ink tank cover then remove all the ink tanks Place each ink tank in a vinyl or plastic bag and seal it z Be sure to wra...

Страница 119: ...s drawn off This requires about 9 minutes After the tubes are drained Turn Power Off is displayed 8 Press and hold the Power button for 3 seconds to switch the printer off disconnect the power cord an...

Страница 120: ...ant Information 4 8 11 Remove the roll media from the roll holder then pack the roll holder and holder stopper 12 Remove the hex screw then remove the belt stopper 13 Close the roll media tray then cl...

Страница 121: ...ver z To avoid damaging the printer never touch any part inside the printer unless instructed to do so 15 Use the belt stopper removed at Step 12 to pinch the belt then attach the hex screw to fasten...

Страница 122: ...Guide 20 If the stand is set up follow the stand setup procedure in reverse order to remove it P 1 10 21 If the stand is set up follow the stand assembly procedure in reverse order to disassemble it...

Страница 123: ...ansported after the power cord is removed or if it is turned off while Move Printer is displayed before it automatically shuts off If the printer is disconnected or switched off accidentally re instal...

Страница 124: ...GARO Status Monitor 3 36 H handles 1 10 holder stopper 1 33 1 34 I IEEE 1394 Expansion Board 4 3 IEEE1394 cable 3 22 IEEE1394 port Windows 3 22 3 26 Ink Tank 1 27 ink tank cover 1 27 ink tank lever 1...

Страница 125: ...1 24 printhead lock lever 1 22 provided items 1 3 R Regis Settings 2 12 Remote UI 2 2 roll holder 1 31 roll media 1 31 1 32 Roll Media Setting 1 31 roll media tray 1 18 1 32 Roll Media Type 1 39 roll...

Страница 126: ...4 14 T TCP IP network 2 2 3 2 tray 1 18 U upper cover 1 16 1 21 USB cable 3 21 USB port Windows 3 21 3 25 W Windows 2 2 3 16...

Отзывы: