Chapter 1
1-41
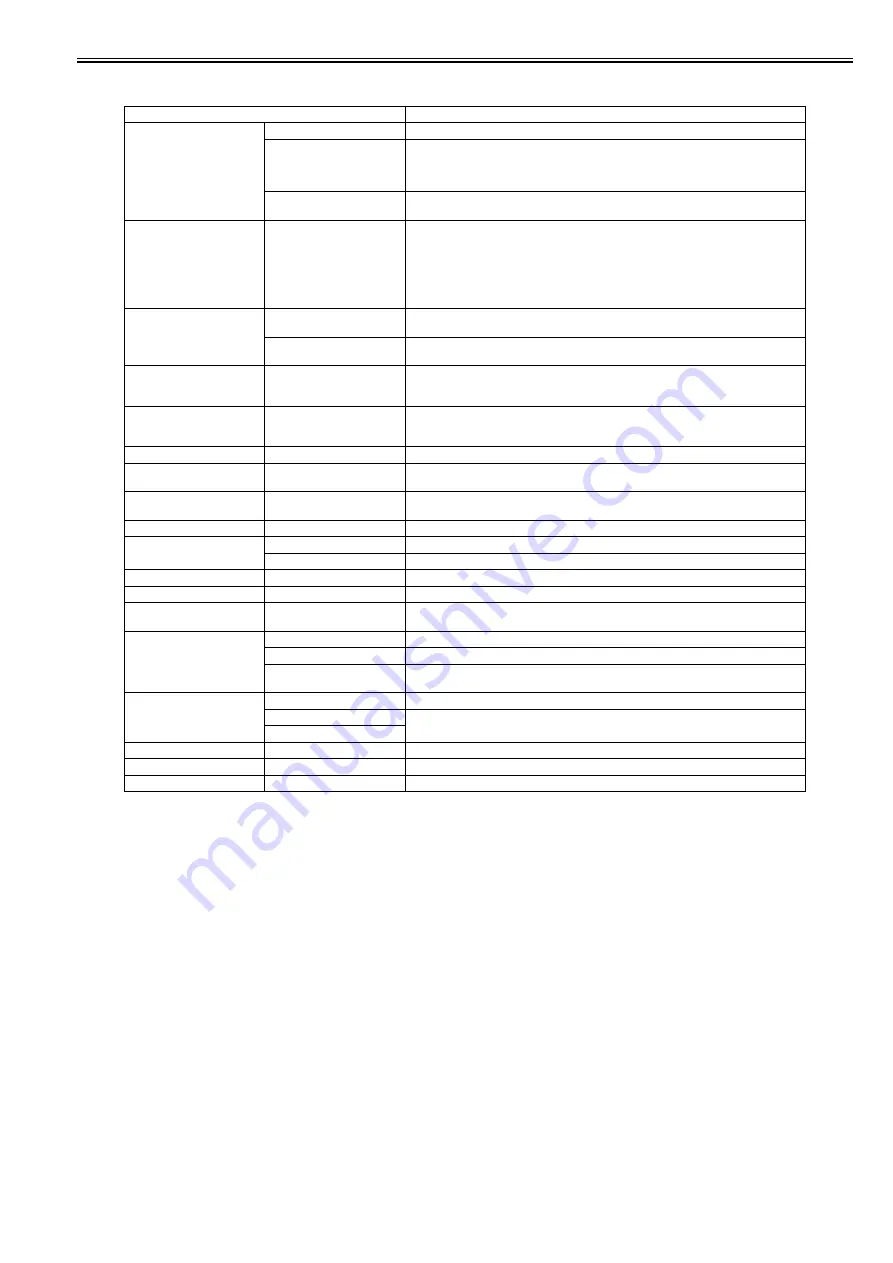
[System Setup]
T-1-25
Setting Item
Description/Instructions
[Warning]
[Buzzer]
Set the buzzer. Choose On for the buzzer to sound once for warnings and three times for errors.
[Detect Mismatch]
Choose Warning for notification (display of a warning message) during printing if the paper
type specified in the printer menu does not match the paper type in the printer driver. Choose
None to continue print without notification. Choose Pause to have printing paused under these
circumstances. In this case, you can continue printing by pressing the Online button.
[Skip Take-Up Err]
Choose On to continue with printing even if an error occurs with the Media Take-up Unit.
Choose Off to have the printer pause before printing if a rewinding error occurs.
[Keep Media Size]
Choose On to use the paper size setting as the basis for printing instead of other settings. The
margin setting of the printer menu will be used instead of the margin setting of the printer driver
if the latter is smaller, which may prevent text or images in the margin from being printed.
Choose Off to use the printer driver settings instead. Even if the margin setting of the printer
driver is smaller than that of the printer driver, text or images will not be cut off. However, this
requires longer paper because the actual margin will be equal to the margin setting of the printer
driver plus the margin setting of the printer menu.
[Paper Size Basis]
[Sht Selection 1]
Select which size is to be recognized, [ISO A3+] or [13"x19"(Super B)], when the detected size
of the cut sheet is between these sizes.
[Sht Selection 2]
Select which size is to be recognized, [ISO B1] or [28"x40"(ANSI F)], when the detected size
of the cut sheet is between these sizes.
[Noz. Check Freq.]
Specify the timing for automatic checks of nozzle clogging. Choose 1 page to check once per
printed page. Choose 10 pages to check once per ten printed pages. Choose Automatic to have
the printer automatically adjust the timing for checks based on the frequency of nozzle use.
[CarriageScanWdth]
Set the scan width of the carriage for printing. Select [Automatic] to move the carriage to meet
the width of the loaded paper. Selecting [Fixed] will reduce stains on the back of the paper but
at the cost of a somewhat longer print time.
[Sleep Timer]
Specify the period before the printer enters Sleep mode.
[Length Unit]
Choose the unit of measurement when roll length is displayed. You can switch the unit
displayed for Roll Length Set and the remaining paper amount displayed in the submenu.
[Time Zone]
Specify the time zone. Time zone options indicate a main city in this time zone and the
difference from Greenwich Mean Time.
[Date Format]
Specify the date format.
[Date & Time]
[Date]
Set the current date.
[Time]
Set the current time.
[Language]
Specify the language used on the Display Screen.
[Contrast Adj.]
Adjust the Display Screen contrast level.
[Reset PaprSetngs]
Restores settings that you have changed with Media Configuration Tool to the factory default
values.
[Erase HDD Data]
[High Speed]
Delete the file management information of the saved data in the HDD.
[Secure High Spd.]
Overwrite the random data in the whole of the hard disk drive.
[Secure]
Overwrite 00 and FF and random data in the whole of the hard disk drive once at a time.
Execute the verify check whether the data has written correctly to the hard disk drive.
[Output Method]
[Print]
Choose how to print.
[Print(auto delete)]
Select [Print] to perform normal printing. Select [Print (Auto delete)], print data and remove it
from the hard disk. Select [Save in mail box] to only save data to the box, without printing it.
[Save in mail box]
[Save and Print]
Select [On] to start printing data when its save is complete.
[Save: Common Box]
Select [Off] to print data without saving it to the common box.
[Show Job Log]
Indicates the job information that choose from the last three print jobs.
Содержание imagePROGRAF iPF815
Страница 2: ......
Страница 6: ......
Страница 11: ...Chapter 1 PRODUCT DESCRIPTION...
Страница 12: ......
Страница 14: ......
Страница 63: ...Chapter 1 1 49 3 Push in the left and right Basket Rods toward the back all the way until they stop F 1 35...
Страница 74: ......
Страница 75: ...Chapter 2 TECHNICAL REFERENCE...
Страница 76: ......
Страница 86: ...Chapter 2 2 8 Printing Modes...
Страница 87: ...Chapter 2 2 9...
Страница 129: ...Chapter 3 INSTALLATION...
Страница 130: ......
Страница 132: ......
Страница 146: ...Chapter 3 3 14...
Страница 147: ...Chapter 4 DISASSEMBLY REASSEMBLY...
Страница 148: ......
Страница 150: ......
Страница 207: ......
Страница 208: ......
Страница 209: ...Chapter 5 MAINTENANCE...
Страница 210: ......
Страница 212: ......
Страница 216: ...Chapter 5 5 4 5 Close upper cover 1 F 5 6 1...
Страница 217: ...Chapter 5 5 5...
Страница 218: ......
Страница 219: ...Chapter 6 TROUBLESHOOTING...
Страница 220: ......
Страница 222: ......
Страница 249: ...Chapter 7 SERVICE MODE...
Страница 250: ......
Страница 252: ......
Страница 273: ...Chapter 7 7 21...
Страница 274: ......
Страница 275: ...Chapter 8 ERROR CODE...
Страница 276: ......
Страница 277: ...Contents Contents 8 1 Outline 8 1 8 1 1 Outline 8 1 8 2 Warning Error Service Call Error 8 2 8 2 1 Code Table 8 2...
Страница 278: ......
Страница 313: ...Appendix...
Страница 314: ......
Страница 322: ......
Страница 323: ...Feb 27 2017...
Страница 324: ......


