


Chapter 1
1-38
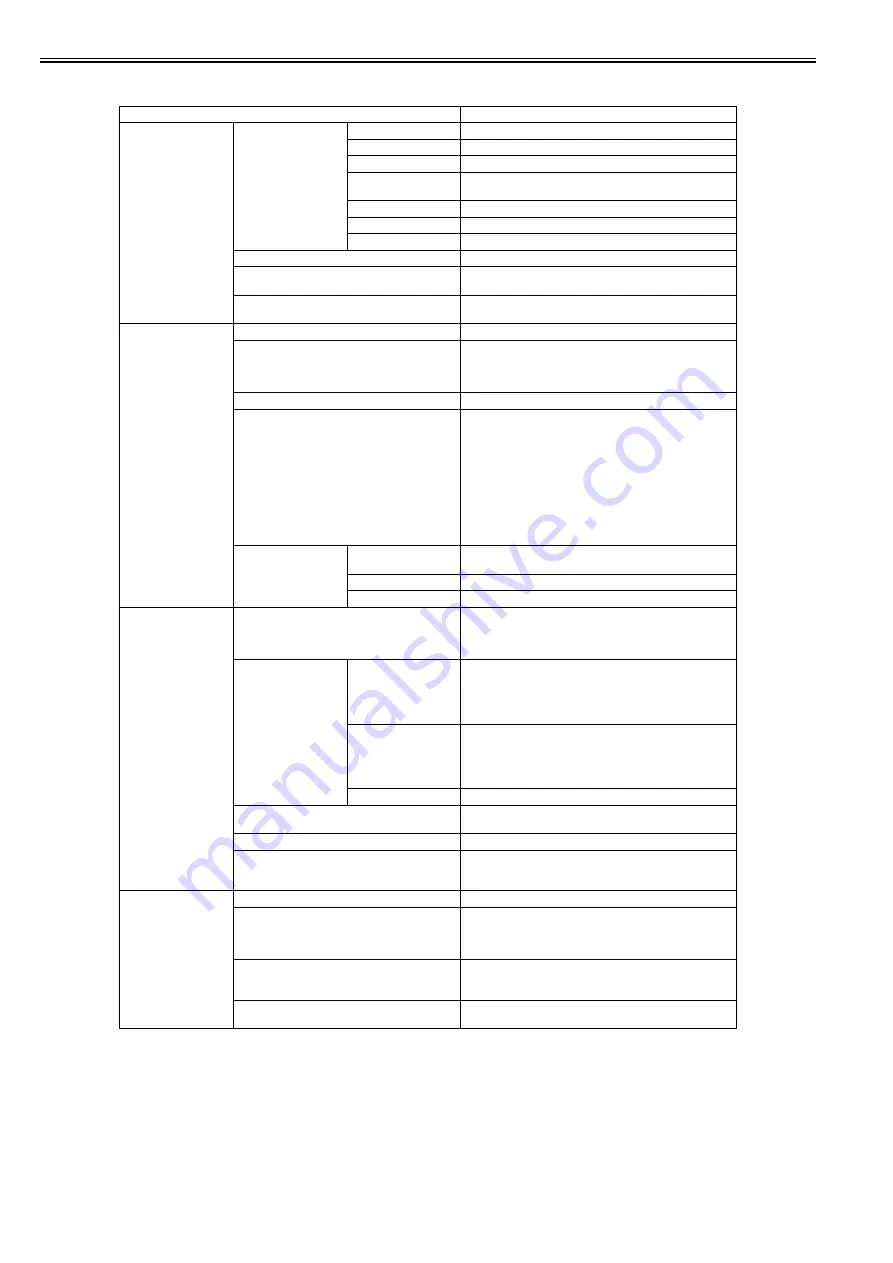
[GL2 Settings]
T-1-21
Setting Item
Description/Instructions
[Quality Manager]
[Color Mode]
[Monochrome]
Print by the monochrome.
[Color (CAD) 1]
Print by the standard color.
[Color (CAD) 2]
Print by the bright color.
[Color (CAD) 3]
Print by the color emulated the Canon iPF500/iPF600/iPF700/
iPF510/iPF610/iPF710/iPF605/iPF720/iPF810/iPF820.
[Color (CAD) 4]
Print by the color emulated the HP Designjet 500/800.
[Color (CAD) 5]
Print by the color emulated the HP Designjet 1000.
[Color (CAD) 6]
Print by the color emulated the HP Designjet 4000/4050.
[Print Quality]
Select the print quality.
[Input Resolution]
Choose the printer input resolution from between [600dpi] and
[300dpi].
[Print (Economy)]
Prints with a lower grade of print than normal, but with less ink
consumption. Select [ON] to economize on inks.
[Paper Manager]
[Paper Source]
Select how to feed paper for printing on the HP-GL/2.
[Margin]
Set the top/bottom and left/right margins of the paper. For cut-
sheet, the trailing edge margin is 23mm.
However, if the leading edge margin is set with [Paper Details],
that value has priority.
[Conserve Paper]
Prints by economizing on paper.
[Auto Rotate]
If a document has its long side shorter than the roll width, the
page rotates by 90 degrees automatically to economize on paper.
If a document contains horizontally long data such that it has its
long side longer than the roll width and its short side shorter than
the roll width, the page rotates 90 degrees to print within the
boundaries of the paper.
HP RTL cannot rotate.
In case of HP RTL image, the image may be truncated or a blank
paper may be ejected because the image cannot be rotated even
if the paper size is rotated by 90 degrees. In that case, set [Auto
Rotate] to [Off].
[Nesting]
[Use Nesting]
Select [On] to print pages when they are tiled fully to the roll
width, instead of printing them one by one.
[Nesting WaitTime]
Set the time to elapse before printing.
[Cut Lines]
Select [On] to print perforated lines between pages.
[Line & Pen Manager]
[Enable merge]
When lines overlap, set whether to merge or overwrite the colors
of the overlapping lines.
Select [Off] to overwrite with the line printed later. Select [On]
to merge all overlapping colors.
[Pen Setup]
[Select Palette]
Select the value related to pen from [Software], [Palette A],
[Palette B], or [Factory].
Select [Software] to print according to the application side
instruction. Select [Palette A] or [Palette B] to print with value
set by [Define Palette].
[Define Palette]
Set [Width], [Color], and [Line Attributes] for the palette's [Pen
Number]. Select [Factory] to check the value when [Factory] is
selected for [Select Palette].
For [Line Attributes], select the shape of line end and joint
between lines as [No Setting] or [Circle Setting].
[Reset Palette]
Return the [Define Palette] settings to factory settings.
[Smoothing]
Choose whether to draw an arc with a smooth curve or with a
polygon.
[ThickenFineLines]
Select [On] to print thin lines clearly.
[AdjustFaintLines]
If thin lines print in a tint of color varied from other patterns,
selecting [Off] may provide the print result as intended, though
the thin lines may print, interrupted, depending on the color.
[ProcessingOption]
[Warning]
Select [On] to display warnings during GL2.
[On-the-Fly]
In printing data consisting solely of HP RTL, if the data is slow
to print, select [On] to expedite the time at which the data starts
printing. Verify the print result to make sure that images are not
chipped in this case.
[PageSizeProcess1]
Normally, an image is printed inside margins necessary for
printing, but if the image data itself has margins, the print
position will not be offset when this is set [On].
[PageSizeProcess2]
Select [On] to determine the paper size based on the drawing
area.
Содержание imagePROGRAF iPF815
Страница 2: ......
Страница 6: ......
Страница 11: ...Chapter 1 PRODUCT DESCRIPTION...
Страница 12: ......
Страница 14: ......
Страница 63: ...Chapter 1 1 49 3 Push in the left and right Basket Rods toward the back all the way until they stop F 1 35...
Страница 74: ......
Страница 75: ...Chapter 2 TECHNICAL REFERENCE...
Страница 76: ......
Страница 86: ...Chapter 2 2 8 Printing Modes...
Страница 87: ...Chapter 2 2 9...
Страница 129: ...Chapter 3 INSTALLATION...
Страница 130: ......
Страница 132: ......
Страница 146: ...Chapter 3 3 14...
Страница 147: ...Chapter 4 DISASSEMBLY REASSEMBLY...
Страница 148: ......
Страница 150: ......
Страница 207: ......
Страница 208: ......
Страница 209: ...Chapter 5 MAINTENANCE...
Страница 210: ......
Страница 212: ......
Страница 216: ...Chapter 5 5 4 5 Close upper cover 1 F 5 6 1...
Страница 217: ...Chapter 5 5 5...
Страница 218: ......
Страница 219: ...Chapter 6 TROUBLESHOOTING...
Страница 220: ......
Страница 222: ......
Страница 249: ...Chapter 7 SERVICE MODE...
Страница 250: ......
Страница 252: ......
Страница 273: ...Chapter 7 7 21...
Страница 274: ......
Страница 275: ...Chapter 8 ERROR CODE...
Страница 276: ......
Страница 277: ...Contents Contents 8 1 Outline 8 1 8 1 1 Outline 8 1 8 2 Warning Error Service Call Error 8 2 8 2 1 Code Table 8 2...
Страница 278: ......
Страница 313: ...Appendix...
Страница 314: ......
Страница 322: ......
Страница 323: ...Feb 27 2017...
Страница 324: ......


