background image

4

MEMO

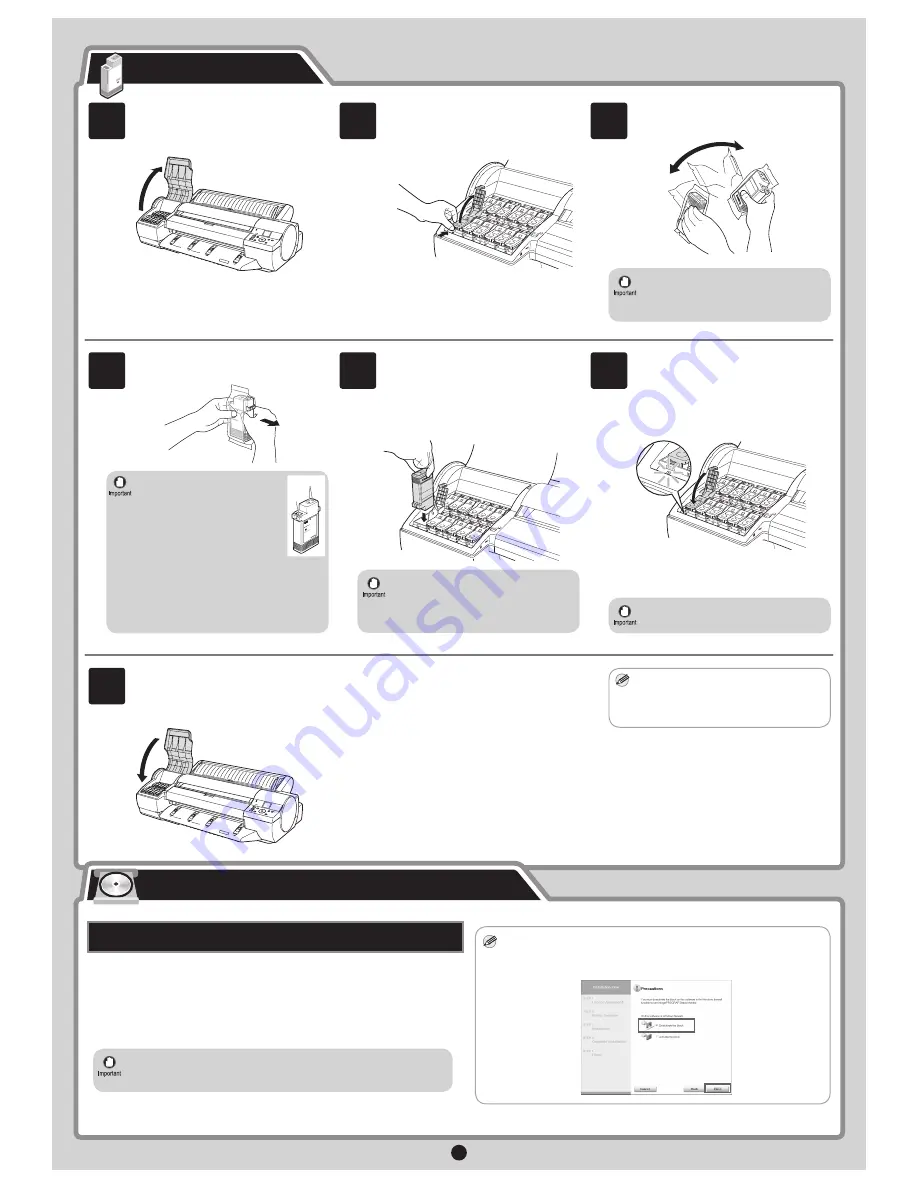
Open the pouch and remove the ink tank.

Insert the ink tank into the holder oriented 

as shown, with the ink holes down.

Close the ink tank lock lever until it clicks 

into place. Make sure the ink lamp lights 

red.

Repeat steps 2 to 6 to install each of the 

ink tanks.

Close the ink tank cover.

After all the ink tanks have been installed, the 

printer automatically starts charging the system 

with ink. Charging the system with ink for the 

first time takes about 20 minutes. Use this time 

to install the printer driver and manuals on your 

computer. If you decide to install the printer 

driver and manuals later, wait for the system to 

be charged with ink and then proceed to page 

12 "Load Paper to Adjust the Printheads".

Open the ink tank cover.

While pressing the stopper of the ink tank 

lock lever inwards, open the ink tank lock 

lever upwards.

Load all 12 ink tanks.

Shake each ink tank gently 7 to 8 times 

before opening its pouch.

You can print from Windows via USB or TCP/IP (network) connections. 

The installation procedure varies depending on how your printer is 

connected. Install the printer driver and the User Manual as follows. 
<Compatible Operating Systems>

Windows 7, Windows Vista, Windows Server 2008, Windows Server 

2003, Windows XP, Windows 2000

Install the Ink Tanks

Install the Printer Driver and the User Manual 

The following screen may be displayed during installation depending on 

the security settings of your computer. 

• Select 

Deactivate the block

 and click 

Next

Windows

• Failure to shake the ink tanks may 

result in reduced print quality because 

ink ingredients have settled on the 

bottom of the tank.

• If the ink lamp is not lit, repeat steps 2, 

5, and 6.

• If the ink tank does not fit in the holder, 

make sure the color of the ink tank lock 

lever matches the color of the ink tank, 

and check the orientation of the ink 

tank.

• Never touch the ink holes (a) 

or metal contacts (b). Touching 

these parts may cause stains, 

damage the ink tank, and affect 

print quality.

a

b

• Avoid dropping the ink tank after removing 

it from the pouch. Otherwise, ink may leak 

and cause stains.

• Do not remove ink tanks to shake them 

after they have been installed. Doing so 

may cause ink to spill.

MEMO

During printer installation, ink fills the 

system between the ink tanks and 

printheads. The ink level quickly falls to 

80% (40% for starter ink tanks), this is 

normal.

• Installation requires administrative rights (such as those of 

Administrator). Be sure to log on using an account with administrative 

rights before installation. 

4

5

6

7

1

2

3

Содержание imagePROGRAF iPF6350

Страница 1: ...inter If an error message is displayed during setup or other problems occur refer to Responding to Messages on page 12 Printer Installation space W x D x H mm iPF6300 iPF6350 Printer alone 1477 1770 6...

Страница 2: ...range tape and packing material from inside the ejection guide b reattach it Lift the belt stopper b from the carriage shaft a and pull it towards you to remove it Plug the power cord into the power s...

Страница 3: ...The display screen shows Open tank cover and install all ink tanks Install the ink tanks Install both printheads Press the Power button to turn on the printer When the following screen appears use the...

Страница 4: ...ystems Windows 7 Windows Vista Windows Server 2008 Windows Server 2003 Windows XP Windows 2000 Install the Ink Tanks Install the Printer Driver and the User Manual The following screen may be displaye...

Страница 5: ...w and click Restart After reviewing the installation results in the Complete Installation window click Next For USB connections Use a USB cable that conforms to the Hi Speed USB specification Connect...

Страница 6: ...fter reading the precautions in the Getting Ready window select Find available printers in the network and click Next MEMO After you have finished setting up the printer and installing the printer dri...

Страница 7: ...ing In the printer menu either set DNS Dync update to On or activate the setting Enable DNS Dynamic Update in RemoteUI Menu Settings User Manual Configuring the Printer s TCP IP Network Settings User...

Страница 8: ...ind available printers in the network and click Next Available printers are listed in the Search Results window Select a printer from the list on either their IPv4 Devices or IPv6 Devices tabs and cli...

Страница 9: ...software title to view a summary of the software After reading the license agreement click Yes In the Printer Selection window select The printer is connected to computers in a network and click Next...

Страница 10: ...rd of a user with administrative rights and click OK Select the country or region where the printer will be used and click Next Confirm that the required installation items are selected and then click...

Страница 11: ...s and click Next MEMO To register another printer click Continue Registration and repeat steps 14 to 16 MEMO If the same model of printer is already registered on the computer a screen is displayed fo...

Страница 12: ...e issue may be easily resolved Common messages and the causes are listed here with corrective actions To respond to error messages other than these refer to the Basic Guide 2 For other detailed printe...

Отзывы: