background image

3

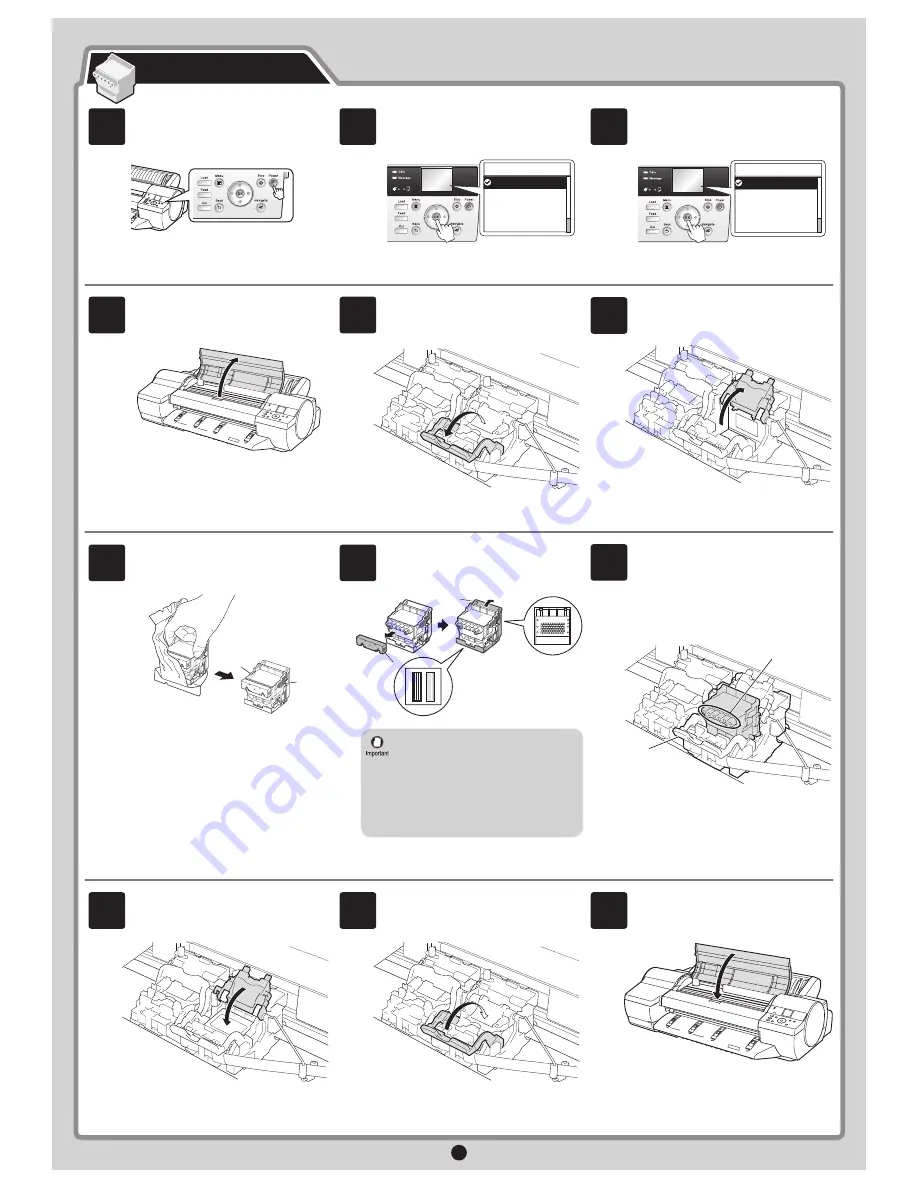
Hold the printhead by the grips (a) as you 

remove it from the pouch.

Lift the printhead fixer cover to open it 

fully.

Remove the orange protective part (a). To 

remove the other orange protective part 

(b), push the grip (c) as you remove it.

Insert the printhead into the carriage (b) 

with the ink holes (a) up and facing the 

front of the printer as shown in the figure. 

Carefully push the printhead firmly into 

the carriage (b), ensuring that the parts 

that were covered by the protective parts 

do not touch the carriage (b).

Pull the printhead fixer cover down toward 

the front to lock the printhead in place.

Press the printhead fixer lever inwards 

until it clicks into place.

Repeat steps 5 to 11 to install the second 

printhead set.

Close the top cover.

The display screen shows 

Open tank 

cover and install all ink tanks

. Install the 

ink tanks.

Install both printheads.

Press the 

Power

 button to turn on the 

printer.

When the following screen appears, use 

the 

 and 

 keys to select a language 

and press 

OK

.

Select your local time zone and press 

OK

.

Install the Printheads

• Never touch the parts covered by the 

protective parts. Doing so may damage 

the printhead and affect printing quality.

• The printhead contains ink, so be 

careful not to spill it once the protective 

parts are removed.

• Do not reattach the protective parts 

after removing them. Dispose of these 

materials according to local regulations.

When the display screen shows 

Open 

Upper Cover

, open the top cover.

Pull the printhead fixer lever forward all 

the way to open it completely.

6

7

8

9

10

11

b

a

12

a

a

a

b

c

㪈㪆㪌

Time Zone

0:London   (GMT)

+1:Paris,Rome
+2:Athens,Cairo
+3:Moscow   
+4:Eerevan,Baku

1

2

㪈㪆㪉

Language

English

ᣣᧄ⺆

Français
Italiano
Deutsch

3

4

5

Содержание imagePROGRAF iPF6350

Страница 1: ...inter If an error message is displayed during setup or other problems occur refer to Responding to Messages on page 12 Printer Installation space W x D x H mm iPF6300 iPF6350 Printer alone 1477 1770 6...

Страница 2: ...range tape and packing material from inside the ejection guide b reattach it Lift the belt stopper b from the carriage shaft a and pull it towards you to remove it Plug the power cord into the power s...

Страница 3: ...The display screen shows Open tank cover and install all ink tanks Install the ink tanks Install both printheads Press the Power button to turn on the printer When the following screen appears use the...

Страница 4: ...ystems Windows 7 Windows Vista Windows Server 2008 Windows Server 2003 Windows XP Windows 2000 Install the Ink Tanks Install the Printer Driver and the User Manual The following screen may be displaye...

Страница 5: ...w and click Restart After reviewing the installation results in the Complete Installation window click Next For USB connections Use a USB cable that conforms to the Hi Speed USB specification Connect...

Страница 6: ...fter reading the precautions in the Getting Ready window select Find available printers in the network and click Next MEMO After you have finished setting up the printer and installing the printer dri...

Страница 7: ...ing In the printer menu either set DNS Dync update to On or activate the setting Enable DNS Dynamic Update in RemoteUI Menu Settings User Manual Configuring the Printer s TCP IP Network Settings User...

Страница 8: ...ind available printers in the network and click Next Available printers are listed in the Search Results window Select a printer from the list on either their IPv4 Devices or IPv6 Devices tabs and cli...

Страница 9: ...software title to view a summary of the software After reading the license agreement click Yes In the Printer Selection window select The printer is connected to computers in a network and click Next...

Страница 10: ...rd of a user with administrative rights and click OK Select the country or region where the printer will be used and click Next Confirm that the required installation items are selected and then click...

Страница 11: ...s and click Next MEMO To register another printer click Continue Registration and repeat steps 14 to 16 MEMO If the same model of printer is already registered on the computer a screen is displayed fo...

Страница 12: ...e issue may be easily resolved Common messages and the causes are listed here with corrective actions To respond to error messages other than these refer to the Basic Guide 2 For other detailed printe...

Отзывы: