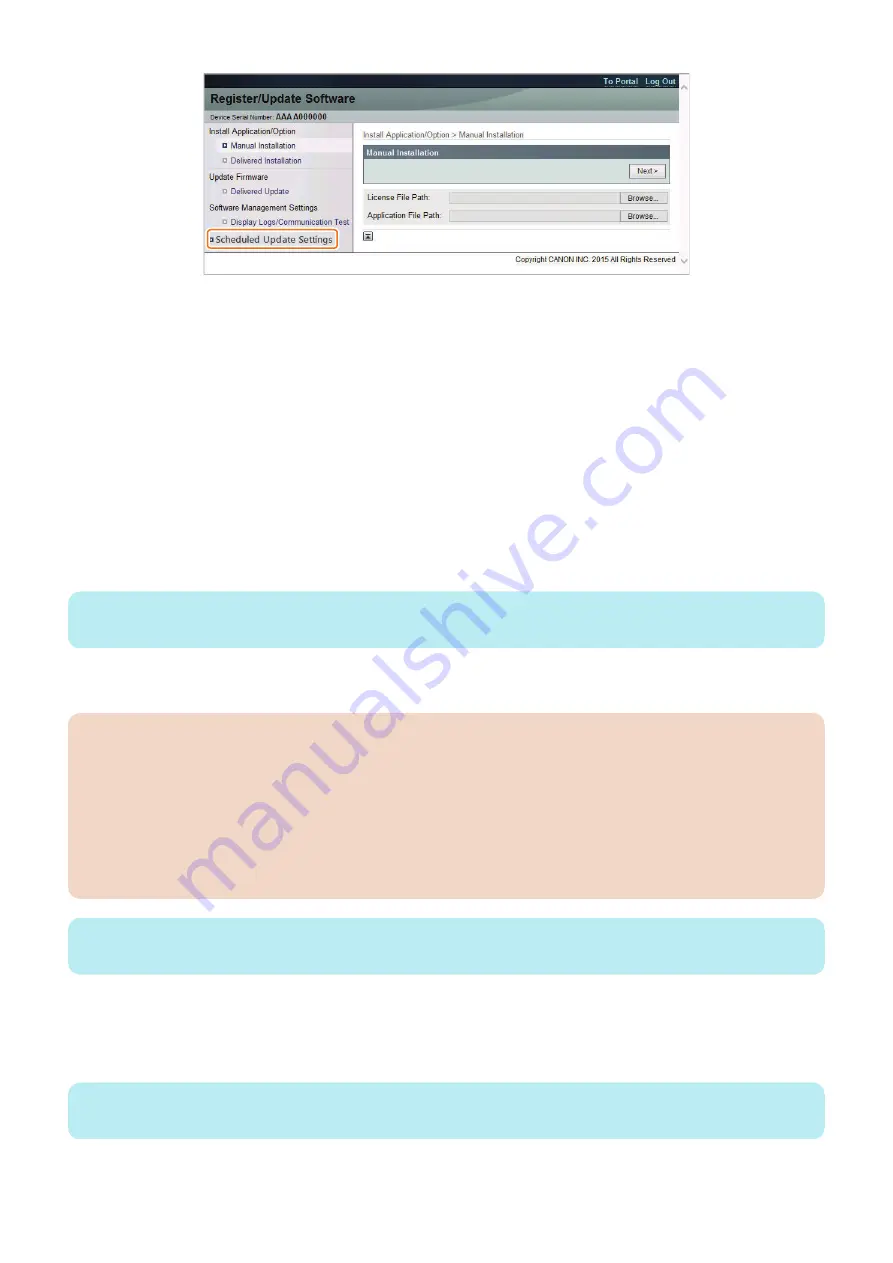
Specify this setting to allow users for the scheduled firmware update using the Updater function.
This operation is not necessary if you do not want to allow users to do so.
1. Enter service mode.
2. Set "On" for the following service mode:
• SERVICE MODE > FUNCTION GR. > MEAP > CDS-LVUP
When this setting is enabled, [Scheduled Update] menu is displayed on [Register/Update Software] screen in [Settings/
Registration] menu.
■ Firmware Update Procedure
● UGW-linked Download and Update (Full-remote Update)
The procedure for updating the firmware using "UGW-linked Download and Update" is described below.
1. The firmware distribution schedule to the certain device should be set on UGW.
NOTE:
See “UGW-linked Download and Update” in Operation Manual of Content Delivery System for Firmware Distribution for details.
The device checks the schedule concerned every 12 hours on UGW. This allows the device to register the firmware
distribution setting, enabling automatic firmware download and update.
CAUTION:
[Device without the function to wait for job completion]
• Explain to the user in advance that a job cannot be accepted during firmware update. Also, it is recommended to
execute the operation during the period of time when no print job is accepted.
[Device with the function to wait for job completion]
• When the following jobs exist at the time of firmware update, firmware update processing is not executed until job
completion.(When the firmware update processing is not executed more than 10 minutes, it will be timeout error.)
• Printing
• I-FAX
NOTE:
To contacts registered for E-mail notification on UGW, the E-mail is sent from UGW upon completing firmware update.
● UGW-linked Download (Remote Distribution Update)
The procedure for updating the firmware using "UGW-linked download" is described below.
1. The firmware distribution schedule to the certain device should be set on UGW.
NOTE:
See “UGW-linked Download” in Operation Manual of Content Delivery System (for Firmware Distribution) for details.
3. Technical Explanation (System)
58
Содержание imageCLASS LBP325dn
Страница 11: ...Safety Precautions Laser 2 Power Supply Lithium Battery 3 Toner Safety 3 Notes on works 4...
Страница 15: ...Product Overview 1 Product Lineup 6 Features 7 Specifications 8 Parts Name 11...
Страница 127: ...Periodical Service 4 Periodically Replaced Parts 118 Consumable Parts 119 Periodical Service 120...
Страница 130: ...Periodical Service Periodical Service No periodic services are required to this machine 4 Periodical Service 120...
Страница 138: ...1 Place paper on the work space 2 Open the Front Cover Unit 3 Remove the cartridge 5 Parts Replacement and Cleaning 128...
Страница 141: ...5 Remove the Right Cover Unit 5 Parts Replacement and Cleaning 131...
Страница 148: ...Procedure 1 Remove the guide 2 Free the Link Arm 3 Remove the shaft 2x 5 Parts Replacement and Cleaning 138...
Страница 166: ...3 Free the harness 2x 1x 4 Remove the Laser Scanner Unit 4x 1x 5 Parts Replacement and Cleaning 156...
Страница 187: ...Adjustment 6 Actions at Parts Replacement 178...
Страница 189: ...Troubleshooting 7 Test Print 180 Cartridge Log Print 186 Troubleshooting 188 Obtaining Debug Log 190...
Страница 204: ...Error Jam Alarm 8 Overview 195 Error Code 197 Jam code 205 Alarm Code 208...
Страница 219: ...Service Mode 9 Overview 210 Service Mode 214...
Страница 243: ...Installation 10 Installation of the host machine 234...


