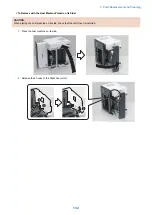
■ Procedure
1. Remove the Upper Cover Unit.
3x
1x
NOTE:
Points to Note at Installation/Removal
Be sure not to let it come in contact with the Full Detection Flag.
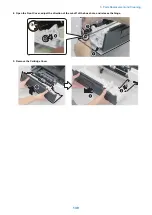
Removing the Cartridge Cover
■ Preparation
1. Remove the cassette.
2.
“Removing the Cartridge” on page 127
5. Parts Replacement and Cleaning
137
Содержание imageCLASS LBP325dn
Страница 11: ...Safety Precautions Laser 2 Power Supply Lithium Battery 3 Toner Safety 3 Notes on works 4...
Страница 15: ...Product Overview 1 Product Lineup 6 Features 7 Specifications 8 Parts Name 11...
Страница 127: ...Periodical Service 4 Periodically Replaced Parts 118 Consumable Parts 119 Periodical Service 120...
Страница 130: ...Periodical Service Periodical Service No periodic services are required to this machine 4 Periodical Service 120...
Страница 138: ...1 Place paper on the work space 2 Open the Front Cover Unit 3 Remove the cartridge 5 Parts Replacement and Cleaning 128...
Страница 141: ...5 Remove the Right Cover Unit 5 Parts Replacement and Cleaning 131...
Страница 148: ...Procedure 1 Remove the guide 2 Free the Link Arm 3 Remove the shaft 2x 5 Parts Replacement and Cleaning 138...
Страница 166: ...3 Free the harness 2x 1x 4 Remove the Laser Scanner Unit 4x 1x 5 Parts Replacement and Cleaning 156...
Страница 187: ...Adjustment 6 Actions at Parts Replacement 178...
Страница 189: ...Troubleshooting 7 Test Print 180 Cartridge Log Print 186 Troubleshooting 188 Obtaining Debug Log 190...
Страница 204: ...Error Jam Alarm 8 Overview 195 Error Code 197 Jam code 205 Alarm Code 208...
Страница 219: ...Service Mode 9 Overview 210 Service Mode 214...
Страница 243: ...Installation 10 Installation of the host machine 234...


