


COPYRIGHT © 1999 CANON INC.
CANON GP605/605V REV.0 JAN. 1999 PRINTED IN JAPAN (IMPRIME AU JAPON)
13-3
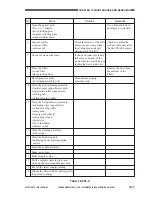
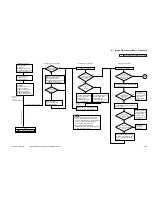
A . Image Adjustment Basic Procedure
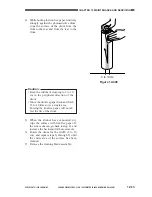
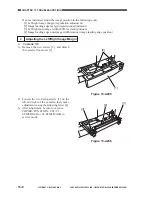
Turn the adjusting screw at
the front of the primary
charging assembly
counterclockwise. (1.5 mm
max. in one direction)
Make several copies of the
NA3 Chart.
Generate several of the
following test prints:
[1] PG4 halftone (printer)
[2] PG6 blank (reader)
[3] PG7 halftone (reader)
[4] PG8 solid black (reader)
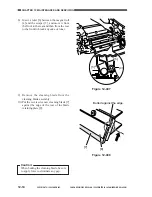
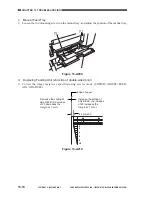
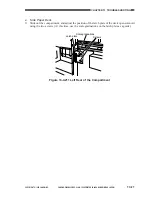
Checking the Scanner Side
Check the following:
[1] Wire height.
[2] Fixing roller nip
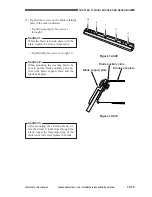
Turn the adjusting screw at
the rear of the primary
charging assembly
counterclockwise. (1.5 mm
max. in one direction)
Turn off and then on the power switch,
and generate one test print of PG7.
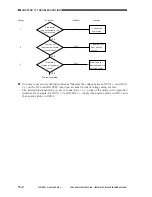
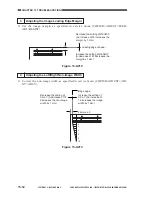
[1] If the difference in density still exists after
turning the adjusting screw 1.5 mm in one
direction (a single full turn causes a change of
0.7 mm), check the charging assembly,
scanning lamp, and scanner for dirt.
[2] When turning the adjusting screw
counterclockwise, be sure that the height of the
wire is not 7.5 mm or less.
Check the
potential control
system; if normal,
replace the
photosensitive
drum.
Check the following;
if normal, replace the
appropriate part:
[1] Laser output
[2] Potential control
system
Set OPTION>BODY>CNT-W/HM
in service mode between 2 and 7.
· A higher setting increases the
density.
Replace the
developing
assembly.
<Making Pre-Checks>
<Checking the Density Slope>
<Checking Solid Black>
YES
NO
YES
NO
YES
NO
NO
YES
NO
YES
YES
NO
If the test prints have a fault,
If a copy image has a fault,
<Making Image Initial Checks>
YES
YES
NO
NO
Check PG7 (halftone).
Check PG8 (solid black).
Caution:
Select COPIER>DISPLAY>DPOT>VDM
in service mode.
Select COPIER>DISPLAY>DPOT>VL1M
in service mode.
A
Clean the following, and check for
adhesion of foreign matter:
[1] Dust-proofing glass
[2] Charging assemblies Clean the
following, and check for
adhesion of foreign matter:
Check the following:
[1] Drum cleaning blade
[2] Separation claws
Does the
copy have vertical
lines?
Is there
a difference in
density between front
and rear?
Is the rear
lighter?
Is
the copy
free of fuzzy images
and is its density
proper?
Is the
reading of VDM
between 432
and 452?
Is
the reading
of VL1M between 62
and 82?
Is the test
print of PG6 (blank)
foggy?
Clean the following:
[1] Grid wire
[2] Primary charging wire
[3] Pre-transfer charging wire
[4] Transfer charging wire
Output Conditions
·
AE OFF
·
Fat 5
·
Potential control ON
Execute potential
control.
Go to
2
Does
the copy have
vertical lines?
1 Checking the Printer Side (1/2)
Содержание GP605
Страница 3: ......
Страница 4: ......
Страница 24: ......
Страница 56: ......
Страница 78: ......
Страница 116: ......
Страница 124: ......
Страница 148: ......
Страница 150: ......
Страница 168: ......
Страница 170: ......
Страница 250: ......
Страница 252: ......
Страница 342: ......
Страница 390: ......
Страница 392: ......
Страница 464: ......
Страница 466: ......
Страница 512: ......
Страница 514: ......
Страница 572: ......
Страница 574: ......
Страница 590: ......
Страница 592: ......
Страница 657: ...COPYRIGHT 1999 CANON INC CANON GP605 605V REV 0 JAN 1999 PRINTED IN JAPAN IMPRIME AU JAPON 13 65 ...
Страница 854: ......
Страница 870: ......
Страница 874: ......