background image

Printing on Envelopes

You can stack up to 15 envelopes in the sheet feeder or you can manually feed envelopes
one at a time.

U.S. Commercial number 10 (COM10) envelopes, and European DL envelopes are
recommended. You may be able to stack envelopes of other sizes in the sheet feeder;
however, Canon cannot guarantee consistent performance on envelope sizes other than
COM10 and DL.

The following envelopes are not recommended because they may cause jams or smears,
or may damage your printer.

Envelopes with windows, holes, perforations, cutouts, and double flaps.

Envelopes made with special coated paper or deeply embossed paper.

Envelopes using peel-off sealing strips.

Envelopes in which letters have been enclosed.

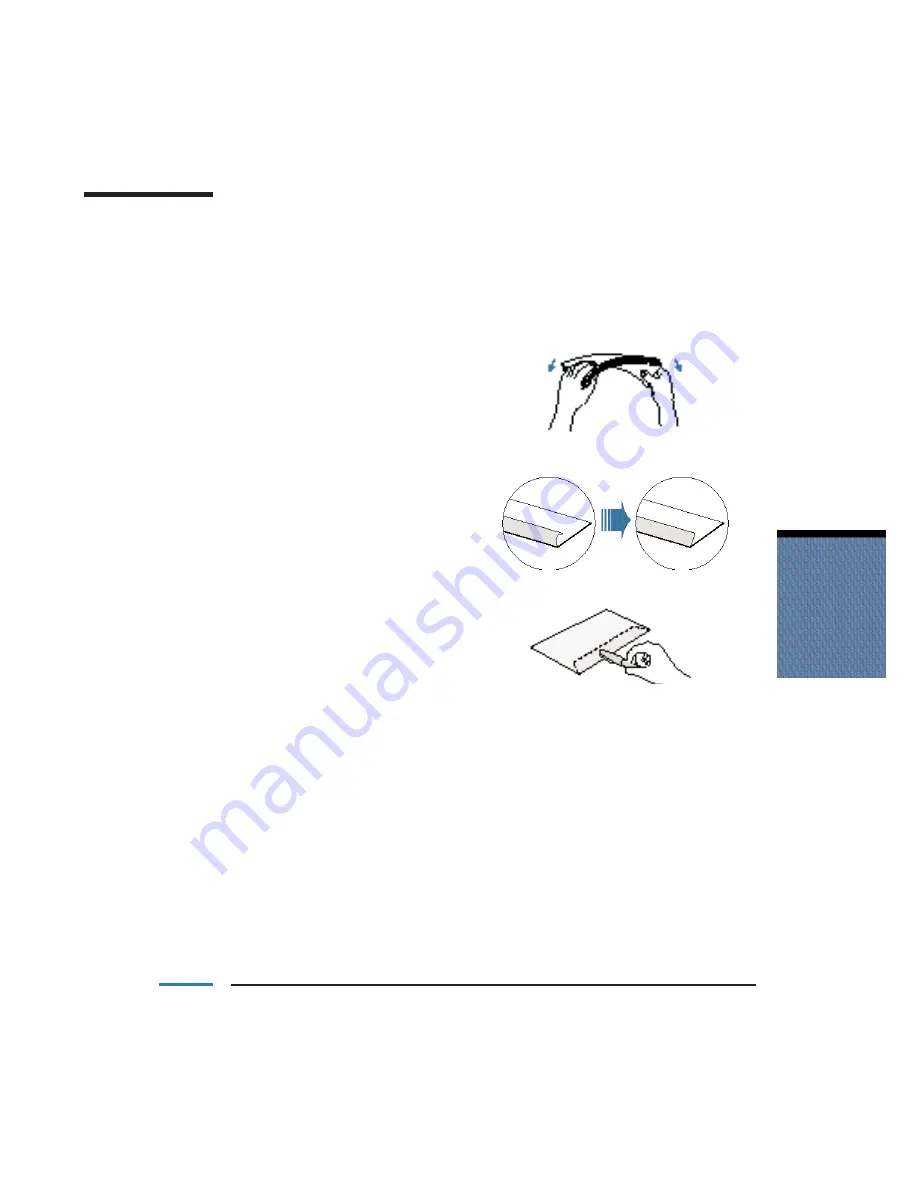
When you are ready to print on envelopes, follow these steps to stack envelopes in the
sheet feeder. (You can also manually feed envelopes one at a time.)

Paper Handling

Chapter 3

Paper Handling

3-11

PRESS DOWN
FIRMLY ON THE
EDGES OF THE
FLAP

Содержание BJC-6000 Series

Страница 1: ...oducts described Your printer and the software media included with your printer have been sold to you subject to the limited warranties set forth in the warranty card and license agreement enclosed with the respective product All software is licensed AS IS as described in the license agreement enclosed with the software media Further CCSI reserves the right to make changes in the specifications of...

Страница 2: ...al to master basic operations and when you need to know the specifications of the printer Conventions This User s Manual uses the following conventions to alert you to information that will help you operate the printer correctly and safely Notes provide advice or suggestions regarding the use of the printer Cautions alert you to operations that could cause damage to your hardware or software or ca...

Страница 3: ...iv ...

Страница 4: ... 2 4 The Windows Tabs 2 5 The General Tab 2 5 The Details Tab 2 6 The Main Tab 2 7 The Paper Tab 2 8 The Features Tab 2 9 The Maintenance Tab 2 10 Specifying Your Printing Options on the Windows Tabs 2 11 Recommended Print Mode Settings 2 11 Customizing the Print Mode 2 13 The Quality Tab 2 13 The Color Tab 2 14 The Save Tab 2 15 Using the BJ Printer Status Monitor 2 16 Printing Speed Versus Color...

Страница 5: ...eaning the Print Heads 4 9 BJ Cartridge Guidelines 4 10 BJ Cartridge and BJ Tank Maintenance 4 10 Replacing BJ Tanks and BJ Cartridges 4 11 Replacing a BJ Tank in a BJ Cartridge 4 12 Replacing a BJ Cartridge 4 16 Aligning the Print Heads 4 20 Aligning the Print Heads Automatically 4 21 Aligning the Print Heads Manually 4 22 Storing a BJ Cartridge 4 25 Transporting the Printer 4 26 5 Troubleshootin...

Страница 6: ...nter Describes Canon s customer support services Supplies and Accessories Your BJC 6000 Series printer supports excellent and unique print media options that will allow you to produce dazzling professional and fun presentations All of these print media are specially designed and manufactured to work with your Canon color printer so you can produce the finest output possible Canon has an extensive ...

Страница 7: ...or BJ Cartridge BCI 3C Cyan BJ Tank BCI 3M Magenta BJ Tank BCI 3Y Yellow BJ Tank For the BC 32 Photo BJ Cartridge BCI 3PBK Photo Black BJ Tank BCI 3PC Photo Cyan BJ Tank BCI 3PM Photo Magenta BJ Tank The BJ cartridges for this printer contain the Bubble Jet print head only You install the BJ tanks into the BJ cartridges after you install the cartridge print head unit in the printer The BJ tanks co...

Страница 8: ...ge caused to Canon s Bubble Jet products that is attributable to the use of third party parts or supplies including inks The limited warranty remains in effect for its life once that particular damage has been properly repaired For optimum printing results Canon recommends that you use Canon BJ cartridges Canon Specialty Papers Canon manufactures numerous specialty papers including Bubble Jet Pape...

Страница 9: ...ranty 1 800 423 2366 Or for a charge of 2 50 per minute to a maximum of 25 00 per call 1 900 246 1200 To find out about all Canon products and accessories to download the latest drivers and to explore all your technical support options including e mail support visit the Canon Computer Systems Inc Web site www ccsi canon com 24 hour toll free Fax Retrieval System 1 800 526 4345 To download the late...

Страница 10: ...about the different service options available to you Save your sales receipt for proof of purchase In the event that your printer needs service you will need your proof of purchase to obtain warranty service If you feel your BJC 6000 Series Color Bubble Jet Printer needs servicing contact Canon on the World Wide Web www ccsi canon com to locate the Canon Authorized Service Facility ASF nearest you...

Страница 11: ...1 6 Introduction Chapter 1 ...

Страница 12: ...can use any type of printer with your computer you must install software that allows the printer and computer to communicate this software is called a printer driver The printer driver tells the computer what kind of a printer you are using The printer driver also controls the various settings such as print quality and paper type You define these settings within the printer driver and the printer ...

Страница 13: ... using to create the document and open the document you want to print Make sure the Canon BJC 6000 is selected as your default printer Choose Print or Print Setup from the File menu You will see a screen similar to this Click on the Properties or Setup button if you want to make any adjustments as appropriate for printing your document See Printer Setup Within Windows 98 and Windows 95 or Printer ...

Страница 14: ...mand from the File menu From the Printers folder you can select the printer click the right mouse button and then select Properties from the drop down list Using the Printer Driver in Windows 98 and Windows 95 The printing options are displayed on the following Windows 98 and Windows 95 tabs General Details Main Paper Features and Maintenance See The Windows Tabs section page 2 5 for details You m...

Страница 15: ...from the File menu of most applications that run in Windows If the Print Setup option does not appear in the File menu for your application refer to the user s manual supplied with the application It should provide information about changing the printer setup parameters In Windows 3 1 the printing options are displayed on these tabs Main Paper Features and Maintenance See the next section The Wind...

Страница 16: ...General Tab This tab allows you to add comments regarding the printer driver and print a test page or a separator page You see this tab in Windows 98 and Windows 95 only and only when you open the Properties dialog box from the Printers folder not from within a Windows application Using the Printer With Windows Chapter 2 Using the Printer With Windows 2 5 ADD COMMENTS HERE PRINT A SEPARATOR PAGE P...

Страница 17: ...ol settings and time out settings You see this tab in Windows 98 and Windows 95 only and only when you open the Properties dialog box from the Printers folder not from within a Windows application DEFINE THE PRINTER S PORT SPECIFY THE PRINTER DRIVER SPECIFY TIMEOUT SETTINGS SPECIFY PORT SETTINGS SPECIFY SPOOL SETTINGS ...

Страница 18: ...inter With Windows Chapter 2 Using the Printer With Windows 2 7 SELECT YOUR PRINT MODE WHICH INCLUDES PRINT QUALITY AND COLOR SETTINGS ILLUSTRATES THE CURRENT PAPER SETTINGS CLICK HERE TO PRINT COLOR DATA AS GRAYSCALE CLICK HERE TO CREATE A CUSTOMIZED PRINT MODE SETTING SEE PAGE 2 13 FOR DETAILS SPECIFY THE TYPE OF BJ CARTRIDGES INSTALLED SELECT YOUR MEDIA TYPE RESTORE DEFAULT SETTINGS ...

Страница 19: ...g the Printer With Windows Chapter 2 SPECIAL PRINTING FEATURES SCALED TURN ON TO ENLARGE OR REDUCE PRINTING PAGE LAYOUT TURN ON TO PRINT 2 OR 4 PAGES ON A SINGLE SHEET BANNER TURN ON FOR BANNER PRINTING SPECIFY PAGE ORIENTATION HOW DOCUMENT PRINTS ON A PAGE FOR SCALED OR PAGE LAYOUT PRINTING SPECIFY SIZE OF PAPER IN PRINTER RESTORE DEFAULT SETTINGS SPECIFY YOUR PAPER SIZE ...

Страница 20: ...ter 2 Using the Printer With Windows 2 9 ENABLE OR DISABLE BACKGROUND PRINTING FEATURES SPECIFY NUMBER OF COPIES TO PRINT ENABLE PRINTING IN REVERSE ORDER LAST PAGE TO FRONT PAGE ENABLE COLLATING FOR MULTIPLE COPIES PRINT BORDERS TO SEPARATE PAGES ENABLE TO PRINT 2 OR 4 PAGES ON A SINGLE SHEET CLICK TO VIEW OR CHANGE THE STAMP SETTINGS RESTORE DEFAULT SETTINGS SPECIFY A GRAPHIC STAMP TO BE PRINTED...

Страница 21: ...3 1 2 10 Using the Printer With Windows Chapter 2 CLEAN THE PRINT HEAD CUSTOM CLEANING DEEP CLEANING ALLOWS YOU TO SELECT SPECIAL FEATURES START THE BJ PRINTER STATUS MONITOR SEE PAGE 2 16 PERFORM TEST PRINTS NOZZLE CHECK PATTERN PRINT HEAD ALIGNMENT POWER THE PRINTER ON OR OFF CLICK ON THE BOX NEXT TO THE SETTING TO ENABLE CHECK OR DISABLE NO CHECK THE SETTING WHEN THE CURSOR IS OVER THE SETTING ...

Страница 22: ...l button To save your settings without exiting click the Apply button To access helpful information about the printer and the printer driver click on the Help button To find out about a setting click the question mark in the upper right corner Move the larger question mark to the setting you are interested in and click again Recommended Print Mode Settings You select the Print Mode options on the ...

Страница 23: ... 30 Black and BC 31 Color BJ Cartridges with this setting Draft Optimum setting for test printing emphasizes speed rather than quality Use the BC 30 Black and BC 31 Color BJ Cartridges with this setting Photo Optimum setting for printing photographs Use the BC 30 Black and BC 31 Color BJ Cartridges with this setting Graphics Optimum setting for printing graphic images Use the BC 30 Black and BC 31...

Страница 24: ... ALLOWS THE PRINTER TO DETERMINE THE TYPE OF IMAGE DATA AND APPLY THE APPROPRIATE DITHERING METHOD FINE FAST USE FOR HIGH SPEED PRINTING OF CHARACTERS OR TABLES FINE USE FOR PRINTING GRAPHICS OR CHARTS WITH CLEARLY DEFINED COLOR BOUNDARIES DIFFUSION USE FOR PRINTING NATURAL COLOR IMAGES SUCH AS PHOTOGRAPHS SPECIFY MEDIA TYPE SPECIFIES PAPER FEED METHOD OF AUTO FEED SELECT THE TYPE OF CARTRIDGE INS...

Страница 25: ...S PRINTING SPEED RESTORES THE DEFAULT SETTINGS ADJUSTS THE LUMINOSITY OF THE FOUR COLOR INKS SPECIFIES WHETHER PRINTED OUTPUT EMPHASIZES INTER MEDIATE TONES OR BRIGHT SHARP BASIC COLORS ADJUSTS THE PRINT INTENSITY TO MAKE THE OVERALL PRINTED OUTPUT DARKER OR LIGHTER ADJUSTS THE CONTRAST AMONG INTERMEDIATE TONES THAT FALL BETWEEN BLACK AND WHITE SPECIFIES HOW TO PROCESS COLOR VALUES SO THEY BEST AP...

Страница 26: ...t in the future Using the Printer With Windows Chapter 2 Using the Printer With Windows 2 15 DISPLAYS CURRENT PRINT MODES SPECIFY A NEW NAME FOR THIS PRINT MODE SPECIFY A NEW ICON FOR THIS PRINT MODE SETTING SAVE THE NEW PRINT MODE SETTING CHANGES THE ORDER OF THE ICONS MOVES THE SELECTED ICON DESCRIBES THE NEW PRINT MODE ...

Страница 27: ...ng in Windows The BJ Printer Status Monitor is automatically enabled therefore you will see the following screen whenever you initiate a print operation You can also start the BJ Printer Status Monitor by clicking the Start Status Monitor button on the Maintenance tab see page 2 10 2 16 Using the Printer With Windows Chapter 2 ...

Страница 28: ... the computer you are using Add a permanent swap file in Windows 3 1 Under the 386 Enhanced icon in the Windows Control Panel add or create a permanent swap file that is from 4 MB to 9 MB The computer will be able to prepare the print file faster See your Windows documentation for instructions Avoid diffusion halftones Choose Diffusion for Halftoning only when printing final output or photographic...

Страница 29: ...o many colors can make the image confusing and less effective as well as cause the print speed to slow down Use primary colors when printing presentation graphics Use black yellow blue green and red when possible The computer will need to calculate and transfer less dot information Use Plain Paper as the Media Type The print head will make one or two passes for each printed line Use smaller graphi...

Страница 30: ...not require special ink jet papers However the print quality varies with different paper types Be sure to test a type of paper before you purchase a large quantity Plain Paper The printer supports paper sizes of letter letter plus legal A4 and A4 plus in portrait orientation You can use regular copier paper cotton bond papers and typical letterhead Always use paper without curls folds staples or d...

Страница 31: ...Printing on the Paper tab Brilliant White Paper Canon s unique paper formulation gives you a bright white printing surface that produces incredibly brilliant colors and dark crisp black text This paper works great for everyday use as well as proposals color presentations color charts and graphs flyers and newsletters You can print on both sides of the sheet In the printer driver select Plain Paper...

Страница 32: ...l covers or any full bleed design In your printer driver select Plain Paper for the Media Type and Letter for Page Size when you load this paper Make sure the settings in your software application match these settings Fabric Sheets Use Fabric Sheets for Canon Bubble Jet printers to print banners pillow covers scarves flags and other textile items Use these sheets for appliqués and other craft and ...

Страница 33: ...3 4 Paper Handling Chapter 3 ...

Страница 34: ...e will adversely affect the print quality When storing paper put the paper back in its original package and avoid locations that are exposed to direct sunlight or that are subject to high temperatures or humidity To avoid bending or wrinkling the paper store the package on a flat surface After printing do not touch the print side until the ink is dry If water gets on the printed media do not touch...

Страница 35: ... to 6 sheets in length Brilliant White Paper Up Auto Approx 130 High Resolution Paper Up Auto Approx 100 T Shirt Transfers Down Auto 1 Bubble Jet Paper Up Auto Approx 130 Greeting Cards Down Auto 1 LetterPlus Letterhead Up Auto 1 Paper Fabric Sheets Down Auto 1 Transparencies Up Auto 30 Back Print Film Up Auto 10 Other heavier weight print media Down Manual 1 max thickness 0 6 mm Envelopes Single ...

Страница 36: ...conditions such as extreme temperatures or humidity If you have trouble with special papers becoming skewed or feeding multiple sheets do not stack them in the sheet feeder Manually feed them one sheet at a time Automatically Feeding Paper Prepare the printer Make sure the printer is turned on Pull the paper support up until it stops Lower the paper output tray and pull out its extension Make sure...

Страница 37: ...ial paper Auto Feed Guidelines When automatically feeding stacks of paper follow these guidelines Do not open the front cover while printing This will cause the printer to pause Do not leave paper stacked in the printer for long periods of time longer sheets of paper may become bent or curled over time This may cause the paper to misfeed or jam If your printed page contains lots of graphics the in...

Страница 38: ...or the tab on the right side of the sheet feeder stacking too much paper may cause paper feeding or printing problems Make sure there are no gaps between the stack of paper and the paper guide nor the right edge of the sheet feeder Manually Feeding Paper You use the manual feed function when printing on heavier weight print media 17 lb to 143 lb 64 g m2 to 500 g m2 or paper thickness up to 0 6 mm ...

Страница 39: ...on Then in the Quality tab select Manual Feed for the Paper Feed type Insert the single sheet With the print side up align the left edge of the sheet with the left side of the manual feed slot on the back of the printer Insert the sheet into the manual feed slot until it stops and hold it in place for about one second until it feeds partially into the printer 3 10 Paper Handling Chapter 3 ...

Страница 40: ...d DL The following envelopes are not recommended because they may cause jams or smears or may damage your printer Envelopes with windows holes perforations cutouts and double flaps Envelopes made with special coated paper or deeply embossed paper Envelopes using peel off sealing strips Envelopes in which letters have been enclosed When you are ready to print on envelopes follow these steps to stac...

Страница 41: ...printer is turned on Make sure the paper thickness lever is pressed down to the position for envelopes A Pull out the paper output tray and extension 3 12 Paper Handling Chapter 3 PRINT SIDE ADDRESS SIDE PAPER OUTPUT TRAY AND EXTENSION ...

Страница 42: ... the way around the envelopes to remove any curls and to expel air from inside the envelopes To remove curling from envelopes hold the edges of the envelopes diagonally and bend gently Make sure any curls are removed from the flap of each envelope Use a pen or similar object to flatten the flaps Paper Handling Chapter 3 Paper Handling 3 13 ...

Страница 43: ...until it stops Align the edge of the paper guide with the left edge of the stack of envelopes Start your print operation Make sure the printer is turned on Set the envelope properties in the printer driver if necessary Normally you specify the envelope settings in your software application Remove each envelope Remove each printed envelope as it is ejected from the printer 3 14 Paper Handling Chapt...

Страница 44: ...r paper dry completely before storing them Paper type Drying time approx Canon High Gloss Photo Film 10 minutes Canon Glossy Photo Paper or Cards 2 minutes Canon Fabric Sheet 1 hour Canon Back Print Film 15 minutes Canon Transparencies 15 minutes When a sheet of film has dried completely cover its printed side with a sheet of plain not coated paper before storing it this is recommended even if you...

Страница 45: ...matte nonglossy side of the film Your data is printed in mirror image so it can be viewed from the front or glossy side using a back lighting device If Back Print Film becomes curled follow these steps to uncurl it Cover the non glossy side of the film with a sheet of plain paper Roll the film and paper up in the direction opposite the curl Do not roll the film too tight The film and paper rolled ...

Страница 46: ...r support and paper output trays are extended Insert the cleaning sheet Remove the two pieces of tape from the sheet Insert the sheet with the sticky side out toward you and down going into the sheet feeder Adjust the paper guide to the edge of the cleaning sheet Feed the sheet Make sure the printer is on Press and hold the RESUME button The printer beeps once slowly Continue to hold down the RESU...

Страница 47: ...To avoid paper jams smearing and other problems do not open the printer s cover during printing Use the fixing agent that comes with the Fabric Sheet Do not touch newly printed fabric sheets until the ink is completely dry This takes about one hour Do not remove the film from the back of the sheet until after printing Set up the printer Make sure the printer is turned on Make sure the paper suppor...

Страница 48: ...from your Windows application Dry and then wash the fabric sheet Remove the fabric sheet as it is ejected from the printer Let the printed fabric sheet set for about one hour to allow the ink to completely dry Do not touch the printed side until the ink is completely dry When dry peel the film backing from the printed fabric sheet Wash the printed fabric sheet for about three minutes under lukewar...

Страница 49: ...ge Printing on banner paper requires quite a bit of ink Check the BJ tanks in your BJ cartridges to make sure they have enough ink before you start the print operation For best print results on banner paper use light design patterns To prevent ink from running over the edges of the sheet print within the specified margins See page A 5 for details To prevent the ink from smearing do not allow the p...

Страница 50: ...ding to the length you need The minimum length is two sheets The maximum length you can use is six sheets 66 inches or 1676 mm Always leave an extra sheet at the end of the banner just in case the type runs over Load the first sheet Align the first sheet of the paper with the right edge of the sheet feeder and slide it into the printer until it stops Adjust the paper guide to the left side of the ...

Страница 51: ...over the edge of the table A dense print will require more time to dry so make sure that wet ink does not stain the desk or the floor Set up the Printer Driver Open the Windows application you are going to use to print From the File menu select Print Then select your print options using the BJC 6000 Series Printer Driver for Windows For Media Type select Plain Paper For the Page size select Letter...

Страница 52: ...o Paper in the printer always use the Loading Support Sheet A provided with the package Prepare the sheets Hold the sheets of Glossy Photo Paper with the whiter sides print sides up and place them on top of the Loading Support Sheet You can load up to 10 sheets of Glossy Photo Paper in the sheet feeder Stack the sheets Tap the stack against a flat surface to align the edges of the Glossy Photo Pap...

Страница 53: ...3 24 Paper Handling Chapter 3 ...

Страница 54: ...inter guidelines Cleaning the printer Performing maintenance Printing the Nozzle Check Pattern Cleaning the print heads Deep cleaning the print heads BJ cartridge guidelines Replacing a BJ tank in a BJ cartridge Replacing a BJ cartridge Aligning the print heads Storing a BJ cartridge Transporting the printer Maintaining the Printer ...

Страница 55: ...ance between the printer and any fluorescent lamp Fluorescent lamps generate electrical noise that may cause printer malfunctions Do not unplug the printer or turn off a power strip to which the printer is attached when the printer s power is turned on This may prevent the print head units from returning to the home position on the right and being capped which may cause the print heads to dry out ...

Страница 56: ...mage the surface of the printer When cleaning the printer avoid the area near the print head on the BJ cartridges Do not touch the print heads Ink may leak out and cause stains Clean the printer regularly to avoid printing problems Remove any ink mist or paper debris from the interior of the printer using a soft cloth moistened with water Clean the exterior of the printer with a soft cloth moisten...

Страница 57: ...tus Monitor opens and displays a message to warn you that a BJ tank has run out of ink After you replace the BJ tank s if there are still signs of poor quality in your printing follow these procedures 4 4 Maintaining the Printer Chapter 4 NOZZLE CHECK PATTERN POOR NOZZLE CHECK PATTERN POOR NOZZLE CHECK PATTERN POOR PRINT A NOZZLE CHECK PATTERN CLEAN THE PRINT HEADS PRINT A NOZZLE CHECK PATTERN REP...

Страница 58: ... the Test Prints option make sure paper is properly loaded in the sheet feeder see Automatically Feeding Paper starting on page 3 6 and the printer is turned on Start the printer driver In Windows 98 and Windows 95 Click the Start button select Settings and then click Printers Right click Canon BJC 6000 and then select Properties In Windows 3 1 Click the Main group in the Program Manager Then clic...

Страница 59: ...olor BJ Cartridges are installed Look at the Nozzle Check Pattern for each BJ cartridge If any colors are missing or if any horizontal lines are broken or missing perform print head cleaning procedure see the next section for details In the alignment head pattern if the lines are not perfectly overlapped align the print heads see page 4 20 4 6 Maintaining the Printer Chapter 4 BC 30 BLACK BJ CARTR...

Страница 60: ...lly performs normal print head cleaning each time you turn it on Cleaning the print heads consumes ink so clean the print heads only when necessary Normal Print Head Cleaning If you are using Windows you can execute print head cleaning from the Maintenance tab in the BJC 6000 Series Printer Driver Start the printer driver and click the Maintenance tab Now click the first Print Head Cleaning icon M...

Страница 61: ...s of the Nozzle Check Pattern are not satisfactory check the BJ Printer Status Monitor for a low ink warning or remove the BJ tanks and visually check the ink levels in the tanks If there is ink in all of the BJ tanks execute print head deep cleaning see page 4 9 You can also start print head cleaning with the RESUME button on the printer Press and hold the RESUME button until you hear one beep an...

Страница 62: ...holds two BJ cartridges The BC 31 Color BJ Cartridge is installed on the right side at all times In the left slot you can install the BC 30 Black BJ Cartridge or a BC 32 Photo BJ Cartridge BJ Cartridge and BJ Tank Maintenance The most important thing you can do to extend the life of your printer and to ensure optimum print quality is take care of the BJ cartridges Spilled ink can stain any surface...

Страница 63: ...f a BJ cartridge or the circuit area on the side The print head area may become hot during printing Replacing BJ Tanks and BJ Cartridges The actual amount of ink that you use will vary depending on the print density of a page If the majority of your output is graphics you may need to change cartridges or tanks more often than when you are printing text only See Appendix A Specifications for detail...

Страница 64: ...t a time to ensure that each new BJ tank is inserted in the correct slot Colors will not print correctly if you insert a BJ tank in the wrong slot To avoid interfering with the ink supply do not touch the opening on a BJ tank Leave the BJ cartridge in the printer when replacing a BJ tank Make sure the printer s power is on Make sure you insert the BJ tank in the correct slot The key below shows th...

Страница 65: ...is on the right Press in on the release tab and then lift the BJ tank up and out of its slot Dispose of the BJ tank properly You may want to place it in a plastic bag to keep from spilling any residual ink Handle the used BJ tank with care to avoid spilling ink on your hands floor furniture or clothing Empty color BJ tanks cannot be refilled Always discard them immediately Maintaining the Printer ...

Страница 66: ... is removed air can get into the BJ tank which will cause the ink to evaporate very quickly Remove the film by pulling on the orange tape Do not attempt to remove the film before you remove the orange tape Twist the orange protective cap in the direction shown by the arrow and remove it Never attempt to reattach a protective cap to a BJ tank Discard the protective cap and protective tape according...

Страница 67: ...ress down until you hear the ink tank lock in place Close the printer cover The printer automatically starts cleaning the print heads and the POWER light blinks This will take about two minutes After print head cleaning is finished the POWER light stays on and the printer is ready for operation Perform another test print to make sure the new color BJ tanks are functioning normally Maintaining the ...

Страница 68: ...k Cartridge Storage Box See page 4 25 for details The BC 31 Color BJ Cartridge must be installed in the right slot of the cartridge holder The BC 30 Black or BC 32 Photo BJ Cartridge must be installed in the left slot of the cartridge holder Before starting make sure the printer is turned on Open the front cover The printer beeps and moves the cartridge holder to the center of the printer If the p...

Страница 69: ...Cartridge Remove the BJ cartridge Remove the entire BJ cartridge with the ink tank in place If you are removing a partially used BJ cartridge store it in the SB 30 Ink Cartridge Storage Box See page 4 25 for details Always hold a BJ cartridge by the circles embossed on the left and right sides of the BJ cartridge Never touch the metal contacts or the print head on a BJ cartridge If you are discard...

Страница 70: ...idge Set the BJ cartridge into the cartridge holder then lower the blue cartridge lock lever until it locks in place Remove the protective tank inside the new BJ cartridge Press the tab on the protective tank and remove it The protective tank protects the BJ cartridge and cannot be used for printing Discard this tank as soon as you remove it do not attempt to re attach it to the BJ cartridge 4 18 ...

Страница 71: ...alled Close the front cover The cartridge holder returns to the home position and print head cleaning starts automatically Do not open the front cover during print head cleaning After you replace a BJ cartridge always align the print heads to ensure optimum print quality Do not attempt to start any other operation until the POWER light stops flashing Be sure to align the print heads after replacin...

Страница 72: ...s 95 Click Start point to Settings and click Printers Right click the Canon BJC 6000 icon and then choose Properties from the pop up window Click the Maintenance tab Windows 3 1 In the Program Manager double click in this order the Main group Control Panel and Printers icon Click the Control button In the printer driver click the Maintenance tab Then click the second icon to the right of the Test ...

Страница 73: ...to align the print heads automatically this is the default you simply start print head alignment from the Maintenance tab A confirmation screen will ask you if you want to perform automatic print head alignment Read the screen and click OK Another screen warns you not to start any other operation until the alignment is complete again simply click OK The BJ Printer Status Monitor displays the Print...

Страница 74: ...d click OK as needed to continue Check the line patterns on the test print For each pattern note the number where the lines perfectly overlap and appear as one line Enter the necessary adjustments In the Print Head Alignment box click the arrows on the boxes to enter the numbers for each alignment When you are finished click the OK button 4 22 Maintaining the Printer Chapter 4 ...

Страница 75: ... and note the number of the pattern where the lines perfectly overlap and appear as one line Enter the necessary adjustments Click the arrows on the boxes to enter the numbers for each alignment When you are finished click the OK button Complete the alignment Maintaining the Printer Chapter 4 Maintaining the Printer 4 23 ...

Страница 76: ...he Nozzle Check Pattern On the Maintenance tab click the first icon next to Test Prints The Nozzle Check Pattern looks like this see page 4 6 for details 4 24 Maintaining the Printer Chapter 4 CLICK THIS ICON ...

Страница 77: ...dge Storage Box When opening the Ink Cartridge Storage Box press in on the release tab that locks the cover in place Carefully set the cartridge in the storage box You must insert the cartridge correctly or the storage box will not close The protective cap must be removed from the cartridge before you set it in the storage box Close the storage box Be sure the lid snaps closed Whenever you remove ...

Страница 78: ... feeder Detach the interface cable and power cord Close the paper support and output tray Press down the paper support Press in the paper output tray extension and push the paper output tray up against the front of the printer Tape the printer Reattach the packing materials to the paper feed slot of the sheet feeder and the paper output slot on the front of the printer Insert the printer into its ...

Страница 79: ... not remove the BJ cartridges from the printer or ship a BJ cartridge or a BJ tank from which you have removed the protective cap An opened BJ cartridge or BJ tank that is not installed in the printer or in the Ink Cartridge Storage Box may leak and the print head may dry out Maintaining the Printer Chapter 4 Maintaining the Printer 4 27 ...

Страница 80: ...4 28 Maintaining the Printer Chapter 4 ...

Страница 81: ... chapter also contains information to help you solve printer problems It covers a few basic problems and describes how to clear a paper jam For complete problem solving information be sure to use our support services See Canon Customer Care Center in Chapter 1 page 1 4 for details on Canon s customer technical support options Identifying Your Printer Problem Before contacting Canon identify your p...

Страница 82: ... came with your printer for details Basic Problems This section describes these basic problems Cannot install the printer driver Paper does not feed from the sheet feeder An error message appears Printing halts Printout is unsatisfactory Printer beeps and the POWER light flashes orange For all other problems be sure to use Canon s support services described on page 1 4 5 2 Troubleshooting Chapter ...

Страница 83: ...g When the ink or paper runs out or a paper jam occurs the BJ Printer Status Monitor automatically appears Look at the messages and pictures to determine what type of error has occurred Click the Guide tab and proceed as directed by the messages shown Printing resumes once you resolve the error Troubleshooting Chapter 5 Troubleshooting 5 3 ...

Страница 84: ... CD ROM icon in the new window Refer to the Quick Start Guide and proceed with the installation Windows 3 1 Follow the installation instructions in the Quick Start Guide Problem with the Verify your CD ROM drive CD ROM You may need to reduce the speed of your CD ROM To lower the speed cache for the CD ROM drive follow these steps Right click on the My Computer icon on the desktop and click on Prop...

Страница 85: ...raised The paper support should be raised unless you are loading envelopes If the paper support is not raised the media will not slide fully into the paper feed slot and will not feed into the printer correctly Paper wrinkled or Check that you are using appropriate media curled Paper that is folded curled or crumpled will not feed into the printer correctly and may also cause paper jams Auto Feede...

Страница 86: ...r cable fault Try to use another printer cable Make sure the cable is an IEEE 1284 compatible parallel interface cable Another device is Check the LPT1 port connected to LPT1 Make sure the printer is connected to LPT1 Switching device or Check the switching device or external buffer external buffer fault Disconnect the switching device or external buffer and print with the printer connected direct...

Страница 87: ... install the printer driver again To uninstall the printer driver select Programs from the Windows Start menu Then select BJ Printer and click Uninstall Follow the on screen instructions For details about installing the printer driver see the Quick Start Guide A Windows Printing Change the WPS driver port setting to FILE or System WPS driver delete the WPS driver is installed on the To change the ...

Страница 88: ...plication programs you are running and try printing again Sufficient memory Check your memory not available for the Refer to the manual for your software application and software application check that the required amount of memory is allocated to the application If there is not enough memory installed install more memory Refer to the documentation for your computer for information on installing a...

Страница 89: ...nting Halts The print job may Check the POWER light be a finely detailed If the POWER light is slowly flashing then the printer is photograph or operating normally The printer requires more time to illustration process a finely detailed illustration or photograph Printer has been Allow the printer to cool down operating for Interrupt printing at a convenient point turn the a long time printer off ...

Страница 90: ...ick Start Guide for details Parallel cable fault Try to use another printer cable Make sure you are using an IEEE 1284 compatible parallel interface cable Switching device or Disconnect the switching device or external buffer external buffer fault Try printing with the printer directly connected to the computer If you can then print normally the fault is probably in the switching device or externa...

Страница 91: ... the paper Page Size setting size specified in the If your software application allows you to specify the software application paper size in the page setup ensure that the Page Size and printer driver settings in the software application and the printer driver are the same Parallel cable not Check the parallel cable connected correctly Make sure the parallel cable is securely fastened to the compu...

Страница 92: ...monitor because the colors vary depending on the circumstances in which the monitor is viewed and the monitor s color calibration settings For example objects that appear blue on the screen are printed purple and objects that appear pale green on the screen are printed dark green However if the differences are extreme check the items below Print head nozzles in the Print a Nozzle Check Pattern BJ ...

Страница 93: ...e POWER light will light or flash and the printer will beep Count the number of beeps and identify the problem below 2 Paper out paper Set the paper correctly jam or paper feed If paper has jammed in the printer remove the error jam and press the RESUME button See page 5 16 3 Paper jam Remove the jammed paper If paper has jammed in the printer remove the jam and press the RESUME button See page 5 ...

Страница 94: ...n to skip the error so you can continue printing Call the Canon Customer The printer has a built Care Center to find out how to have the waste ink in waste ink tank that tank replaced immediately holds the ink used by print head cleaning When the waste ink tank becomes full the printer When you hear the will beep 10 times the POWER light will flash six printer beep eight times times and printing w...

Страница 95: ...the number of times the POWER light flashes If the light flashes seven or nine times remove the BJ cartridges Re insert the BJ cartridges and try your print operation again If necessary replace the BJ cartridges If the error continues to occur count the number of beeps and flashes and call the Canon Customer Care Center see page 1 4 You may be asked for this information Troubleshooting Chapter 5 T...

Страница 96: ...RESUME If the paper tears off inside the printer turn off the printer Open the printer s cover and remove the paper left inside the printer If you cannot remove the jammed paper press the POWER button twice for one second to eject the jammed paper automatically Start the print job and try again If you are printing high density graphics when a paper jam occurs feed at least two sheets of paper thro...

Страница 97: ...ume printing RESUME button After you have removed the cause of a printer error press to resume printing Press and hold the RESUME button for the required number of beeps and then release to perform these special tasks 1 Beep Print head cleaning 2 Beeps Printing Nozzle Check Pattern 3 Beeps Cleaning the feed rollers You can also initiate these tasks using the printer driver Troubleshooting Chapter ...

Страница 98: ...5 18 Troubleshooting Chapter 5 ...

Страница 99: ...parencies 30 sheets Envelopes 15 envelopes U S Com 10 or European DL Specifications Appendix Specifications A 1 Printing Specifications Specifications Printing Method Bubble Jet ink on demand Print Resolution 1440 720 horizontal vertical dpi on Canon Specialty Paper Print Speed BC 30 Black BJ Cartridge 8 ppm BC 31 Color BJ Cartridge 5 ppm High Speed Draft Mode Print speed will vary depending on sy...

Страница 100: ...ean DL envelope 220 mm 110 mm Canon envelope 4 in 6 in Custom Minimum W H 3 94 in 3 94 in 100 mm 100 mm Maximum W H 9 5 in 23 9 in 241 3 mm 584 2 mm Canon Specialty Papers Canon High Gloss Photo Film Canon Glossy Photo Paper Canon Glossy Photo Cards Canon High Resolution Paper Canon T Shirt Transfers Fabric Sheet for Canon Bubble Jet printers Canon Greeting Cards Canon LetterPlus Letterhead Paper ...

Страница 101: ...print However printing in this area can adversely affect the print quality or the paper feed precision A4 A5 B5 Printable Area width x length A4 203 2 mm 287 0 mm A5 141 2 mm 200 0 mm B5 175 2 mm 247 0 mm Letter Legal Printable Area width x length Letter 8 10 6 Legal 8 13 6 Glossy Photo Cards LetterPlus Printable Area width x length Glossy Photo Cards 4 3 6 3 LetterPlus paper 8 6 11 1 Specificatio...

Страница 102: ...elope Printable Area width x length U S Commercial 10 8 3 6 European DL Envelope Printable Area width x length European DL 220 mm 110 mm Banner Paper When you print on Banner Paper the maximum length is 6 sheets Printable Area width x length Banner Paper 203 2 mm 1779 0 mm A4 8 65 9 Letter A 4 Specifications Appendix ...

Страница 103: ...rint head 48 nozzles per color Ink Photo Black Photo Cyan Photo Magenta Yield Approx 280 pages at 7 5 coverage per page Print head life Approx 3000 pages Based on the number of pages per BJ tank over the printable area General Interface IEEE 1284 compatible parallel interface Acoustic Noise Level Approx 48 dB A per ISO 9296 Operating Environment Temperature 41 F to 95 F 5 C to 35 C Humidity 10 to ...

Страница 104: ...ndows 3 1 or Windows NT 8 megabytes MB of RAM 16 MB or more recommended for high resolution printing 40 MB hard disk space Bi directional Centronics compatible parallel cable IEEE 1284 compliant a cable less than 6 6 feet in length is recommended CD ROM drive 2x or better If you do not have a CD ROM drive you can download the printer driver from Canon s Web site or BBS or call the Canon Customer C...

Страница 105: ...haracters per inch A unit of measurement relevant to a fixed space font Because all characters have the same width you can calculate the number of characters printed per inch cpl Characters per line A unit of measurement that indicates the number of characters printed per line cps Characters per second A unit of measurement that indicates the printer s speed dB A Stands for decibel level a decibel...

Страница 106: ...ad of the cartridge from drying and clogging Intensity The amount of color More intense or more saturated colors are more pure Less intense or less saturated colors are less vivid Interface The connection between two devices that makes it possible for them to communicate with each other This printer features a parallel interface which makes it compatible with IBM and similar personal computers Lan...

Страница 107: ... is printing across the length of the page Print head The printing mechanism that contains print nozzles and ejects the ink for printing Print head capping An automatic protection function that prevents the print head unit and ink cartridges from drying out or becoming clogged with dust Printable area The area of a sheet of paper on which a printer can reproduce text or graphics the printing area ...

Страница 108: ...ns Resolution values are represented by horizontal data and vertical data for example 360 360 dpi This printer can produce output with resolutions up to 1440 720 dpi precision on specialty paper RGB An acronym for Red Green and Blue the three primary colors used in the additive process to form a wide spectrum of colors TrueType font The scalable font technology built into Microsoft Windows It offe...

Страница 109: ...BJ Cartridge 1 2 4 10 12 4 16 17 4 25 A 1 A 5 See also BJ cartridges BC 32 Photo BJ Cartridge 1 2 4 10 12 4 16 17 4 25 A 5 See also BJ cartridges BCI tanks See BJ tanks Bi directional cable A 5 6 BJ cartridges 1 2 3 4 4 4 8 5 11 cleaning print heads 4 7 10 defective 5 14 guidelines 4 10 11 holders 4 2 maintenance 4 10 11 not installed 5 13 14 out of ink 5 13 setting 2 7 2 13 specifications A 5 sta...

Страница 110: ...ies printing 2 9 Curled pages 5 13 Custom cleaning print heads 2 10 Custom Setting dialog box 2 10 Customer Care Center 1 4 5 5 1 Customer support 1 4 5 1 Customizing print mode 2 13 15 Cut sheet paper 3 4 D Deep cleaning print heads 2 10 4 9 10 Details tab Windows 2 6 Diffusion halftoning 2 13 2 17 Digital camera image 2 12 13 Dimensions printer A 6 DL envelopes 3 10 A 1 2 A 4 Document printing 2...

Страница 111: ...are requirements A 6 Heavier weight print media 3 5 3 8 Help Canon 1 4 printer driver 2 3 High Gloss Photo Film 1 3 3 1 3 5 3 13 A 1 2 High Resolution Paper 1 3 3 2 3 5 3 15 A 1 2 cleaning sheet 3 15 High speed printing 2 10 Humidity 3 14 A 5 I IBM PC compatible A 6 IEEE 1284 compliant cable A 5 6 Image optimizer 2 13 Ink 1 2 3 4 14 A 5 Ink Cartridge Storage Box 4 11 4 16 4 25 4 27 Ink tank See BJ...

Страница 112: ...e setting 2 14 P Page layout 2 8 settings 2 9 Page Orientation settings 2 8 Page size 3 17 3 20 3 23 Paper does not feed 5 5 fanning 3 6 feeding problems 5 5 guidelines 3 4 handling 3 1 33 A 1 jammed 5 13 jams clearing 5 16 loading 3 6 9 out 5 13 settings 2 7 size A 2 thickness 3 8 types selecting 3 1 4 weight A 1 Paper feed limit 3 5 method 3 5 setting 2 13 Paper guide 3 7 8 3 12 Paper output tra...

Страница 113: ...es curled warped wrinkled 5 13 Printer beeps light flashes 5 13 15 cable problem 5 6 5 10 11 cleaning 4 3 guidelines 4 2 maintaining 2 10 4 1 27 Printer continued port 2 6 problem identifying 5 1 2 properties 2 2 servicing 1 5 setup 2 3 4 software 2 1 stands 4 2 status 2 16 transporting 4 26 27 using with Windows 2 1 10 Printer driver 3 17 3 20 4 5 4 20 cannot install 5 4 help 2 3 printer maintena...

Страница 114: ...4 27 Storing BJ cartridge 4 25 environment A 5 SuperPhoto mode 2 12 Supplies 1 1 2 Support Canon 1 4 5 1 Swap file Windows 3 1 2 17 Switching device 5 6 5 10 11 System memory 2 18 A 6 T Tabs Windows 2 5 15 Technical support 1 4 5 1 Temperature 3 14 A 5 Test prints 2 5 2 10 4 5 4 20 Text mode 2 12 Thick paper 3 4 3 8 Timeout settings 2 6 Transparencies 1 3 3 3 3 5 6 3 13 A 1 2 Transporting printer ...

Страница 115: ... Increase the separation between the equipment and receiver Connect the equipment into an outlet on a circuit different from that to which the receiver is connected Consult the dealer or an experienced radio TV technician for help Do not make any changes or modifications to the equipment unless otherwise specified in the manual If such changes or modifications should be made you could be required ...

Страница 116: ...FCC 2 FCC Regulations ...

Отзывы: