background image

Basic Printing

13

„

Setting the Media Type, Paper Size, and Layout When Printing From 
a PDA

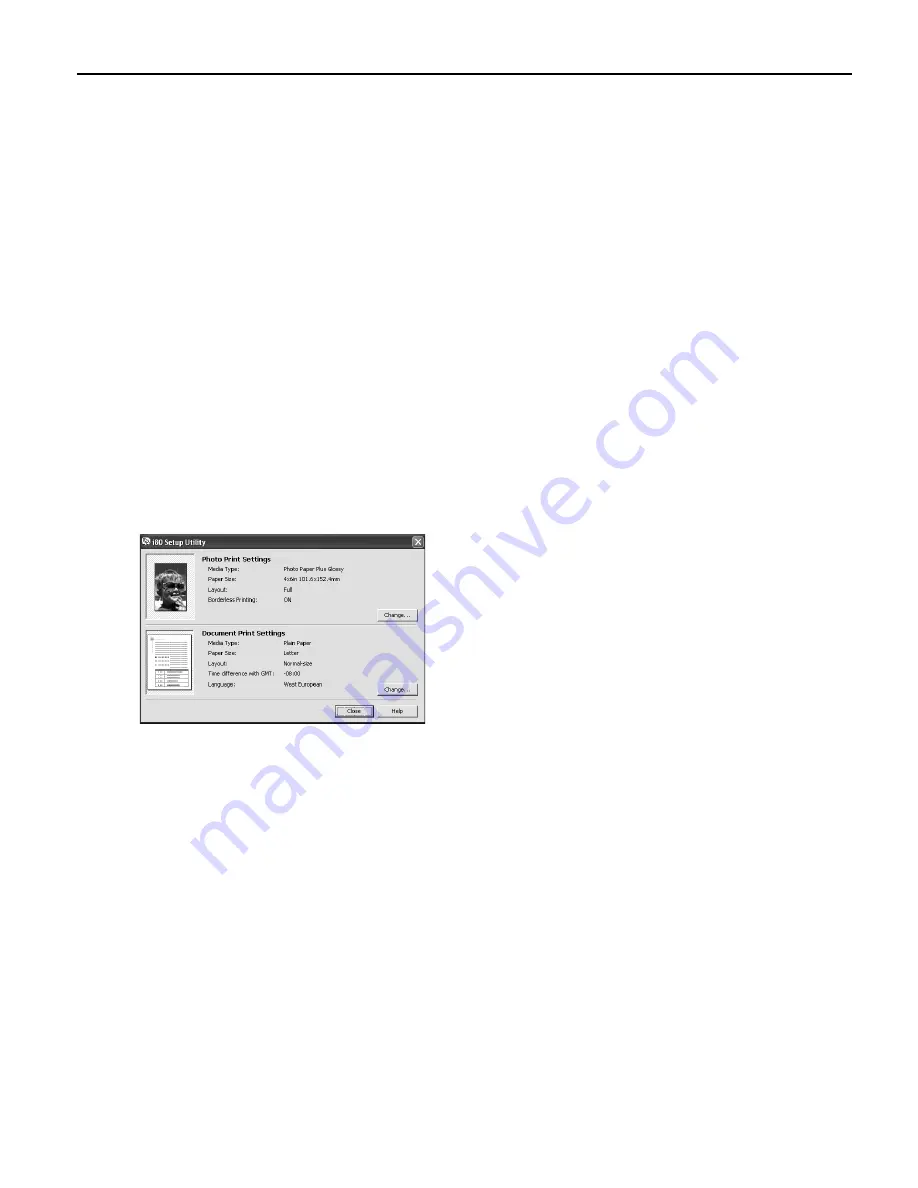
You can select the media type, page size, layout and borderless printing in the i80 
Setup Utility when printing from a PDA or mobile phone.

1

Set up the printer.

(1)

Ensure that the universal AC adapter is connected securely.
When using an optional battery, ensure that it has been charged.

(2)

Connect the printer to your computer with a USB cable.

(3)

Open the paper rest, turn on the printer, and then turn on the computer.

2

Start the i80 Setup Utility.

Important

Before using the ii80 Setup Utility, you must connect this printer to your 
computer with a USB cable and install the printer driver and the ii80 Setup 
Utility.

Windows
Click S

Start and select A

All Programs (or 

Programs), C

Canon Utilities, ii80 Setup Utility

and ii80 Setup Utility.
The i80 Setup Utility screen appears.
Macintosh
Open the A

Applications folder, and then 

double-click the ii80 Setup Utility folder and 
the ii80 Setup Utility icon.
The i80 Setup Utility screen appears.

* Windows XP is used as an example here.

The same operation is applicable in 
Macintosh.

US_i80_QSG.book  Page 13  Friday, October 10, 2003  3:25 PM

Содержание 8582A001 - i 80 Color Inkjet Printer

Страница 1: ...Quick Start Guide Color Bubble Jet Printer Series i80 ...

Страница 2: ...ing your product s warranty period After that 90 day period you can continue to call via the toll number for technical support see 4 below during the balance of your warranty period or you can extend your service and support coverage both toll free tech support and repair by purchasing a cost attractive Canon CarePAK extended service plan For more information please visit our Web site at www canon...

Страница 3: ...Color Bubble Jet Printer Quick Start Guide Series ...

Страница 4: ... the products described Specifications are subject to change without notice As an ENERGY STAR partner Canon U S A Inc has determined that this product meets the ENERGY STAR guidelines for energy efficiency All information regarding non Canon products was compiled from publicly available information No representation is made regarding the accuracy thereof Trademarks Canon is a registered trademark ...

Страница 5: ...int or Colors are Incorrect 37 Printing the Nozzle Check Pattern 38 Print Head Cleaning 41 Print Head Deep Cleaning 44 Aligning the Print Head 46 Replacing an Ink Tank 50 Troubleshooting Cannot Install the Printer Driver 56 Print Quality is Poor or Contains Errors 57 Troubleshooting Printer Hardware 58 Paper Does Not Feed Properly 59 Handling Error Messages 60 An Error Message Appears on the Scree...

Страница 6: ...ur printer driver interface While in the printer s Properties window press the F F1 key or click in the upper right corner Then click the feature you want to know more about or click H Help when displayed While in the P Page Setup dialog box or P Print dialog box click in the lower left corner Click provides detailed information about each setting When the Help window appears select your desired t...

Страница 7: ...r Envelopes with a double flap Envelopes with pressure seals Envelopes with an embossed or treated surface Loading the Print Media This section describes how to load plain paper into your printer For detailed information on the speciality media Canon provides for use with its various printers refer to the section U Using Speciality Media on page 5 Consult the User s Guide for detailed instructions...

Страница 8: ...e paper thickness lever to the correct position for the media in use Move to the right position for plain paper Move to the left position for envelope and T Shirt Transfers 2 Align the paper stack against the right side of the sheet feeder 3 Slide the paper guide against the left side of the stack of paper Load Limit Mark Do not load beyond this Load Limit Mark 1 Insert the paper into the sheet fe...

Страница 9: ...nuine Canon media to ensure optimal print quality Photo Quality Media Photo Paper Pro Photo Paper Pro Perforated Photo Paper Plus Glossy Photo Paper Plus Semi Gloss Matte Photo Paper Glossy Photo Paper Media Suited to Business Documents High Resolution Paper Transparencies ...

Страница 10: ...per High Resolution Paper Up to 10 sheets Right High Resolution Paper T Shirt Transfers 1 sheet Left T Shirt Transfer Transparencies Up to 10 sheets Right Transparency Note z When using plain paper 64 gsm or 17 lb up to 30 sheets can be set Set the Paper Thickness Lever to the right and select P Plain Paper from the printer driver M Media Type z For detailed description of print media types refer ...

Страница 11: ...ation software s F File menu Note z The menu screens and dialog boxes that appear may vary depending on the software application you are using z The steps described in this section are for printing in Windows XP Note In Windows 2000 click the M Main tab in the P Print dialog box 2 Ensure that C Canon i80 is selected 3 Click P Preferences or Properties ...

Страница 12: ...r printer driver functions refer to the User s Guide or Help z Select P Preview before printing by clicking the check box This displays a preview screen that allows you to confirm the selected printing effects and how your document will look when printed Some applications do not contain the function to display the preview Note You can cancel a print job in progress by simply pressing the R RESUME ...

Страница 13: ...s F File menu Page Setup dialog box opens Note z The menu screens and dialog boxes that appear may vary depending on the software application you are using z The steps described in this section are for printing in Mac OS X 3 Select the desired paper size from the P Paper Size pop up menu 2 Select i80 from F Format for 2 Select i80 from F Format for 4 Click O OK ...

Страница 14: ... charts Select when printing documents consisting mainly of graphs and graphics illustrations with strong color definition Printing a composite document Select when printing documents consisting mainly of text Detailed Setting You can fine tune the Print Quality and Halftoning settings Refer to the User s Guide z For details about other printer driver functions refer to the User s Guide or Help z ...

Страница 15: ... must have been installed in Windows 98 computer or later z In Windows 98 or Windows Me check whether the infrared communication driver has been installed To activate the infrared port carry out the following operation 1 Click S Start and select S Settings and then C Control Panel 2 Check whether the W Wireless Link icon Windows Me or the I Infrared icon Windows 98 is displayed in the window If th...

Страница 16: ...lowing limitations apply on transmittable data It does not support printing a downloaded content or photo and a photo attached to an email for security reason It does not support printing video files Depending on your device the Fine print quality option may not be available due to the restriction on the infrared transfer capacity Depending on your device it may not print data stored in a memory c...

Страница 17: ...n on the printer and then turn on the computer 2 Start the i80 Setup Utility Important Before using the i i80 Setup Utility you must connect this printer to your computer with a USB cable and install the printer driver and the i i80 Setup Utility Windows Click S Start and select A All Programs or Programs C Canon Utilities i i80 Setup Utility and i i80 Setup Utility The i80 Setup Utility screen ap...

Страница 18: ...e Specifies the size of paper loaded on the printer Layout Specifies how many images to print on a sheet Borderless Printing Specifies whether to perform borderless printing or not Refer to the User s Guide for more detailed information on media type 4 6 Prints a photo on Photo Paper Plus Glossy 4 6 101 6 152 4 mm paper without border 5 7 Prints a photo on Photo Paper Plus Glossy 5 7 127 0 177 8 m...

Страница 19: ... and layout Note Bible Mini 6 hole and A5 paper are used for a personal organizer When Printing these papers z Select 3 74 6 69 95 170mm for B Bible 2 99 4 96 76 126mm for M Mini 6 hole and 8 27 5 83 210 148mm for A5 as paper size z Load only one sheet at a time z Do not use paper thinner than 64 gsm or 17lb Note Click C Change on D Document Printing to change the following settings Time differenc...

Страница 20: ...lowable distance of communication with the printer depends on the computer or PDA you use For this distance refer to your computer or PDA manual Note z Do not place any obstacle between the infrared ports of the printer and PDA or computer Data cannot be transmitted between them Check the orientation and positions of the infrared ports of the printer and PDA or computer Oppose these ports properly...

Страница 21: ...m a digital still cameras or camcoders without the need to use a computer z This printer supports Canon Bubble Jet Direct It allows you to print photos from a Canon Bubble Jet Direct compatible PictBridge incompatible digital camera or digital camcorder without a computer by simply connecting the digital camera or digital camcorder to this printer Hereafter the digital still camera and digital vid...

Страница 22: ...ital camera connected to the printer it is advisable to use the AC adapter supplied with the camera If you use the camera battery be sure to charge it fully z Depending on the model or brand of your camera you may have to select a mode of printing photos in compliance with PictBridge before connecting the camera You may also have to turn on the camera or select Play mode manually after connecting ...

Страница 23: ...dge compatible camera connected to the printer Confirming or Changing the Camera Settings When a PictBridge compatible camera is connected and printing is started with no setting changes this printer operates based on the following default settings Paper size 4 6 Paper type Photo Photo Paper Plus Glossy Layout Borderless Trimming Off No trimming Image optimize On Exif Print Date print Off No print...

Страница 24: ...ess is selected in Layout and Off No trimming is selected in Trimming for this printer About Image optimize By default On Exif Print is selected for this printer About Date print By default Off is selected for this printer Date Print depends on the settings using the controls of the camera Paper Size setting Paper Type setting Paper loaded in printer 4 6 Default Photo Default Photo Paper Plus Glos...

Страница 25: ... make the following prints You can make a standard print from the image displayed in the single display mode or in the index display mode You can print specified numbers of images or make an index print by editing the DPOF For the images taken with an Exif 2 2 compatible digital camera the Photo Optimizer PRO function can be used If date printing is set from the operation panel of the digital came...

Страница 26: ...Printer Properties dialog box is opened from the S Start menu additional tabs appear including the D Details tab These do not appear when the P Printer Properties dialog box is opened from within an application For more information about these additional tabs refer to your Windows documentation 1 Click Start and select Control Panel Printers and Other Hardware and then Printers and Faxes For non W...

Страница 27: ...User s Guide Adjusting Print Quality Features that affect the appearance and quality of your printed images can be controlled with the printer driver The i80 automatically adjusts printer settings to improve print quality based on the media type plain paper Photo Paper Pro and so on You can also customize the Print Quality settings if desired To manually adjust Print Quality settings 1 Open the Pr...

Страница 28: ...e the slide bar to adjust the Print Quality 4 When the process is complete click OK 1 Open the Print dialog box See P Printing with Macintosh on page 9 2 Select Quality Media from the pop up menu and then click Detailed Setting 3 Move the slide bar to adjust the Print Quality 4 When the process is complete click OK ...

Страница 29: ... Printer Properties dialog box See O Opening the Printer Properties Dialog Box from Your Application Program on page 22 2 Click the Effects tab 3 Select the Photo Optimizer PRO check box 4 Click OK To use Vivid Photo option Vivid Photo intensifies background colors such as fields trees oceans and skies while maintaining natural skin tones in the images Note In Windows Me or Windows 98 If Backgroun...

Страница 30: ...nder S Special Effects To reduce noise from images captured with a digital camera Photo Noise Reduction function reduces noise from blue portions such as the sky and dark portions of the images captured with your digital camera Note In Windows Me or Windows 98 If Background Printing has been disabled the Photo Noise Reduction function is not available ...

Страница 31: ...nced Printing 27 To use Photo Noise Reduction select the P Photo Noise Reduction check box on the Effects tab To use Photo Noise Reduction select the P Photo Noise Reduction check box under Special Effects ...

Страница 32: ...ter new settings in Profiles The A Add to Profiles dialog box opens 4 Click OK 5 Click OK on the Profiles tab This registers your printer driver print settings Note You can retrieve or delete the print settings profile at any time Retrieving profile Select the desired profile from P Printing Profiles and click R Retrieve from P Profiles Deleting unwanted profile Select the desired profile from P P...

Страница 33: ...rs your printer driver settings Note You can retrieve or change the saved driver settings at any time Retrieving print settings Select the name of the print settings to retrieve from the P Presets in the P Print dialog box Changing drivers settings When registered print settings are selected you can delete them or change their name 1 Select S Save As from the pop up menu 2 Enter a name of your pri...

Страница 34: ... basic introduction to the many features offered by your printer driver Note For detailed description of the printer driver functions refer to the User s Guide Printing with Borderless Printing Reducing Noise from Images Recorded with Digital Camera Smoothing the Rough Edges of Certain Images Automatically Resizing the Image to Fit the Page Resizing the Image by Selecting the Scaling Ratio Adding ...

Страница 35: ...nd print them in an album format PhotoRecord is Exif Print Exif 2 2 compatible PhotoStitch Windows Macintosh You can select multiple photographs and merge them to create a panoramic photo Easy WebPrint Windows You can easily print pages displayed on the Internet Explorer or pages from the User s Guide on screen manual of this printer in full size Easy WebPrint automatically adjusts the layout when...

Страница 36: ...disk This section describes how to print photographs stored in the folder on the hard disk 2 Click S Start select A All Programs or P Programs C Canon Utilities E Easy PhotoPrint and then E Easy PhotoPrint The I Image Selection sheet is displayed Note z Media Types Suitable for Borderless Printing Media types compatible with Borderless Printing include Photo Paper Plus Glossy LTR 4 6 5 7 Photo Pap...

Страница 37: ...thumbnail of the photograph you want to print and specify the number of copies 3 Select the paper Guidance Thumbnail Folder window Increases the number of copies Displays the specified number of copies Decreases the number of copies 1 Click the P Paper Selection tab 2 Select the size of the paper you use from Paper Size 3 Select the type of the paper you use from Media Type ...

Страница 38: ...rint Exif 2 2 Easy PhotoPrint can handle only JPEG files filename extension jpg and jpeg Note z Media Types Suitable for Borderless Printing Media types compatible with Borderless Printing include Photo Paper Plus Glossy LTR 4 6 5 7 Photo Paper Plus Semi gloss LTR 4 6 Photo Paper Pro LTR 4 6 Matte Photo Paper LTR and Glossy Photo Paper LTR 4 6 z You can edit images taken with a digital camera by u...

Страница 39: ...pplications folder the E Easy PhotoPrint folder and then double click the E Easy PhotoPrint icon 2 Select photographs 1 Select the folder containing the photograph you want to print All photographs in the selected folder are displayed 2 Click on the thumbnail of the photograph you want to print and specify the number of copies Guidance Thumbnail Folder window Increases the number of copies Display...

Страница 40: ...ion message is displayed click O OK 6 Click P Print in the P Print dialog box 1 Click the P Paper Selection tab 2 Select the size of the paper you use from Paper Size The paper sizes available for Borderless Printing are 4 6 5 7 Letter and A4 3 Select the type of the paper you use from Media Type 1 Click the Layout Print tab 2 Select B Borderless full ...

Страница 41: ...rint Head on page 46 z If ink tank replacement does not resolve the problem the print head may be worn out Contact the Customer Care Center P Printing the Nozzle Check Pattern on page 38 If the print quality is poor perform print head cleaning Step 1 P Print Head Cleaning on page 41 Step 2 If the pattern is printed normally click OK If the problem remains after performing print head cleaning three...

Страница 42: ... sheet of Letter paper in the printer 2 Open the Printer Properties dialog box See O Opening the Printer Properties Dialog Box Directly from the Start Menu on page 22 3 Print the Nozzle Check Pattern Note Nozzle check pattern printing can be executed also from the printer itself With the printer on load a sheet of A4 or Letter paper in the printer Hold the RESUME CANCEL button until the P POWER la...

Страница 43: ...er 2 Double click the P Print Center icon 3 Select i80 from the N Name list and click C Configure 4 Select i80 from the P Product list and click M Maintenance 3 Print the Nozzle Check Pattern 4 Examine the nozzle check pattern See E Examining the Nozzle Check Pattern on page 40 You can see a normal pattern and an irregular pattern in a color by clicking Pattern Analysis 5 If the patterns are print...

Страница 44: ...ne the nozzle check pattern See E Examining the Nozzle Check Pattern on page 40 You can see a normal pattern and an irregular pattern in a color by clicking Pattern Analysis 5 If the patterns are printed properly click OK to finish the operation If the patterns are not printed properly click C Cleaning to start print head cleaning 2 White stripes in this pattern indicate that the print head of col...

Страница 45: ...x Directly from the Start Menu on page 22 3 Start Print Head Cleaning 3 Select the ink nozzles to be cleaned and then click E Execute 4 When the confirmation message is displayed click O OK Note Print head cleaning can also be performed from the printer itself Ensure that the printer is turned on Hold down the R RESUME CANCEL button until the P POWER lamp flashes once Important Do not perform any ...

Страница 46: ...ern Analysis 3 If the patterns are printed properly click O OK to end the operation If the patterns are not printed properly click C Cleaning to start print head cleaning again 1 Ensure that the printer is turned on 2 Open the BJ Printer Utility dialog box 1 Double click the hard disk icon where the printer driver was installed the Applications folder and the U Utilities folder 2 Double click the ...

Страница 47: ...he Nozzle Check Pattern on page 40 You can see a normal pattern and an irregular pattern in a color by clicking Pattern Analysis 3 If the patterns are printed properly click O OK to end the operation If the patterns are not printed properly click C Cleaning to start print head cleaning again Important Do not perform any other operations until the print head cleaning finishes This takes about 60 se...

Страница 48: ...printer is turned on 2 Open the Printer Properties dialog box See O Opening the Printer Properties Dialog Box Directly from the Start Menu on page 22 3 Start Print Head Deep Cleaning 3 Select the ink nozzles to be cleaned and then click E Execute 4 When the confirmation message is displayed click O OK Important Do not perform any other operation until the print head deep cleaning finishes This tak...

Страница 49: ... cleaned and then click O OK 4 When the confirmation message is displayed click O OK Important Do not perform any other operation until the print head deep cleaning finishes This takes about one or two minutes Note After print head deep cleaning finishes print the nozzle check pattern to verify that the print head nozzles are clean See P Printing the Nozzle Check Pattern on page 38 If the problem ...

Страница 50: ...pen the Printer Properties dialog box See O Opening the Printer Properties Dialog Box Directly from the Start Menu on page 22 3 Print the pattern 1 Click the M Maintenance tab 2 Click P Print Head Alignment 3 Click P Print Head Alignment When the confirmation message is displayed click O OK The Pattern will be Printed Note Click C Check Setting to print the current setting and finish the operation...

Страница 51: ...terns and enter the number that corresponds 4 When the confirmation message is displayed click O OK Note If it is difficult to pick up the best pattern on Column H pick the setting that produces the least noticeable vertical white stripes 2 Enter the numbers 3 Click O OK Less noticeable white stripes More noticeable white stripes ...

Страница 52: ...folder and the U Utilities folder 2 Double click the P Print Center icon 3 Select i80 from the N Name list and click C Configure 4 Select i80 from the P Product list and click M Maintenance 3 Print the pattern 1 Select Test Print from the pop up menu 2 Click P Print Head Alignment 3 Click P Print Head Alignment When the confirmation message is displayed click O OK The Pattern will be Printed Note ...

Страница 53: ...st even least irregular patterns and enter the number that corresponds Note If it is difficult to pick up the best pattern on Column H pick the setting that produces the least noticeable vertical white stripes 2 Enter the numbers 3 Click S Send Less noticeable white stripes More noticeable white stripes ...

Страница 54: ...uns out of ink replace it using the following steps 1 Ensure that the printer is on and then open the print head cover The print head holder moves to the center 2 Remove the empty ink tank 1 Push the tab 2 Remove the ink tank Important z Handle ink tanks carefully to avoid staining clothing or the surrounding area z Discard empty ink tanks according to the local laws and regulations regarding disp...

Страница 55: ... Note z To maintain optimal print quality use an ink tank within six months of its first use z Once an ink tank has been used do not remove it from the printer and leave it out in the open This will cause the ink tank to dry out and the printer may not function properly if it is reinstalled z Color ink consumption may occur even when black and white or grayscale printing is specified Color ink is ...

Страница 56: ... click Yes Mistakenly clicking N No instead will prevent the low ink warning from functioning properly If this happens manually reset the ink counter in Printer Properties dialog box 2 Select the replaced ink tank and click OK The dialog box allows you to select the replaced ink tank When both black and color ink tanks have been replaced select both Black and Color If you have not replaced the ink...

Страница 57: ...r Utility dialog box 1 Double click the hard disk icon where the printer driver was installed the Application folder and the U Utilities folder 2 Double click the P Print Center icon 3 Select i80 from the N Name list and click C Configure 4 Select i80 from the P Product list and click M Maintenance 2 Reset the Ink Counter 2 Click I Ink Counter Reset 1 Select R Remaining ink level setting from the ...

Страница 58: ... the ink counter every time you install a new ink tank The ink counter cannot work correctly unless you synchronize it with the actual ink level The ink counter can only be adjusted when it is reset at the time a new ink tank is installed Do not reset the ink counter of an ink tank in use Synchronization of the counter and the actual ink level will not work properly BJ Status Monitor BJ Printer Ut...

Страница 59: ...bleshooting Printer Hardware on page 58 P Paper Does Not Feed Properly on page 59 H Handling Error Messages on page 60 A An Error Message Appears on the Screen on page 61 C Cannot Print Properly through Infrared Communication on page 63 C Cannot Print Properly from the Digital Camera on page 64 When an Error Occurs The BJ Status Monitor opens and displays a message Take the appropriate action desc...

Страница 60: ... Computer 2 Double click the C CD ROM icon For non Windows XP open the M My Computer window and then double click the CD ROM icon Double click the C CD ROM icon on your desktop to start installation InstallationCD ROM not working properly Ensure that there are no problems with the S Setup Software User s Guide CD ROM Use Windows Explorer to ensure that the CD ROM can be read Ensure that the C CD R...

Страница 61: ...ch may resolve the problem Load one sheet at a time and remove each sheet as soon as it is printed Incorrect Paper thickness lever position Set the paper thickness lever according to the printing paper type See L Loading Paper on page 3 Print Quality not set properly Be sure to set the P Print Quality setting to H High for Windows or Fine for Macintosh On the M Main tab click H High for the P Prin...

Страница 62: ...y solve the problem Delete an undesired print job if there is any Use BJ Status Monitor in Windows or Print Center in Macintosh for the deletion 1 Open the Printer Properties dialog box See O Opening the Printer Properties Dialog Box Directly from the Start Menu on page 17 2 Click M Maintenance tab and then S Start Status Monitor 3 Click D Display Print Queue 4 Select C Cancel All Documents in the...

Страница 63: ...rinting a document through infrared communication do not operate other infrared communication units like a television remote control See P Printing Data through Infrared Communication on page 11 Problem Possible Cause Try This Paper Does Not Feed Properly Inappropriate paper type used Check to see if the paper you are printing on is too thin or curled See P Print Media to Avoid on page 3 Check if ...

Страница 64: ... continue Contact the Customer Care Center Nine flashes Ink tank is not installed If a black or color ink tank is not installed install it If all ink tanks are installed push the PUSH mark of each ink tank to see if it has snapped firmly into place Ten flashes Low battery level Follow the procedure below 1 Turn off the printer 2 Connect the supplied universal AC adapter or load a charged battery 3...

Страница 65: ...ngs and printer interface do not match Select the destination port as follows When connected to the computer with a USB cable Confirm that the destination Printer Port is set to USB PRNnn Canon i80 or USBnn Canon i80 Where nn represents a number When performing infrared communication Open the Printer Properties dialog box directly from the Start menu See O Opening the Printer Properties Dialog Box...

Страница 66: ...the ink tank icon with the indicates ink tank is not synchronized with its ink counter Always be sure to reset the ink counter in your printer driver when you replace ink tank See R Resetting the Ink Counter on page 52 A is displayed next to the Ink counter between the time one ink tank is removed and the ink counter is reset when the next one is installed Display of the can be disabled by uncheck...

Страница 67: ...le machine or the PDA that has an infrared port conforming to IrDA 1 1 Other computers and PDAs cannot be used for printing through infrared communication The selected printer port is wrong Check the printer port setting 1 Open the printer driver Properties dialog box from the S Start menu 2 Click P Ports tab or D Details tab to ensure that the infrared port is selected as the destination port In ...

Страница 68: ...m occurrs in the printer Remove the jammed paper load new media and press the RESUME C CANCEL button Printer cover open The print head cover is open Close the front cover No print head No print head is installed The P POWER lamp on the printer flashes six times Install a print head according to the Easy Setup Instructions The print head is defective The P POWER lamp on the printer flashes seven ti...

Страница 69: ...order is connected to this printer a communication time error may occur and no more images can be printed If this error occurs press the R RESUME CANCEL button It will automatically turn on If not turn it on z A low ink warning is not displayed on the digital camera s viewer z After replacing an ink tank cancel the connection with the digital camera and reset the ink counter by operating the compu...

Страница 70: ...r will load automatically 6 If the message No other applications can be running is displayed click Continue 7 When the Installation was successful screen displays click Restart 8 Open the Mac OS 8 6 9 x folder on the CD ROM then double click the Application folder 9 Double click on the software to be installed Follow the on screen instructions 10 When the Installation has Finished screen appears c...

Страница 71: ...ting Order Printing on Nonstandard Size Paper Reducing the Sound of Printer Operation Registering Printer Driver Settings Printing Media Compatible Media Types Photo Paper Pro PR 101 Photo Paper Pro PC 101S Photo Paper Plus Glossy PP 101 Photo Paper Plus Semi Gloss SG 101 Matte Photo Paper MP 101 Glossy Photo Paper GP 401 High Resolution Paper HR 101N T Shirt Transfers TR 101 Transparencies CF 102...

Страница 72: ...the portable kit LK 51 Canon Cradle Kit CK 51 This option is a kit that consists of a stand dedicated to this printer and a portable kit LK 51 battery charger and lithium ion battery The lithium ion battery can be charged with the printer placed upright Canon Automobile Power Unit PU 100U This option is a unit that allows you to supply power from a cigarette lighter outlet to your printer for oper...

Страница 73: ... mode Operating environment Temperature 5 to 35 C 41 to 95 F Humidity 10 to 90 RH no condensation Storage environment Temperature 0 to 40 C 32 to 104 F Humidity 5 to 95 RH no condensation Power supply AC 100 127 V 50 60 Hz AC 220 240 V 50 60 Hz Power consumption Standby Approx 1 W Printing Approx 14 W 100 120 V Approx 15 W 240 V Dimensions with the paper rest and paper output tray retracted 12 19 ...

Страница 74: ...erate z USB interface or IrDA Ver 1 1 z Available hard disk space for printer driver installation including temporary files Windows XP Windows 2000 65MB Windows Me Windows 98 30MB including the capacity for the electric manual USB operation can only be guaranteed on a PC with pre installed Windows XP Windows 2000 Windows Me or Windows 98 This includes Windows XP Windows 2000 or Windows Me upgraded...

Страница 75: ... power cord is bundled or knotted If you detect smoke unusual smells or strange noises around the printer immediately unplug the printer at the power supply and call for service Periodically unplug the printer and use a dry cloth to wipe off any dust or dirt collected on the plug and the power outlet If the printer is placed at a location exposed to a lot of dust smoke or high humidity the dust co...

Страница 76: ... times so you can easily unplug the power cord if necessary Never remove the plug by pulling on the cord Do not use an extension lead cord Working around the printer Never put your hands or fingers in the printer while it is printing Do not carry or store the printer with the round side down A failure can result Do not place metal objects paper clips staples etc or containers of flammable solvents...

Страница 77: ...raged to try to correct the interference by one or more of the following measures Reorient or relocate the receiving antenna Increase the separation between the equipment and receiver Connect the equipment into an outlet on a circuit different from that to which the receiver is connected Consult the dealer or an experienced radio TV technician for help Use of a shielded cable is required to comply...

Страница 78: ... a Canon USA repair facility or ASF Without limiting the foregoing dropping the Product scratches and abrasions will be presumed to have resulted from misuse abuse or failure to operate the Product as set forth in the user s manual or other documentation for the Product b Use of parts or supplies other than those sold by Canon USA that cause damage to the Product or cause abnormally frequent servi...

Страница 79: ...be responsible for the value of the replacement product for which Canon USA may invoice you International Warranty Service outside the U S A Warranty service may be provided by participating Canon Affiliates at certain locations outside the United States a copy of the Canon International Warranty System regulations is included with the Product A Product covered by this limited warranty and submitt...

Страница 80: ...meras 19 Document Print Settings 15 Document Printing dialog box 15 Driver saving setting 28 settings 8 10 uninstalling 61 E Easy PhotoPrint 31 32 34 35 Easy PhotoPrint Plus 31 Easy WebPrint 31 Examining the Nozzle Check Pattern 40 Exif 2 2 31 Exif Print 31 G Glossy Photo Paper 6 H Handling Error Messages 60 Help 2 High Resolution Paper 6 I i80 Setup Utility 13 ImageBrowser 31 Infrared Communicati...

Страница 81: ...ype 6 Printer Properties dialog box 7 22 38 57 Printing Borderless Photographs 32 34 Printing Photographs Directly from a Canon Bubble Jet Direct compatible digital camera 21 Printing Photographs Directly from a Digital Camera 17 Printing the Nozzle Check Pattern 38 R Recalling Driver Settings 28 Replacing an Ink Tank 50 Requirements for Infrared Communication with the Computer 11 Requirements for...

Страница 82: ...78 ...

Страница 83: ...ssy 4 x 6 20 sheets 7980A007 Photo Paper Plus Glossy 4 x 6 50 sheets 7980A012 Photo Paper Plus Glossy 4 x 6 120 sheets 7980A022 Photo Paper Plus Glossy 5 x 7 20 sheets 7980A019 Photo Paper Plus Glossy 8 5 x 11 20 sheets 7980A006 Photo Paper Plus Semi Gloss 4 x 6 20 sheets 8386A008 Photo Paper Plus Semi Gloss 8 5 x 11 20 sheets 8386A007 Photo Paper Pro Perforated 4 x 6 20 sheets 5699A005 Photo Pape...

Страница 84: ...yo 146 8501 Japan Canon Canada Inc 6390 Dixie Road Mississauga Ontario L5T 1P7 Canada Canon Latin America Inc 703 Waterford Way Suite 400 Miami FL 33126 U S A Canon Mexicana S de R L de C V Periferico Sur No 4124 Col Ex Rancho de Anzaldo C P 01900 Mexico D F P i80 QSG 0903 QA7 3121 V01 2003 Canon U S A Inc Printed in Vietnam ...

Отзывы: