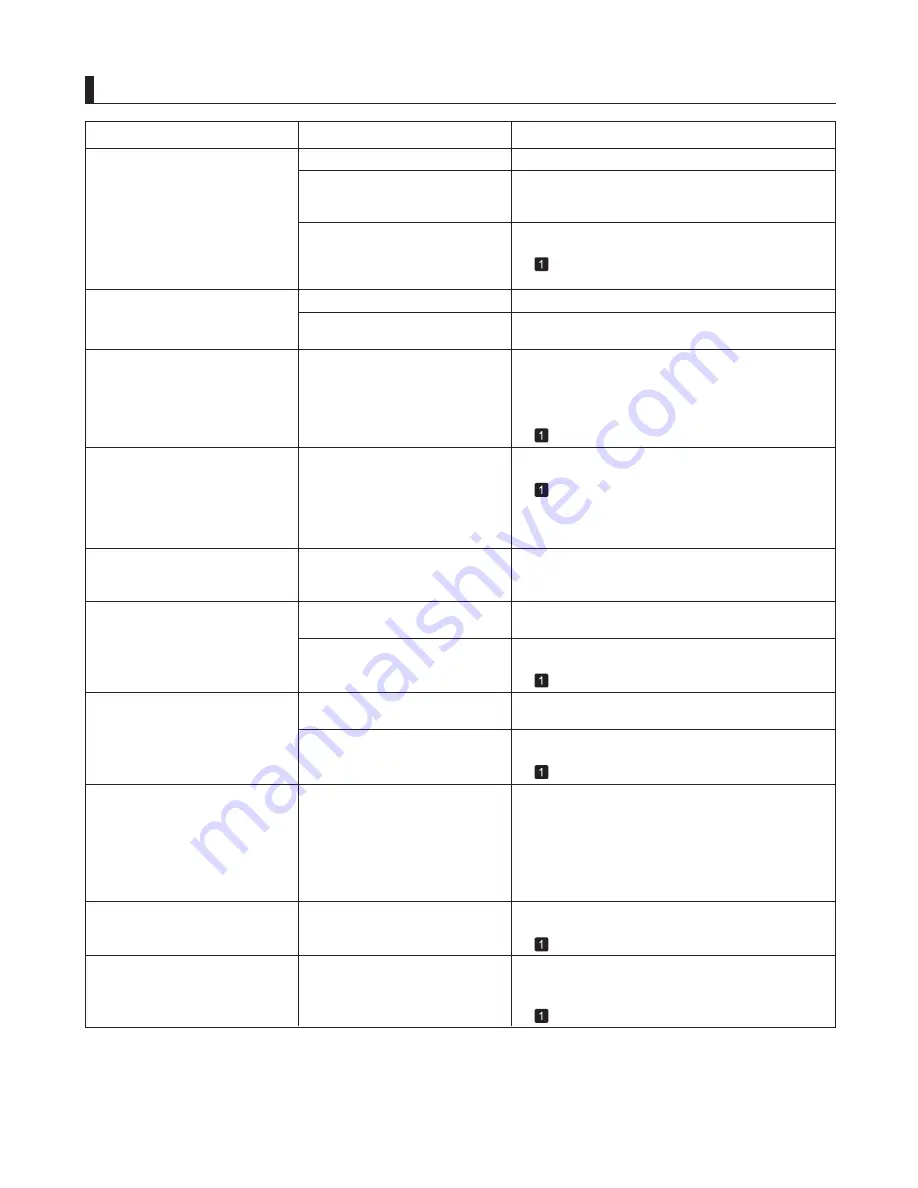
Canon 3433B010 Скачать руководство пользователя страница 15

15

Troubleshooting

HP-GL/2 Problems

Phenomenon

HP-GL/2 printing takes a long time

Please wait a while until printing is finished.

Large print jobs with a lot of data 
take longer to print.

The printer stops when printing an 
HP-GL/2 job (the carriage stops 
moving)

Please wait a while until printing is finished.

HP-GL/2 jobs are printed in 
monochrome (or color)

Check the  

Color Mode  

  setting in the  

Control Panel  


menu.

The printer is analyzing the print 
job.

The  

Color Mode  

  setting in the 


Control Panel  

  menu is incorrect.

Lines or images are incomplete in 
printed HP-GL/2 jobs.

With HP-GL/2, printing is 
misaligned

Check the size of the data in the print job.

Check the print job and settings.

Check the printing commands.

The memory is full.

An HP-GL/2 command not 
supported by this printer was 
received.

The plotter origin is incorrect.

Cause

Corrective Action

Lines are printed too thick or thin in 
HP-GL/2 print jobs

Check the  

Width  

  setting value specified for  

Pen no.  


in the palette ( 

Palette A  

  or  

Palette B  

 ) selected in the 


Control Panel  

  menu. If fine lines are printed faintly, 

setting  

ThickenFineLines  

  to  

On  

  will print the lines 

more distinctly.

The  

Width  

  setting in the  

Control 

Panel  

  menu is incorrect.

(

, Menu Map)

(

, Menu Map)

In the  

Control Panel  

 , set  

Auto Rotate  

  to  

Off  

  and 

print again.

The printer has received print data 
that includes HP RTL commands 
when  

Auto Rotate  

  is  

On  

  in the 


Control Panel  

  menu.

(

, Menu Map)

Replotting with HP-GL/2 jobs is not 
possible.

Data for replotting is lost after the following 
operations. In this case, send the print job again.

The data was lost because of 
replotting.

HP-GL/2 jobs are printed at 
maximum size, even if a standard 
size is specified

In  

MAIN MENU  

 , set  

PageSizeProcess2  

  or  

Conserve 

Paper  

  to  

On  

 .

The page size of the HP-GL/2 
print job, as created in the source 
application, is incorrect.

The layout will be changed to the optimal layout.
(

, Menu Map)

(

, Menu Map)

However, for optimal  Printhead


  performance, the 

printer consumes trace amounts of color ink even 
when  

Monochrome  

  is selected as  

Color Mode  

 .

Printed colors of lines are 
inaccurate during HP-GL/2 printing

Setting  

AdjustFaintLines  

  to  

Off  

  in the  

Control 

Panel  

  menu may help produce the expected results. 

However, lines in some colors may appear broken.


AdjustFaintLines  

  is  

On  

  in the 


Control Panel  

  menu.

The memory buffer was cleared from the  

Control 

Panel  

 .

1.

The printer was turned off.

2.

The printer received a new HP-GL/2 print job.

3.

Printing has been canceled

4.

HP-GL/2 jobs are printed 6 mm 
larger than specified

In the  

Control Panel  

  menu, set  

PageSizeProcess1  


to  

On  

 .

The page size of the HP-GL/2 
print job, as created in the source 
application, is incorrect.

(

, Menu Map)

Adjust the  

Margin  

  setting values in the  

Control Panel  


menu.

The  

Margin  

  setting in the  

Control 

Panel  

  menu is incorrect.

In the  

Control Panel  

  menu, set  

Input Resolution  

  to 


300dpi  

  and print again.

A job was printed when  

Input 

Resolution  

  in the  

Control Panel  


menu was set to  

600dpi  

 .

(

, Menu Map)

In the  

Control Panel  

  menu, set  

Input Resolution  

  to 


300dpi  

  and print again.

A job was printed when  

Input 

Resolution  

  in the  

Control Panel  


menu was set to  

600dpi  

 .

Содержание 3433B010

Страница 1: ... Holder to Rolls 12 Loading Rolls in the Printer 14 Removing the Roll from the Printer 16 Loading Sheets in the Printer 18 Removing Sheets 20 Consumables 21 Replacing Ink Tanks 22 Replacing the Maintenance Cartridge 26 Replacing the Printhead 30 Menu Map 35 Troubleshooting 2 If Roll Paper Jams 18 If a Sheet Jams 21 If Paper is Soiled 23 If Printing is Faint 25 If Vertical Lines are Warped or Color...

Страница 2: ...y is most important we recommend setting TrimEdge Reload to On or Automatic so that the paper edge is automatically cut before printing The size of clear film cannot be detected The Platen is soiled with ink or other substances Open the Top Cover and clean the entire Platen If Paper is Soiled Paper is jammed by the paper feed slot Remove the jammed paper If a Sheet Jams If Roll Paper Jams You are ...

Страница 3: ...lity in some versions of Mac OS X Select the printer and then Start Jobs in the Printers menu to restart the print job Wait until the system has been filled with ink This process may take about seven and a half minutes The printer is not on In the Control Panel menu Pause Print is On The printer is not selected in the printer driver The printer is in Sleep mode The print job is paused The printer ...

Страница 4: ...s are clogged A print job was received from an incompatible printer driver The printer is damaged Checking for Nozzle Clogging User Manual An error message is shown on the Display Screen Check the error message and take action as necessary Remove the used roll and insert a new roll An error message is displayed during printing The last portion of roll paper was used during a print job and paper co...

Страница 5: ...oll DryingTime Print a test pattern to check the nozzles and see if they are clogged After the ink tanks have been installed for 24 hours run Head Cleaning B from the Control Panel Follow the steps below to remove the jammed piece of paper inside the Top Cover Open the Top Cover and make sure the Carriage is not over the Platen Remove any scraps of paper inside the Top Cover In Advanced Settings o...

Страница 6: ...er or other paper based media choose a VacuumStrngth setting of Strong or Strongest in the Control Panel menu If the paper still rubs set Head Height to Highest in the Control Panel menu When printing on paper 0 1 mm 0 004 in thick or less choose a VacuumStrngth setting of Weakest in the Control Panel menu If the paper still rubs set Head Height to Highest in the Control Panel menu Loading Rolls i...

Страница 7: ...he Control Panel menu If the paper still rubs set Head Height to Highest in the Control Panel menu The edges of the paper are dirty Open the Top Cover and clean the Platen The Platen has become dirty after borderless printing or printing on small paper The paper is wrinkled or warped The type of paper as specified on the printer does not match the type specified in the printer driver A cut line is...

Страница 8: ...on the Layout sheet of the printer driver and select Application Color Matching Priority in the dialog box If Paper is Soiled Checking for Nozzle Clogging User Manual If Vertical Lines are Warped or Colors are Misaligned Manual Adjustment to Straighten Lines and Colors Head Posi Adj User Manual Color may change slightly even on the same model of printer if you use a different version of the firmwa...

Страница 9: ...he type of paper specified in the printer driver does not match the type loaded in the printer Load paper of the same type as you have specified in the printer driver Loading Rolls in the Printer Loading Sheets in the Printer Press the Stop button and stop printing 1 Change the type of paper in the printer driver and try printing again 2 Banding in different colors occurs The paper feed amount is ...

Страница 10: ...in Print Quality Specify No in Auto Cut in the printer driver before printing In this case the paper can be printed without borders on the left and right sides only Cut the printed document ejected from the printer then use scissors to cut away the edges on the top and bottom Adjust the Printhead alignment Choose a higher level of Print Quality in the Advanced Settings of the printer driver To avo...

Страница 11: ... Control Panel menu The type of paper specified in the printer driver does not match the type loaded in the printer Make sure the same type of paper is specified in the printer driver as you have loaded in the printer Load paper of the same type as you have specified in the printer driver Press the Stop button and stop printing 1 Change the type of paper in the printer driver and try printing agai...

Страница 12: ...kew Check Lv is set to Loose or Off In the Control Panel menu Width Detection is set to Off In the Special Settings dialog box of the Windows printer driver Fast Graphic Process is selected Clear the option Open Preview When Print Job Starts on the Main sheet Clear the option Page Layout on the Layout sheet Click the Special Settings button on the Layout sheet to display the Special Settings dialo...

Страница 13: ...nter s Ethernet port 1 2 Make sure the printer is connected to the network with the correct Ethernet cable and then turn the printer on For instructions on connecting the cable refer to the Setup Guide Make sure the Link indicator is lit The bottom indicator is green if the printer is connected via 1000BASE T while the top indicator is orange if connected via 100BASE TX and the top indicator is gr...

Страница 14: ...rst mode in that printer s network protocol settings If the printer is used in queue server mode specify Other Unknown as the printer type 5 Phenomenon Cause Corrective Action Configuring the Printer s NetWare Network Settings User Manual Configuring NetWare Network Settings User Manual Cannot print over AppleTalk or Bonjour networks Activate AppleTalk on the printer Make sure the computer s Apple...

Страница 15: ...ible Data for replotting is lost after the following operations In this case send the print job again The data was lost because of replotting HP GL 2 jobs are printed at maximum size even if a standard size is specified In MAIN MENU set PageSizeProcess2 or Conserve Paper to On The page size of the HP GL 2 print job as created in the source application is incorrect The layout will be changed to the...

Страница 16: ...rce that conforms to the printer specifications The specified voltage is not supplied Cause Corrective Action If the Printer Makes a Strange Sound The following sounds do not indicate a problem with the printer The printer makes a sound during operation There is a sound of suction from the Platen There is a sound when a different size of paper is used and when the Carriage goes from side to side R...

Страница 17: ...and Printhead which may cause the ink level indicators to drop to 80 This does not indicate a problem with the printer The printer has not detected the new Maintenance Cartridge that was used to replace the old one Many full page color images are printed Head Cleaning B in the Control Panel menu is executed frequently You have just finished initial installation when more ink is consumed to fill th...

Страница 18: ...per Paper Feed Slot User Manual 1 2 If paper from a roll becomes jammed Paper jam is shown on the Display Screen of the Control Panel Remove the jammed paper as follows Open the Roll Cover Use a commercially available cutter or the like to cut the paper of the loaded roll Push the Release Lever back If Roll Paper Jams Clear jammed roll paper as follows Prepare to remove the jammed paper ...

Страница 19: ...ammed paper from inside the Top Cover Open the Top Cover and move the Carriage to the left or right side manually away from the jam Clear any jammed paper from inside the Top Cover Close the Top Cover Pull the Release Lever forward After removing the paper make sure there are no other scraps of paper in the printer ...

Страница 20: ... the Paper Feed Slot Pull the Release Lever forward Clear any jammed paper near the Ejection Guide After removing the paper make sure there are no other scraps of paper in the printer Remove the jammed paper from the Output Tray Pull the Release Lever forward After removing the paper make sure there are no other scraps of paper in the printer ...

Страница 21: ...he Display Screen of the Control Panel Remove the jammed paper as follows Push the Release Lever back Open the Top Cover and move the Carriage to the left or right side manually away from the jam Clear any jammed paper from inside the Top Cover Close the Top Cover If a Sheet Jams Clear jammed sheets as follows Clear any jammed paper from inside the Top Cover Prepare to remove the jammed paper Afte...

Страница 22: ... paper near the Paper Feed Slot Clear any jammed paper near the Ejection Guide Pull the Release Lever forward Pull the Release Lever forward After removing the paper make sure there are no other scraps of paper in the printer After removing the paper make sure there are no other scraps of paper in the printer Pull the Release Lever forward ...

Страница 23: ...Clean inside the Top Cover once a month to maintain better printing quality and help prevent problems Also clean inside the Top Cover in the following situations to ensure optimal operation Open the Top Cover If paper dust has accumulated in the Vacuum holes a on the Platen or in the Borderless Printing Ink Grooves b use the Cleaning Brush c provided with the printer to wipe it away If the printed...

Страница 24: ...ity When cleaning between the Platen and Ejection Guide use a damp cloth that you have wrung out completely to wipe over the Output Tray and along grooves 3 4 Using a damp cloth that you have wrung out completely wipe inside the Top Cover to clean it Close the Top Cover Wipe away any ink residue on the Platen as a whole a the Paper Retainer b Borderless Printing Ink Grooves c and Ejection Guide d ...

Страница 25: ...n the Tab Selection screen of the Control Panel press or to select the Settings Adj tab Press the OK button Press or to select Maintenance and then press the OK button Print a test pattern to check the nozzles and determine whether cleaning has cleared the nozzles Checking for Nozzle Clogging User Manual If Printing is Faint Clean the printhead as follows Head Cleaning A Use this mode if printing ...

Страница 26: ...ighten Lines and Colors Head Posi Adj User Manual Always make sure the loaded paper matches the type of paper specified on the printer Adjustment cannot be completed correctly unless the loaded paper matches the settings If printed vertical lines are warped or colors are out of alignment execute Head Posi Adj to adjust the Printhead alignment Use Auto Standard or Auto Advanced to have the printer ...

Страница 27: ...is printed for adjustment Adjustment is now finished if you have printed on a roll or a sheet of A2 size or larger If you are printing on sheets smaller than A2 size for Auto Advanced a confirmation message is displayed requesting you to continue printing Press the OK button and follow the instructions displayed Perform adjustment as follows Attaching the Roll Holder to Rolls Loading Rolls in the ...

Страница 28: ...usting Line Length Adjust Length User Manual 1 Perform adjustment as follows If printed images are affected by banding in different colors across the sheet execute Adj Quality for automatic adjustment of the paper feed amount There are two modes of automatic adjustment to correct banding Auto GenuinePpr and Auto OtherPaper In either mode the printer prints and reads a band adjustment test pattern ...

Страница 29: ...uinePpr or Auto OtherPaper and then press the OK button A test pattern is printed for adjustment Adjustment is now finished if you have printed on a roll or a sheet of A2 size or larger If you are printing on sheets smaller than A2 size for Auto GenuinePpr a confirmation message is shown on the Display Screen requesting you to continue printing Press the OK button and follow the instructions on th...

Страница 30: ...t Quality in the printer driver A High This setting is applied when Highest or High is selected in Print Quality in the printer driver Paper to Prepare Rolls An unused roll at least 10 inches wide Sheets One sheet of unused paper of at least A4 Letter size Perform adjustment as follows Load the paper On the Tab Selection screen of the Control Panel press or to select the Settings Adj tab If Line L...

Страница 31: ... Press or to select Adjust Length and then press the OK button Press or to select AdjustmentPrint or Change Settings and then press the OK button Press or to enter the amount of discrepancy and then press the OK button When you select AdjustmentPrint a test pattern is printed for you to measure the scale and calculate the discrepancy The scale bar shows Millimeter in 50 mm units and Inch in 1 inch...

Страница 32: ...ent Ink tank is empty Insert the maintenance cartridge Insufficient paper for job Mail box full Now printing without saving data Mail box nearly full Maint cart The level is low Maintenance cartridge full Maintenance cartridge problem Maximum jobs stored MediaType Mismatch Multi sensor error No ink left No ink tank loaded No Maintenance Cartridge capacity No printhead Not much ink is left Paper cu...

Страница 33: ...t be used This type of paper is not compatible with HP GL 2 Too many jobs for mail box Top cover is open Unable to detect ink level correctly Unknown file Wrong ink tank Wrong maintenance cartridge Remaining level of the ink cannot be correctly detected Other messages These messages do not indicate problems that prevent printer operation Check the message on the Display Screen and take action as n...

Страница 34: ... press the OK button Replace the Ink Tank that is low with a new Ink Tank Not much ink is left Not much ink is left Prepare a new Ink Tank We recommend replacing the Ink Tank with a new Ink Tank at this point if you plan to print large format or high quantity jobs Close Ink Tank Cover The Ink Tank Cover is open Close the Ink Tank Cover Ink tank is empty There is no ink left in an ink tank Open the...

Страница 35: ... is loaded Press or to select Remove Roll Paper and then press the OK button to stop printing 1 After removing the roll load and print on a sheet of the type and size of paper you have specified in the printer driver 2 Removing the Roll from the Printer Loading and Printing on Sheets User Manual Loading and Printing on Rolls User Manual Remaining level of the ink cannot be correctly detected Ink l...

Страница 36: ...ay run out during the print job and you may not be able to print all of the document Press or to select Change Paper and then press the OK button to stop printing Either change the printer driver Paper Source setting or the GL2 Settings Paper Source setting in the printer menu or replace the roll with a roll that has enough paper for the print job and then try printing again Removing the Roll from...

Страница 37: ...urn off the printer open the Top Cover and remove the tape or the Belt Stopper before restoring power An error requiring service may have occurred Turn off the printer and wait at least three seconds before restoring the power Hard disk error The format of the printer s hard disk is invalid Press the OK button to start reformatting the hard disk When formatting is finished data on the printer hard...

Страница 38: ... Types of Paper User Manual Press or to select Change Paper and then press the OK button to remove the roll 1 Replace the paper with paper compatible for borderless printing 2 Removing the Roll from the Printer Removing the Roll Holder from Rolls Attaching the Roll Holder to Rolls Loading Rolls in the Printer The printer now starts printing the print job For information on types of paper compatibl...

Страница 39: ...ed The Printhead is installed crooked Straighten the Printhead as follows and then execute Head Posi Adj again Use Head Inc Adj to adjust the angle of inclination of the Printhead 2 Execute Head Posi Adj again 3 Adjusting Line Misalignment Head Inc Adj User Manual If Vertical Lines are Warped or Colors are Misaligned We recommend using a type of paper that you often use other than film for Printhe...

Страница 40: ...rect sunlight or strong lighting may be shining on the printer and causing the sensor to malfunction Take steps to ensure the printer is not used when exposed to direct sunlight or strong lighting The performance of a sensor inside the printer may be impaired Turn off the printer and wait at least three seconds before restoring the power If the message is displayed again contact your Canon dealer ...

Страница 41: ...nter under the recommended environmental conditions for the paper Use the printer only where the recommended environmental conditions for the paper are met Note that various environmental conditions are recommended for various types of paper For details on the recommended environmental conditions for paper see the Paper Reference Guide You are using paper that is not compatible with automatic cutt...

Страница 42: ...op Printing and then press the OK button to stop printing 1 Change the paper size setting in the printer driver to the size loaded in the printer and try printing again 2 Replace the loaded paper with paper of a size that matches the size setting in the printer driver as follows Press or to select Change Paper and then press the OK button to stop printing 1 Replace the loaded paper to match the pa...

Страница 43: ...r as follows Press or to select Change Paper and then press the OK button Removing the Roll from the Printer Attaching the Roll Holder to Rolls 2 1 Replace the roll with a roll 10 inches wide or larger The printer will resume printing Press or to select Stop Printing and then press the OK button Replace paper with A4 LTR vertical or larger Removing the Roll Holder from Rolls User Manual Loading Ro...

Страница 44: ... it is displayed repeatedly despite reloading paper for example choose Off or Loose in the Skew Check Lv setting of the printer menu However this may cause jams and printing problems because paper may be askew when printed Also the Platen may become soiled which may soil the back of the next document when it is printed Push the release lever back A paper jam occurred in the printer during printing...

Страница 45: ...until it touches the Roll Holder flange and reload the Roll Holder in the printer Follow these step to reload a sheet Push the Release Lever back 1 Load the sheet aligning it with the guide on the right 2 Pull the Release Lever forward 3 If Not finished printing Finish printing remaining jobs is shown on the Display Screen press the OK button 4 Loading Rolls in the Printer Attaching the Roll Holde...

Страница 46: ... driver You can continue to print but note that this error may cause problems in the printing results Either change the type of paper specified in the printer driver settings or replace the loaded paper and change the paper type setting on the printer 2 Loading and Printing on Rolls User Manual Loading and Printing on Sheets User Manual When printing a test pattern for adjustment use sheets of the...

Страница 47: ...is set to Pause or Warning the width of the loaded roll does not match the width specified in Fit Roll Paper Width in the printer driver Press or to select Print and then press the OK button to resume printing Press or to select Stop Printing and then press the OK button to stop printing Follow these steps to replace the roll to match the width specified in the printer driver However note that thi...

Страница 48: ...ed but sheets are loaded A print job for rolls was received when a sheet is loaded Press or to select Stop Printing and then press the OK button Press or to select Eject Cut Sheet press the OK button and remove the sheet Removing Sheets Load a new roll Loading Rolls in the Printer Follow these steps to load and print on a roll The printer now starts printing the print job 1 2 Turn off the printer ...

Страница 49: ...ype of Paper User Manual Roll paper is not securely in contact with roll holder When the roll was loaded the roll was not inserted firmly all the way on the Roll Holder Follow these steps to reload the roll If Not finished printing Finish printing remaining jobs is shown on the Display Screen press the OK button 5 Printing will resume starting from the page on which the error occurred There is rem...

Страница 50: ...1 Cleaning Brush 23 Color unevenness 10 e Error messages 32 h HP GL 2 15 34 j Jammed roll paper 18 Jammed sheets 21 n NetWare 14 Network 13 p Paper Retainer 24 Paper soiling 23 Printhead cleaning 25 Printing not possible 13 t Top Cover 23 Index ...

Страница 51: ......

Страница 52: ... Inc One Canon Plaza Lake Success NY 11042 U S A Canon Europa N V Bovenkerkerweg 59 61 1185 XB Amstelveen The Netherlands Canon China Co Ltd 15F Jinbao Building No 89 Jinbao Street Dongcheng District Beijing 100005 China Canon Australia Pty Ltd 1 Thomas Holt Drive North Ryde Sydney N S W 2113 Australia Q T 5 2 2 9 1 V 2 ...

Отзывы: