background image

10

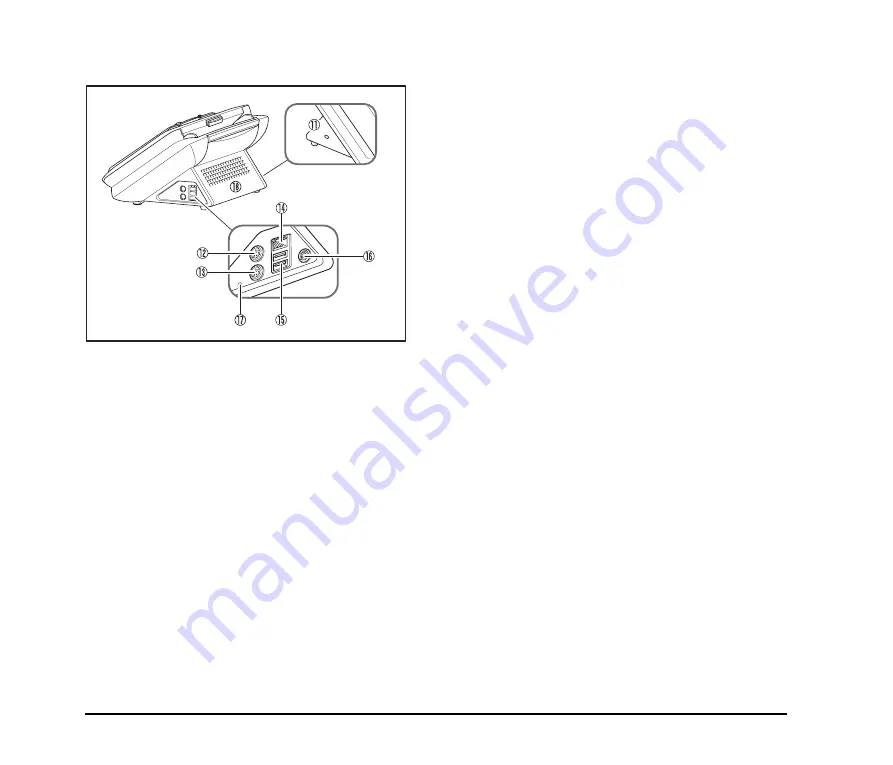
Side and Rear

k

Kensington Slot

This is an anti-theft slot that enables a key chain or lock to 
be connected to prevent theft. 

l

PS/2 Connector (Green)

Connect a PS/2 mouse.

m

PS/2 Connector (Purple)

Connect a PS/2 keyboard.

n

LAN Port (RJ-45)

Connect an RJ-45 (10Base-T/100Base-TX) compatible 
network cable. 

o

USB Ports

Connect a USB1.1/Hi-Speed USB2.0 compatible USB 
flash drive, USB keyboard, or USB mouse.

p

Power Connector (16 V DC)

Connect the plug of the supplied AC adapter. 

q

Service Switch

This is a service switch. Do not insert any object into this 
hole. 

r

Ventilation Holes

Содержание 2263B002 - imageFORMULA ScanFront 220

Страница 1: ...Setup Guide Read This First Please read this manual before using the device After you finish reading this manual keep it in a safe place for future reference ...

Страница 2: ...ns should be made you could be required to stop operation of the equipment Canon U S A Inc One Canon Plaza Lake Success NY 11042 U S A Tel No 516 328 5000 RADIO INTERFERENCE REGULATIONS For 120 V models This digital apparatus does not exceed the Class B limits for radio noise emissions from digital apparatus as set out in the Interference causing equipment standard entitled Digital Apparatus ICES ...

Страница 3: ...demarks or registered trademarks in other countries imageFORMULA is a trademark of Canon Electronics Inc eCopy the eCopy logo eCopy ScanStation eCopy Desktop eCopy Quick Connect and eCopy Xpert Compression are trademarks of eCopy Inc ShareScan is a registered trademarks of eCopy Inc Opera or Opera SoftwareTM are registered trademarks of Opera Software ASA in Norway or other countries Microsoft Win...

Страница 4: ...OM LOSS OF USE DATA OR PROFITS WHETHER OR NOT ADVISED OF THE POSSIBILITY OF DAMAGE AND ON ANY THEORY OF LIABILITY ARISING OUT OF OR IN CONNECTION WITH THE USE OR PERFORMANCE OF THIS SOFTWARE libjpeg Portions of this software are based in part on the work of the Independent JPEG Group Copyright 2008 by CANON ELECTRONICS INC All rights reserved No part of this publication may be reproduced or transm...

Страница 5: ...s a network scanner that allows you to scan paper documents and send scanned images to eCopy ShareScan Services Manager which then forwards the scanned images to multiple destinations such as the Shared Folder Mail Server SMTP Notes FTP Server Printer Fax via Email or USB flash drive attached to the device Mail Server Data route ScanFront USB flash drive FTP Server PC Shared folder PC eCopy Deskto...

Страница 6: ... 5 Software CD ROM and requires Adobe Reader to open eCopy ShareScan 4 5 Launch Questions Answers general questions about eCopy ShareScan 4 5 This manual is stored as an HTML file on the eCopy ShareScan 4 5 Software CD ROM Symbols Used in This Manual The following symbols are used in this manual to explain procedures restrictions handling precautions and instructions that should be observed for sa...

Страница 7: ...Manager 18 System Requirements 18 Installing Services Manager 18 Entering the Product Key Licensing the Device 19 Configuring and Registering the Device 20 Installing Quick Connect 23 8 Configuring ShareScan Services Manager 24 9 Documents 25 Plain Paper 25 Business Card 25 Plastic Card 26 10 Preparing the Device 27 Preparing the Document Feed Tray and Eject Tray 27 Feed Selection Lever 28 USB Por...

Страница 8: ...nd QuickConnect to suit your requirements you must first establish a connection between the ScanFront 220e 220eP and eCopy ShareScan Services Manager This section describes how to configure settings on the ScanFront 220e 220eP and eCopy ShareScan Services Manager to establish a connection 8 Configuring ShareScan Services Manager See p 24 After connection is established you can configure the variou...

Страница 9: ...ld but rapidly heated water droplets condensation may form inside the device This may result in a noticeable degradation in scanning quality The following conditions are recommended for optimal scanning quality Room temperature 10 C to 32 5 C 50 F to 90 5 F Humidity 20 to 80 RH Avoid installing the device near equipment that generates a magnetic field e g speakers televisions or radios Power Conne...

Страница 10: ...ut damage or modify the power cord or AC adapter Do not place heavy objects on the power cord or AC adapter and do not pull or excessively bend the power cord Never connect the power cord when your hands are wet Do not connect the device to a multiplug power strip Do not knot or coil the power cord as this may result in a fire or electric shock When connecting the power cord make sure that the pow...

Страница 11: ... and fall resulting in personal injury Do not use the device with a power supply voltage other than 120 V AC and 220 240 V AC depending on the model in use Doing so might cause fire or electric shock When disconnecting the power cord grasp it firmly by its plug Do not pull directly on the power cord as this may damage or expose the cord s internal wiring resulting in a fire or electric shock Leave...

Страница 12: ...on fails frequently clean the surface of the fingerprint sensor regulary When cleaning the fingerprint sensor use a soft dry cloth to wipe dirt off the surface Do not use a pointed object to remove any dirt that accumulates around the fingerprint sensor Doing so may cause the fingerprint sensor to malfunction Touching the fingerprint sensor while charged with static electricity may cause the finge...

Страница 13: ... to match the width of the document f Panel Unit Open this when there is a paper jam or to perform maintenance g Touch Panel Touch this screen to operate the ScanFront h Document Eject Tray Open this tray when using the ScanFront If scanned documents are likely to fall out of the tray open the tray extension If scanned documents curl in the document eject tray remove the entire tray i Fingerprint ...

Страница 14: ...ector Purple Connect a PS 2 keyboard n LAN Port RJ 45 Connect an RJ 45 10Base T 100Base TX compatible network cable o USB Ports Connect a USB1 1 Hi Speed USB2 0 compatible USB flash drive USB keyboard or USB mouse p Power Connector 16 V DC Connect the plug of the supplied AC adapter q Service Switch This is a service switch Do not insert any object into this hole r Ventilation Holes ...

Страница 15: ...be attached to the device during installation See p 13 Information sheet on how to obtain the eCopy ShareScan Product Key AC Adapter Cord length 4 9 ft 1 5 m Warranty Card U S A and Canada only Power Cord Cord length 3 3 ft 1 m Registration Card U S A and Canada only Setup Guide this manual Make sure to use only the supplied AC adapter and power cord The PDF files stored on the CD ROM require Adob...
Страница 16: ...evice during installation See p 13 eCopy Desktop Setup CD ROM AC Adapter Cord length 4 9 ft 1 5 m Information sheet on how to obtain the eCopy ShareScan Product Key Power Cord Cord length 3 3 ft 1 m Clear Binder Before Use Make sure to use only the supplied AC adapter and power cord The PDF files stored on the CD ROM require Adobe Acrobat or Adobe Reader to open You can download Adobe Reader from ...

Страница 17: ...es securing the outer case 2 Gently open the document eject tray 3 Pull the lock lever toward you and then fully open the panel unit CAUTION The open close movement of the panel unit is linked to the up down movement of the document eject tray Do not press on the document eject tray when you open the panel unit 4 Remove the orange tape 2 pieces securing the roller covers Lock lever ...

Страница 18: ...he roller with the shaft of the device and place the feed roller into position 8 Move the lock lever in the direction of the arrow then insert it into the hole in the feed roller 9 Lower the roller lock lever to lock the feed roller into position 10 Close the roller cover Make sure you hear a click which indicates the cover has returned to its original position ...

Страница 19: ...15 11 Gently close the panel unit Press on both sides of the unit until you hear a click which indicates the unit is locked 12 Gently close the document eject tray ...

Страница 20: ...e AC adapter CAUTION Make sure to use only the AC adapter and power cord included with the device a Connect the power cord and AC adapter b Insert the plug of the AC adapter into the power connector c Connect the power cord to the wall outlet Connecting the Network Cable Insert the network cable connector RJ 45 into the LAN port The shape of the plug and outlet shown may vary depending on your cou...

Страница 21: ...enu screen to appear after the power switch is turned on When the power indicator is lit but nothing appears on the touch panel Display Off has activated to turn the panel display off You can touch the panel to restore the display Turning the Power OFF Press and hold the power switch until the device shuts down IMPORTANT When restarting the device wait at least 5 seconds after turning the power OF...

Страница 22: ... 2003 Server Microsoft Windows 2008 Server Hard disk Type and format IDE or SCSI drive NTFS format is required Capacity 40GB or higher Network 100 Base TX network interface card is required Required components TCP IP and Client for Microsoft Networks IMPORTANT Depending on how the device is used a system with higher specifications may be required For details refer to the eCopy ShareScan 4 5 Instal...

Страница 23: ...se the device Hint Refer to the supplied information sheet on how to obtain the eCopy ShareScan product key and obtain the product key beforehand requires Internet connection The product key for the device is also required to obtain the eCopy ShareScan product key 1 Click the Start button and then click All Program eCopy Applications and ShareScan Administration eCopy ShareScan Administration star...

Страница 24: ...ion and registration of the device As you will need to operate both the device and the computer when registering the device do not exit ShareScan Administrator yet Configuring and Registering the Device After setting up the computer on which Services Manager is installed configure the necessary settings on the device and register the device on the computer 1 Turn the device ON The Startup Menu for...

Страница 25: ...evice This is the name that will appear for the device on the network IP Address Enter a unique IP address to assign the device IMPORTANT You must assign the device a static IP address Consult your network administrator to determine a static IP address for the device Subnet Mask Enter the subnet mask of the network to which the device will be connected For details contact your network administrato...

Страница 26: ...en the device starts again a screen for entering the IP address of the computer on which Services Manager is installed appears 5 Enter the IP address of the computer on which Services Manager is installed and press Connect Hint The Use HTTPS option is enabled by default You can disable this option to enter a port number of your choice in the Port box You should now be able to access the device fro...

Страница 27: ...or computer cannot connect to the Internet activation can be performed manually For details refer to the eCopy ShareScan 4 5 Installation and Setup Guide electronic manual You can also click Activate Later in step 9 You will still be able to use the device in this case but only for a period of 30 days Installing Quick Connect The eCopy ShareScan 4 5 Setup CD ROM also includes a connector applicati...

Страница 28: ...en the ScanFront and eCopy ShareScan Services Manager is established you can configure the various settings of eCopy ShareScan and QuickConnect to suit your requirements For details please refer to the eCopy ShareScan 4 5 Installation and Setup Guide electronic manual ...

Страница 29: ...ss after scanning a document written in pencil Scanning documents with pencil written on them may soil the rollers or scanning glass cause stripes to appear in images or dirty other documents When scanning a two sided document that is printed on thin paper the image on the opposite side of each page may show through Adjust the brightness in the scanning conditions before scanning the document Note...

Страница 30: ...Insertion orientation Landscape CAUTION A plastic card placed into the document feed tray in the portrait orientation may not be output properly because a load is placed on it during feeding Furthermore removing a card that has caused a feeding error may damage the card so make sure to correctly insert the card ...

Страница 31: ...tray a 2 Pull out the document feed tray b c to match the length of the document to be placed in the tray Hint Open the center tray extension when output documents are likely to fall out of the tray Hint If the output documents curl in the eject tray when scanning particularly thin documents remove the eject tray To remove the document eject tray push in on the illustrated portions of the tray on ...

Страница 32: ...g a stack of documents will cause multiple pages to be fed at the same time USB Port You can insert a USB flash drive to store image files or connect a USB keyboard or USB mouse to operate the device IMPORTANT Insert the USB flash drive while the device is ON Some USB flash drive may not be recognized properly if the power is turned ON after the USB flash drive is inserted Use USB flash drive that...

Страница 33: ...2 Mouse You can connect a PS 2 keyboard and mouse to the PS 2 port and use them to operate the device IMPORTANT Turn OFF the device before connecting or disconnecting the PS 2 mouse and keyboard Green Top Mouse Purple Bottom Keyboard ...

Страница 34: ...ng a Document Follow the procedure below to place a document 1 Adjust the document guides to be wider than the width of the document 2 Fan the document to offset the pages so that the top edge of the first page is the lowest 3 Place the document face down with its top edge at the bottom of the tray 4 Adjust the document guides to fit the width of the document ...

Страница 35: ... sure to scan the cards one at a time 2 Adjust the document guides to match the width of the card 3 Place the card face down in the landscape orientation with the top edge at the bottom of the tray CAUTION A card placed into the document feed tray in the portrait orientation may not be output properly because a load is placed on it during feeding Furthermore removing a card that has caused a feedi...

Страница 36: ...etected if Double Feed Detection is enabled in the Scanning Settings for the device IMPORTANT If double feed errors occur repeatedly reduce the number of sheets you place in the document feed tray to about 10 A dirty or worn feed roller or documents stuck together as a result of static electricity are common causes of paper jams or double feed errors If the feed roller is dirty clean it If paper j...

Страница 37: ...d to the up down movement of the document eject tray Do not press on the document eject tray when you open the panel unit 3 Pull out the jammed document in the direction that seems the easiest to remove it 4 Close the panel unit and then place the document again ...

Страница 38: ...e fingerprint sensor with dirty hands which might scratch or dirty the surface of the fingerprint sensor Placing a sticker on the surface of the fingerprint sensor or covering the surface with ink or another substance If fingerprint authentication fails frequently the fingerprint sensor may be dirty Clean the surface of the fingerprint sensor regularly When cleaning the fingerprint sensor use a so...

Страница 39: ...nditions may cause an error in fingerprint authentication The finger is wet or sweaty The finger is dirty The grooves of the fingerprint are filled with sweat or oil The finger is dry dry skin Part of the fingerprint is missing because of for example a wound or burn injury The fingerprint has worn thin Authentication performance may improve if the condition of the fingerprint is improved as a resu...

Страница 40: ...nual Scanning Procedure 1 Confirm the scan settings in the Home screen and change them as necessary The scan settings appear at the left in the Home screen The scan settings displayed here are the same as those configured on the Services Manager PC By pressing a setting item you can display the configuration for that item and change it as necessary 2 Place a document in the device 3 Press a task b...

Страница 41: ...the on screen keyboard see On Screen Keyboard on p 38 Hint The button will not appear when a USB keyboard is connected 7 Press Send The scanned data is sent After the data is successfully sent a screen for selecting the next operation appears 8 Select the next operation Press one of the following buttons Home End scanning operations and return to the Home screen New Document Begin scanning a new d...

Страница 42: ...ed images g First page Display the first page of the scanned images h Previous page Display the previous page of the scanned images i Current page total pages Displays the total number of pages for the scanned images currently displayed and the current page number j Next page Display the next page of the scanned images k Last page Display the last page of the scanned images l Zoom Zoom in or out o...

Страница 43: ... on the keyboard Shift focus to a different text box when multiple boxes are displayed Display candidates for text when typing with the Search while typing option enabled Enable or disable the Search while typing option Apply the entered text and close the on screen keyboard Cancel the entered text and close the on screen keyboard ...

Страница 44: ... INC 6390 DIXIE ROAD MISSISSAUGA ONTARIO L5T 1P7 CANADA CANON EUROPA N V BOVENKERKERWEG 59 61 P O BOX 2262 1180 EG AMSTELVEEN THE NETHERLANDS CANON AUSTRALIA PTY LTD 1 THOMAS HOLT DRIVE NORTH RYDE SYDNEY N S W 2113 AUSTRALIA CANON SINGAPORE PTE LTD 1 HARBOUR FRONT AVENUE 04 01 KEPPEL BAY TOWER SINGAPORE 098632 PUB CE IE 681 CANON ELECTRONICS INC 2008 ...

Отзывы: