background image

Erasing Shadows/Frame Lines (Frame Erase)

3-19

Ad

v

anced

 Co

p

y

ing 

F

e

at

ur

es

3

NOTE

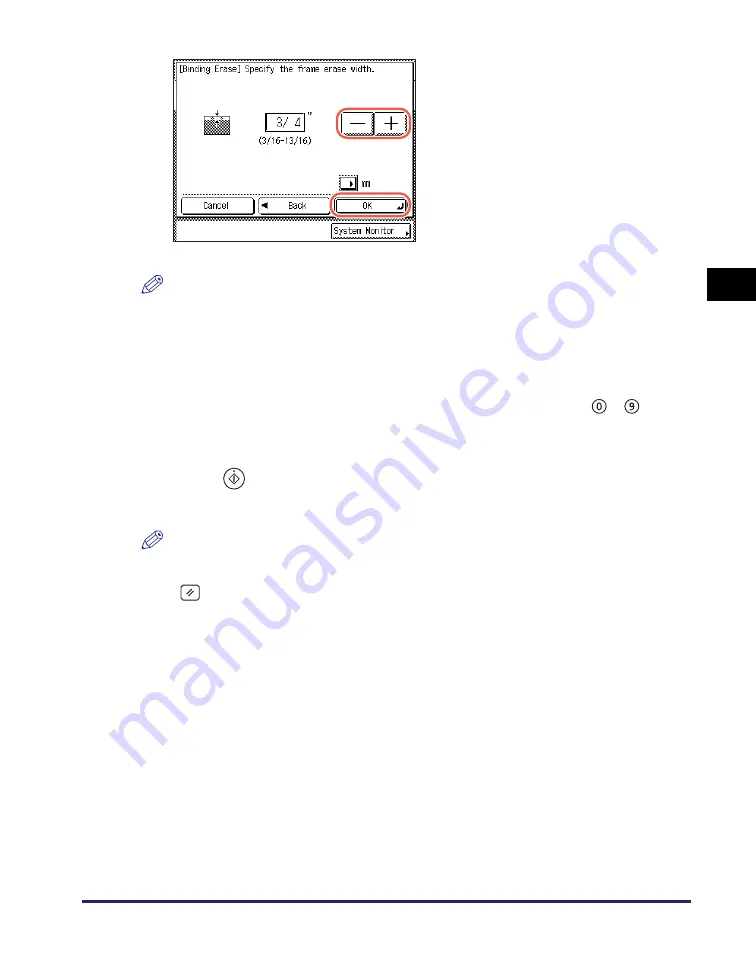
The default setting is '3/4" (18 mm)'. You can adjust the frame erase width to between
3/16" and 13/16" (3 mm and 20 mm).

To enter values in millimeters, press [mm]. (See Chapter 3, "Configuring the Machine's 
Basic Settings," in the 

Reference Guide

.)

5

Enter the desired copy quantity (from 1 to 999) using 

 - 


(numeric keys).

6

Press  

(Start).

Copying starts.

NOTE

To cancel this setting, press [Special Features] 

 [Frame Erase] 

 [Cancel].

To cancel all settings and return the machine to the Standard Settings, press 

(Reset).

4

Press [-] or [+] to set the frame 
erase width 

 press [OK] 


[Done].

The display returns to the top screen.

Содержание 1750

Страница 1: ...ENG Please read this guide before operating this product After you finish reading this guide store it in a safe place for future reference Copying Guide Copying Guide...

Страница 2: ...imageRUNNER 1750iF 1750 1740iF 1740 1730iF 1730 Copying Guide...

Страница 3: ...ding and Fax Instructions Sending and Facsimile Guide CD ROM Remote User Interface Instructions Remote UI Guide CD ROM Network Connectivity Security Management System Settings Guide CD ROM Windows Pri...

Страница 4: ...the instructions on how to place originals available combination of copy modes and index Chapter 1 Chapter 2 Chapter 3 Chapter 4 Chapter 5 Considerable effort has been made to ensure that this manual...

Страница 5: ...atures 1 4 Basic Copying Procedure 1 6 Managing Copy Jobs 1 11 Canceling a Copy Job Using the Stop Key 1 11 Checking and Canceling Copy Jobs Using the System Monitor 1 12 Checking the Copy Log 1 13 Ch...

Страница 6: ...nt Size Originals Together Different Size Originals 3 20 Adjusting Sharpness 3 23 Frequently Used Settings Mode Memory 3 26 Registering Mode Memory 3 26 Recalling Mode Memory 3 29 Deleting Mode Memory...

Страница 7: ...ctions handling precautions and instructions that should be observed for safety IMPORTANT Indicates operational requirements and restrictions Be sure to read these items carefully to operate the machi...

Страница 8: ...attached Staple Finisher H1 and Cassette Module Y1 triple tiered Displays Used in This Manual Screen shots used in this manual may differ from actual displays depending on the machine configuration T...

Страница 9: ...s Windows logo and Windows are trademarks or registered trademarks of Microsoft Corporation in the U S and or other countries Other product and company names herein may be the trademarks of their resp...

Страница 10: ...f Canon Inc Disclaimers The information in this document is subject to change without notice CANON INC MAKES NO WARRANTY OF ANY KIND WITH REGARD TO THIS MATERIAL EITHER EXPRESS OR IMPLIED EXCEPT AS PR...

Страница 11: ...x...

Страница 12: ...n Overview of Copying Features 1 2 Keys and Functions 1 2 Basic Copying Procedure 1 6 Managing Copy Jobs 1 11 Canceling a Copy Job Using the Stop Key 1 11 Checking and Canceling Copy Jobs Using the Sy...

Страница 13: ...e keys as instructed in the messages displayed on the touch panel display Keys and Functions Basic Features Top Screen The screen below which appears when you press COPY is called the top screen See S...

Страница 14: ...Selected Press to select the Collate Group or Staple mode See 2 Sided Copying on p 2 20 1 to 2 Sided Is Selected Press to make 1 to 2 Sided 2 to 2 Sided or 2 to 1 Sided copies See Density on p 2 11 P...

Страница 15: ...the System Monitor screen The screen on the left which appears on the touch panel display when you press Special Features on the top screen is called the Special Features screen All advanced copy mode...

Страница 16: ...Originals Together Different Size Originals on p 3 20 Press to copy different size originals together as one group See Adjusting Sharpness on p 3 23 Press to sharpen or soften the image of the origina...

Страница 17: ...eder scanning area is dirty Always keep them clean Do not touch the feeder while copying Rocking the feeder may distort the image being copied 1 Press COPY NOTE If any of the messages below appears fo...

Страница 18: ...size and type copy density original type copy ratio two sided and the desired finishing mode 4 If necessary specify the copy modes on the Special Features screen Press Special Features Press the desi...

Страница 19: ...ot change the number of copies while the machine is copying NOTE If you make a mistake when entering a value press Clear and enter the correct value The number of copies is displayed on the right side...

Страница 20: ...eparately See Chapter 6 Troubleshooting in the Reference Guide If you want to cancel the current copy job NOTE If you cancel a copy job make sure to remove the original for that job You can also cance...

Страница 21: ...er is jammed or when no paper is loaded in any of the paper drawers or stack bypass NOTE You can reserve up to 10 copy jobs including the current job You can set different copy modes with different pa...

Страница 22: ...System Monitor screen Canceling a Copy Job Using the Stop Key You can cancel a copy job by using Stop NOTE Several copies may be output even after you cancel a job 1 Press Stop If the screen returns...

Страница 23: ...em all at once Select and cancel one job at a time Press Done to return to the top screen Checking and Canceling Copy Jobs Using the System Monitor You can check the status of copy jobs and cancel cop...

Страница 24: ...ns on how to clear paper jams in the feeder see Chapter 6 Troubleshooting in the Reference Guide You cannot select multiple jobs and cancel them all at once Select and cancel one job at a time 5 Press...

Страница 25: ...Managing Copy Jobs 1 14 Introduction to Copy Function 1 4 Press Done to return to the top screen 3 Press Log select the job you want to check press Details...

Страница 26: ...onfirmation NOTE This key appears after you specify any of the copy mode settings 2 Check the settings If the desired modes are set proceed to step 4 Otherwise proceed to step 3 NOTE A right triangle...

Страница 27: ...for a copy mode Perform again the setting procedure for the mode to change the settings as you desire press OK The display returns to the Setting Confirmation screen To cancel a copy mode Press Cancel...

Страница 28: ...l Paper Selection 2 4 Copying Using the Stack Bypass 2 5 Adjusting Density and Image Quality 2 11 Density 2 11 Type of Original 2 12 Enlarging Reducing Images 2 14 Preset Zoom 2 14 Zoom by Percentage...

Страница 29: ...per size IMPORTANT The machine automatically detects the size of the originals to select the optimal paper size However the machine cannot detect the size of the following originals Nonstandard size o...

Страница 30: ...e Automatic Paper Selection mode when The paper is loaded in the stack bypass and the paper size and type are specified The Drawer Eligibility For APS ADS setting is set to On for the stack bypass for...

Страница 31: ...the screen appears prompting you to specify the size of the original select the original size press OK Start Copying starts Manual Paper Selection You can manually select the paper size 1 Place your o...

Страница 32: ...Stack Bypass IMPORTANT If Stack Bypass Standard Settings is set to On the specified paper size and type are applied as the default settings regardless of the actual paper size and type of the paper lo...

Страница 33: ...etting screens See Chapter 3 Configuring the Machine s Basic Settings in the Reference Guide If you want to select a standard paper size NOTE Transparency can be selected only when LTR is selected as...

Страница 34: ...values in millimeters you can also use numeric keys and Clear on the control panel You can store up to two sets of frequently used sizes Press Store Edit Size 1 or Size 2 enter the value for X and Y...

Страница 35: ...t paper type setting may adversely affect the image quality damage the fixing unit and cause paper jams NOTE 3 hole punch Transparency and Labels cannot be selected for a nonstandard paper size For mo...

Страница 36: ...type press OK IMPORTANT If the correct envelope type is not selected a paper jam will occur If an envelope size is selected the Staple 1 to 2 Sided 2 to 2 Sided Image Combination or ID Card Copy mode...

Страница 37: ...ying Features 2 4 Press Start Copying starts NOTE You can load envelopes in Paper Drawer 2 only when the optional Envelope Cassette D1 is attached to the machine For more information see Chapter 5 Rou...

Страница 38: ...the quality of the text original Also you can manually adjust the copy density to the most appropriate level for the original NOTE The default setting is A Auto 1 Place your originals 2 Set the desir...

Страница 39: ...as faithfully as possible to the original The following three types of original modes are available Text Mode This mode is best suited for making copies of text originals Blueprints or pencil drawn or...

Страница 40: ...f an original containing halftones such as a printed photograph using the Photo mode the moir effect a shimmering wavy pattern may occur You can lessen this moir effect by using the Sharpness mode See...

Страница 41: ...ge standard size originals to another standard paper size IMPORTANT To achieve outputs in the desired image orientation place smaller sized originals such as STMT horizontally even if the scanning are...

Страница 42: ...rt Copying starts NOTE To reset the copy ratio to 100 press Direct on the top screen You can also reset the copy ratio to 100 by using the Zoom by Percentage mode See Zoom by Percentage on p 2 15 Zoom...

Страница 43: ...instead of entering 100 or pressing Direct on the top screen If you enter a value outside the setting range and press Done a message prompting you to enter an appropriate value appears on the touch p...

Страница 44: ...T The machine automatically detects the size of the originals to generate the optimal copy ratio However the machine cannot detect the size of the following originals Nonstandard size originals Highly...

Страница 45: ...and the copy ratio generated by the machine is displayed On the following cases however the copy ratio is displayed as Auto When the original is placed in the feeder the copy ratio is generated when...

Страница 46: ...y from 1 to 999 using numeric keys 6 Press Start If the screen appears prompting you to specify the size of the original select the original size press OK Start Copying starts NOTE To return the copy...

Страница 47: ...TR size only Heavy Paper 1 Paper weight 17 to 28 lb bond 64 to 105 g m2 1 to 2 Sided The 1 to 2 Sided mode enables you to make two sided copies from one sided originals NOTE If there is an odd number...

Страница 48: ...cally turns over two sided originals placed in the feeder to copy both sides of the original on the front and back sides of the paper 2 to 1 Sided The 2 to 1 Sided mode automatically turns over two si...

Страница 49: ...en glass NOTE You can make 1 to 2 sided and 2 to 2 sided copies with the platen glass by manually replacing or turning over the originals Follow the instructions that appear on the touch panel display...

Страница 50: ...pying For 2 to 2 Sided copying 4 Select the orientation of the originals press Next Press Book Type or Calendar Type to select the layout type of the copies press OK Press Book Type or Calendar Type t...

Страница 51: ...nel display press Start once for each original When scanning all the originals is complete press Done Copying starts NOTE To cancel this setting press 2 Sided Cancel To cancel all settings and return...

Страница 52: ...an be used N A Not Available Indicates the maximum number of sheets that can be stapled when you are using 21 lb bond 80 g m2 paper NOTE For more information on the optional Staple Finisher H1 see Cha...

Страница 53: ...the claws of the staple appear on the front side first page of the printouts The Staple mode with Horizontal Original specified as the original orientation cannot be used with the Image Combination mo...

Страница 54: ...inishing IMPORTANT To achieve the desired outputs make sure that your originals are placed in the correct orientation See Placing Orientations of Originals on p 5 2 Press Collate or Group Press Collat...

Страница 55: ...If the original is placed on the platen glass follow the instructions that appear on the touch panel display press Start once for each original When scanning is complete press Done Copying starts NOTE...

Страница 56: ...n 1 Copies Image Combination 3 4 Making ID Card Copies 3 9 Erasing Shadows Frame Lines Frame Erase 3 11 Original Frame Erase 3 13 Book Frame Erase 3 15 Binding Erase 3 18 Copying Different Size Origin...

Страница 57: ...paper size In addition the ID Card Copy mode enables you to copy the both sides of an ID card on one side of paper 2 on 1 and 4 on 1 copy Image Combination This mode enables you to automatically redu...

Страница 58: ...envelopes cannot be used for the 2 on 1 and 4 on 1 combination modes NOTE The reduction ratio is automatically set so that the originals fit onto the selected paper size You cannot change the copy ra...

Страница 59: ...pying two sided originals 1 Place your originals press Special Features Image Combination 2 Select the original size press Next IMPORTANT You can set the Image Combination mode only for the original p...

Страница 60: ...ottom orientation Calendar Type The front and back sides of the original have opposite top to bottom orientations Press Next 3 Select the desired Image Combination feature press Next IMPORTANT To copy...

Страница 61: ...o make book type copies and select Book Type to make calendar type copies If you want to specify the image order Press 2 Sided Copy Select the type of two sided copy press OK Book Type The front and b...

Страница 62: ...ntation select the layout according to the chart below Select the image order press Done Next If you select 2 On 1 the display on the left appears The layout images on the display are for originals in...

Страница 63: ...Select the desired paper size press OK Done The display returns to the top screen 5 Enter the desired copy quantity from 1 to 999 using numeric keys If you select 4 On 1 the display on the left appea...

Страница 64: ...g starts If you are copying in the Collate Staple or Offset Collate mode copying starts when the scanning of all pages is complete Otherwise copying starts when enough pages to make a 2 on 1 or 4 on 1...

Страница 65: ...uctions on how to place the ID card see step 6 Scanning for the other side of the ID card starts and copying starts 3 Select the paper source press OK Done Select the size of the paper that is loaded...

Страница 66: ...se modes can be set at a time If you select one of these modes the previously set mode is canceled Original Frame Erase The Original Frame Erase mode erases the dark borders and frame lines that appea...

Страница 67: ...al to be copied on the platen glass The Book Frame Erase mode cannot be used with the Image Combination ID Card Copy or Different Size Originals modes Binding Erase The Binding Erase mode erases shado...

Страница 68: ...d outputs make sure that your originals are placed in the correct orientation See Placing Orientations of Originals on p 5 2 2 Press Original Frame Erase Next 3 Select the original size press Next IMP...

Страница 69: ...Guide If you want to set the same width for all four borders If you want to set the top left right and bottom widths independently Press or to set the frame erase width press OK Press Adjust Each Dim...

Страница 70: ...ng numeric keys 7 Press Start Copying starts NOTE To cancel this setting press Special Features Frame Erase Cancel To cancel all settings and return the machine to the Standard Settings press Reset Bo...

Страница 71: ...s in millimeters press mm See Chapter 3 Configuring the Machine s Basic Settings in the Reference Guide If you want to set the same width for all four borders 3 Select the size of the bound original w...

Страница 72: ...starts NOTE To cancel this setting press Special Features Frame Erase Cancel To cancel all settings and return the machine to the Standard Settings press Reset Press Adjust Each Dim Select the side t...

Страница 73: ...For help see step 1 in Original Frame Erase on p 3 13 NOTE To achieve the desired outputs make sure that your originals are placed in the correct orientation See Placing Orientations of Originals on...

Страница 74: ...s mm See Chapter 3 Configuring the Machine s Basic Settings in the Reference Guide 5 Enter the desired copy quantity from 1 to 999 using numeric keys 6 Press Start Copying starts NOTE To cancel this s...

Страница 75: ...cessary preparations for using the Different Size Originals mode Example of use of the Different Size Originals mode Preparation before proceeding to step 1 Copying LTR and LGL originals on the same p...

Страница 76: ...set the scanning speed may be slower than normal The Different Size Originals mode cannot be used with the Image Combination Frame Erase or ID Card Copy modes NOTE If the Different Size Originals mode...

Страница 77: ...ced Copying Features 3 3 Enter the desired copy quantity from 1 to 999 using numeric keys 4 Press Start Copying starts NOTE To cancel this setting press Special Features Different Size Originals To ca...

Страница 78: ...cal creatures come together Original Copy Set Lower Not Set Lower Copy The world s coral reefs where brilliantly colored fish and a myriad of other tropical creatures come together Aptly nicknamed Tro...

Страница 79: ...al Features 2 Press Sharpness 3 Press Low or High to adjust the sharpness press OK Done To copy originals containing printed images or other halftones the setting should be towards Low To copy text or...

Страница 80: ...3 4 Enter the desired copy quantity from 1 to 999 using numeric keys 5 Press Start Copying starts NOTE To cancel this setting press Special Features Sharpness Cancel To cancel all settings and return...

Страница 81: ...d convenience This function is useful for storing frequently used copy settings NOTE The copy settings stored in memory keys are not erased when the main power is turned OFF Registering Mode Memory 1...

Страница 82: ...ck square in the lower right corner of the key If you select a key that already has settings stored in it the settings are displayed If there are more stored copy settings than are currently displayed...

Страница 83: ...you want to name the mode memory setting Repeat steps 1 to 3 press Register Name Select a key M1 to M4 for naming the copy settings press Next NOTE You can name keys regardless of whether or not they...

Страница 84: ...Chapter 2 Basic Operations in the Reference Guide If you press OK without entering any characters the key name reverts to its current name default M1 to M4 If you want to erase the assigned name press...

Страница 85: ...l The display returns to the top screen NOTE Recalling copy settings from the memory key cancels the current copy settings You can make changes to the recalled copy settings If you press another key t...

Страница 86: ...croll through the list by pressing or 5 Press Cancel Done The display returns to the top screen NOTE When a memory key is not in use as is the case when you delete its settings OK is grayed out and yo...

Страница 87: ...Frequently Used Settings Mode Memory 3 32 Advanced Copying Features 3...

Страница 88: ...his chapter describes how to change the machine s settings from the Additional Functions screen Customizing the Copy Settings 4 2 Copy Settings Table 4 2 Changing the Current Standard Settings 4 2 Res...

Страница 89: ...he following table lists the settings in the Copy Settings menu Changing the Current Standard Settings Standard Settings in the Copy Settings in the Additional Functions menu refers to a combination o...

Страница 90: ...Combination Off Frame Erase Off Different Size Originals Off Sharpness middle center ID Card Copy Off Storing New Standard Settings You can store your own copy settings as the Standard Settings To sto...

Страница 91: ...ess Yes The message Stored in memory appears for approximately two seconds on the touch panel display The displayed settings are stored as the Standard Settings NOTE The settings displayed are the cur...

Страница 92: ...o return to the top screen Initializing Standard Settings You can restore the Standard Settings to their default settings 1 Press Additional Functions Copy Settings For help see step 2 in Storing New...

Страница 93: ...anged in Copy Settings can be restored to the factory default settings See Copy Settings Table on p 4 2 NOTE The Standard Settings are also initialized See Changing the Current Standard Settings on p...

Страница 94: ...Copy Settings For help see step 2 in Storing New Standard Settings on p 4 3 4 Press Reset to return to the top screen 2 Press Initialize Copy Settings 3 Press Yes The message Initialized appears for a...

Страница 95: ...Customizing the Copy Settings 4 8 Customizing Settings 4...

Страница 96: ...e detailed instructions on how to place originals the combination of functions chart and the index Placing Orientations of Originals 5 2 Placing One Sided Originals 5 2 Placing Two Sided Originals 5 4...

Страница 97: ...be specified in the optional setting procedure Be sure to match the setting and the orientation of the placed originals Place originals such as STMT horizontally even if the scanning area of the plate...

Страница 98: ...of Originals 5 3 Appendix 5 Place your originals as indicated below For Originals in Portrait Orientation For Originals in Landscape Orientation Type of Original Platen Glass Feeder Type of Original...

Страница 99: ...y to scan the back side making sure that the original is placed in the same orientation as the front side was scanned The front and back sides of the original have the same top to bottom orientation t...

Страница 100: ...trait Orientation Turn over the original horizontally to scan the back side making sure that the original is placed in the same orientation as the front side was scanned For Calendar Type Originals in...

Страница 101: ...he available combinations of settings when you want to set more than one mode at a time 1 You cannot combine these modes when a nonstandard paper size or envelope is selected 2 You cannot combine the...

Страница 102: ...ting 2 27 Combination of Copy Modes Chart 5 6 Copy Ratio 2 14 Auto zoom 2 17 Preset ratio 2 14 Zoom by Percentage 2 15 Copy Ratio key 1 2 Copying features 1 2 D Density 2 11 Automatic 2 11 Manual 2 12...

Страница 103: ...Offset Mode 2 26 Original Frame Erase 3 13 Original type Photo mode 2 13 Text mode 2 12 Text Photo mode 2 13 P Paper Select key 1 2 Paper selection Automatic 2 2 Manual 2 4 Stack Bypass 2 5 Photo Mode...

Страница 104: ...Index 5 9 Appendix 5 Z Zoom by Percentage 2 15...

Страница 105: ...Index 5 10 Appendix 5...

Страница 106: ...tp www canon europe com for details on your regional dealer CANON LATIN AMERICA INC 703 Waterford Way Suite 400 Miami Florida 33126 U S A CANON AUSTRALIA PTY LTD 1 Thomas Holt Drive North Ryde Sydney...

Отзывы: