


E-Series Owner’s Manual Supplement - 130374
E
Sp
añ
Ol
ITal
Ia
NO
NEDER
la
NDS
FR
aNÇ
aIS
DEUT
SCH
ENGLISH
3
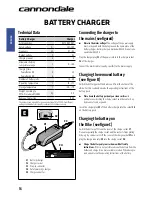
Battery & Charger
WARNING
BOSCh INSTRuCTIONS
- In addition to this supplement,
you must read and follow the BOSCH battery and charger
instructions. Go to:
http://www.cannondale.com/manual_
ebikes/
REPLACEMENT
- Only use the battery pack and charger
indicated in the Specifications section of this supplement. Do
not use other batteries or chargers. Do not use the charger to
charge other batteries.
PREVENT DAMAGE
- Do not drop the battery or charger. Do
not open or modify the battery or charger. No user serviceable
parts inside.
Keep the battery out of intense sunlight. Keep away from heat.
Heat will damage the battery.
Keep battery away from paper clips, coins, keys, nails, screws or
other small metal items, to prevent shorting exposed battery
contacts. Shorting battery contacts can cause severe burns, fire,
or explosion.
ACCIDENTAL ACTIVIATION
- Always remove battery from bike
rack before working on the bicycle or if you transport the bike
by car or plane. Accidental activation of the bicycle drive
system can result in serious injury.
STORAGE & TRANSPORTATION
- When the battery is not in
use in the bicycle, its transportation is subject to hazardous
materials regulation. Special packaging and labeling
requirements may exist. Contact local authorities for specific
requirements. Never transport a damaged battery. Insulate
battery contacts before packaging. Package the battery inside
shipping container to prevent damage.
ChARGING
- Remove battery from bike before charging. Bring
indoors and allow to reach room temperature before charging.
Make sure charger and A/C outlet are the same voltage.
Locate both charger and battery indoors, in a clean, dry area
with good ventilation to charge. Make sure the area is free from
combustibles to avoid fire from sparks or overheating. Keep
charger ventilation openings unobstructed. Do not cover the
charger.
Disconnect the battery from the charger unit when fully charged.
Do not leave a fully charged battery connected to the charger.
Unplug the charger from the wall outlet when not in use.
DISPOSAL
- Battery pack/charger contain regulated materials
and must be disposed/discarded in accordance with national
and/or local laws. Do not discard the battery/charger into fire,
water or ordinary household waste/garbage. Take to a waste
facility/recycler.
+
+
TRANSPORTATION & ShIPPING
- The battery of this bicycle is
subject to transportation regulations for handling hazardous
materials. The battery must be removed before flying and may
be subject to special handling by the carrier.
Failure to observe these warnings can result in electrical fires,
explosion, or severe burns or electrocution.
YOu CAN BE YOu SERIOuSLY INJuRED, PARALYZED OR kILLED
If YOu IGNORE ThESE WARNINGS.
Rear Rack & kickstand
WARNING
Do not sit on the bicycle with the kickstand down. Kickstand
is not designed to support the weight of a person. Make sure
kickstand is up before riding.
Do not overload the rear rack. Make sure the cargo is secured
properly.
RACk MAXIMuM WEIGhT LIMIT: 25kg, 55lbs
YOu CAN BE YOu SERIOuSLY INJuRED, PARALYZED OR kILLED
If YOu IGNORE ThESE WARNINGS.