


E-Series Owner’s Manual Supplement - 130374
E
Sp
añ
Ol
ITal
Ia
NO
NEDER
la
NDS
FR
aNÇ
aIS
DEUT
SCH
ENGLISH
11
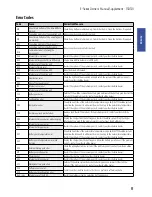
Error Codes
Code
Cause
Corrective Measure
410
One or more buttons of the drive HMI are
blocked.
Check if any buttons are blocked, e.g. from dirt or debris. Clean the buttons, if required.
414
Connection problem of the operating unit Have connections and contacts checked
418
One or more buttons of the operating unit
are blocked.
Check if any buttons are blocked, e.g. from dirt or debris. Clean the buttons, if required.
422
Connection problem of the drive unit
Have connections and contacts checked
423
Connection problem of battery pack
424
Communication error among the
components
426
Internal time-out error
Restart the system. If the problem persists, contact your Bosch eBike dealer.
430
Internal battery pack of drive HMI empty
Charge drive HMI (in holder or via USB port)
440
Internal error of the drive unit
Restart the system. If the problem persists, contact your Bosch eBike dealer.
450
Internal software error
490
Internal error of the drive HMI
Have the drive HMI checked
500
Internal error of the drive unit
Restart the system. If the problem persists, contact your Bosch eBike dealer.
502
Illumination error
Check the light and the associated wiring. Restart the system. If the problem persists,
contact your Bosch eBike dealer.
503
Error of the speed sensor
Restart the system. If the problem persists, contact your Bosch eBike dealer.
510
Internal sensor error
511
Internal error of the drive unit
530
Battery pack error
Switch off the e-Bike, remove the battery pack and reinsert the battery pack. Restart the
system. If the problem persists, contact your Bosch eBike dealer.
531
Configuration error
Restart the system. If the problem persists, contact your Bosch eBike dealer.
540
Temperature error
The eBike is outside of the permissible temperature range. Switch off the eBike system
and allow the drive unit to either cool down or heat up to the permissible temperature.
Restart the system. If the problem persists, contact your Bosch eBike dealer.
550
An improper load was detected.
Remove load. Restart the system. If the problem persists, contact your Bosch eBike
dealer.
602
Internal battery pack error while charging
Unplug the charger from the battery pack. Restart the eBike system. Plug the charger
into the battery pack. If the problem persists, contact your Bosch eBike dealer.
602
Internal battery pack error
Restart the system. If the problem persists, contact your Bosch eBike dealer.
603
Internal battery pack error
605
Battery pack temperature error
The eBike is outside of the permissible temperature range. Switch off the eBike system
and allow the drive unit to either cool down or heat up to the permissible temperature.
Restart the system. If the problem persists, contact your Bosch eBike dealer.
605
Battery pack temperature error while
charging
Unplug the charger from the battery pack. Allow the battery pack to cool. If the problem
persists, contact your Bosch eBike dealer.
606
External battery pack error
Check the wiring. Restart the system. If the problem persists, contact your Bosch eBike
dealer.
610
Batter pack voltage error
Restart the system. If the problem persists, contact your Bosch eBike dealer.
620
Charging error
Replace the charger. Contact your Bosch eBike dealer.
640
Internal battery pack error
Restart the system. If the problem persists, contact your Bosch eBike dealer.
655
Multiple battery pack errors
Switch off the eBike system. Remove the battery pack and reinsert it. Restart the
system. If the problem persists, contact your Bosch eBike dealer.
656
Software version error
Contact your Bosch eBike dealer so that he can perform a software update.
656
Battery pack configuration error
No Display
Internal error of the HMI
Restart your eBike system by switching it off and back on.