background image


Using the Radio 

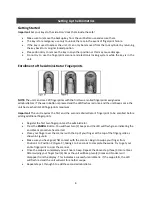
Charging Your iPhone/iPod


Gently place the iPhone/iPod into the dock station.  While docked with the DC power connected, the 
iPhone/iPod will recharge until full. 

Listening to iPhone/iPod


Important

:  The DC adapter must be plugged in to listen to the iPhone/iPod. 


Place the iPhone/iPod into the dock station and press the 

ON/OFF

 button.  The default source is 

AUX

 and can be changed by pressing the 

SOURCE

 button.   


Change the source to 

iPhone

 by pressing the 

SOURCE

 button to cycle through the sources (AUX. 

iPhone, and Radio). 


Press the 

>||

 button to pause and play the music. 


Press the 

|<< 

or 

>>|

 button to skip the previous or next track on you iPhone/iPod.  Press and 

hold the 

|<<

 or 

>>|

 button to rewind of fast-forward the track. 


Press the 

VOL +

 or 

VOL –

 to adjust the system volume. 


Press the 

EQ

 button to select Bass or Treble, then press the 

VOL +

 or 

VOL – 

to adjust the setting. 


To turn the unit off press the 

ON/OFF

 button. 

Listening to the Radio


Set up the antenna by extending the FM wire fully and away from the unit for the best reception.   

Important:

 Do not strip, alter or attach to other antennas. 


Press the 

ON/OFF

 button to turn the unit on.  The default source is 

AUX

 and can be changed by 

pressing the 

SOURCE

 button.   


Change the source to 

Radio

 by pressing the 

SOURCE

 button to cycle through the sources (AUX, 

iPhone, and Radio). 


Press the 

|<< 

or the

 >>|

 button to search for the desired station.  Press and hold the 

|<<

 or 

>>| 

button to quickly scan through stations. 


The unit can save up to 16 presets to memory.  Press the 

CH –

 or 

CH+

 button to cycle through 

the presets.  The current preset channel will appear in the bottom right of the display. 


To set a preset use the 

CH –

 or 

CH+

 button to choose the desired preset location and press the 

OK

 button for 3 seconds to save the desired station to that preset location. 


Press the 

VOL +

 or 

VOL –

 to adjust the system volume. 


Press the 

EQ

 button to select Bass or Treble, then press the 

VOL +

 or 

VOL – 

to adjust the setting. 


To turn the unit off press the 

ON/OFF

 button. 


Содержание RadioVault

Страница 1: ...RadioVault Owner s Manual REV 1 4 12 ...

Страница 2: ...Pod Listening to the Radio Using the Aux Input Using the Sleep Function Setting Up the Biometrics Pg 8 Getting Started Enrollment of the Administrator Fingerprint Enrolling Additional Users Using the Biometrics Pg 9 Accessing the Unit Deleting Users Resetting the Unit Warning and Maintenance Pg 10 FCC Notification for Class B Digital Device or Peripheral Installing Replacing the Batteries Technica...

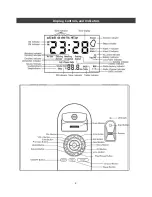
Страница 3: ...2 Display Controls and Indicators ...

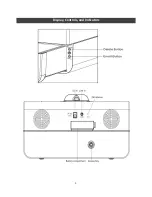
Страница 4: ...3 Display Controls and Indicators ...

Страница 5: ...st be in the OFF position Press and hold the TIME button for 3 seconds Once sync is completed the updated time will appear on the display Press TIME button once to see the Month and Date Setting the Time and Date Manually Important The iPhone iPod cannot be in the dock station The unit must be in the OFF position Press and hold the TIME button until the Year appears and flashes on the display Pres...

Страница 6: ...L or VOL button Press the button to go to Alarm 2 section Follow the same steps above to set Alarm 2 The or buttons can be used to go back or forward between the Alarm 1 and Alarm 2 settings At any point in the process the OK button can be pressed to exit and confirm changes Arming Disarming and Reviewing the Alarm Alarm On and Off Important Alarms are not automatically armed when set Active alarm...

Страница 7: ...f press the ON OFF button Listening to the Radio Set up the antenna by extending the FM wire fully and away from the unit for the best reception Important Do not strip alter or attach to other antennas Press the ON OFF button to turn the unit on The default source is AUX and can be changed by pressing the SOURCE button Change the source to Radio by pressing the SOURCE button to cycle through the s...

Страница 8: ...lect Bass or Treble then press the VOL or VOL to adjust the setting To turn the unit off press the ON OFF button Using the Sleep Function Sleep mode allows you to sleep listening to the Radio or iPhone iPod turning the unit off after a specified time Off 90m 75m 60m 45m 30m or 15m Press the ON OFF button to turn the unit on The default source is AUX and can be changed by pressing the SOURCE button...

Страница 9: ...its 120 fingerprints maximum Important The unit requires the first and the second administrator s fingerprint to be enrolled before adding additional fingerprints Register the first two fingerprints as the administrator Press the ENROLL Button You will hear two 2 beeps and the LED will flash green indicating the enrollment procedure has started Place your finger over the scanner with the tip of yo...

Страница 10: ...int or via the keys provided Press and release the START Button the green LED flashes and the unit beeps once Place your finger over the scanner with the tip of your finger at the top of the finger guide as shown in Figure B Make sure you have good flat contact with the scanner Begin to swipe your finger from Position 1 to Position 2 Figure C it will take 1 to 2 seconds to complete the swipe Try t...

Страница 11: ...ct the equipment into an outlet on a circuit different from that of the receiver Consult the dealer or an experienced radio TV technician for help Placement and Cleaning Place the on level surface and away from excessive heat or sunlight Only clean the unit with a soft cloth and mild soap Protect furniture surfaces by placing a cloth or protective material between unit and furniture Installing Rep...

Страница 12: ...11 Notes ...

Страница 13: ...12 Notes ...

Страница 14: ... is not responsible for damage to or theft of the Purchaser s product or its contents 8 The obligation of Company under this warranty is contingent upon proper use of the Product and shall not apply to Products or parts or components thereof which have been put in unusual or extreme environments or any damage caused by an act of God or force of nature Modifying or tampering with the Product which ...

Страница 15: ...14 ...

Страница 16: ...15 WWW CANNONSECURITYPRODUCTS COM ...

Отзывы: