background image

7

USE AND CARE

When emptying the dirt container or

lter bag, it is

recommended to inspect the permanent

lter located inside the

unit above the intake ports. If the

lter surface appears to be

caked in dust, clean as follows:
Do not remove the permanent

lter!

1. Unplug the power cord to prevent unintentional operation of

the central vacuum. Remove the bottom dirt container by

lifting the side latches, one at a time. Set container aside.

2. If using a

lter bag, remove it by grasping the cardboard

ange on opposite sides and pull away from the bag adapter

tting.

3. Place an open garbage bag or other large plastic bag around

the open end of the unit. Seal the bag to the unit by tying it

tight or by grasping the excess bag in one hand to prevent

dust from escaping.

4. Reach up under the bag into the bottom of the unit using the

bag as a glove. Shake the

lter gently to dislodge dust from

the

lter so that the dust falls into the bag.

5. Remove the plastic bag, empty the dirt container contents

into it, including the full

lter bag (if applicable) and dispose.

6. Install a new

filter bag (if required) and re-install the dirt

container. Use the hooks on the body to hang the dirt

container and latch both sides at the same time to ensure the

container is aligned with the gasket.

7. Plug the power cord in and verify proper operation of the

vacuum.

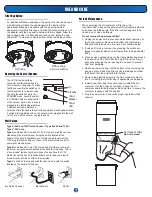
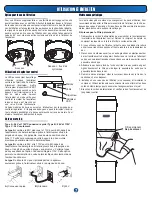
Operating the Central Vacuum:

Filter Bag Option:

Periodic Maintenance:

For

additional

ltration and ease of cleaning, this unit can be used

with a

lter bag. Attach the bag adapter to the interior of the

operational intake port as shown with the opening pointed

downward. Unfold the

lter bag and slide the hole over the end of

the adapter until the bag seal is between the two ridges. Allow the

bag to hang down. If a

lter bag will not be used, rotate the bag

adapter 90° to create a cyclonic air

ow action inside the vacuum.

With bag

Without bag:

Cyclonic Air

ow

Permanent Filter

Do not remove!

On
Standby

Power

LED

Circuit

Breaker

Wall Valves:

The LED at the low voltage 

connector will illuminate when the 

central vacuum has power.To briefly 

test the vacuum,flip the switch up to 

the ON position for a few seconds. 

Then flip the switch down to the 

STANDBY mode. Leave the switch 

in STANDBY mode to allow control 

of the vacuum motor when a hose is 

plugged into a functioning wall valve. 

Certain hose models will have a 

switch built into the handle to control the operation. Hose handles without 

a switch will immediately turn on the vacuum when plugged into the wall 

valve.To turn o

ff 

the vacuum, unplug the hose.

A) 

Quick Connect

B) 

Standard

C) 

24V

Type A: 24V and 110V Quick Connect / Type B: 24V and 110V / 

Type C: 24V only.
Type A 

combines 24V as well as 110V to stop and start the vacuum 

cleaner and the electric broom using the switch located at the 

handle of the hose.If applicable, you will also need to connect the 

110V plug that comes with your hose to the electrical wall outlet to 

power your electric broom.

Type B 

combines 24V and 110V to stop and start the vacuum and 

the broom using the switch located at the handle of the hose. This is 

a "supervalve" type socket.Some types of hoses have the 110V 

Quick Connect option. This option allows you to feed your electric 

broom directly into the nozzle on the wall side.
Type C 

uses 24V to stop and start the vacuum only with the switch 

located on the handle of the hose.

Содержание MAYTAG

Страница 1: ...Vacuum Guide de l utilisateur Aspirateur central Guía del usuario Aspiradora central Manufactured under licence by Cana Vac Systems Inc Fabriqué sous licence par Cana Vac Systems Inc Fabricado bajo licencia por Cana Vac Systems Inc ...

Страница 2: ......

Страница 3: ...ety of others are very important We have provided many important safety messages in this manual Always read and obey all safety messages This is the safety alert symbol This symbol alerts you to potential hazards that can kill or hurt you and others All safety messages will follow the safety alert symbol and either the word DANGER or WARNING These words mean DANGER WARNING You can be killed or ser...

Страница 4: ...entral vacuum must be grounded If it should malfunction or breakdown grounding provides a path of least resistance for electric current to reduce the risk of electric shock This central vacuum is equipped with a cord having an equipment grounding conductor and grounding plug The plug must be inserted into an appropriate outlet that is properly installed and grounded in accordance with all local co...

Страница 5: ...pliance requires ventilation Do not install in a heat producing area or confined space such as a furnace room or attic Closet installation is not recommended Mount the wall bracket where there will be at least 12 30 cm of space above and to the sides of the central vacuum Mount so there is at least 18 46 cm above the floor For most installations the top of the bracket can be mounted 50 127 cm above ...

Страница 6: ...or some models Central Piping Trunk Line 12 30 cm Minimum Low Voltage Wiring ON Standby Switch 12 30 cm Minimum 18 46 cm Minimum INSTALLATION Typical Installation Hardware is shipped inside the bottom of the unit Remove before proceeding Airflow ...

Страница 7: ...ALLATION Installing the Wall Bracket Drywall Stud Concrete Wall 1 1 2 2 1 5 3 8 cm 1 4 6 5 mm Masonry Bit 1 5 3 8 cm 1 8 3 2 mm Wood Bit 50 127 cm See Page 3 See Page 3 50 127 cm Step Step Step Step 3 5 89 mm ...

Страница 8: ... Final Steps Connect Terminals 9 Electrical Shock Hazard Plug into a grounded 3 prong outlet Do not remove ground prong Do not use an adapter Do not use an extension cord Failure to follow these instructions can result in death or electric shock WARNING Right Side Intake Left Side Intake PVC Cap Bag tied to cord Use right or left intake Pressfit Do not glue ...

Страница 9: ...wn with the opening pointed downward Unfold the filter bag and slide the hole over the end of the adapter until the bag seal is between the two ridges Allow the bag to hang down If a filter bag will not be used rotate the bag adapter 90 to create a cyclonic air flow action inside the vacuum With bag Without bag Cyclonic Airflow Permanent Filter Do not remove On Standby Power LED Circuit Breaker Wall V...

Страница 10: ...crossed wires first Inspect wiring where possible for screws or staples through the wires Lack of suction Vacuum bag is full Obstruction in hose or attachments Lower dirt container not properly attached Replace the bag See Page 7 If the blockage is in the hose insert a long blunt item such as a broom handle to clear the blockage Check attachments for blockages Blockages in the hose or attachments c...

Страница 11: ...or implied warranty is not valid This warranty applies to residential applications and is for the original homeowner in it s original installation only Vacuuming liquids construction materials such as drywall dust or any other kind of material that this unit is not designed or removal of the protective filter voids the warranty If you purchased your unit from an online retailer all warranty claims ...

Страница 12: ......

Страница 13: ...formez vous toujours à tous les messages de sécurité Ceci est le symbole d alerte de sécurité Ce symbole vous avertit des dangers potentiels qui peuvent vous tuer ou vous blesser vous et les autres Tous les messages de sécurité suivront le symbole d alerte de sécurité et le mot DANGER ou AVERTISSEMENT seront affichés Ces mots signifient DANGER Tous les messages de sécurité vous indiqueront quel es...

Страница 14: ...rforé Évitez de ramasser des objets pointus Connectez vous à une prise correctement mise à la terre seulement Voir les instructions pour la mise à la terre Ne pas utiliser sans sac à poussière et ou filtres en place Cet aspirateur central doit être mis à la terre En cas de mauvais fonctionnement ou de panne la mise à la terre offre moins de résistance pour le courant électrique et ainsi réduit le ...

Страница 15: ...faire le branchement avec de la tuyauterie existante Ne collez pas les tuyaux ou les raccords à l admission Cet appareil nécessite de la ventilation Ne pas installer dans un endroit produisant de la chaleur ou dans un espace restreint tel qu une salle de chauffage ou un grenier L installation dans un placard n est pas recommandée Installer le support mural où il y aura au moins 12 30 cm d espace a...

Страница 16: ...expédiée à l intérieur de la cuve Retirer avant de procéder Conduit extérieur en option Câblage bas voltage Ligne centrale de la tuyauterie Entrée d air Silencieux optionnel pour certains modèles 12 30 cm Minimum 12 30 cm Minimum 18 46 cm Minimum Interrupteur ...

Страница 17: ...ion du support mural MUR DE BÉTON 1 1 2 2 1 5 3 8 cm 1 4 6 5 mm Mèche pour maçonnerie 1 5 3 8 cm 1 8 3 2 mm Mèche pour le bois 50 127 cm Voir page 3 Voir page 3 50 127 cm Étape Étape Étape Étape 3 5 89 mm CLOISON SÈCHE MONTANT ...

Страница 18: ...hon en PVC Utiliser l entrée d air de gauche ou de droite Installation sous pression ne pas coller Sac attaché au cordon électrique RISQUE DE CHOC ÉLECTRIQUE Branchez vous sur une prise à 2 pôles avec mise à la terre N enlevez pas la pôle de mise à la terre N utilisez pas d adaptateur N utilisez pas de rallonge électrique Le non respect de ces instructions peut provoquer la mort ou des chocs élect...

Страница 19: ...sière tombe dans le sac 5 Retirez le sac en plastique videz le contenant dans le sac et le sac le cas échéant et en disposer 6 Installez un nouveau sac de filtration si nécessaire et réinstallez le contenant Utilisez les loquets pour accrocher la cuve et fermez les deux côtés en même temps pour s assurer de l enlignement avec le joint 7 Branchez le cordon d alimentation et vérifiez le bon fonction...

Страница 20: ... instructions peut provoquer la mort ou des chocs électriques L aspirateur ne s allume pas lorsque l interrupteur est à la position MARCHE et l indicateur LED reste éteint Pas d électricité dans la prise Cordon d alimentation non branché L aspirateur ne s allume pas lorsque l interrupteur est à la position MARCHE et l indicateur LED reste éteint Disjoncteur de surcharge a disjoncté Moteur surchauf...

Страница 21: ...re les défauts de fabrication pour une période de 10 ans et de 1 an pour la main d oeuvre à partir de la date d achat Pour faire une réclamation retournez simplement votre unité avec la facture de vente originale ou copie à un centre de service autorisé pour la réparation ou le remplacement à notre discrétion Cette garantie est limitée aux pièces seulement et n inclut pas les frais d expédi tion c...

Страница 22: ......

Страница 23: ...Todos los mensajes de seguridad le dirán el peligro potencial le dirán cómo reducir la posibilidad de lesiones y le dirán lo que puede suceder si no se siguen las instrucciones W11454804A 1 Fabricado bajo licencia por Cana Vac Systems Inc Puede morir o sufrir lesiones graves si no sigue las instrucciones de inmediato Puede morir o sufrir lesiones graves si no sigue las instrucciones Para futuras r...

Страница 24: ...ros colocados Esta aspiradora central debe estar conectada al muro Si se produce un mal funcionamiento o una avería la conex ión al muro proporciona un camino de menor resistencia para la corriente eléctrica a fin de reducir el riesgo de descarga eléctrica Esta aspiradora central está equipada con un cable que tiene un conductor de conexión y un enchufle de conexión al muro El enchufle debe insert...

Страница 25: ...a de PVC incluida firmemente en la entrada sin usar Una entrada debe estar tapada en todo momento No pegue ni aditamentos a las entradas Este aparato requiere ventilación No lo instale en un área que produz ca calor o en un espacio confinado como una sala de calefacción o un ático No se recomienda la instalación del armario Monte el soporte de pared donde haya al menos 12 30 cm de espacio por enci...

Страница 26: ... la parte inferior de la unidad Retirar antes de continuar Ventilación exterior opcional Cableado de baja tensión Línea troncal de tubería central Flujo de aire Silenciador opcional 12 30 cm Minimum 12 30 cm Mínimo 18 46 cm Mínimo Interruptor de encendido en espera ...

Страница 27: ... del soporte de pared PARED DE CONCRETO 1 1 2 2 1 5 3 8 cm 1 4 6 5 mm Poco de albañilería 1 5 3 8 cm 1 8 3 2 mm Pedazo de madera 50 127 cm Ver pagina 3 Ver pagina 3 50 127 cm Paso Paso Paso Paso 3 5 89 mm PANEL DE YESO MONTANTE ...

Страница 28: ...do izquierda Tapa PVC Utilice la entrada de aire izquierda o derecha Instalación bajo presión no pegar Bolsa atada al cordón Enchuflar Conectar terminals ADVERTENCIA PELIGRO DE DESCARGA ELÉCTRICA Enchufe en un tomacorriente de 3 clavijas con conexión a tierra No quite el terminal de tierra No use un adaptador No utilice un cable de extensión El incumplimiento de estas instrucciones puede provocar ...

Страница 29: ... plástico vacíe el contenido del contenedor de suciedad en ella incluida la bolsa de filtro si corresponde y deséchela 6 Instale una nueva bolsa de filtro si es necesario y vuelva a instalar el contenedor de suciedad Utilice los ganchos del cuerpo para colgar el contenedor de suciedad y asegure ambos lados al mismo tiempo para asegurarse de que el contenedor esté alineado con la junta 7 Enchufe el...

Страница 30: ...isparado o un fusible quemado Reinicie el disyuntor Presione el botón etiquetado como INTERRUPTOR DE CIRCUITO en el costado de la unidad La unidad se enciende pero se apaga sola La unidad no se apaga Falta de succión El contenedor de suciedad inferior no está colocado correctamente ADVERTENCIA PELIGRO DE DESCARGA ELÉCTRICA Enchufe en un tomacorriente de 3 clavijas con conexión a tierra No quite el...

Страница 31: ...nte si corresponde No se aplica ninguna otra garantía expresa o implícita Esta garantía se aplica a aplicaciones residenciales y es para el propietario original en su instalación original únicamente Aspirar líquidos materiales de construcción como polvo de paneles de yeso o cualquier otro tipo de material que esta unidad no esté diseñada o quitar el filtro protector anula la garantía Si compró su ...

Страница 32: ...na Vac Ontario Canada LIMITED WARRANTY PROVIDED BY THE MANUFACTURER 2021 Maytag Tous droits réservés Fabriqué sous licence par Cana Vac Ontario Canada GARANTIE LIMITÉE FOURNIE PAR LE FABRICANT 2021 Maytag Todos los derechos reservados Fabricado bajo licencia por Cana Vac Ontario Canadá GARANTÍA LIMITADA PROPORCIONADA POR EL FABRICANTE ...

Отзывы: