background image

EN

UVIX suite User Manual

15

Before describing how to manage the user registry effectively, it is 

necessary to understand how to correctly configure users to ensure that 

they can only access the required features.

In order to limit/control access to certain features, the UVIX system uses 

two different concepts: Profiles and Authorisations.
PROFILES

Users can have two profiles:

1. 

User

: profile for users intending to only monitor devices or perform  

  limited functions.

2. 

Installer

: profile to be assigned to the system managers who must make  

  adjustments and device configurations.
AUTHORISATIONS

The authorisations instead allow you to specify which of the available 

features are assigned to a specific user. The authorisations available are:

• 

Manage registries

: permission to manage registries of users, devices  

  and device groups

• 

Manage command

: authorisation to send commands

• 

Manage setup parameter

: authorisation to configure device and slave  

  setup parameters
The following explains how some basic features of the web app are 

influenced by profiles and authorisations.
Variables

Each variable can only be viewed by users with a specific profile. Therefore, 

some variables can be seen by both users belonging to the User and the 

Installer profiles, while other variables can only be viewed by users 

belonging to the Installer profile.

3.3  User registry management

Registries of Machines and Device groups:

A user can create or edit these registries if they have authorisation to Manage 

registries. The profile to which a user belongs is insignificant.
User registries

A user can create or edit users if they have authorisation to Manage registries.

Furthermore, a user will only be able to manage users with a profile lower 

than or equal to their own: a user belonging to the User profile can create 

or edit users with a User profile. A user belonging to the Installer profile can 

create or edit users with both a User and Installer profile.
Device registries

For complete access to device registry management, you must have 

authorisation to Manage registries, but instead, in order to add a device 

via notifications on the top bar, you do not need to have any particular 

authorisation.
Commands

A user must have Manage command authorisation in order to send commands.

The commands, unlike the variables, do not have a level and, therefore, the 

profile to which the user belongs is irrelevant.
Configuration

In order to view/edit the configuration of a device or a slave, a user must have 

Manage setup parameter authorisation. The setup parameters, similarly to 

the variables, are associated with a level. A parameter can only be viewed 

and/or edited by users with a profile greater than or equal to the level of 

the parameter itself. Therefore, a level 1 parameter can be viewed and/or 

edited by users belonging to the User and Installer profile, whereas a level 

2 parameter can only be viewed and/or edited by users belonging to the 

Installer profile.

In order to access device management, you have to select it from the 

treeView in the left bar.

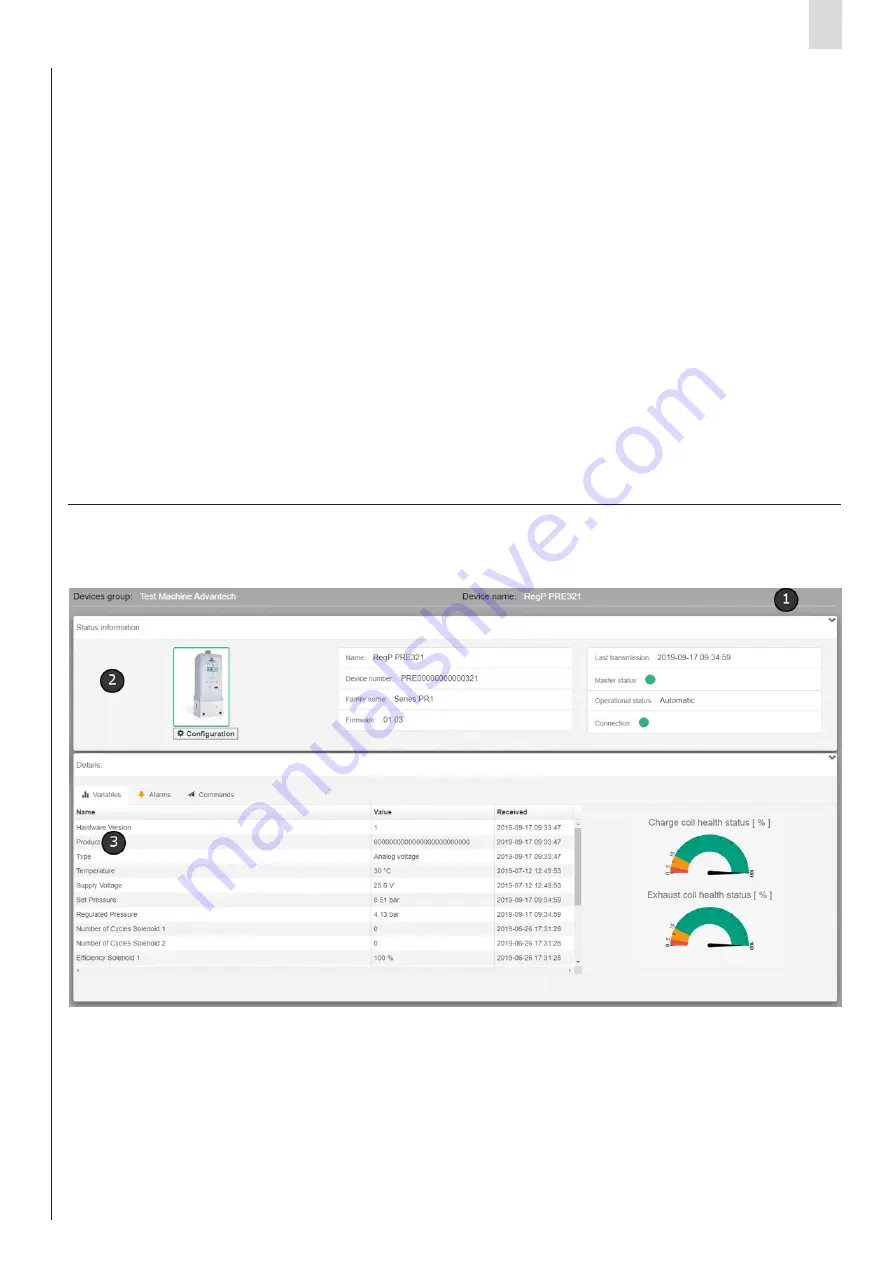
The device management page is divided into 3 macro-areas:

• Header 

[1]

: the name assigned by the user to the selected device and the  

  name of the device group to which it belongs are displayed.

•  Status information 

[2]

: the following fields related to the selected device  

  are displayed.

  - An image which represents it with a coloured border based on its  

    overall status.

 - 

Name

: name assigned by the user. 

 - 

Family name

: description of the type.

 - 

Firmware

: firmware version. 

 - 

Last  trasmission

: date and time of the last data received. 

 - 

Master status

: overall status. 

 - 

Slaves status

: status of the slaves (only if the device has slaves).

 - 

Operational status

: operational status. 

 - 

Connection

: indicates whether the device is transmitting or more precisely  

    whether the FEP is receiving data from it. The indication is shown by the  

    colour of the dot which turns green if the device is connected or red if not.

  - Under the image of the device, there may be a “Configuration” button,  

    if required, which allows the user to open the configuration window of the  

    selected device.

• Details 

[3]

: it is divided in turn into three tabs:

 - 

Variables

: consisting of a table showing the variables sent by the device  

    accompanied by their value and the date of receipt. For more information,  

    see the paragraph "Variables".

  - 

Alarm

: consisting of a table showing all possible alarms that the device  

    may trigger. For more information, see the paragraph "Alarms".

 - 

Commands

: allows the user to send commands and see the command  

    history. For more information, see the paragraph "Commands". 

3.4  

Device management

Содержание UVIX

Страница 1: ...UVIX USER MANUAL USE AND MAINTENANCE MANUAL...

Страница 2: ...of the types of connection 5 2 Installation 6 3 Web App 9 3 1 Login 9 3 2 Navigating the web app 9 3 2 1 Top bar 10 Notifications 10 Setup 10 Session account management 13 About 13 3 2 2 Left bar 14...

Страница 3: ...ribed in the following chapters The UVIX software comprises Gateway USB manages the transmission via a USB connection and is an optional component that is only necessary for devices that have this typ...

Страница 4: ...into a network a company one for example so that any device entered in that network can directly access the UVIX and therefore it is not necessary to repeat the installation and configuration on each...

Страница 5: ...he browser used by the terminals connected via wireless The two types of connection can coexist perfectly in fact the type of connection is completely transparent in the web page opened by the browser...

Страница 6: ...ll the necessary components and configuring the UVIX with the default data Advanced the installation will ask at each step if and how to configure all the components necessary for the operation of the...

Страница 7: ...on the choice the installation will respectively select both components only those required or those selected by the user The full installation is selected by default If you want to install the Core...

Страница 8: ...g used by other services on the PC After setting up the port press any key to continue once done a window will appear asking if you want to restart the computer immediately or at a later time to be ab...

Страница 9: ...ing an internet browser via the URL configured by the system administrator Inordertologintothesystem theusermustentertheircredentials consisting of a username and password When logging in for the firs...

Страница 10: ...l be automatically opened allowing you to insert it into the device registry The user will have to assign it a name it is advisable to associate a name which refers to the role of the device within th...

Страница 11: ...oups of devices already After entering the required information mandatory information is indicated with you can enter the new user by pressing the button Save located on the bottom right Before saving...

Страница 12: ...ote appears describing the problem After entering the required information mandatory information is indicated with you can enter the new device by pressing the Save button located on the bottom right...

Страница 13: ...e the password of the active user profile By pressing Unit of measure preferences you can select the desired unit of measurement About By pressing About a popup appears containing information about th...

Страница 14: ...the device coloured according to the overall status of the device Name assigned to the device Adotwiththeinitialsofthedevicefamilytowhichthedevicebelongs coloured according to the overall status of t...

Страница 15: ...ar authorisation Commands AusermusthaveManagecommandauthorisationinordertosendcommands The commands unlike the variables do not have a level and therefore the profile to which the user belongs is irre...

Страница 16: ...slave there may be a Configuration button which allows the user to open the configuration window of the selected slave Details 3 it is divided into two tabs Variables consisting of a table showing th...

Страница 17: ...rt Manual Mode command Only once the device has effectively switched to manual operating mode will the other controls be visible which vary based on the type of device selected Furthermore the command...

Страница 18: ...nd Command description of the command sent Slave in the event that the command is sent to a particular slave its ID is shown followed by a description of the type Result outcome of the command Sent at...

Страница 19: ...slave Upon accessing the system for the first time after connecting a new device since no configuration has been saved yet the parameters sent by the device will be shown on screen regardless of the...

Страница 20: ...ll in manual operating mode they will be asked via a When we talk about manual operating mode we are always referring to a device in the case of slave configurations the operating status of As it is a...

Страница 21: ...device is next restarted In order to make these changes permanent use the command Save on device The data sent is also automatically saved in the local database as is the case by clicking the command...

Страница 22: ...amozzi Automation S p A Via Eritrea 20 I 25126 Brescia Italy Tel 39 030 37921 www camozzi com Customer Service Tel 39 030 3792790 service camozzi com Product Certification Information concerning produ...

Отзывы: