background image

1

2

1

p.


10

 - M

an

ua

FB

00

98

2-

EN

 v.


1

- 0

3/

20

18 - © C

AM

E S

.p

.A

. - T

he c

ont

ent

s o

f t

hi

s m

an

ua

l m

ay b

e c

ha

ng

ed

, a

t a

ny t

im

e, a

nd w

ith

ou

t n

ot

ic

e.

Light

Entry panel

Gate

Entry panel

Home

Back

Info

Call register

Contacts

Aux List

Entry panels

Video Recording

Favourites

Home

Home

Back

Back

Info

Info

Call register

Contacts

Aux List

Entry panels

Video Recording

Favourites

19:02 

Thursday


01 Feb 2018

19:02 

Thursday


01 Feb 2018

19:02 

Thursday


01 Feb 2018

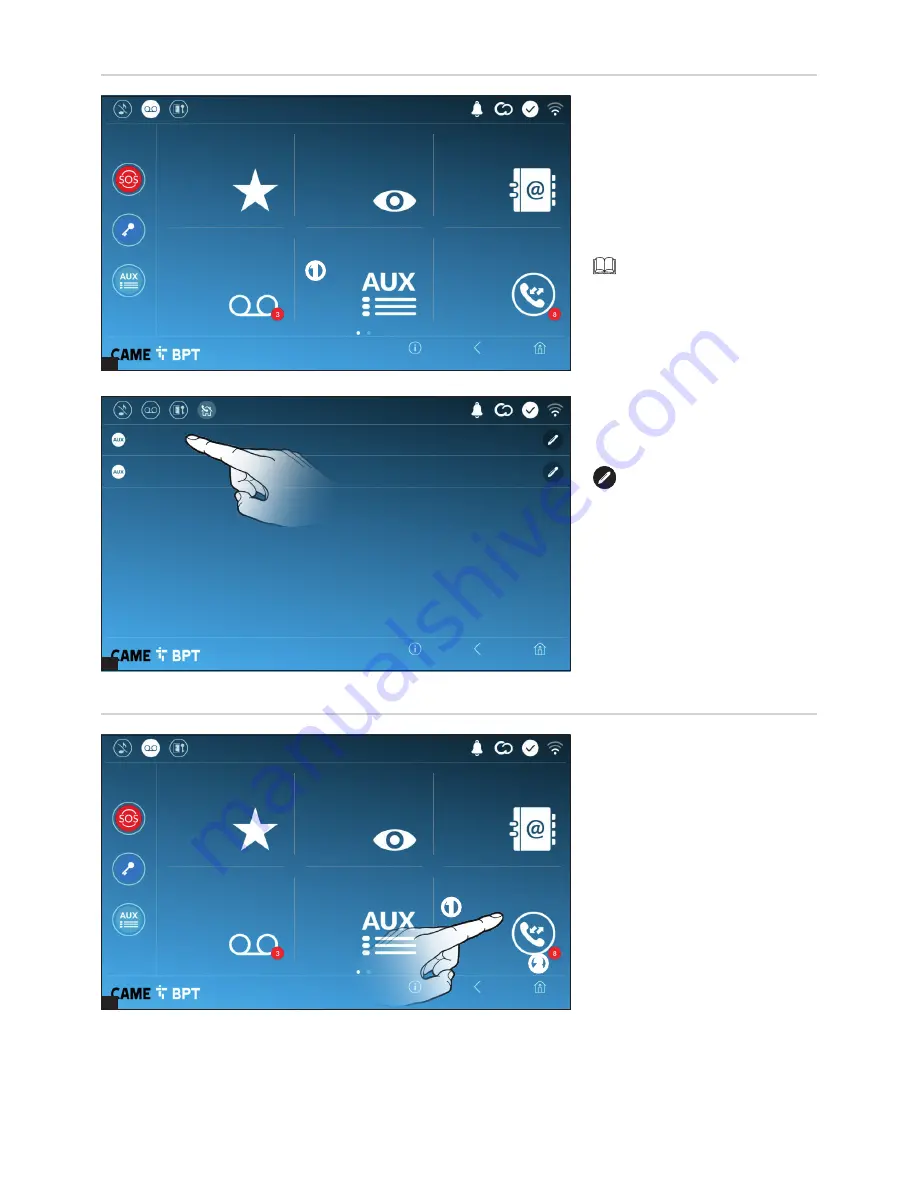
Touch the name of the wanted 
command to activate its correspon-
ding contact.

 Touch the icon to edit the 

command name.
Touch the 

Back

 button to return.

A

 Touch the icon to access the call 

history. 

B

 The number with the red back-

ground is the number of missed 
calls.
When the screen standing-by, any 
missed calls are flagged by the 
blinking, blue LED fitted on the 
frame.

Call register

A

 Touch the icon to access the list 

of auxiliary contacts.
The auxiliary commands (AUX) let 
you activate suitably programmed 
contacts to carry out additional 
commands to the classic opening 
of the entry door. 

 to fill the list of auxiliary con-

tacts, see the chapter called "Aux 
settings (auxiliary commands)" 
on page 13.

Aux List

A

A

B

Содержание XTS 7 WH WIFI

Страница 1: ...Wifi touch screen speaker video intercom XTS 7 WH WIFI XTS 7 BK WIFI XTS 7 WH WFBF USER MANUAL EN English FB00982 EN...

Страница 2: ...tenance of the product must only be carried out by qualified technicians properly trained in compliance with the regulations in force including health and safety measures and the disposal of packaging...

Страница 3: ...hat the device is enabled for connecting to CAMEConnect the white icon means that the device is connected to CAMECon nect H The white icon means that the device is working properly and is ready to tak...

Страница 4: ...ion E It turns on the electric lock of the shown entry panel FThis opens the list of auxiliary commands configured for the shown entry panel touch the name of the com mand that you want to send G Touc...

Страница 5: ...b 2018 When communication is underway certain commands and information appear on the screen as mentio ned before in the Answering a call chapter on page 4 Select one of the listed contacts to initiate...

Страница 6: ...and information appear on the screen as mentio ned before in the Answering a call chapter on page 4 Select the entry panel to initiate a call This opens the door associated to the entry panel without...

Страница 7: ...contacts Opens the door associated to the entry panel Opens a pop up containing a list of auxiliary commands associated to the entry panel Adds removes the selected to and from the favorites list Adds...

Страница 8: ...e Touch the icon to add the con tact to the list of favorites Touch the Back button to return to the previous screen Unit A Household includes the indoor receiver and any associated apps B the indoor...

Страница 9: ...on or off To properly set up the an swering service see the Video answering service chapter on page 15 B The number with the red back ground is the number of unseen video messages When the screen sta...

Страница 10: ...d to activate its correspon ding contact Touch the icon to edit the command name Touch the Back button to return A Touch the icon to access the call history B The number with the red back ground is th...

Страница 11: ...Back Back Info Info Info Settings IP 04 Video camera IP 03 Video camera IP 02 Video camera IP 01 Video camera CCTV 19 02 Thursday 01 Feb 2018 19 02 Thursday 01 Feb 2018 19 02 Thursday 01 Feb 2018 Sele...

Страница 12: ...Video Recording Quick commands Date time Language System information 19 02 Thursday 01 Feb 2018 19 02 Thursday 01 Feb 2018 Choose the device interface lan guage from the drop down menu Save the settin...

Страница 13: ...ally set by the user B The date and time are auto matically synchronized by a cor responding internet service the WiFi network to which the device is connected must be able to access the internet Sele...

Страница 14: ...ously configured commands needs to be executed by pressing the Aux button on the homepage A From the list select the wanted auxiliary command Touch the Back button to return to the list of settable pa...

Страница 15: ...d back C Button for recording and playing back the courtesy message Save the setting by touching the Save button Touch the Back button to return to the list of settable parameters Video Recording If t...

Страница 16: ...lect your preferred backdrop the new setting appears immediately Touch the Back button to return to the list of settable parameters Backdrops B Touch the area to assign a name to the IP video camera t...

Страница 17: ...uch the Back button to return to the list of settable parameters A Adjusts the brightness of the screen during use B Adjusts the brightness of the screen in standby C This makes the screen insensi tiv...

Страница 18: ...b 2018 This section requires speci fic know how in operating the video intercom system Wrong settings may cause partial or even total malfunctions that is why the editing of some parame ters is allowe...

Страница 19: ...e connection mode the button is for selecting and setting up a Wifi network Every 30 seconds the device scans for available networks D Lets you choose the type of address from DHCP The device s IP add...

Страница 20: ...connection will be immediate If the network is protected enter the password for the WiFi network to get access To save the configuration touch this button L To connect to a WiFi network with a hidden...

Страница 21: ...abled to connect to the device via mobile devices Touch the user you want to access the screen that lets you assign or edit an access password This window lets you configure the maximum BITRATE that t...

Страница 22: ...1 Feb 2018 19 02 Thursday 01 Feb 2018 19 02 Thursday 01 Feb 2018 For editing the selected ele ment For eliminating the selected element Touch the Back button to return to the list of settable paramete...

Страница 23: ...day 01 Feb 2018 This section is for customizing the appearance of the homepage A Select the type of homepage that you wish to see B Touch the button to create a cu stomized homepage Configuring the us...

Страница 24: ...tton to set the indoor receiver to slave mode D Touch the button to return all the local settings to the default factory settings administrator password required the default password is 112233 A Touch...

Отзывы: