31
cab Produkttechnik GmbH & Co KG
1
2
3
4
5. Connecting the Printer
Connection to a Computer
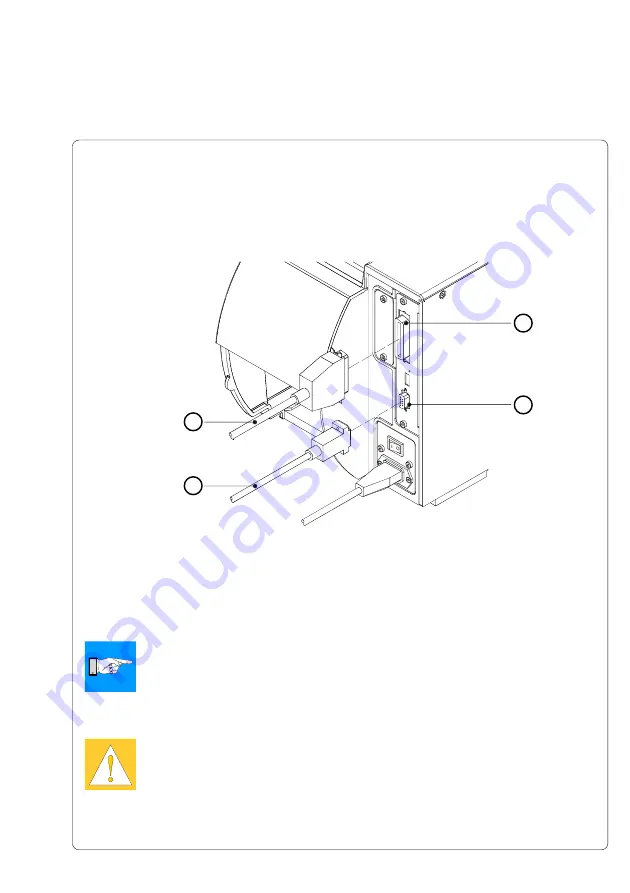
As standard, the printer is equipped with a bi-directional parallel interface (
3
)
and a serial RS-232-interface with a 9 pin connector (
4
).
For connection to the parallel interface use a suitable parallel interface cable
(
1
).
Cables for the serial connection (
2
) are described in appendix B. You can also
find descriptions of the pin assignments for the interface connectors
NOTICE !
For serial connection, make sure the serial interface RS-232 of the printer
is correctly configured to the settings of your computer (see printer
configuration section).
Connect the computer and the printer with a suitable cable and secure the
cable connections with screws provided on the connectors.
CAUTION !
Make sure that all connected computers and their connecting cables are
correctly grounded.
Information for the optional interfaces (RS-422/485, ethernet, USB) can be
found in the documentation for the respective interface.
Fig. 5b Computer connection
Содержание A4
Страница 1: ...Edition 4 03 Thermal Transfer Printer Operator s Manual ...
Страница 33: ...33 cab Produkttechnik GmbH Co KG 5 Connecting the Printer This page is intentionally left blank ...
Страница 55: ...55 cab Produkttechnik GmbH Co KG This page is intentionally left blank 7 Media Loading ...
Страница 71: ...71 cab Produkttechnik GmbH Co KG This page is intentionally left blank 8 Printer Configuration ...
Страница 77: ...77 cab Produkttechnik GmbH Co KG A B D C E F 9 Test Options Fig 9l Status Print ...
Страница 83: ...83 cab Produkttechnik GmbH Co KG 9 Test Options Fig 9o Printhead Profile ...
Страница 87: ...87 cab Produkttechnik GmbH Co KG 9 Test Options Fig 9s Test Grid ...
Страница 104: ...104 cab Produkttechnik GmbH Co KG This page is intentionally left blank 11 External Keyboard ...
Страница 130: ...D 4 cab Produkttechnik GmbH Co KG This page is intentionally left blank Appendix D Maintenance Cleaning ...
Страница 138: ...E 8 cab Produkttechnik GmbH Co KG This page is intentionally left blank Appendix E Replacing Assembly Units ...


