Page 10
For technical questions, please call 1-800-444-3353.
Item 61229
Sa
FE
tY
O
PER
ati
O
n
nE
tWOR
k
SE
ttin
GS
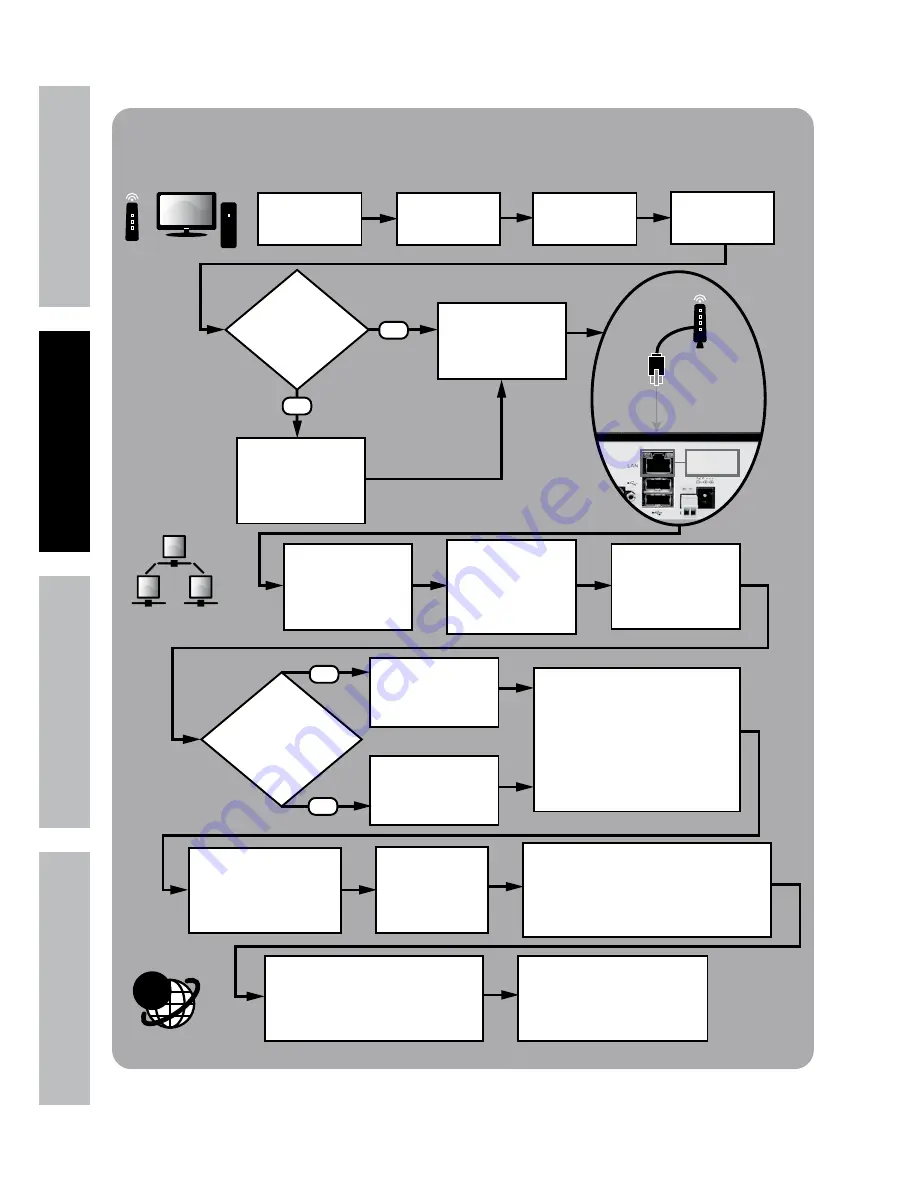
Local Area Network (LAN) Setup
On PC, go to Start
Menu, click Run.
In DOS window
type “cmd”, click OK.
type “ipconfig”
press ENTER
STOP
Ensure you have a
Windows® PC with
Internet Explorer®
and a Router before
proceeding.
NO
Connect DVR to
Router via
Ethernet Cable
(Sold Separately)
From DVR Main Menu
select
Network > Network
Type = Static
Find the Router’s LAN
Write down:
1. Subnet Mask
2. Default Gateway
(Router’s IP Address)
In DVR Network > Network
change settings:
1. Client Port: 3000
2. HTTP Port: 3001
3. New IP Address
4. Subnet Mask you wrote down
5. Default Gateway you wrote down
6. DNS1 same as Gateway
Change last 3 digits
to a number between
200 and 255
Change last 3 digits
to a number between
100 and 255
Click Apply then OK
to save changes.
Click Exit, DVR will prompt
restart. Click OK.
After restart,
on DVR go to
Network > Network
to view settings.
Open Internet Explorer®.
In address bar, type in
DVR’s IP Address and HTTP Port:
http://xxx.xxx.xxx.xxx:3001
(where x = IP Address and 3001 = HTTP Port)
Press Enter.
Allow ActiveX Control to install.
You may need to adjust the settings in
Internet Explorer® by adding the http
address to Trusted Sites and modifying
ActiveX controls to allow installation.
After ActiveX Control installs,
Log in to DVR
with User Name and Password.
@
In DVR
Main Menu
Select System
Select
Users
Set User Name
and Password
Click Apply
then OK
Do you have a
Windows® PC with
Internet Explorer®
and a Router?
YES
YES
NO
Create New IP
Address:
Are last 3 digits of
Default Gateway
between 0-99?
Ethernet
Connection
See Page 28


