background image

7


Boiler installation

Logano G

C

 124 II – 6 720 804 440 (2012/11)

9

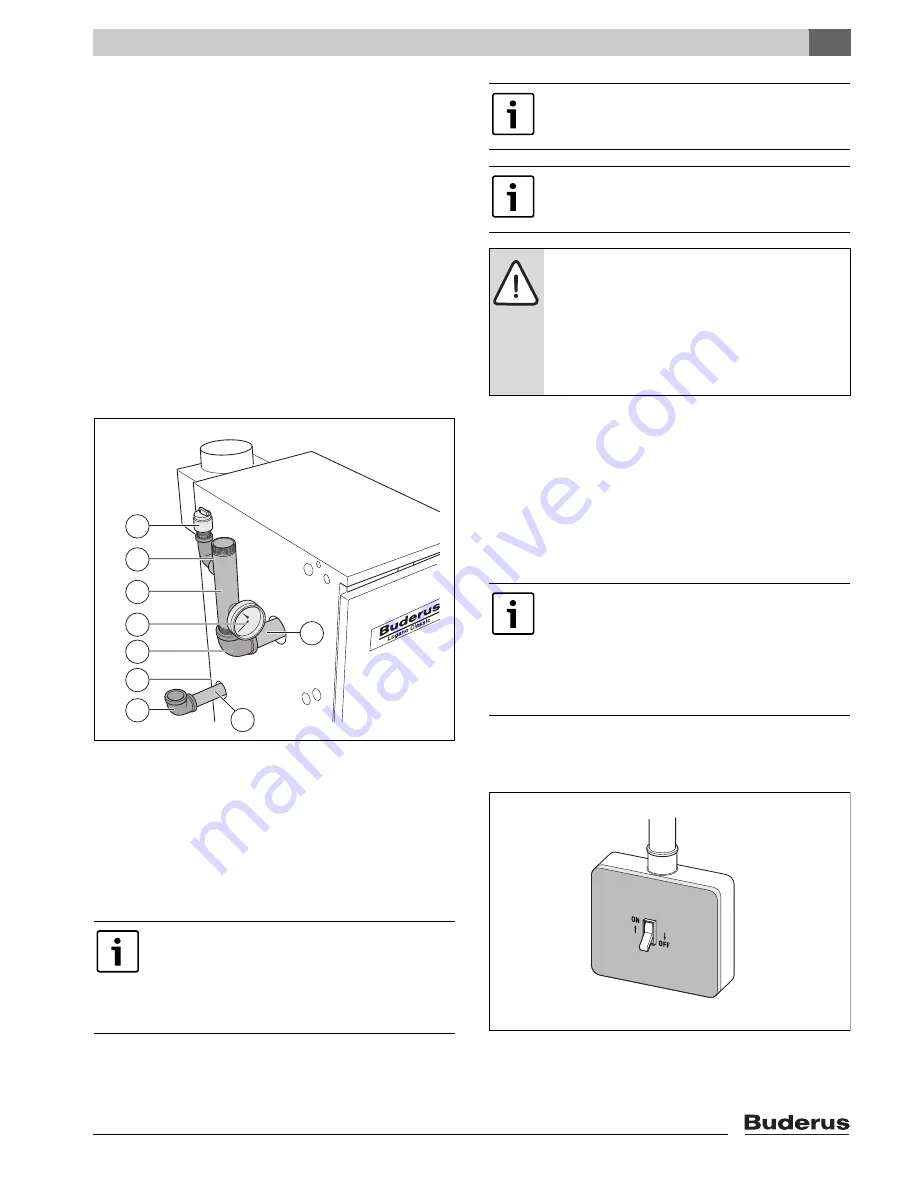
Installation of B-kit

The relief valve and the pressure/temperature gauge are mounted on the 
boiler supply manifold which is attached to the VK (supply) connection 
of the boiler (included in B-kit).

Installing boiler supply VK:
▶ Remove factory installed plastic inserts from boiler supply (VK), boiler 

return (RK) and boiler drain (EL) connections.

▶ Install the 1¼"NPT nipple into boiler supply, the 1" NPT nipple into 

boiler return and ¾" male NPT drain valve into boiler drain connection.

▶ Install 90° 1¼" x 1¼"NPT on 1¼" NPT supply nipple and face upward 

and install 90° 1¼" x 1"NPT elbow on return nipple and face in desired 
direction.

▶ Install G

C

124 1¼" x 1¼"NPT supply manifold into supply connection 

(VK) of the boiler.  Do NOT place on return connection of the boiler!

▶ Install first 90° ¾" street elbow in upper ¾" NPT tapping of G

C

124 1-

1/4" supply manifold and install pressure relief valve into this ¾" 
tapping.  Make sure to orient the discharge of the relief valve 
horizontally.  Install the temperature/pressure gauge in the lower 3/4" 
tapping of the supply manifold.

Fig. 9

Installation of B-kit 

[1]

Pressure relief valve ¾"

[2]

90° 3/4" street elbow

[3]

G

C

124 1-1/4" supply manifold

[4]

Pressure & temperature gauge

[5]

90° 1-1/4"  NPT elbow

[6]

1-1/4" x 1" NPT nipple

[7]

Boiler drain ¾" NPT (backside of boiler)

[8]

90° 1-1/4" NPT elbow

[9]

1" NPT nipple

7.3

Electrical connections

The electrical connections of the boiler must be made as specified by the 
local codes and the current regulations of the National Electrical 

C

ode, 

ANSI/NFPA–70.

The boiler must be grounded as specified by the regulations of the 
relevant local authorities; otherwise follow the regulations of the 
National Electrical 

C

ode, ANSI/NFPA–70.

The boiler is fully functional with the factory installed aquastat and the 
field installed vent damper and heating system circulation pump. 

Power supply connection.

Install incoming power to the boiler per local and state codes.
▶ Install an ON/OFF switch near the boiler per local code requirements.

Fig. 10 ON/OFF switch (emergency shutoff switch)

Install the relief valve after the leak test. (

 chapter 7.5, 

page 11).
The relief valve must be installed in a vertical position.
 The relief valve must also be installed in accordance with 
the requirements of the ANSI/ASME Boiler and Pressure 
Vessel 

C

ode, Section IV.

1

2

3

4

5

7

8

6

VK

EL

RK

9

6 720 804 440-09.1T

We recommend installing a y-strainer (accessory) in the 
boiler return connection to reduce build-up of debris on 
the water side inside the boiler.

Ensure compliance with all state and local regulations 
pertaining to the installation of boiler systems.

WARNING: 

Fire danger due to exposure to hot water 

pipes.
▶ Maintain a minimum clearance of two inches between 

non-insulated pipes carrying hot water and 
combustible walls and surfaces in the boiler room.  
A minimum of 1" high quality pipe insulation is 
required to permit direct contact with combustible 
surfaces.

When making the electrical connections please observe 
the following guidelines:
▶ Perform only electrical work, if you possess the 

required certification for such work.  When you do not 
have the required certification, have the electrical 
work performed by a certified electrician.

▶ Observe all local and state installation regulations.

6 720 804 440-10.1T

Содержание Logano GC 124 II

Страница 1: ...efore placing this boiler in operation observe the safety instructions of this installation and mainte nance manual CAUTION The operating manual is a component of the tech nical documentation handed o...

Страница 2: ...s for combustion air supply and venting 12 9 Requirements for connection to chimneys or venting systems 13 10 Flue pipe installation 13 11 Placing the heating system in operation 14 11 1 Starting up t...

Страница 3: ...bility may cause dangerous flue gas leaks or formation Make sure that inlets and outlets are not reduced in size or closed If faults are not corrected immediately the boiler must not be operated until...

Страница 4: ...e ANSI Z 223 1 If specified by the local regulatory authorities the heating system must comply with the regulations of the Standard for Controls and Safety Devices for Automatically Fired Boilers ANSI...

Страница 5: ...oiler 2 3 8 RK 1 VK 1 GAS EL GAS 6 720 804 440 02 1T Boiler size Boilerinput A B Vent connection II Min relief valve capacity Number of Orifices Water volume Dry weight Btu hr Inches Inches Inches lb...

Страница 6: ...ponent Qty Packaging method Boiler complete 1 1 palette B kit components 1 1 4 supply manifold 30 psi relief valve long shank boiler drain pressure temperature gauge 90 elbow 1 x 1 NPT 90 elbow 1 x 1...

Страница 7: ...and horizontal The boiler may be installed on a flammable base but not on carpet Fig 7 Required clearances in the boiler room 1 Recommended service clearances 2 Required minimum clearances 3 Burner tr...

Страница 8: ...ut off Thelow watercut offmustbeinstalledduring installation of the boiler and placed above the water level in the boiler without any means of shutting the water off between the boiler and low water c...

Страница 9: ...ust be grounded as specified by the regulations of the relevant local authorities otherwise follow the regulations of the National Electrical Code ANSI NFPA 70 The boiler is fully functional with the...

Страница 10: ...jacket if required by the local code We recommend installing a manual shut off valve in the main gas pipe to the boiler The gas pipe must be fastened outside the boiler The local codes must be observ...

Страница 11: ...iler slowly with water from the feed water connection Open automatic vents slightly to allow the air to escape Slowly fill heating system Observe pressure display on pressure gauge during this process...

Страница 12: ...iler room calculated from the outer edge of the opening The shortest dimension of all inlet and outlet openings must not be less than three inches Total air supply from outside the building Make sure...

Страница 13: ...nspect the venting system to ensure that it has the correct dimensions and longitudinal inclination Make sure that the system is not blocked leaking corroded or has any other faults that cause it to o...

Страница 14: ...ed in the boiler have been tested at the factory as described in ANSI Z 21 13 to ensure safe operation of the heating system and verify specific performance indicators Preparing for operation Set the...

Страница 15: ...n the gasvalve Installpressure measuring nipple andattach a pressure gauge to measure the orifice pressure Open gas shut off Fig 20 Gas valve 1 ON OFF knob shown in ON position 2 Screw plug for gas pr...

Страница 16: ...e 1 ON OFF knob shown in ON position Checking gas supply pressure Check the gas supply pressure while the boiler is operating The connection pressure for natural gas must be between 4 7 and 10 5 W C F...

Страница 17: ...shut off The main burner flame figure 25 and the ignition flame are extinguished After no more thansix 6 secondsthemaingassolenoidvalveonthegasvalvemust close with an audible noise If the gas valve do...

Страница 18: ...to the OFF position Disconnect the heating system from the power source and turn thermostat to its lowest setting Seal leaks Repeat all steps in this paragraph Carefully wipe away the soapy water to p...

Страница 19: ...ion Start up procedure Remarks or measured values 1 Type of gas Natural gas LP 2 Has the leak test been completed 3 Check combustion air inlet and outlet openings and flue gas connection 4 Check the e...

Страница 20: ...stion air air inlets and Ventilation openings Check the venting system including the combustion air inlet and outlet openings All faults must be repaired immediately Make sure that the combustion air...

Страница 21: ...figure 39 page 23 If the igniter flame is acceptable start cleaning Fig 33 Gas valve 1 Safety screw on igniter adjustment screw 15 5 1 Cleaning the boiler with brushes Burner removal Beforeopeningaun...

Страница 22: ...ace cleaning cover install screws and replace insulation 15 5 2 Wet cleaning chemical cleaning For wet cleaning use a suitable cleaning agent depending on the degree of build up of dirt soot or scale...

Страница 23: ...s line screw Rinse out burner rods with a water jet hold burner so water enters all slots of the burner rods and drains back out Fig 40 Moving burner back and forth to remove water Remove remaining wa...

Страница 24: ...rmthatall maintenace work has been conducted Sign the maintenance protocol and discuss it with the owner of the heating system Be careful not to damage the pilot orifice during installation and cleani...

Страница 25: ...er page 20 4 Cleaning of boiler page 21 5 Cleaning of burner page 23 6 Measuring gas supply pressure page 16 inches W C inches W C 7 Measuring orifice pressure page 16 inches W C inches W C 8 Checking...

Страница 26: ...nd maintenance Logano GC 124 II 6 720 804 440 2012 11 26 Date Date Date Date Date inches W C inches W C inches W C inches W C inches W C inches W C inches W C inches W C inches W C inches W C Table 13...

Страница 27: ...f everything is OK replace automatic ignition No Heat requirement ended system switches off flue baffle closes End of troubleshooting Repeat procedure until heating system operates properly On models...

Страница 28: ...ition flame Specified thermostat value control reached Main and ignition gas valves close gas burners ex tinguished flue gas baffle if installed closes Ignition burner operation Ignition flame burns a...

Страница 29: ...ly valid in the U S A and only for elevations from 0 8500 ft Boiler size Number of orifices Main gas orifice identification for elevations from feet in ft3 h inch W C 0 8500 ft 1 1 installation attitu...

Страница 30: ...yellow black 4 R W L2 Plug Plug PV Intermittent pilot control module S8600H Connecting terminals for thermostat 2 Burner assembly Terminals on boiler block Main supply power use circuit breaker as req...

Страница 31: ...Pilot Burner Spark Gas valve Main Pilot PV PV MV GND MV S8600H GND PV PV MV MV 24V 24VGND K1 TR High Limit Flame roll out safety shutoff switch K2 B2 L2 N L 24V AWG 18 WIRE 120 VAC Wiring Schematic G...

Страница 32: ......

Отзывы: