background image

—19—

C. Wiring the Room Controller

The room controller is capable of controlling from 1 to 6 fan

coil units. The total run length of the wire connecting the

room controller to the fan coil units should be kept to under

500 feet. Wire the room controller to the unit using daisy

chain wiring. See Fig. 28. The room controller connects to

the receiver board connection on the electronic board inside

the unit.
Wiring the Power Connection to the Room Controller
The thermostat will be powered by unregulated nominal

12.5 volts DC (10V min to 20V max) which is provided by the

electronic board inside the unit. The power consumption will

be 50 mA 12.5 volts DC. For applications where more than

one fan coil unit is to be controlled, the fan coil unit closest to

the room controller will be the only one that supplies power

to the room controller. The control should be protected from

damage  in  case  of  accidental  wiring  of  power,  ground  and

signal wiring occurs.
Wiring the Room Controller to the Indoor Unit
Loosen the screws of terminals P (DC Power), G (GROUND)

and C (SIGNAL) on the indoor unit and room controller

terminal blocks. Refer to Fig. 29 and connect the indoor unit

terminal block to the room controller terminal block.

INSTALLATION OPTIONS

The 619FNF, FNQ units can be used to cool an adjacent

room or for fresh-air ventilation. Plan the installation care-

fully. Measure carefully and follow acceptable building prac-

tices and the National Electric Code (NEC).

I. FRESH AIR INTAKE

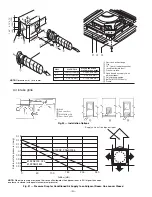
1. Using Fig. 30, locate and remove the factory-installed

insulation from the side of the unit where the

pre-punched knockouts are located.

2. Remove the pre-punched knockouts for fresh air

intake. Refer to Fig. 30. Be careful not to damage

internal parts such as the heat exchanger coil.

3. If installing a 619FNF018 unit, install baffle. Refer to

Fig. 30.

4. Install ductwork using field-supplied, insulated flex

duct, or insulated sheet metal suitable for working

temperatures up to 140 F. Conduits can be of flexible

polyester (with spiral core) or corrugated aluminum,

externally covered with anti-condensate material

(fiberglass from 

1

/

4

 in. to 1 in. thickness).

5. Use Fig. 31 to determine the allowable static pres-

sure loss for the ductwork airflow. The ductwork

design must not exceed this value or the job airflow

requirements will not be met.

6. Use a field-supplied


fan if airflow does not meet job

requirements. The field-supplied fan motor for out-

side air intake must be controlled by a bipolar ON/

OFF switch with safety fuses.

IMPORTANT: 

Ventilated air must not exceed 10% of the total

airflow or problems with operation will result. If the venti-

lated air surpasses 10% of the total airflow, a field-supplied

primary air treatment system with separate deflectors is

recommended.

7. Install an air inlet grille with filter inspection port to

prevent dust and dirt from entering and fouling the

indoor unit heat exchanger. Filter installation also

makes the installation of a duct closing damper dur-

ing shutdown periods unnecessary.

8. All non-insulated ducts must be covered with anti-

condensate insulation (such as expanded neoprene,

1

/

4

 in. thickness).

II. CONDITIONED AIR SUPPLY TO ADJACENT ROOM

Air supply to an adjacent room requires that the outlet corre-

sponding with the duct is closed, using the air supply outlet

obstruction accessory kit.

NOTE:

 The accessory kit cannot be used in units equipped

with an electric heater.
An air inlet grille must be fitted (if possible near the floor)

between the air conditioned room (where the unit is situ-

ated) and the adjacent room or, alternatively, the door must

be undercut, as shown in Fig. 30. The duct lengths can be

calculated in accordance with Fig. 30, also taking into

account the pressure drop through air diffusers and fresh air

filters.

IMPORTANT: 

DO NOT use active carbon or electrostatic

filter kits for ducts towards adjacent


rooms.

P

G

C

P
G

C

Indoor unit
Room Controller

Diagram 1

Main electronic card
4 pins terminal block placed on external
control box
Wires supplied by the installer
Terminal block in the Room Controller

A

B

Red

Black

White

Remote connector

(J5) 5 pins

A
B

Fig. 29 — Wiring the Room Controller to

the Indoor Unit

REMOTE

FCU 6

FCU 3

FCU 2

FCU 1

Fig. 28 — Room Controller Daisy Chain Wiring 

(Multidrop)

Содержание 619FNF

Страница 1: ...llow all safety codes Wear safety glasses and work gloves Use quenching cloth for brazing operations Have fire extin guisher available Read these instructions thoroughly Con sult local building codes...

Страница 2: ...charged or under charged from the factory NAME SPECIFICATIONS Connection Pipe 619FNF018 024 FNQ01824 5 8 in Mixed Phase 3 8 in Liquid 619FNF FNQ03036 3 4 in Mixed Phase 3 8 in Liquid Wall Sleeve Wall...

Страница 3: ...4 8 7 3 15 16 100 5 29 32 150 1 10 5 8 575 0 2 1 4 3 4 0 8 2 1 1 5 2 2 4 6 5 5 8 2 0 1 4 3 5 1 6 3 4 6 1 1 1 1 2 13 64 56 2 52 1 10 5 8 575 8 5 1 2 3 7 7 0 3 8 9 0 5 1 2 3 9 2 5 2 3 14 70 8 9 2 4 3 1...

Страница 4: ...18 18 18 Circuits 5 6 10 10 FILTERS Cleanable Quantity Size in 1 17 x 16 AIRSWEEP Horizontal Auto Preset OPERATING LIMITS Cooling Min Max 55 F 125 F CONTROLS Integrated Microprocessor Remote Controlle...

Страница 5: ...4 6 4 6 No of Rows 2 2 3 3 Fins in 18 18 18 18 Circuits 6 6 10 10 FILTERS Cleanable Quantity Size in 1 24 x 235 16 AIRSWEEP Horizontal Auto Preset OPERATING LIMITS Heating Min Max 15 F 75 F Cooling M...

Страница 6: ...ith the unit may be used as a guide Depending on the type of ceiling the hangers can be fixed as shown in Fig 5 Once the threaded hangers have been positioned do not tighten the nuts Insert the washer...

Страница 7: ...the frame in to position See Fig 12 Ensure that the frame is not distorted by excessive tighten ing that it is aligned with the false ceiling and that there is a seal between the air inlet and outlet...

Страница 8: ...e or other tem perature radiating object that may cause a false reading Do not locate close to or in direct airflow of a heating or cooling supply Do not locate in areas with poor circulation such as...

Страница 9: ...extend through the hole in the mounting base Adjust the length and routing of each wire to reach the proper terminal in the connector block on the mounting base with 1 4 in of extra wire strip only 1...

Страница 10: ...able 5 Refer to Fig 20 Table 5 Tightening Torque B Piping Connection to the Unit Use two wrenches to tighten all connections Once all connections have been completed check for leaks using soapy water...

Страница 11: ...e unit shall be fuse or equipped with a breaker Table 6B 619FNQ Fan Coil Electrical Data LEGEND Permissible limits of the voltage range at which unit will operate satisfactorily NOTE In compliance wit...

Страница 12: ...Room Controller Connections Ground Connection Outdoor Unit Connections Low Voltage High Voltage Power Connections Fig 21 619FNF Unit Matched to 538ENF Outdoor Unit Wiring Connection Cooling Only Syst...

Страница 13: ...ltage High Voltage Room Controller Connections Outdoor Unit Connections Power Connections Ground Connection Fig 22 619FNQ Unit Matched to 538ENF Outdoor Unit Wiring Connection Cooling with Electric He...

Страница 14: ...14 Low Voltage High Voltage Room Controller Connections Ground Connection Outdoor Unit Connections Power Connections Fig 23 619FNQ Unit Matched to 538QNF Outdoor Unit Wiring Connection Heat Pump Syste...

Страница 15: ...ch OFM Outdoor Fan Motor OL Overload S Emergency TB Terminal Block TM Sensor TRAN Transformer Terminal Marked Terminal Unmarked Splice Terminal Block Factory Wiring Field Control Wiring Field Power Wi...

Страница 16: ...Louver Motor LMS Louver Micro Switch OFM Outdoor Fan Motor OL Overload S Emergency ST Safety Thermostat TB Terminal Block TM Sensor TRAN Transformer Terminal Marked Terminal Unmarked Splice Terminal...

Страница 17: ...est Point LLPS Liquid Low Pressure Switch LM Louver Motor LMS Louver Micro Switch OAS Outdoor Air Sensor OFM Outdoor Fan Motor OFR Outdoor Fan Relay OL Overload RVS Reversing Valve Solenoid S Emergenc...

Страница 18: ...ctric heater Transformer Holes for fixing panel in position Emergency push button Fan connector LED RECEIVER connector Float connector Pump connector Louver connector CP CG CA CV CLR INTERNAL CONTROL...

Страница 19: ...orrugated aluminum externally covered with anti condensate material fiberglass from 1 4 in to 1 in thickness 5 Use Fig 31 to determine the allowable static pres sure loss for the ductwork airflow The...

Страница 20: ...m C 2 3 4 70 mm 3 15 16 100 mm 4 14 105 1 93 49 8 50 216 Note Dimensions in are in mm Fig 30 Installation Options NOTE Dimensions in are in mm Supply air duct to adjacent room Airflow cfm e r u s s e...

Страница 21: ...C Temperatures will be displayed in degrees Celsius F Temperatures will be displayed in degrees Fahrenheit IV LOUVER MODE SELECTION To enter louver mode selection ensure the room controller is on and...

Страница 22: ...unit is configured as a Heat Pump unit the louver will operate according to user selected position If user selected louver is Auto louver operates according to auto heat or cool louver based on operat...

Страница 23: ...shes at intervals of 0 5 sec onds The fault code is deduced from the number of times the green LED flashes blocking unit operation Between one flash cycle and the next one a pause of 5 seconds elapses...

Страница 24: ...right 2006 Bryant Heating Cooling Systems Printed in U S A CATALOG NO 02 619F0001 II Green LED Red LED Yellow LED Remote control signal receiver Emergency Button Fig 35 Warning Lamps and Emergency But...

Отзывы: