52
Locate the enthalpy control in the economizer next to the
Actuator Motor. Locate two GRA leads in the factory
harness and connect the gray lead labeled “ESL” to the
terminal labeled “LOW”. See Fig. 61. Connect the enthalpy
control power input terminals to economizer actuator power
leads RED (connect to 24V) and BLK (connect to GND).
The outdoor enthalpy changeover setpoint is set at the
enthalpy controller.
Differential Enthalpy Control —
Differential enthalpy control is provided by sensing and
comparing the outside air and return air enthalpy
conditions. Install the outdoor air enthalpy control as
described above. Add and install a return air enthalpy
sensor (see Fig. 62).
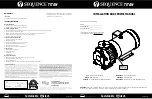
GRA
BLK
RED
–
4-20
Main
+
VDC
Out
–
4-20 Main
Out
+
24-36
VDC In
LOW
GND
24V
7
CTB ECON
(RTU Open: to J2-6)
PL6-1 (24-V)
PL6-4 (COM)
Outside Air
Enthalpy Switch
Return Air
Enthalpy
Sensor
C11170
Fig. 62 -- Outside and Return Air Enthalpy Sensor
Wiring
To wire the return air enthalpy sensor, perform the
following:
1. Use a 2--conductor, 18 or 20 AWG, twisted pair cable
to connect the return air enthalpy sensor to the
enthalpy controller.
2. Connect the field--supplied RED wire to (+) spade
connector on the return air enthalpy sensor and the (+)
terminal on the enthalpy controller. Connect the BLK
wire to (--) spade connector on the return air enthalpy
sensor and the (--) terminal on the enthalpy controller.
Smoke Detectors
Smoke detectors are available as factory--installed options on
548J units. Smoke detectors may be specified for Supply Air
only or for Return Air without or with economizer or in
combination of Supply Air and Return Air. The unit is
factory--configured for immediate smoke detector shutdown
operation; additional wiring or modifications to unit terminal
board may be necessary to complete the unit and smoke
detector configuration to meet project requirements.
Return Air Sensor Tube Installation —
The return air sampling tube is shipped in the unit’s supply
fan section, attached to the blower housing (see Fig. 63). Its
operating location is in the return air section of the unit (see
Fig. 64, unit without economizer, or Fig. 65, unit with
economizer), inserted into the return air sensor module
housing which protrudes through the back of the control box.
ROT
ATION
Return Air Sampling Tube
(Shipping Location)
C09102
Fig. 63 -- Typical Supply Air Smoke Detector Sensor
Location
Return Air Detector
Sampling Tube
C09135
Fig. 64 -- Return Air Sampling Tube Location
in Unit without Economizer
Return Air Detector
Sampling Tube
C09136
Fig. 65 -- Return Air Sampling Tube Location
in Unit with Economizer
To install the return air sensor sampling tube:
1. Remove the tube from its shipping location.
2. Open the unit end to access the return air sensor
(located on right--hand partition)
3. Orient the tube’s sampling holes into the return air flow
direction. Position the sampling holes on the bottom of
Содержание 548J*17 D Series
Страница 4: ...4 a548J 015 Fig 2 Unit Dimensional Drawing Size 17 Units ...
Страница 5: ...5 a548J 016 Fig 2 Unit Dimensional Drawing Size 17 Units cont ...
Страница 6: ...6 a548J 017 Fig 2 Unit Dimensional Drawing Size 17 Units cont ...
Страница 7: ...7 a548J 018 Fig 3 Unit Dimensional Drawing Size 24 Units ...
Страница 8: ...8 a548J 019 Fig 3 Unit Dimensional Drawing Size 24 Units cont ...
Страница 9: ...9 a548J 020 Fig 3 Unit Dimensional Drawing Size 24 Units cont ...
Страница 13: ...13 C10139 Fig 7 Roof Curb Details Size 17 Units ...
Страница 14: ...14 C10140 Fig 8 Roof Curb Details Size 24 Units ...
Страница 19: ...19 a50 9696 Fig 20 548J 17 24 Control Wiring Diagram with VFD Option ...
Страница 20: ...20 a50 9697 Fig 21 Typical 548J 17 24 Power Wiring Diagram 208 230V 3 Phase 60Hz unit shown ...
Страница 44: ...44 a50 9699 Fig 44 RTU Open System Control Wiring Diagram ...