


8-39
Confidential
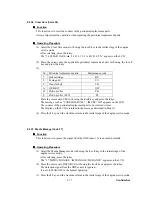
[ 1 ] Margin Adjust (Code 43)
Function
This function is to check and adjust the top margin and left margin.
The adjustment range is from –4.9mm max to +4.9mm max.
Always implement the operation when replacing the engine control board.
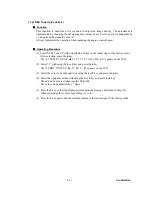
Operating
Procedure
(1) Select Margin Adjust with using the
4
or
5
key in the initial stage of the factory mode.
After selecting, press the
6
key.
The “43 MARGIN ADJUST /
►
TOP / LEFT / LEFT1” appears on the LCD.
(2) Select the top margin (TOP) or left margin (LEFT or LEFT1) with using the
4
or
5
key.
After selecting, press the
6
key.
LEFT: For adjusting the left margin on the paper in the upper tray
LEFT1: For adjusting the left margin on the paper in the lower tray
<Example of LCD indication>
“43 TOP +2.5mm / - 1 0 1 2 3 4 6 7 +”
・
The margin can be adjusted up to 4.9mm max. in the right and left sides from the
standard value “0” by 0.7mm pitch.
・
Select the value according as the adjusted amount with using the
4
or
5
key. The
selected amount is displayed at the upper right side.
・
Press the
6
key to set the adjustment value.
(3) Press the
3
key so that the display is returned to the message described in Step (1).
(4) Press the
3
key again, and the machine returns to the initial stage of the factory mode.
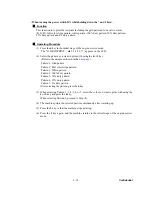
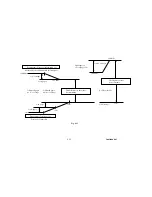
<How to measure>
1) Implement “GRID PRINT” in the service mode.
2) Measure A and B of the top margin.
(Leading Edge) (A+B) / 2 Default Value 4.2±1.5mm
3) Measure C and D of the left margin.
(Left Margin) (C+D) / 2 Default Value 4.2±1.5mm
A
B
C
D
Fig. 8-14
Paper Feeding
Direction
Guarantee
Area
Left Margin
Содержание MFC-9420CN
Страница 1: ...Confidential FACSIMILE EQUIPMENT SERVICE MANUAL MODELS MFC 9420CN ...
Страница 16: ...Confidential CHAPTER 1 PARTS NAMES FUNCTIONS ...
Страница 22: ...Confidential CHAPTER 2 SPECIFICATIONS ...
Страница 33: ...Confidential CHAPTER 3 THEORY OF OPERATION ...
Страница 48: ...Confidential 3 1 4 CBV DBV Fig 3 16 Y M C K Fig 3 17 ...
Страница 69: ...Confidential 3 3 5 Fig 3 35 ...
Страница 73: ...Confidential 3 3 9 3 Interface Circuit Printer side Fig 3 38 ...
Страница 82: ...Confidential CHAPTER 4 TRANSFER OF DATA LEFT IN THE MACHINE TO BE SENT FOR REPAIR ...
Страница 85: ...Confidential 4 2 Cover page sample End page sample Fig 4 1 ...
Страница 86: ...Confidential CHAPTER 5 DISASSEMBLY REASSEMBLY AND LUBRICATION ...
Страница 94: ...Confidential 5 5 5 1 1 AC Cord 1 Disconnect AC cord from the machine Fig 5 1 AC cord Machine ...
Страница 100: ...Confidential 5 11 5 1 5 Side Cover LR 1 Remove the screw and then remove the side cover LR Fig 5 8 Side cover LR Screw ...
Страница 172: ...Confidential 5 83 CIS unit 2 Side cover L Hole Main PCB CIS unit CIS flat cable Document scanner Insert ...
Страница 173: ...Confidential 5 84 FB motor 3 Side cover L Hole Hole Main PCB Document scanner FB motor FB motor harness Insert ...
Страница 175: ...Confidential CHAPTER 6 ADJUSTMENTS AND UPDATING OF SETTINGS REQUIRED AFTER PARTS REPLACEMENT ...
Страница 203: ...Confidential CHAPTER 7 CLEANING ...
Страница 205: ...Confidential CHAPTER 8 MAINTENANCE MODE ...
Страница 213: ...8 6 Confidential Fig 8 2 Scanning Compensation Data List a b c d e f g h i j k l m n q ...
Страница 224: ...8 17 Confidential Cover page sample End page sample Fig 8 8 ...
Страница 255: ...Confidential CHAPTER 9 ERROR INDICATION AND TROUBLESHOOTING ...
Страница 279: ...Confidential 9 23 2 Image failure 1 2 3 4 5 6 7 8 9 10 11 12 13 14 ...
Страница 280: ...Confidential 9 24 15 a 15 b 16 17 18 19 20 21 22 23 24 25 Fig 9 1 ...
Страница 325: ...App 1 5 Confidential 6 Transfer Unit X X X X X X 7 1 2 3 Location SERIAL NO YEAR MONTH DATE ...
Страница 398: ...B Power Supply PCB 100V 127V Confidential ...
Страница 399: ...B Power Supply PCB 240V Confidential ...
Страница 428: ...SM FAX045 5CS101 6 Printed in Japan ...


