


6-24
Confidential
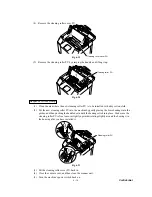
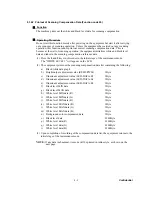
Sequence of Assembling
(1) Install the transfer unit PU into the printer.
(2) Secure the transfer unit PU with the knob screw (2 pieces).
(3) Close the
back
cover.
Fig. 6-33
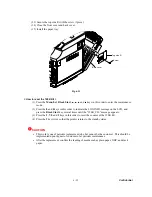
<
How to reset the 120K Kit >
(1) Press the
Menu/Set
,
Black Start
, , , and keys in this order to enter the maintenance
mode.
(2) Press the
8
and
0
keys in this order to indicate the LOG INFO message on the LCD, and
press the
Black Start
key several times until the “120K_CH:” message appears.
(3) Press the
2
,
7
,
8
and
3
keys in this order to reset the counter of the 120K Kit.
(4) Press the
9
key twice so that the printer returns to the standby status.
CAUTION
•
This work is one of periodic replacement jobs, but cannot be the customer. This should be
implemented upon request of customer or at periodic maintenance.
•
After the replacement, confirm the improvement of print quality failure by test print.
Transfer unit PU
Knob screws
Back
cover
Содержание MFC-9420CN
Страница 1: ...Confidential FACSIMILE EQUIPMENT SERVICE MANUAL MODELS MFC 9420CN ...
Страница 16: ...Confidential CHAPTER 1 PARTS NAMES FUNCTIONS ...
Страница 22: ...Confidential CHAPTER 2 SPECIFICATIONS ...
Страница 33: ...Confidential CHAPTER 3 THEORY OF OPERATION ...
Страница 48: ...Confidential 3 1 4 CBV DBV Fig 3 16 Y M C K Fig 3 17 ...
Страница 69: ...Confidential 3 3 5 Fig 3 35 ...
Страница 73: ...Confidential 3 3 9 3 Interface Circuit Printer side Fig 3 38 ...
Страница 82: ...Confidential CHAPTER 4 TRANSFER OF DATA LEFT IN THE MACHINE TO BE SENT FOR REPAIR ...
Страница 85: ...Confidential 4 2 Cover page sample End page sample Fig 4 1 ...
Страница 86: ...Confidential CHAPTER 5 DISASSEMBLY REASSEMBLY AND LUBRICATION ...
Страница 94: ...Confidential 5 5 5 1 1 AC Cord 1 Disconnect AC cord from the machine Fig 5 1 AC cord Machine ...
Страница 100: ...Confidential 5 11 5 1 5 Side Cover LR 1 Remove the screw and then remove the side cover LR Fig 5 8 Side cover LR Screw ...
Страница 172: ...Confidential 5 83 CIS unit 2 Side cover L Hole Main PCB CIS unit CIS flat cable Document scanner Insert ...
Страница 173: ...Confidential 5 84 FB motor 3 Side cover L Hole Hole Main PCB Document scanner FB motor FB motor harness Insert ...
Страница 175: ...Confidential CHAPTER 6 ADJUSTMENTS AND UPDATING OF SETTINGS REQUIRED AFTER PARTS REPLACEMENT ...
Страница 203: ...Confidential CHAPTER 7 CLEANING ...
Страница 205: ...Confidential CHAPTER 8 MAINTENANCE MODE ...
Страница 213: ...8 6 Confidential Fig 8 2 Scanning Compensation Data List a b c d e f g h i j k l m n q ...
Страница 224: ...8 17 Confidential Cover page sample End page sample Fig 8 8 ...
Страница 255: ...Confidential CHAPTER 9 ERROR INDICATION AND TROUBLESHOOTING ...
Страница 279: ...Confidential 9 23 2 Image failure 1 2 3 4 5 6 7 8 9 10 11 12 13 14 ...
Страница 280: ...Confidential 9 24 15 a 15 b 16 17 18 19 20 21 22 23 24 25 Fig 9 1 ...
Страница 325: ...App 1 5 Confidential 6 Transfer Unit X X X X X X 7 1 2 3 Location SERIAL NO YEAR MONTH DATE ...
Страница 398: ...B Power Supply PCB 100V 127V Confidential ...
Страница 399: ...B Power Supply PCB 240V Confidential ...
Страница 428: ...SM FAX045 5CS101 6 Printed in Japan ...


