IV - 19
4.3
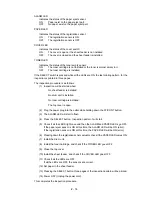
Inspection mode 2
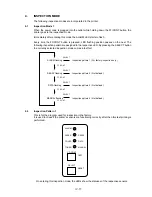
When the power code is plugged into the outlet while holding down the SELECT button, the printer
goes to the inspection mode 2.
Immediately after entering this mode the ALARM LED starts to flash.
Every time the FF/CONT button is pressed, LED flushing position passes on the next. The
following inspection pattern are assigned to the respective LED. By pressing the SELECT button
the currently selected inspection mode comes into effect.
4.4
Initialization of EFPROM
The EFPROM can be returned to its factory setting by using the remote printer console supplied
as an accessory, but the settings indicated below can only be made by using the special utility
software:
(1) Initialization of the page counter.
(2) Initialization of the drum life indicator.
Use the utility software for these settings.
ALARM flashing
READY flashing
DATA flashing
MANUAL flashing
Inspection pattern 1 (Continuous test print)
Inspection pattern 2 (Continuous ejection of blank sheets)
Inspection pattern 3 (Continuous grid pattern 10 mm x 10 mm)
Inspection pattern 4 (Continuous horizontal lines, 1-dot spacing)
SELECT
SELECT
SELECT
SELECT
FF /CONT
FF /CONT
FF /CONT
FF /CONT

