background image

APPENDIX

A-19

2.

How to Read the Drum Unit Life

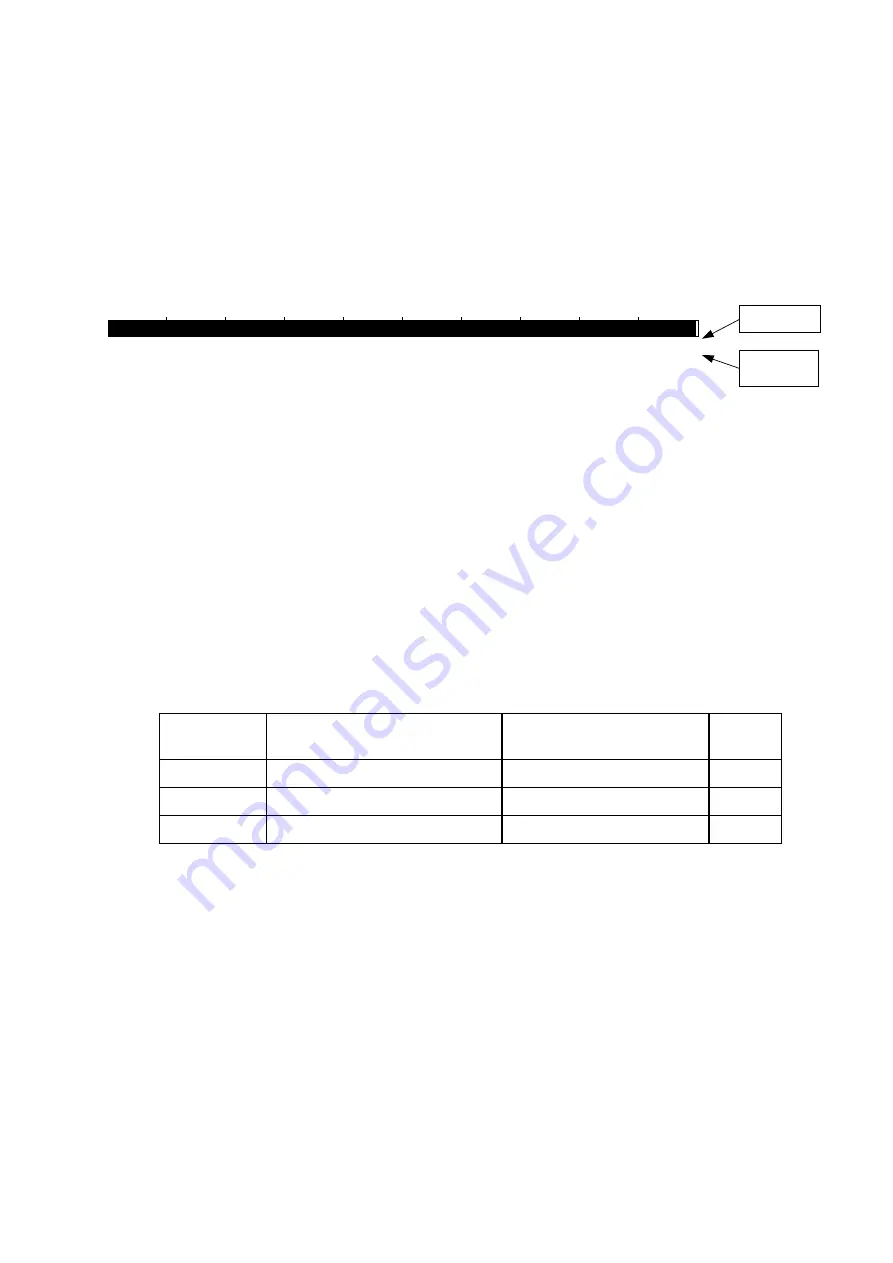
The drum unit life is shown by the bar at the bottom of Print Configuration or Test Print as

follows;

  It initially indicates 100% and gradually decreases.

  It indicates 0% when the “CHANGE DRUM SOON” message appears on the LCD display

on the control panel.

  It stays at 0% even if further printing is done.

Drum Life

00000020202020202

100%

0%

99.9%

MZ-L2000000006801


Fig. A-2

The drum unit life is based on the page counter.  If the average number of drum rotations is

more than the number of drum rotations in non-continuous printing, however, the drum unit life

is counted by the number of drum rotations.
Since the drum counter printed in Print Configuration is an actual page counter after a new

drum unit is replaced, the drum unit life may be different from the drum counter.
For details on the difference between the drum unit life and drum counter, refer to the drum unit

life calculation below;

<How to calculate drum unit life>

**Printing time for 1 page/job in discontinuous printing = 12 seconds
(Page counter reduced by the number of drum rotations) = (Time of motor rotation) ÷ (12 sec.)

Example:

Cold start (Idling for 6 sec.)

Hot start

Page

counter

1 page/job

(6 + 8.4) / 8.4 = 1.71

8.4 / 8.4 = 1

1

2 pages/job

(6 + 8.4 + 3.3) / 8.4 = 2.11

(8.4 + 3.3) / 8.4 = 1.39

2

16 pages/job

(6 + 8.4 + 3.3 x 17) / 8.4 = 8.39

(8.4 + 3.3 x 17) / 8.4 = 7.68

18

If printing 1 page per job with cold start, the drum unit life is decreased earlier.

NOTE:
For information on how to understand the numbers on the right below the bar, see the following

sections, 

‘3. How to Read the Page Counter’

 and 

‘4. How to Read the Maintenance

Information’

.

Page counter

Maintenance

information

Содержание HL-1870N

Страница 1: ...er Laser Printer SERVICE MANUAL MODEL HL 1850 1870N Read this manual thoroughly before maintenance work Keep this manual in a convenient place for quick and easy reference at all times January 2002 SM PRN031 ...

Страница 2: ...rks registered in the United States and other countries and TrueType is a trademark of Apple computer Inc Epson is a registered trademark and FX 80 and FX 850 are trademarks of Seiko Epson Corporation Hewlett Packard is a registered trademark and HP LaserJet is a trademark of Hewlett Packard Company IBM IBM PC and Proprinter are registered trademarks of International Business Machines Corporation ...

Страница 3: ...MBLY AND RE ASSEMBLY Procedures for disassembling and re assembling the mechanical system CHAPTER 5 PERIODIC MAINTENANCE Periodical replacements parts consumable parts etc CHAPTER 6 TROUBLESHOOTING Reference values and adjustments troubleshooting image defects troubleshooting malfunctions etc CHAPTER 7 HIDDEN FUNCTIONS Professional menu mode and Service menu mode etc APPENDICES Serial No descripti...

Страница 4: ...NSTALLATION 2 1 1 1 Power Supply 2 1 1 2 Environment 2 1 1 3 System Requirements for Brother Printer Solution for Windows 2 1 2 UNPACKING 2 2 3 INSTALL THE PRINTER 2 3 3 1 For All Users 2 3 3 1 1 Install the drum unit assembly 2 4 3 1 2 Load paper into the paper cassette 2 4 3 1 3 Print a test page 2 5 3 2 For Windows Users 2 6 3 3 For Macintosh Users 2 10 4 PRINTING METHODS 2 12 4 1 Printing from...

Страница 5: ... 30 5 5 5 Print menu 2 31 5 5 6 Network 2 34 5 5 7 Interface 2 34 5 5 8 Reset menu 2 35 5 5 9 Set IP address 2 35 5 5 10 About emulation modes 2 36 5 5 11 List of factory settings 2 36 5 6 Other Control Features 2 40 5 6 1 Sleep mode 2 40 5 6 2 Inspection mode 2 40 6 NETWORK BOARD OPERATION 2 41 6 1 Installing the Network Board 2 41 6 2 Functions 2 43 6 2 1 LED functions 2 43 6 2 2 Factory default...

Страница 6: ...ver sensor 3 21 2 3 5 Cassette sensor Paper empty sensor 3 22 2 3 6 Paper eject sensor 3 22 2 4 Drum Unit 3 23 2 4 1 Photosensitive drum 3 23 2 4 2 Primary charger 3 23 2 4 3 Transfer roller 3 23 2 4 4 Cleaner 3 23 2 5 Toner Cartridge 3 23 2 6 Print Process 3 23 2 6 1 Charging 3 23 2 6 2 Exposure stage 3 24 2 6 3 Developing 3 25 2 6 4 Transfer 3 25 2 6 5 Fixing stage 3 26 CHAPTER 4 DISASSEMBLY AND...

Страница 7: ...ed Roller ASSY 4 53 3 26 Exit Roller Unit 4 55 3 27 Harness Winding Form 4 57 4 PACKING 4 58 CHAPTER 5 PERIODIC MAINTENANCE 5 1 1 CONSUMABLE PARTS 5 1 1 1 Drum Unit 5 1 1 2 Toner Cartridge 5 2 2 PERIODICAL REPLACEMENT PARTS 5 5 3 PERIODICAL CLEANING 5 6 3 1 Cleaning the Printer Exterior 5 6 3 2 Cleaning the Drum Unit 5 6 3 3 Cleaning the Scanner Window 5 7 3 4 Cleaning the Electrical Terminals 5 8...

Страница 8: ...ompatible Method Troubleshooting 6 58 8 8 Windows 95 98 Me NT 4 0 2000 or later Peer to Peer Print NetBIOS Troubleshooting 6 58 8 9 Internet Print TCP IP Troubleshooting 6 58 8 10 Novell Netware Troubleshooting 6 59 8 11 AppleTalk Troubleshooting 6 59 8 12 Apple TCP IP Printing System 8 6 or later 6 60 8 13 Web Browser Troubleshooting TCP IP 6 60 9 INSPECTION MODE 6 61 9 1 Entering Inspection Mode...

Страница 9: ...DIAGRAM HL 1850 1870N 2 2 A 9 10 NETWORK BOARD PCB CIRCUIT DIAGRAM HL 1850 1870N A 10 11 LOW VOLTAGE POWER SUPPLY PCB CIRCUIT DIAGRAM 100V A 11 12 LOW VOLTAGE POWER SUPPLY PCB CIRCUIT DIAGRAM 200V A 12 13 HIGH VOLTAGE POWER SUPPLY PCB CIRCUIT DIAGRAM A 13 14 SERIAL NO DESCRIPTIONS A 14 15 DIAMETER CIRCUMFERENCE OF ROLLERS A 16 16 PRINT SPEEDS WITH VARIOUS SETTINGS A 17 17 HOW TO KNOW DRUM UNIT LIF...

Страница 10: ...fter August 2 1976 Compliance is mandatory for products marketed in the United States One of the following labels on the back of the printer indicates compliance with the FDA regulations and must be attached to laser products marketed in the United States The label for Japanese manufactured products MANUFACTURED K BROTHER INDUSTRIES LTD 15 1 Naeshiro cho Mizuho ku Nagoya 467 8561 Japan This produc...

Страница 11: ... in the laser unit is adjusted in accordance with the standards never touch it Caution Use of controls adjustments or performance of procedures other than those specified in this manual may result in hazardous radiation exposure For Finland and Sweden LUOKAN 1 LASERLAITE KLASS 1 LASER APPARAT Varoitus Laitteen käyttäminen muulla kuin tässä käyttöohjeessa mainitulla tavalla saattaa altistaa käyttäj...

Страница 12: ...it ACHTUNG Im Falle von Störungen der Lasereinheit muß diese ersetzt werden Das Gehäuse der Lasereinheit darf nicht geöffnet werden da sonst Laserstrahlen austreten können Location of the laser beam window ADDITIONAL INFORMATION When servicing the optical system of the printer be careful not to place a screwdriver or other reflective object in the path of the laser beam Be sure to take off any per...

Страница 13: ...TTIINA NÄKYMÄTTÖMÄLLE LASERSÄTEILYLLE ÄLÄ KATSO SÄTEESEEN LUOKAN 3B LASERLAITE ADVARSEL USYNLIG LASERSTRÅLING UNNGÅ DIREKTE KONTAKT MED LASERENHETEN NÅR TOPPDEKSELET ER ÅPENT KLASSE 3B LASERPRODUKT ATTENTION RADIATIONS LASER INVISIBLES QUANDOUVERT ET VERROUILLAGE ENLEVE EVITER EXPOSITIONS DIRECTES AU FAISCEAU PRODUIT LASER CLASSE 3B VORSICHT UNSICHTBARE LASERSTRAHLUNG WENN ABDECKUNG GEÖFFENT UND S...

Страница 14: ...arious kinds of WARNING messages included in this manual WARNING Always turn off the power switch and unplug the power cord from the power outlet before accessing any parts inside the printer WARNING Some parts inside the printer are extremely hot immediately after the printer is used When opening the front cover or rear cover to access any parts inside the printer never touch the red colored part...

Страница 15: ...HL 1850 1870N SERVICE MANUAL xiii ...

Страница 16: ...n water mark and many layout functions You can easily setup these print options through the Printer Setup Menu Printer Status Monitor with Bi directional Parallel Interface The printer driver can monitor the status of your printer using bi directional parallel communications IEEE 1284 bi directional parallel printer cable is recommended The printer status monitor program can show the current statu...

Страница 17: ...c images Environment Friendly Economy Printing Mode This feature will cut your printing cost by saving toner It is useful for obtaining draft copies for proof reading You can select the 50 toner saving economy mode through the Windows printer driver supplied with your printer Sleep Mode Power Save Mode Sleep mode automatically reduces power consumption when the printer is not in use for a certain ...

Страница 18: ...sette Control panel Extension flap Front cover Multi purpose tray Cover release button Power switch Parallel interface connector Face up output tray Face up tray extension Rear cover USB connector PCB access plate Face down output tray Interface cover AC power inlet Duplex tray Paper adjustment lever for duplex printing ...

Страница 19: ... toner saving Print speed Normal Up to 18 pages minute A4 UP to 19 pages minute Letter size paper Duplex printing Up to 8 5 pages minute when loading A4 or Letter size paper from the standard paper cassette Warm up Max 20 seconds at 23 C 73 4 F First print Max 12 seconds when loading A4 or Letter size paper from the standard paper cassette Print media Toner cartridge Life expectancy 6 500 pages ca...

Страница 20: ...acintosh with USB printer driver Optional Macintosh driver available for System 6 0 7 or higher Interface Bi directional parallel Universal Serial Bus USB 10 100 BaseTX Ethernet network interface optional for HL 1850 Optional IrDA Memory HL1850 16 Mbytes HL1870N 32 Mbytes Expandable up to 136 Mbytes for HL1850 and 144 Mbytes for HL1870N by installing an industry standard DIMM Control Panel Display...

Страница 21: ...perature Operating 10 to 32 5 C 50 to 90 5 F Non operating 0 to 40 C 38 to 104 F Storage 20 to 40 C 4 to 104 F Humidity Operating 20 to 80 non condensing Storage 10 to 85 non condensing Dimensions 425 x 424 x 275 mm W x D x H 16 7 x 16 7 x 10 8 inches A4 lower paper cassette installed 425 x 424 x 384 mm 16 7 x 16 7 x 15 1 inches Weight Approx 14 5 kg 32 2 lb including the drum unit Approx 18 7 kg ...

Страница 22: ... SNMP MIB II as well as Brother private MIB TELNET command console NIC only HP JetAdmin compatible BRCONFIG DOS Utility NIC only needs Netware network Front Panel Configuration if the printer has LCD panel Firmware update Flash ROM based for Network module Can be upgraded using TFTP Can be upgraded using IPX SPX Easy upgrade using Brother BRAdmin utility Supplied software BRAdmin Professional mana...

Страница 23: ... paper Transparency Up to 10 sheets Only A4 or Letter size Transparencies Label Only A4 or Letter size Plain paper Envelope Envelopes or Env Tick or Env Thin Card Thick paper or thicker paper 2 Paper size Upper paper tray Multi purpose tray Optional lower tray Duplex printing Paper size A4 Letter Legal 8 5x13 in B5 JIS B5 ISO Executive A5 A6 B6 Width 70 to 216 mm 2 75 to 8 5 in Length 116 to 356 m...

Страница 24: ...ny paper jams print quality problems or printer damage It is recommended to use long grained paper for the best print quality If short grained paper is being used it might be the cause of paper jams Use neutral paper Do not use acid paper to avoid any damage to the drum unit Avoid using coated paper such as vinyl coated paper Avoid using preprinted or highly textured paper It is recommended to use...

Страница 25: ... 1 Face down output tray capacity Maximum 150 sheets 80 g m2 face down only 2 Face up output tray capacity Maximum 50 sheets 80 g m2 face up only NOTE Face down Delivery with the printed face of the paper downwards Face up Delivery with the printed face of the paper upwards 3 We recommend the following print methods output tray for each paper media type Paper output Media type Face down Face up Pl...

Страница 26: ... shows the printable area each emulation guarantees when printing on Portrait and Landscape Portrait Aʝ Bʝ Cʝ Dʝ Eʝ Fʝ Gʝ Fʝ Gʝ Eʝ Gʝ Gʝ Physical pageʝ Printable areaʝ Logical pageʝ Bʝ Physical page lengthʝ Dʝ Maximum logical page lengthʝ Fʝ DIstance from edge of physical page toʝ edge of logical pageʝ ...

Страница 27: ...4 dots Ç 0 mm 4 2 mm 0 16 50 dots B 5 JIS 182 0 mm 7 1 2 130 dots 257 0 mm 10 11 3 033 dots 170 0 mm 6 69 2 007 dots 257 0 mm 10 11 3 033 dots Ç 0 mm 4 2 mm 0 16 50 dots B 5 ISO 176 0 mm 6 93 2 078 dots 250 0 mm 9 84 2 952 dots 164 0 mm 6 46 1 936 dots 250 0 mm 9 84 2 952 dots Ç 0 mm 4 2 mm 0 16 50 dots B 6 125 0 mm 4 92 1 476 dots 176 0 mm 6 93 2 078 dots 164 0 mm 4 44 1 334 dots 176 0 mm 6 93 2 ...

Страница 28: ... MANUAL 1 13 Landscape Aʝ Bʝ Cʝ Dʝ Eʝ Fʝ Gʝ Fʝ Gʝ Eʝ Gʝ Gʝ Physical pageʝ Printable areaʝ Logical pageʝ B Physical page lengthʝ D Maximum logical page lengthʝ F D istance from edge of physical page to edge of logical pageʝ ...

Страница 29: ... 3 033 dots 182 0 mm 7 1 2 130 dots 247 0 mm 9 72 2 916 dots 182 0 mm 7 1 2 130 dots Ç 0 mm 4 2 mm 0 16 50 dots B 5 ISO 250 0 mm 9 84 2 952 dots 176 0 mm 6 93 2 078 dots 240 0 mm 9 44 2 834 dots 176 0 mm 6 93 2 078 dots Ç 0 mm 4 2 mm 0 16 50 dots B 6 176 0 mm 6 93 2 078 dots 125 0 mm 4 92 1 476 dots 166 4 mm 6 55 1 960 dots 125 0 mm 4 92 1 476 dots Ç 0 mm 4 2 mm 0 16 50 dots COM10 241 3 mm 9 5 2 8...

Страница 30: ...the printer where the ventilation hole of the printer is blocked Keep approximately 100 mm 4 inches between the ventilation hole and the wall Do not place the printer where it is exposed to direct sunlight Use a blind or a heavy curtain to protect the printer from direct sunlight when the printer is unavoidably set up near a window Do not place the printer near devices that contain magnets or gene...

Страница 31: ...CKING When unpacking the printer check to see that all of the following components are included in the carton Fig 2 1 NOTE Components may vary depending on the country AC cord Printer Paper cassette Drum unit with Toner cartridge included Documents CD ROM ...

Страница 32: ...re setup and driver installation are contained on the supplied CD ROM 3 1 For All Users For Windows users Turn on the PC power Insert the supplied CD ROM into the CD ROM drive The opening screen will appear automatically NOTE If the opening screen does not appear click Start and select Run Then enter the CD drive letter and type START EXE for example D START EXE Select the language you want The ma...

Страница 33: ... the drum unit assembly into the printer Fig 2 3 Close the front cover 3 1 2 Load paper into the paper cassette 1 Pull the paper cassette completely out of the printer While pressing the paper guide release lever slide the adjusters to fit the paper size Check that they locate correctly into the slots Fig 2 4 NOTE For Legal or 8 5 x 13 in paper press the universal guide release lever to extend the...

Страница 34: ...ake sure the printer power switch is off Connect the AC power cord to the printer Do not connect the interface cable Plug the AC power cord into an AC outlet Turn the power switch on After the printer has finished warming up the READY message appears Reprint Data Go Job cancel Back Set READY Fig 2 6 Press the Go switch The printer prints a test page Check that the test page printed correctly Exten...

Страница 35: ...e users Start installing the driver before connecting the USB interface cable to the printer If it has been already connected remove it NOTE When the Add New Hardware Wizard appears on the PC click the Cancel button 1 Click Connect the interface cable and install the printer driver utilities 2 Select the USB cable Click the Next button and then click the OK button Make sure the printer power switc...

Страница 36: ...ions once the administrator has configured the printer 1 For the administrator Install the BRAdmin Professional Configuration utility The BRAdmin Professional software provides sophisticated network and printer management capabilities for Brother and non Brother products By identifying potential problems before they arise and by addressing important IT requirements such as streamlined printer conf...

Страница 37: ...eployment Wizard 2 Installing the driver 1 Click the Connect the interface cable and install the printer driver utilities Select the Network interface Turn the printer power switch off Connect the cable to your printer and then connect it to a free port on your hub Turn the printer power switch on Click the Next button Select the Network shared printer or the Brother peer to peer network printer a...

Страница 38: ...button to see a list of printers and click the OK button Fig 2 10 4 Click the Finish button and restart the PC After the PC has restarted setup is complete For Windows NT 4 0 Windows 2000 XP users 1 Select LPR Recommended and then click the Next button NOTE If the following screen appears insert the Windows NT 4 0 CD ROM into the CD ROM drive Fig 2 11 2 Click the Next button 3 Enter the printer s ...

Страница 39: ...er power switch is ON 3 Connect the USB interface cable to the Macintosh and then connect it to the printer 4 Follow the instructions on the screen 5 Open the Macintosh HD icon 6 For Mac OS 8 6 to 9 04 Users Open the Apple Extras folder Open the Apple LaserWriter Software folder For Mac OS 9 1 to 9 2 Users Open the Applications Mac OS 9 folder Open the Utilities folder 7 Open the Desktop Printer U...

Страница 40: ...en the Chooser from the Apple Menu on the Macintosh 6 Click the LaserWriter8 icon If you need to change the network zone select which zone you want to use from the AppleTalk zones list NOTE In the Chooser the name BRN_xxxxxx_P1_AT is appeared where xxxxxx is the last six digits of the Ethernet address See Chapter 7 of the Network User s Guide for more information 7 Click on the appropriate printer...

Страница 41: ...er in CHAPTER 1 4 2 Printing from Multi purpose Tray You can feed bond paper thick paper labels envelopes or cards as well as plain paper recycled paper or transparencies into the multi purpose tray For details on feedable paper see subsection 3 5 Paper in CHAPTER 1 NOTE For correct printing the same paper size must be selected from within the software application as the paper in the tray If the a...

Страница 42: ...more than 135 g m2 36 lbs use the face up output tray Insert the leading edge of the paper first and push it gently into the tray If pre printed paper is used in the multi purpose tray the paper should be inserted top edge first with the printed side face up 4 Press and slide the paper width adjuster to fit the paper Fig 2 16 5 Use the face down output tray for printing on transparencies Fig 2 17 ...

Страница 43: ...ecifications for the printer Poorly manufactured envelopes with edges that are not straight or consistently square Envelopes with transparent windows holes cutouts or perforations NOTE Before printing envelopes fan the stack well to avoid paper jams and misfeeds Do not load different types of paper at the same time in the paper tray because it may cause paper jams or misfeeds Do not print envelope...

Страница 44: ...settings in the printer driver Property tab NOTE If DL size double flap envelopes were creased after they have been printed put in new DL size double flap envelopes sideways and print again 4 2 2 Printing on label transparency etc Use of any of the types of paper listed below may cause damage to your printer Such damage is not covered under any warranty or service agreement Envelopes that are dama...

Страница 45: ...CHAPTER 2 INSTALLATION AND BASIC OPERATION 2 16 CAUTION Do not touch transparencies that have just been printed because they are very HOT ...

Страница 46: ... 3 Place paper in the multi purpose tray so it touches the back of the tray and remains below the limit mark Fig 2 24 NOTE Note the following when placing paper in the multi purpose tray If paper to be printed on weighs more than 135 glm2 36 lbs use the face up output tray Insert the leading edge of the paper first and push it gently into the tray The printed side must be face up 4 Press and slide...

Страница 47: ...fter the printer ejects all the printed pages remove them and close the face up output tray 4 4 Printing on Both Sides of the Paper Duplex Printing The supplied printer drivers for Windows 95 98 Me Windows NT 4 0 Windows 2000 XP supports automatic duplex printing Guidelines for duplex printing If the paper is thin it may wrinkle If paper is curled straighten it and then place it in the paper casse...

Страница 48: ...HL 1850 1870N SERVICE MANUAL 2 19 If the paper adjustment lever for duplex printing is not correctly set for the paper size paper jams may occur and the printing will be out of position on the paper ...

Страница 49: ...ware command setting overrides the control panel s setting It will not be necessary to set MANUAL FEED in PAPER mode If pre printed paper is used in the multi purpose tray the paper should be inserted top edge first with the pre printed side face up 4 6 Printing side of duplex printing Since the standard delivery tray is a face down tray when duplex printing is carried out an even numbered paper i...

Страница 50: ...ons in the printer The display also shows the current printer status When you use the control panel switches the display will change Reprint Data Go Job cancel Back Set Fig 2 29 5 1 Data LED Indications The Data LED indicates with orange lamp the current status of the printer LED Printer status On Data remains in the printer buffer Blinking Receiving or processing data Off No remaining data Data L...

Страница 51: ...m the current status MENU ERROR and REPRINT settings by pressing the Go switch once For ERROR indications the panel changes only when the error is cleared You can PAUSE printing with the Go switch Pressing the Go switch again restarts the print job and clears the PAUSE During PAUSE the printer is in the off line state NOTE If you do not wish to print the remaining data when the printer is in PAUSE...

Страница 52: ...witch to increase the reprint RAM size in 1MB steps NOTE When you increase the RAM size to use for secure printing the work area of the printer is decreased and the printer performance will reduce Ensure that you reset the RAMDISKSIZE to 0MB when you have finished using secure printing When you store the data in RAM the data is deleted when the printer power is turned off We also recommend adding ...

Страница 53: ...printer will not print the document when you have sent it for printing to print the document you must use the control panel of the printer or connect to the printer using a web browser When you want to delete the spooled data you can carry out this operation on the control panel or in the web based management software NOTE If there is data in the job information that cannot be displayed on the LCD...

Страница 54: ...e data When you cancel the reprinting job Pressing the Job Cancel switch allows you to cancel the reprint job The Job Cancel switch also allows you to cancel a paused reprint job Press or Press Set LAST JOB SECURE USER XXXXXXX If there is no data NO DATA STORED JOB XXXXXXX PASSWORD XXXX COPIES 1 PRINTING Press or to select the user name Press the Set switch to set the user name Press or to select ...

Страница 55: ...s briefly on the right and the mode returns to the previous menu 5 2 6 Back switch If you press the Back switch when the printer is in the on line state READY it goes off line and the LCD goes to the menu display Pressing the Back switch allows you to return to the previous level from the current menu level The Back switch also allows you to select the next digit while inputting numbers When the l...

Страница 56: ...inter status with the different colors and the light indications on off and blinking Signal Status Off The printer is in sleep status Warming up Ready to print Green General Printing Red Error A problem has occurred with the printer Setting menu Setting reprint times Orange Setting Pause PR2001022 ...

Страница 57: ... mode PRINTING Printing SELF TEST Performing self diagnostics PAUSE The printer has suspended feeding forms Pressing the Go switch resumes form feed NOW INITIALIZING The printer is setting up WARMING UP The printer is warming up MEMORY SIZE XX MB This printer has XX MB memory JOB CANCELING Canceling the job RESOLUTION ADAPT Printing with reduced resolution PRESS SET TO PRINT Press the Set switch t...

Страница 58: ...nchanged Numbers can be input by scrolling through the available range 000 to 999 or by setting digits one at a time When setting digits one at a time the blinking digit is the changeable digit An example for operation When turning the MP FIRST setting on Choose this setting to load paper from the multi purpose tray first READY INFORMATION PAPER SOURCE MP FIRST OFF ON ON Press the switch Press the...

Страница 59: ...tion see subsection 5 5 2 PAPER in this Chapter QUALITY For more information see subsection 5 5 3 QUALITY in this Chapter SETUP For more information see subsection 5 5 4 SET UP in this Chapter PRINT MENU For more information see subsection 5 5 5 PRINT MENU in this Chapter NETWORK For more information see subsection 5 5 6 NETWORK in this Chapter INTERFACE For more information see subsection 5 5 7 I...

Страница 60: ...nly netword users NET VER Network firmware version NET DATE Network date VERSION RAM SIZE MB The size of memory in this printer PAGE COUNTER REMAIN DRUM REMAIN PF KIT1 REMAIN PF KIT2 REMAIN FUSER MAINTENANCE REMAIN LASER 5 5 2 Paper Setting Menu Description SOURCE AUTO MP TRAY TRAY1 TRAY2 TRAY PRIORITY MP T1 T2 T1 T2 MP MP FIRST OFF ON Feed paper from the MP tray first MP SIZE ANY LETTER LEGAL A4 ...

Страница 61: ...SITY 6 0 6 Increase or decrease the print density 5 5 4 Setup Setting Menu Description LANGUAGE ENGLISH FRANÇAIS LCD DENSITY 0 1 2 POWER SAVE TIME 1 to 99 MIN AUTO CONTINUE OFF ON OFF ON Turn on off lock panel function LOCK PANEL PASS NO REPRINT ON OFF PAGE PROTECTION PROTECT AUTO AUTO OFF LETTER A4 OR LEGAL EMULATION AUTO EPSON AUTO IBM HP LASERJET KEEP PCL OFF ON RAMDISK SIZE 0 1 2 MB RESTART De...

Страница 62: ... the upper left corner of pages horizontally up to 500 left to 500 right dots in 300 dpi units PRINT POSITION Y OFFSET 0 Move the print start position at the upper left corner of pages vertically up to 500 up to 500 down dots in 300 dpi units AUTO FF OFF OFF 1 5 99 sec Allows you to print the remaining data without pressing the Go switch FF SURPRESS OFF ON Turn on off the form feed suppress functi...

Страница 63: ...et the bottom margin at a distance from the bottom edge of the paper 0 0 33 0 5 1 0 1 5 or 2 0 Factory setting 0 33 None HP 0 5 HP HP LASERJET LINES Set the number of lines per page from 5 to 128 lines FONT NO I0000 FONT PITCH POINT SYMBOL CHARACTER SET PC 8 Set the symbol set or the character set TABLE PRINT Print code table AUTO LF OFF OFF ON ON CRÆCR LF OFF CRÆCR AUTO MASK OFF ON LEFT MARGIN Se...

Страница 64: ...1870N SERVICE MANUAL 2 35 BOTTOM MARGIN Set the bottom margin a distance from the top edge of the paper 0 0 33 0 5 1 0 1 5 or 2 0 Factory setting 0 33 LINES Set the number of lines per page from 5 to 128 lines ...

Страница 65: ...N Set the right margin at column 10 to 136 columns at 10 cpi TOP MARGIN Set the top margin a distance from the top edge of the paper 0 0 33 0 5 1 0 1 5 or 2 0 Factory setting 0 33 BOTTOM MARGIN Set the bottom margin a distance from the top edge of the paper 0 0 33 0 5 1 0 1 5 or 2 0 Factory setting 0 33 IBM PROPRINTER LINES Set the number of lines per page from 5 to 128 lines ERROR PRINT OFF ON BR...

Страница 66: ...NYAN ON OFF LAT ON OFF NETBIOS IP ON OFF ENET ATUO 100B FD 100B HD 10B FD 10B HD 5 5 7 Interface Setting Menu Description AUTO IF TIME 1 5 99 SEC You must set the timeout period for the auto interface selsection INPUT BUFFER Level 1 5 15 Increase or decrease the input buffer capacity RESTART PRINTER When using the parallel interface Sub setting Menu Description HIGH SPEED ON OFF Turns the high spe...

Страница 67: ...11 List of factory settings in this Chapter 5 5 9 Set IP address NETWORK TCP IP TCP IP ENABLE IP ADDRESS 192 0 0 192 Press the or switch to select the NETWORK menu Press the Set switch Press the Set switch Press the switch Press the Set switch The last number in the digit which you can change is blinking Press the or switch to increase or decrease the number Press the Set switch to go to next digi...

Страница 68: ...Systems Incorporated PostScript Language Tutorial and Cookbook Menlo Park Addison Wesley Publishing Company Inc 1985 Adobe Systems Incorporated PostScript Language Reference Manual third Edition Addison Wesley Longman Inc 1999 EPSON FX 850 and IBM Proprinter XL Mode The EPSON FX 850 and IBM Proprinter XL modes are the emulation modes that this printer emulates to meet the industry standard for dot...

Страница 69: ...CHAPTER 2 INSTALLATION AND BASIC OPERATION 2 40 password and IP address information hold down the Network Test Button of the Network board NC 4100h for more than 5 seconds ...

Страница 70: ... ANY PAPER DUPLEX OFF RESOLUTION 600 HRC MEDIUM TONER SAVE OFF QUALITY DENSITY 0 LANGUAGE ENGLISH LCD DENSITY 0 POWER SAVE TIME 5 MIN AUTO CONTINUE OFF LOCK PANEL OFF REPRINT ON EMULATION AUTO EPSON SETUP KEEP PCL OFF MEDIA TYPE PLAIN PAPER PAPER A4 LETTER COPIES 1 ORIENTATION PORTRAIT PRINT POSITION X OFFSET 0 Y OFFSET 0 AUTO FF TIME 5 PRINT MENU FF SUPPRESS OFF ...

Страница 71: ... TOP MARGIN BOTTOM MARGIN HP LASER JET LINES FONT NO 59 FONT PITCH POINT 10 00 12 00 SYMBOL CHARACTER SET US ASCII AUTO LF OFF AUTO MASK OFF LEFT MARGIN RIGHT MARGIN TOP MARGIN BOTTOM MARGIN EPSON FX 850 LINES FONT NO 59 FONT PITCH POINT 10 00 12 00 SYMBOL CHARACTER SET PCB AUTO LF OFF AUTO CR OFF LEFT MARGIN RIGHT MARGIN TOP MARGIN BOTTOM MARGIN IBM PROPRINTER LINES ERROR PRINT OFF PRINT MENU BR ...

Страница 72: ...ing TCP IP ENABLE ON IP METHOD AUTO IP ADDRESS 192 0 0 192 SUBNET MASK 0 0 0 0 GATEWAY 0 0 0 0 IP BOOT TRIES 3 TCP IP IP METHOD AUTO NETWARE ENABLE ON NETWARE NEE FRAME AUTO APPLETALK ON NETBEUI ON DLC LLC ON BANYAN ON LAT ON NETBIOS IP ON NETWORK ENET AUTO ...

Страница 73: ...l not stop until the printer engine has cooled down The fan running time varies depending on the sleep mode timeout because the fan running conditions are defined as follows 1 The fan runs for 10 minutes whenever printing finishes 2 The fan runs while the printer is in ready status 3 The fan runs for at least 5 minutes after the printer goes into sleep mode EX If the timeout is 5 minutes the fan w...

Страница 74: ...tor are included For more information about set up see section 3 INSTALL THE PRINTER in this Chapter 6 1 Installing the Network Board 1 Turn off the printer power and then unplug the power cord Disconnect the interface cable printer cable from the printer 2 Open the interface cover Fig 2 30 3 Unscrew the two screws that secure the PCB access plate Remove the plate Fig 2 31 4 Remove the two screws ...

Страница 75: ...ews removed in 4 Fig 2 33 7 Re install the PCB access plate and then secure it with the two screws removed in 3 8 Close the interface cover 9 Plug the power cord into the AC outlet and then turn on the power switch Print configuration page Press the network test button for less than 5 seconds to print a configuration page Fig 2 34 Network port ...

Страница 76: ...ver is connected to a 100BaseTX Fast Ethernet network It is off if the print server is connected to a 10BaseT network A LED Green Transmission activity This LED will blink as the print server receives or transmits data 6 2 2 Factory default setting If you wish to reset the print server back to its default factory settings resetting all information such as the password and IP address information ho...

Страница 77: ...CHAPTER 2 INSTALLATION AND BASIC OPERATION 2 48 ...

Страница 78: ...on block Control panel Control system Low voltage power supply block High voltage power supply block Laser unit Drive block DC motor Drum unit Transfer block Drum Charging block External device External device Paper tray unit Paper cassette MP tray Fixing unit Paper eject block Paper feed system Image generation system Interface block Parallel USB RAM 8MB Paper dust cleaner block Developing block ...

Страница 79: ...50 8 0 Mbytes HL 1670N 16 Mbytes Option RAM DIMM max 128Mbytes EEPROM 8192 x 8 bits CPU Core MB86834 A S I C Oscillator 48MHz Address Decoder DRAM Control Timer FIFO CDCC Parallel I O Soft Support EEPROM I O Engine Control I O To Engine PCB BUS INT To PC USB I O To PC Network Program 2 0 Mbytes PCI Bus Control Network Board To PC or Hub Option for HL 1650 Oscillator 33 3MHz Fig 3 2 HL 1850 HL 1870...

Страница 80: ...riven with a clock frequency of 48 MHz in the user logic block it itself runs at 96 MHz which is generated by multiplying the source clock by two The functions of the interface block communication with external devices are described below 1 IEEE1284 Stores the data received from the PC into DRAM as controlled by the DMA controller It is applicable to both normal receiving and bi directional commun...

Страница 81: ...s the data received from the PC into DRAM as controlled by the DMA controller The transmission speed is 12Mbps Fig 3 4 3 Engine GA transfer circuit Communicates with the engine GA by a full duplex synchronous serial method The communication speed is 520Kbps ...

Страница 82: ...HL 1850 1870N SERVICE MANUAL 3 5 Fig 3 5 ...

Страница 83: ...CHAPTER 3 THEORY OF OPERATION 3 6 1 3 2 ROM Two 64 Mbits ROMs x 16 bit are fitted Fig 3 6 HL 1850 HL 1870N ...

Страница 84: ...HL 1850 1870N SERVICE MANUAL 3 7 1 3 3 Flash ROM Two 8 Mbits flash ROMs x 16 bit are fitted Fig 3 7 HL 1850 HL 1870N ...

Страница 85: ...CHAPTER 3 THEORY OF OPERATION 3 8 1 3 4 SDRAM A 64M bit SDRAM x 32 bits is used as the RAM Fig 3 8 HL 1850 ...

Страница 86: ...HL 1850 1870N SERVICE MANUAL 3 9 Two 64M bit SDRAMs x 16 bits are used as the RAM Fig 3 9 HL 1870N ...

Страница 87: ... 3 THEORY OF OPERATION 3 10 1 3 5 Optional RAM A 32bit 100 pin DIMM can be fitted as optional RAM The main PCB has one slot and the capacity of DIMM can be from 16 Mbyte to 128 Mbytes Fig 3 10 HL 1850 HL 1870N ...

Страница 88: ...HL 1850 1870N SERVICE MANUAL 3 11 1 3 6 PCI bus The interface of the PCI bus is PCI specification revision 2 2 compliant Fig 3 11 HL 1850 HL 1870N ...

Страница 89: ...he EEPROM is M24C64 type of two wire method with a 8192 x 8 bits configuration Fig 3 12 1 3 8 Reset circuit The reset IC is a S 80928ANMP The reset voltage is 2 7V typ and the LOW period of reset is 260ms typ Fig 3 13 HL 1850 HL 1870N HL 1850 HL 1870N ...

Страница 90: ...e interface circuit The interface with the engine PCB is by full duplex synchronous serial method Fig 3 14 1 3 10 Panel I O Fig 3 15 shows the panel interface circuit The interface with the panel PCB is by full duplex synchronous serial method HL 1850 HL 1870N HL 1850 HL 1870N ...

Страница 91: ...CHAPTER 3 THEORY OF OPERATION 3 14 Fig 3 15 ...

Страница 92: ...per eject sensor Front registration sensor Fixing unit cover sensor Rear registration sensor Multi purpose tray paper exit sensor Upper cassette sensor For the circuit diagram of the engine PCB see APPENDIX 8 and 9 ENGINE PCB CIRCUIT DIAGRAM HL 1850 1870N in this manual 1 5 BR net PCB The BR net PCB is connected to the ASIC mounted on the main PCB through the PCI bus The Ethernet controller AM79C9...

Страница 93: ...de of each power supply are listed below Regulated Output Production Code 3 3V 1 0A 7V 0 7A 24V 3 0A 100V MPW1860 200V MPW1760 For the circuit diagram of the low voltage power supply PCB see APPENDIX 11 or 12 LOW VOLTAGE POWER SUPPLY PCB CIRCUIT DIAGRAM in this manual Heater Circuit Thermal Fuse Feedback Line Filter Fuse Rectifier Oscillator 24V Regulation Circuit 24V 3 3V Lamp Heater Engin Circui...

Страница 94: ...the circuit diagram of the high voltage power supply PCB see APPENDIX 13 HIGH VOLTAGE POWER SUPPLY PCB CIRCUIT DIAGRAM in this manual Transfer Roller Supply Roller Photosensitive Drum Development Roller Corona Unit Current Regulator Current Regulator Voltage Regulator Voltage Regulator B1 B61 Q63 B81 Q82 Voltage Regulator Z51 VR51 VR21 24VI GND R1 VR81 Voltage Regulator VR31 Cleaning Brush Fig 3 1...

Страница 95: ...gistration sensor lever Front registration sensor lever Separation pad Cassette pressure roller Paper pick up roller First feed roller Toner sensor DRUM UNIT Supply roller Blade Scanner motor LASER UNIT Corona wire Heat roller Second eject roller Paper guide Pressure roller Rear cover Duplex outer guide DUPLEX TRAY Pressure plate MP pick up roller First feed pinch roller Paper feed roller Paper fe...

Страница 96: ...60 mm sq Fan Motor Rear Cover Sensor Panel Back Light PCB Toner Sensor PCB Light reception 80 mm sq Fan Motor SOL Relay PCB DX Solenoid Registration Solenoid Casette Solenoid MP Solenoid Toner Sensor PCB Light emission DX Sensor PCB DX Tray Sensor DX Paper Size Sensor Main Motor Paper Eject Sensor Thermister For Heat Roller Thermister Relay PCB Jam Clear Cover Sensor Rear Registration Sensor Caset...

Страница 97: ...hes against the front registration sensor lever and the paper top position absence of paper is detected by sensing the motion of the lever 2 2 2 Paper registration After the paper top position is detected by the front registration sensor the paper separated into individual sheets by the paper pick up roller is fed further for a specified time and the paper top position reaches the paper feed rolle...

Страница 98: ...HL 1850 1870N SERVICE MANUAL 3 21 The rear registration sensor in the path from the feed roller to the transfer roller controls the first print position on the paper ...

Страница 99: ...o the printer rear straight paper path Fig 3 22 2 2 4 Duplex printing After the paper exits from the second eject roller with the front of sheet printed the second eject roller rotates conversely and feeds the paper to the duplex tray where the paper skew is adjusted Afterwards the paper is ejected from the duplex tray to the path through the paper feed roller and the transfer roller to the transf...

Страница 100: ...ge The toner sensor at the left side emits light through the window on the left side of the toner cartridge then the toner sensor at the right side receives it when the toner is low They also detect whether or not the drum unit is installed The toner cartridge is installed in the drum unit Fig 3 25 Toner sensor Light emission Toner sensor Light reception MP sensor PCB assy Shutter arm C ...

Страница 101: ...CHAPTER 3 THEORY OF OPERATION 3 24 ...

Страница 102: ...y in installed and the DX tray size sensor detects if the correct size of paper is selected Fig 3 26 2 3 4 Rear cover sensor Detects opening and closing of the rear cover It also detects an error if the rear cover is open when duplex printing is selected Fig 3 27 Rear cover sensor Exit roller unit DX sensor PCB assy ...

Страница 103: ... sensor Detect if the paper cassette is installed They also detect if there is paper in the paper cassette Fig 3 28 2 3 6 Paper eject sensor Detects if paper is ejected from the fixing unit Fig 3 29 Cassette sensor PCB assy Feed MP unit Eject sensor PCB assy Fixing unit ...

Страница 104: ...harging The drum is charged to approximately 870V by an ion charge which is generated by the primary charger The charge is generated by ionization of the corona wire which has a DC bias from the high voltage power supply applied to it The flow of the ion charge is controlled by the grid to ensure it is distributed evenly on the drum surface The aluminum drum sleeve in the photosensitive drum is gr...

Страница 105: ...he surface potential of the exposed area is reduced forming the electrostatic image to be printed 1 Cycle of drum Surface Potential V 870 400 150 1 2 3 a b Time 1 2 3 Primary charging Laser beam exposure and developing a Unexposed area Non image area b Exposed area Image area Transfer the image to paper Drum Sleeve 0 Fig 3 32 Drum Lens Laser beam Polygon mirror Paper Laser detector Laser diode Mot...

Страница 106: ...trostatic potential to attract toner particles from the development roller to the latent image area on the drum surface Fig 3 33 2 6 4 Transfer 1 Transfer process After the drum has been charged and exposed and has received a developed image the toner formed is transferred onto the paper by applying a negative charge to the back of the paper The negative charge applied to the paper causes the posi...

Страница 107: ...d pressure when passing through the heat roller and the pressure roller in the fixing unit The thermistor keeps the surface temperature of the heat roller constant by detecting the surface temperature of the heat roller and turning on or off the halogen heater lamp Fig 3 34 First eject roller Thermistor Pressure roller Heat roller ...

Страница 108: ...using soldering irons or other heat generating tools take care not to accidentally damage parts such as wires PCBs and covers 4 Before handling any PCBs touch a metal portion of the equipment to discharge any static electricity charge on your body or the electronic parts or components may be damaged 5 When transporting PCBs be sure to wrap them in the correct protective packaging 6 Be sure to repl...

Страница 109: ...CHAPTER 4 DISASSEMBLY AND RE ASSEMBLY 4 2 ...

Страница 110: ... L SIDE COVER R L 8 MP COVER ASSY 9 PROCESS UNIT COVER ASSY 10 PAPER PICK UP ROLLER ASSY 13 LOW VOLTAGE PS PCB ASSY 16 MAIN PCB ASSY 17 18 FAN MOTOR FAN MOTOR 60 FEED MP UNIT 14 EXIT ROLLER UNIT 26 DRIVE UNIT 15 PAPER FEED ROLLER ASSY 24 FIRST FEED ROLLER ASSY 25 A TONER SENSOR PCB UNIT 22 TONER LED PCB UNIT 23 DX SENSOR PCB ASSY 21 BASE PLATE 19 ENGINE PCB ASSY HIGH VOLTAGE PS PCB ASSY 20 A ...

Страница 111: ...is Chapter when re assembling printer parts 3 1 AC Cord 1 Disconnect the AC cord from the printer AC inlet Fig 4 1 3 2 Drum Unit 1 Press the cover release button and open the process unit cover ASSY and remove the drum unit from the printer Fig 4 2 AC cord AC inlet Printer Cover release button Drum unit Process unit cover ASSY ...

Страница 112: ...paper cassette from the printer and remove the paper from the cassette Fig 4 3 2 Remove the pad holder ZLh ASSY JPN by pulling it upwards then remove the separation pad spring 350 from the paper cassette Fig 4 4 Paper cassette Separation pad spring 350 Pad holder ZLh ASSY JPN Paper cassette MP cover ...

Страница 113: ... pan B M3x8 Taptite screw and remove the paper tray cover from the front of the cassette Fig 4 6 NOTE The cover film must not be reused after it has been removed Always replace it with a new one The screw securing the paper cassette cover indicated RED in the figure above is very special When disassembling re assembling the screw you need a special screw driver Refer to the parts reference list Pa...

Страница 114: ...from the pressure roller collar 7 Remove the sponge holder ASSY from the holder The two sponge holder springs will also come off Fig 4 7 8 Keeping the paper cassette upside down remove the two cup B M2 6x5 Taptite screws 9 Unhook the catches of each side guide then press the lock lever towards the front of the cassette to release the pressure plate Fig 4 8 Pressure roller collar Pressure roller ho...

Страница 115: ... pressure plate while pulling the plastic frame outwards then unhook the other two catches B of the plate while pulling the plastic frame outwards to remove the pressure plate ASSY 13 Unhook the pressure plate spring from the plastic hook to remove the two pressure plate springs Fig 4 10 Pressure plate ASSY Pressure plate spring Paper cassette hook Plastic frame Step 12 Step 13 catches A Step 12 c...

Страница 116: ...d paper feeding problems may occur 14 Remove the release lever extension spring 15 Unhook the two catches and rotate the lock lever to remove it downwards from the cassette Fig 4 11 NOTE When re assembling the lock lever insert it upwards from underneath the cassette and rotate it until the two catches lock into place 16 Slide the rear paper guide fully forwards in the cassette and remove it from ...

Страница 117: ...that the wide end of the racks are in line with the inside edge of the paper guide release slots in the cassette before refitting the spring and gear When replacing re assembling the paper cassette remove the old grease and apply a suitable amount of grease onto both sides of the paper cassette referring to the figure below Fig 4 14 Taptite cup B M3x8 Side guide gear Friction spring Side guide rac...

Страница 118: ...e pan B M3x8 Taptite screw to remove the tray lock lever from the paper cassette 21 Unhook the four catches to remove the paper tray rear from the paper cassette Fig 4 15 Taptite pan B M3x8 Tray lock lever Paper tray rear catch Paper cassette catches catch ...

Страница 119: ...bind S M3x8 Taptite screws to remove the PCB access plate Fig 4 16 3 Remove the two bind S M3x8 Taptite screws to remove the network board cover plate 4 Disconnect the connector connected with the main PCB and remove the network board Fig 4 17 PCB access plate Taptite bind S M3x8 Printer Access cover Main PCB Taptite bind S M3x8 Network board Printer ...

Страница 120: ...d L 3 Open the rear cover and disconnect the two harnesses for the panel PCB ASSY 4 Remove the top cover from the printer Fig 4 18 5 Remove the paper stopper and the paper stopper S from the top cover Fig 4 19 Shoulder screws Top cover Side cover R Side cover L Process unit cover ASSY Rear cover Top cover Paper stopper Paper stopper S Shoulder screws ...

Страница 121: ...to remove the panel cover ASSY from the top cover Fig 4 20 8 Disconnect the connector and the harness connected with the panel PCB ASSY 9 Remove the three cup B M3x10 Taptite screws to remove the panel PCB ASSY from the panel cover ASSY Fig 4 21 Taptite cup B M3x8 Top cover Back side Panel cover ASSY Taptite cup B M3x10 Taptite cup B M3x10 Panel PCB ASSY LCD holder Panel cover ASSY ...

Страница 122: ... ASSY and remove the back light PCB ASSY by releasing two hooks from ASSY 11 Remove the LCD from the panel PCB ASSY by releasing two hooks and then remove the diffusion film from the ASSY Fig 4 22 Fig 4 23 hooks LCD holder Panel cover ASSY Back light PCB hooks Diffusion film LCD LCD holder ...

Страница 123: ...D RE ASSEMBLY 4 16 12 Remove the panel light guide and then remove the key from the panel cover Fig 4 24 13 Remove the key top A and the key top B form the key Fig 4 25 key Panel cover Panel light guide Key top B Key top A Key ...

Страница 124: ...d wire from the paper guide upper ASSY and then remove the ground wire from the ground wire cover 3 Remove the bind B M3x7 5 Taptite shoulder screw the washer and the bind B M3x8 Taptite screw to remove the paper guide upper ASSY from the DX feed ASSY Fig 4 27 DX feed ASSY Bind M3x4 Taptite bind B M3x8 Ground wire cover Ground wire Shoulder Taptite bind B M3x7 5A Paper guide upper ASSY DX feed ASS...

Страница 125: ...M3x5 Taptite screw from the DX feed ASSY 6 Turn the DX feed ASSY the correct way up and remove the side regist roller holder and the pressure rollers using a pair of tweezers by releasing the boss from the left guide plate ASSY Remove the two pressure rollers from the side regist roller holder Fig 4 29 boss Roller holder Pressure roller Paper guide upper ASSY Pressure rollers Side regist roller ho...

Страница 126: ... the left guide springs are not fitted correctly See subsection 2 2 Service Calls in CHAPTER 6 for more information on ERROR 41 Fig 4 30 9 Remove the left guide plate from the DX feed ASSY while pushing down the DX paper actuator forward and then release the Drive gear 14 to remove the DX feed roller ASSY Taptite bind B M3x8 Guide plate stopper Left guide springs 2 hook DX feed ASSY Back side 2 1 ...

Страница 127: ...40S2M224 Fig 4 32 11 Remove the DX paper actuator and the guide actuator from the DX feed ASSY and then remove the paper actuator spring and the guide actuator spring from the each actuator Fig 4 33 DX feed ASSY Side regist roller T belt B40S2M224 T belt B40S2M142 Paper actuator spring DX feed ASSY Guide actuator spring hooks DX paper actuator Guide actuator ...

Страница 128: ... the DX rear chute to release the DX outer chute ASSY from the rear cover Fig 4 34 3 Remove the DX outer chute ASSY from the printer by releasing the hooks at the right and left sides of the printer Fig 4 35 hook Printer DX outer chute ASSY Rear cover R DX rear chute Rear cover Rear cover L hook Printer DX outer chute ASSY 2 1 2 1 ...

Страница 129: ...en remove the flap 2 from the DX outer chute Fig 4 36 5 Remove rear cover from the printer by releasing the hooks at the right and left sides of the printer and then remove the DX rear chute from the rear cover C Fig 4 37 Flap 2 Frap 2 spring hook DX outer chute DX rear chute Rear cover C 1 2 ...

Страница 130: ...he back side of the side cover R while releasing the hook and remove the side cover R from the printer while pulling outward taking care not to break the cover 4 Remove the shoulder screw to remove the side cover L from the printer by releasing the hook at the bottom of the cover CAUTION Use caution not to bend the hooks of the interface when handling the side cover R Rear cover R Printer Shoulder...

Страница 131: ...CHAPTER 4 DISASSEMBLY AND RE ASSEMBLY 4 24 Fig 4 39 ...

Страница 132: ... hooks and pulling slightly upward Fig 4 40 2 Remove the cup B M3x6 Taptite screw to remove the side guide gear from the MP pager guide 1 ASSY 3 Remove the MP side guide R and MP side guide L from the ASSY Fig 4 41 Printer MP paper guide 1 ASSY MP cover ASSY hook MP side guide R MP side guide L MP paper guide 1 ASSY 2 3 1 Side guide gear Taptite cup B M3x6 ...

Страница 133: ... 26 4 Remove the MP cover ASSY from the printer Fig 4 42 5 Remove the MP side guide 2 from the MP cover and then MP side guide 3 from the MP side guide 2 Fig 4 43 Printer hook MP cover ASSY MP side guide 3 MP side guide 2 MP cover hook hook ...

Страница 134: ...he two cup B M3x8 Taptite screws to remove the process unit cover from the process unit cover ASSY 3 Remove the lock lever spring from the process unit cover ASSY and then the P cover lock lever R and P cover lock lever L from the cover Fig 4 45 Taptite cup B M3x8 Process unit cover Lock lever spring 2 1 P cover lock lever L P cover lock lever R Process unit cover ASSY hook Printer 2 1 Process uni...

Страница 135: ... S M3x16 Taptite screws 3 Push the P harness cover to the right to release it from the hook and remove the P harness cover 4 Disconnect the LD harness and the polygon motor connector 5 Taking care not to touch the lens and mirror remove the laser unit Fig 4 47 Taptite cup S M3x16 LD harness Laser unit Polygon motor connector hook P harness cover Polygon motor connector Screw cup S tite 3x6 Fan rel...

Страница 136: ... clean paper Refer to subsection 3 3 Cleaning the Scanner Window in CHAPTER 5 Fig 4 48 3 12 Fixing Unit 1 Place the main frame on its base so that the rear side is facing you 2 Disconnect the two connectors of the heater harness and release the harness from the hooks on the right side of the fixing unit 3 Remove the shoulder screw and the cup S M3x8 Taptite screw securing the fixing unit 4 Remove ...

Страница 137: ...er guide from the fixing unit Fig 4 50 6 Remove the two cup B M3x20 Taptite screws from the top of the fixing unit frame 7 Release the thermistor harness from the hooks Fig 4 51 Fixing unit Screw bind B tite 3x10 FU front paper guide Pin Taptite cup B M3x20 Taptite cup B M3x20 Thermistor harness Fixing unit hooks ...

Страница 138: ... the pan washer M2 6x6 screw at the other side 10 Disconnect the halogen lamp connector from the FU frame upper 11 Lift the right hand end of the heat roller 25 HE and remove the halogen heater lamp from the heat roller 25 HE Fig 4 53 Halogen heater lamp Heat roller 25 HE Screw pan washer M2 6 6 Screw pan washer M2 6x6 Halogen heater lamp Colored side 115V Purple 230V Yellow Halogen lamp connector...

Страница 139: ...CHAPTER 4 DISASSEMBLY AND RE ASSEMBLY 4 32 NOTE When re assembling the halogen heater lamp ensure that the direction of the halogen heater lamp is correct referring to the figure above ...

Страница 140: ...gen heater lamp Fig 4 54 12 Lift and remove the heat roller 25 HE The HR gear 34 HE will also come off 13 Remove the HR bearing 25 from the left hand end of the heat roller 25 To remove the HR bearing 25 at the gear side first remove the two washers then remove the bearing Fig 4 55 CAUTION Heat roller 25 HE Heat roller bearing 25 Heat roller gear 34 HE HR bearing 25 HE Washer Washer Screw pan wash...

Страница 141: ...CHAPTER 4 DISASSEMBLY AND RE ASSEMBLY 4 34 Never touch the surface of the heat roller ...

Страница 142: ... onto the bosses on the frame as shown in the figure below Fig 4 56 When re assembling the heat roller 25 HE to the FU frame upper ensure you do not damage the heat roller 25 HE with the four pick off fingers on the FU frame upper Fig 4 57 Heat roller 25 HE FU frame upper Pick off fingers Pick off fingers Heat roller gear 34 HR bearing 25 Heat roller 25 HE projection boss ...

Страница 143: ...pring and the thermistor cleaner spring from the each cleaner pinch roller ASSY Fig 4 59 NOTE When re assembling the cleaner pinch roller ASSY complete with the cleaner spring onto the FU frame lower ensure the direction of the roller is correct referring to the figure above Ensure that the both springs are seated correctly in the locating channel and does not protrude from either end Ensure also ...

Страница 144: ...y PCB ASSY from the FU frame lower Fig 4 60 21 Release the paper eject actuator from the hook on the FU frame lower and then slide the paper eject actuator to the right direction to remove the paper eject actuator and the eject actuator spring from the FU frame lower Fig 4 61 Screw bind B tite 3x10 Eject sensor PCB ASSY FU frame lower Thermistor relay PCB ASSY Eject paper spring Paper eject actuat...

Страница 145: ...tuator is seated correctly in the locating channel referring to the figure below Fig 4 62 22 Release the thermistor harness from the hooks on the FU frame upper and then remove the one cup B M3x12 Taptite screw and remove the thermistor ASSY Fig 4 63 Thermistor ASSY FU frame upper hooks FU frame lower Eject actuator spring Paper eject actuator hook Taptite cup B M3x12 ...

Страница 146: ... end of the eject roller and then remove the left end of the roller from the hook first then remove the eject roller from the FU frame upper NOTE When removing the left end of the eject roller align the protrusion of the hook of the frame with the concave part of the roller and then pull the roller through underneath the protrusion Fig 4 65 FU frame upper Idle gear 13H Eject roller Thermistor Tapt...

Страница 147: ... Fig 4 66 25 Remove the four eject pinch roller F from the two eject pinch roller holder R and the four eject pinch roller F from the two eject pinch roller holder L Fig 4 67 Eject pinch springs Eject pinch springs Eject pinch roller F with eject pinch roller holder L Eject pinch roller F with eject pinch roller holder R FU frame upper Eject pinch roller F Eject pinch roller F Eject pinch roller h...

Страница 148: ...CHAPTER 4 DISASSEMBLY AND RE ASSEMBLY 4 41 ...

Страница 149: ...frame upper Turn the frame up side down Remove the cup B M3x6 Taptite screw to remove the pick off finger holder plate and then remove the pick off finger using a piece of tweezers Fig 4 68 Pick off finger holder plate Taptite cup B M3x6 Pick off finger FU frame upper Tweezers Pick off finger ...

Страница 150: ...roller ASSY with two roller collars to the left the bearing R side to release from the paper pick up roller shaft 4 Remove the paper pick up roller ASSY and the roller collars from the front chute ASSY 5 Remove the bearing L from the front chute ASSY Fig 4 69 Bearing L Bearing R Main frame Bearing L Bearing R Paper pick up roller ASSY Roller collar Paper pick up roller ASSY Roller collar 1 2 3 Fro...

Страница 151: ...ler ASSY with two roller collars to the left the bearing R side to release from the MP paper pick up roller shaft 4 Remove the paper pick up roller ASSY and the roller collars from the MP chute ASSY 5 Remove the bearing L from the MP chute ASSY Fig 4 70 Bearing R Bearing L MP roller cover Bearing R Bearing L Paper pick up roller Roller collar Paper pick up roller ASSY Roller collar 3 1 2 MP chute ...

Страница 152: ...ite 3x10 screws from the MP chute cover 9 Release the two bosses at the both ends of the MP pressure plate ASSY using a flat screwdriver and then remove it from the main frame Fig 4 71 Separation plate ASSY MP pressure spring 25 MP pressure spring 25 Screw bind B tite 3x10 Screw bind B tite 3x10 boss MP pressure plate ASSY boss MP chute cover ...

Страница 153: ...three cup S tite 3x6 screws securing the reversing drive frame unit 3 Disconnect the harness connector and remove the bind M3x4 screw to remove the reversing switch solenoid from the reversing drive frame unit Fig 4 72 Fig 4 73 Screw cup S tite 3x6 Printer body Drive unit Reversing switch solenoid Reversing drive frame unit Screw bind M3x4 Reversing drive frame unit ...

Страница 154: ...x6 screws to remove the gear pressure plate from the gear plate 6 Shift the pendulum gear 30 to the arrow direction and release the hook from the gear 21H to remove the gear 21H by pulling upward through the opening space of the gear plate Fig 4 75 hook Drive unit hook Gear Gear hook T belt Switch arm ASSY Gear pressure plate Gear plate Gear 21 H Pendulum gear 30 Screw cup S tite 3x6 Feed roller g...

Страница 155: ...tor ASSY and the toner LED PCB unit 10 Remove the drive sub ASSY A from the main frame Fig 4 76 CAUTION Be sure to hold the pendulum gear 30 when removing the drive sub ASSY A in order not to lose the friction spring fitted under the gear name Be careful not to lose the joint spring on the develop joint when removing the drive sub ASSY A Tapes Screw cup S tite M3x6 Main frame Drive sub ASSY A Main...

Страница 156: ...SY from the drive sub ASSY A Fig 4 77 8 Place the main frame so that the drive unit side is at the right as the figure shown below 9 Remove the two bind B M4x10 Taptite screws Fig 4 78 Main motor ASSY Drive sub ASSY A Main frame Solenoid unit Taptite bind B M4x10 Screw cup S tite 3x6 Screw cup S tite 3x6 Drive sub ASSY A Fuser drive gear ...

Страница 157: ... shown below 13 Remove the bind M3x4 screw to remove the feed solenoid ASSY from the main frame L CAUTION Be sure not to lose the solenoid return spring F R when removing the clutch lever F R 15 Remove the clutch lever F R from the main frame Solenoid ASSY 04C4 red hook hook Solenoid unit Solenoid ASSY 04C5 black Clutch lever F R Feed solenoid ASSY Screw bind M3x4 Screw bind M3x4 DX guide rail L M...

Страница 158: ...CHAPTER 4 DISASSEMBLY AND RE ASSEMBLY 4 51 Fig 4 80 ...

Страница 159: ...ain frame L Fig 4 81 3 16 Low voltage Power Supply PCB ASSY 1 Remove the eight cup S tite 3x6 screws and the pan M3 5x6 screw with washer and the lead wire FG and then disconnect the engine PCB connector 2 Remove the PS PCB ASSY from the main frame Gear 60 P R Middle roller gear Main frame Conductor bearing 5 Conductor bearing H Gear 72 MP Screw cup S tite 3x6 Screw cup S tite 3x6 PS PCB ASSY PS P...

Страница 160: ...CHAPTER 4 DISASSEMBLY AND RE ASSEMBLY 4 53 Fig 4 82 ...

Страница 161: ...in PCB ASSY from the frame Fig 4 83 3 18 Fan Motor Fan Motor 60 NOTE Be sure to disconnect the fan motor connector on the fan relay PCB before removing the fan motor and fan motor 60 1 Release the two hooks and remove the fan motor from the fan duct by pulling slightly forward 2 Remove the fan motor 60 from the main frame by pulling upward Fig 4 84 NOTE Main PCB ASSY Screw pan M3x6 Screw cup S tit...

Страница 162: ...CHAPTER 4 DISASSEMBLY AND RE ASSEMBLY 4 55 When re assembling the fan motor and the fan motor 60 fit the both motors with the labeled surface facing the printer ...

Страница 163: ...om the base plate 3 Slide the base plate to the rear of the printer to remove it Fig 4 85 3 20 Engine PCB ASSY High voltage Power Supply PCB ASSY 1 Remove the two bind B M4x10 Taptite screws to remove the PCB insulation sheet Fig 4 86 Taptite bind B M4x10 Screw cup S tite 3x6 Base plate Main frame Taptite bind B M4x10 PCB insulation sheet Main frame Screw cup S tite 3x6 ...

Страница 164: ... frame then connect the both PCB ASSY with each other by the central connector And then fit the high voltage PS PCB ASSY straight downward onto the frame Fix the both PCB ASSY with the two screws CAUTION Even if you want to remove only one of either the engine and high voltage power supply PCBs ensure you remove all screws securing both PCBs and disconnect the central connector while lifting both ...

Страница 165: ...nsor PCB ASSY 1 Remove the two cup S tite 3x6 screws to remove the DX guide rail L with DX sensor PCB ASSY from the main frame Fig 4 88 2 Remove the bind B M3x8 Taptite screw to remove the DX sensor PCB ASSY from the DX guide rail L Fig 4 89 Main frame DX guide rail L Screw cup S tite 3x6 DX sensor PCB ASSY Taptite bind B M3x8 DX guide rail L DX sensor PCB ASSY ...

Страница 166: ...d slide the fan duct to remove it 3 Remove the cup S tite 3x6 screw to remove the toner sensor PCB unit Fig 4 90 3 23 Toner LED PCB Unit Light Emission NOTE Be sure to disconnect the toner LED light emission connector on the engine PCB before removing the toner sensor PCB ASSY light emission Release the two hooks from the LED holder and remove the toner LED PCB unit light emission by pulling upwar...

Страница 167: ...CHAPTER 4 DISASSEMBLY AND RE ASSEMBLY 4 60 Fig 4 91 ...

Страница 168: ...ove the joint 5 from the paper feed roller ASSY Fig 4 92 3 25 First Feed Roller ASSY NOTE Be sure to disconnect the engine PCB connector on the cassette sensor PCB ASSY and remove the tape on the engine PCB connector before removing the cassette sensor PCB ASSY 1 Place the frame upside down 2 Remove the bind B tite 3x10 screw to remove the PE sensor cover and the cassette sensor PCB ASSY from the ...

Страница 169: ...CHAPTER 4 DISASSEMBLY AND RE ASSEMBLY 4 62 Fig 4 93 ...

Страница 170: ...s to remove the front chute ASSY Fig 4 94 5 Turn the front chute ASSY upside down and then remove the bearing 5 and the joint 5 to remove the first feed roller from the front chute ASSY Fig 4 95 Taptite bind B M4x10 Paper pick up roller shaft First feed roller shaft Front chute ASSY Taptite bind B M4x10 Bearing 5 Front chute ASSY hook First feed roller Joint 5 CA actuator PE actuator ...

Страница 171: ...he exit roller holder from the exit roller unit 3 Lift up and remove the pinch roller ASSY from the exit roller unit and then remove the pinch roller spring from the pinch roller ASSY 4 Remove the cup B M3x8 Taptite screw to remove the rear cover sensor PCB ASSY from the unit Shoulder screws Exit roller unit Exit roller ASSY ZLh Exit roller unit Rear cover sensor PCB ASSY Taptite cup B M3x8 Pinch ...

Страница 172: ...CHAPTER 4 DISASSEMBLY AND RE ASSEMBLY 4 65 Fig 4 97 ...

Страница 173: ...CHAPTER 4 DISASSEMBLY AND RE ASSEMBLY 4 66 5 Remove the fan motor 60B unit from the exit roller holder Fig 4 98 Fan motor 60B unit Exit roller holder ...

Страница 174: ...CHAPTER 4 DISASSEMBLY AND RE ASSEMBLY 4 67 3 27 Harness Winding Form ...

Страница 175: ...CHAPTER 4 DISASSEMBLY AND RE ASSEMBLY 4 68 4 PACKING Fig 4 99 AC Cords Accessory Bag Accessory Carton Drum Unit with Toner Cartridge included Pad Printer Pad Carton ...

Страница 176: ...ng figures 1 CONSUMABLE PARTS The consumable parts described in this section are parts which are subject to deterioration or damage and should be replaced at least once during the period of warranty of the product if any print quality problem appears 1 1 Drum Unit The CHANGE DRUM SOON message appears on the LCD display when the drum unit is nearly at the end of its life Life expectancy 20 000 page...

Страница 177: ... a drum unit immediately before you need to install it into the printer If an unpacked drum unit is subjected to excessive direct sunlight or room light the unit may be damaged Handle the drum unit and toner cartridge carefully If toner scatters on your hands or clothes wipe or wash it off with cold water immediately Discard the used drum unit according to local regulations Be sure to seal up the ...

Страница 178: ...drum unit assembly on a piece of disposable paper or cloth in case you accidentally spill or scatter toner 3 Press the lock lever down and then pull the toner cartridge out of the drum unit assembly 4 Unpack the new toner cartridge Keeping the cartridge horizontal gently rock it from side to side five or six times Fig 5 5 Fig 5 5 5 Remove the protective cover Fig 5 6 Fig 5 6 6 Install the new tone...

Страница 179: ...acked drum unit is subjected to excessive direct sunlight or room light the unit may be damaged Use a Brother genuine toner cartridge which is specially formulated to ensure top print quality Printing with a 3rd party toner or toner cartridge may reduce not only the printing quality but also the quality and life of the printer itself It may also cause serious damage to the performance and life of ...

Страница 180: ...er referring to the service life For the procedures to replace these parts refer to CHAPTER 4 DISASSEMBLY AND RE ASSEMBLY Parts Name Part No Qty Service life number of prints Replacement Procedure Fixing Unit 115V LJ7005001 1 80 000 pages Fixing Unit 230V LJ7006001 1 80 000 pages See subsection 3 12 in CHAPTER 4 Paper Feeding Kit Pad holder ZLh ASSY Paper pick up roller ASSY LJ5615001 1 50 000 pag...

Страница 181: ...Turn off the power switch and unplug the power cord 2 Wipe dirt and dust away from the printer exterior with a damp cloth and allow the printer to dry completely before turning the power on again 3 Plug in the power cord CAUTION Use water or neutral detergents for cleaning Cleaning with volatile liquids such as thinner or benzene will damage the surface of the printer Do not use cleaning materials...

Страница 182: ...pes 5 Re install the drum unit into the printer 6 Close the front cover 3 3 Cleaning the Scanner Window When replacing the drum unit or toner cartridge with a new one be sure to clean the scanner window 1 Turn off the power switch and unplug the power cord 2 Press the cover release button and then open the front cover 3 Pull the drum unit assembly out of the printer CAUTION It is recommended to pl...

Страница 183: ...CHAPTER 5 PERIODIC MAINTENANCE 5 8 ...

Страница 184: ...ty immediately wipe or wash it off with cold water Do not touch the scanner window with your fingers Do not wipe the scanner window with isopropyl alcohol 3 4 Cleaning the Electrical Terminals To obtain the best print performance be sure to clean the electrical terminals inside the printer body 1 Turn off the power switch and unplug the power cord 2 Remove the drum unit from the printer 3 Wipe the...

Страница 185: ...me between failure MTBF and the meantime to repair MTTR for this printer are as follows MTBF Up to 4 000 hours MTTR Average 30 minutes except the periodical maintenance parts the Paper Feeding Kit and the printer control boards whose MTTR is average 5 minutes ...

Страница 186: ...HL 1850 1870N SERVICE MANUAL 5 11 ...

Страница 187: ... printer is not placed where the ventilation hole of the printer is blocked 2 Print paper Check if A recommended type of print paper is being used If the paper is too thick or too thin or tends to curl paper jams or paper feed problems may occur or printed images may be blurred The print paper is damp If so use fresh paper and check whether the print quality improves or not The print paper is shor...

Страница 188: ...nsation has occurred print several pages or leave the printer for 2 hours to allow it to reach room temperature If the drum unit is unpacked soon after it is moved from a cold room to a warm room condensation may occur inside the unit which may cause incorrect images Instruct the user to allow the unit to come to room temperature before unpacking it This will take one or two hours 1 2 Warnings for...

Страница 189: ...hnicians should perform Error message appears on LCD display The printer does not start printing 3 1 Paper Loading Problems 3 2 Paper Jams 4 Software Setting Problems Paper jam occurs Printed image has a problem 6 Image Defects 3 3 Paper Feeding Problems Printout is not correct 7 Incorrect Printout The printer does not print Printed page has a problem 2 1 Operator Calls 2 2 Service Calls 5 Malfunc...

Страница 190: ... 4 Check that the paper is specified type of paper COVER OPEN Close the front cover If the cover is half opened the error may not be cleared even after closing it In that case open the cover once and close it again FUSER OPEN Close the jam clear cover Refer to the illustration of the jam cleaner cover in subsection 3 2 1 Clearing jammed paper in this Chapter FACE UP OPEN Close the face up output t...

Страница 191: ... DX LEVER ERROR Set paper adjustment lever for duplex printing NO TRAY1 Install paper cassette standard into the Tray 1 CLEAN DRUM UNIT Clean the corona wire Refer to subsection 3 2 Cleaning the drum unit in CHAPTER 5 Maintenance Message Remedy CHANGE DRUM SOON The drum unit is almost at the end of life Prepare a new drum unit Refer to subsection 1 1 Drum Unit in CHAPTER 5 TONER LOW Indicates that...

Страница 192: ... turn it on again If the error is not cleared and the same service call appears identify the error from the table on the next page and take the corrective action described for each indication to correct it Error occurs Confirm the LCD indication Turn OFF ON the power switch Error occurs again See section 5 MALFUNCTIONS Temporary error Use the printer with out corrective action NO YES ERROR SERVICE...

Страница 193: ... turn it on again If still remains replace the main PCB ERROR S07 Turn off the printer Wait a few seconds then turn it on again If still remains replace the main PCB ERROR S08 Illegal instruction Turn off the printer Wait a few seconds then turn it on again If still remains replace the main PCB ERROR S09 No fpu Turn off the printer Wait a few seconds then turn it on again If still remains replace ...

Страница 194: ...CHAPTER 6 TROUBLESHOOTING 6 8 error in this chapter ...

Страница 195: ...Wait a few seconds and then turn it on again ERROR H63 D RAM error Turn off the printer Wait a few seconds and then turn it on again Refer to M 10 ROM error D RAM error NV RAM error in this chapter ERROR H66 NV RAM writing error Turn off the printer Wait a few seconds and then turn it on again Refer to M 10 ROM error D RAM error NV RAM error in this chapter ERROR H67 NV RAM reading error Turn off ...

Страница 196: ...e printer does not load envelopes The printer can load envelopes from the multi purpose tray The application software must be set up correctly to print on the envelope size you are using This is usually done in the page setup or document setup menu of the software Refer to the software application manual The printer does not print into the face down output tray Close the face up output tray The pr...

Страница 197: ...he jammed paper Refer to subsection 3 2 1 Clearing jammed paper in this Chapter After you have followed the instructions the printer will automatically resume printing JAM TRAY 1 JAM INSIDE JAM TRAY 2 JAM REAR JAM MP TRAY JAM DUPLEX PAPER JAM If the PAPER JAM error message appears there are several possible places that the paper could have jammed Refer to PAPER JAM section in this Chapter for more...

Страница 198: ...ely out of the printer Fig 6 2 2 Pull the jammed paper out of the printer 3 Install the paper cassette into the printer Fig 6 3 CAUTION Do not pull out the standard paper cassette while paper is being fed from the optional lower paper cassette because it will cause a paper jam JAM TRAY 2 1 Pull the lower paper cassette completely out of the printer Fig 6 4 ...

Страница 199: ...rinter Fig 6 5 JAM MP TRAY 1 Remove the jammed paper from the multi purpose tray Fig 6 6 2 Reset all the paper into the multi purpose tray correctly Fig 6 7 JAM INSIDE 1 Press the cover release button and then open the front cover 2 Pull the drum unit assembly out of the printer Pull the paper cassette completely out of the printer Fig 6 8 ...

Страница 200: ...y CAUTION After having removed the jammed paper if the printed page has a stain print several pages before restarting your print job Remove the jammed paper carefully so you don t spread toner Take care not to stain your hands and clothes with toner Immediately wash toner stains with cold water Never touch the transfer roller JAM REAR 1 Press the cover release button and then open the front cover ...

Страница 201: ...e print caused by static electricity do not touch the electrodes shown below 3 Pull the jammed paper out of the printer Fig 6 12 If the paper jam can be cleared go to 7 4 Open the face up out put tray rear cover Fig 6 13 CAUTION After the printer has just been used some internal parts of the printer are extremely hot Wait for the printer to cool down before you touch the internal parts of the prin...

Страница 202: ...CHAPTER 6 TROUBLESHOOTING 6 16 ...

Страница 203: ...d paper out of the fuser unit Fig 6 14 6 Close the jam clear cover Close the face up output tray rear cover Fig 6 15 7 Install the drum unit assembly into the printer 8 Close the front cover Fig 6 16 JAM DUPLEX 1 Open the face up output tray rear cover Fig 6 17 Jam clear cover ...

Страница 204: ...e the face up output tray rear cover If the paper jam can not be cleared go to the next step Fig 6 19 4 Pull the duplex tray and paper cassette out of the printer Fig 6 20 5 Pull the jammed paper out of the printer Fig 6 21 6 Install the duplex tray and paper cassette into the printer Fig 6 22 ...

Страница 205: ...HL 1850 1870N SERVICE MANUAL 6 19 ...

Страница 206: ...are A4 Letter and Legal If the paper adjustment lever for duplex printing is not set correctly for the paper size paper jams may occur and printing will be out of position on the page PAPER JAM 1 Pull the paper cassette completely out of the printer Fig 6 23 2 Pull the jammed paper out of the printer If the paper jam can be cleared go to 10 Fig 6 24 3 Press the cover release button and then open t...

Страница 207: ...am can be cleared go to 8 5 Open the face up output tray rear cover Fig 6 27 6 Open the jam clear cover Pull the jammed paper out of the fuser unit 7 Close the jam clear cover Close the face up output tray rear cover Fig 6 28 8 Install the drum unit assembly into the printer Fig 6 29 9 Close the front cover 10 Install the paper cassette into the printer ...

Страница 208: ... caused by paper length detected as shorter than 80mm The front registration sensor was turned off early Malfunction of actuator or hardware noise Check the front registration sensor referring to subsection 9 2 Sensor Check Mode in this Chapter Top of paper stopped between the paper feed roller and the pick up roller Jam caused by a paper feed delay Paper was not fed in at the proper timing due to...

Страница 209: ...ifications 3 Try printing using the straight through output path 4 Turn over the stack of paper in the cassette or try rotating the paper 180 in the cassette Possible cause Step Check Result Remedy Paper 1 Is the problem solved if new paper is used Yes Instruct the user how to store paper so that it does not absorb moisture Fixing unit entrance guide 2 Is the entrance guide dirty Yes Clean the ent...

Страница 210: ...CHAPTER 6 TROUBLESHOOTING 6 24 ...

Страница 211: ...g in the paper cassette Turn over the stack of paper in the paper cassette Also try rotating the paper 180 in the paper cassette 3 Try printing using the straight through output path NOTE For no paper supplied as the cause of a malfunction see M 4 No paper supplied in 5 MALFUNCTIONS in this Chapter F 5 Prints only single side of the paper when duplex printing User Check Check the size of the paper...

Страница 212: ...ot connected to the same port which is also connected to a mass storage device or scanner Remove all other devices and connect the port to the printer only Turn off the printer status monitor in the device options tab in the printer driver 5 If the print port is set as an ECP port change it to a normal port 6 Try printing the test page referring to 9 INSPECTION MODE in this Chapter 7 Try resetting...

Страница 213: ...rinter cable No Replace the main PCB Yes This problem may appear under the specified system environment Check the environment which the user used S 3 Unable to print from application software with an Apple Macintosh Computer User Check 1 Check that the supplied Macintosh printer driver is installed in the System Folder and it is selected with Chooser 2 Check the PORT selection within the Chooser I...

Страница 214: ...0x4f9 No Check the printer is turned on and the USB interface cable is connected correctly Check that the USB cable used is the shielded twisted pair type and 5 m or less Try to connect the printer and PC with the USB cable directly Driver installation 2 Are there the following files in the Extensions Folder of System Folder No Try to re install the printer driver For System 8 6 or higher BR_Backg...

Страница 215: ...ower plug Yes Replace the AC power cord M 2 No DC power supplied Possible cause Step Check Result Remedy AC power supply 1 Is AC power supplied between connectors CN1 L and CN1 N when the power plug is plugged into the outlet No Follow the same check procedure of M 1 No AC power supplied Wiring DC load 2 Turn off the power switch and disconnect the P3 and P5 connectors on the engine PCB Turn on th...

Страница 216: ... Is the contact of the solenoid connector on the engine PCB good No Reconnect the connector Engine PCB circuit 2 Set paper in the manual paper slot and make a test print by pressing the control panel button Yes Replace the engine PCB Paper pick up clutch solenoid Does the voltage between pins 2 SOLENOID and 1 24V of the P13 connector on the engine PCB change from approx 24V DC to 0V within the spe...

Страница 217: ...re Possible cause Step Check Result Remedy Poor thermistor harness contact 1 Is the contact of connector P6 on the engine PCB good No Reconnect the connector Blown thermal fuse 2 Remove the fixing unit and measure the resistance of the thermal fuse Is it open circuit Yes Replace the fixing unit Thermistor failure 3 Is the thermistor installed properly Yes Replace the fixing unit No Reinstall the t...

Страница 218: ...2 Remove the fixing unit and measure the resistance between the input connectors Is it open circuit Yes Replace the fixing unit Thermistor failure 3 Is the thermistor installed properly Yes Replace the fixing unit No Reinstall the thermistor properly Halogen heater lamp failure 4 Remove the fixing unit and measure the resistance of the halogen heater lamp Is it open circuit Yes Replace the halogen...

Страница 219: ... problem appear when printing specific data or printing under a specific environment Yes Inform the Brother office of the used specific data printer condition and system environment M 12 E41 error Possible cause Step Check Result Remedy Process unit ground wire connection 1 Is the ground wire on the process unit secured correctly No Secure the ground wire correctly with the shoulder screw If the g...

Страница 220: ...Is the connection between connector P21 on the main PCB and connector P1 on the network board secure No Reconnect the connectors securely Network board 2 Is the problem solved by replacing the network board Yes Replace the network board Main PCB 3 Is the problem solved by replacing the main PCB Yes Replace the main PCB ...

Страница 221: ... i n t o u t t e s t p r i n t o u t t e s t p r i n t o u t t e s t P r i n t o u t t e s t p r i n t o P r i n t o u t t e s t p r i n t o u t t e s t p r i n t o u t t e s t P r i n t o u t t e s t p r i n t o P r i n t o u t t e s t p r i n t o P r i n t o u t t e s t p r i n t o u t t e s t p r i n t o u t t e s t P r i n t o u t t e s t p r i n t o P r i n t o u t t e s t p r i n t o u t t e...

Страница 222: ... cartridge is replaced with a full one Yes The wiper of the toner cartridge is defective Replace the toner cartridge Drum connection failure 3 Are all the contacts between the drum unit and printer body connected correctly No Clean contact electrodes both on the drum unit and in the printer body 1 4 5 6 High voltage power supply PCB failure 4 Is the harness connection between the high voltage powe...

Страница 223: ...ew one High voltage power supply PCB failure 4 Is the connections of the connector between the high voltage power supply PCB and the engine PCB secured correctly Yes Replace the high voltage power supply PCB Main PCB failure 5 Are there any disconnected connectors No Replace the main PCB Engine PCB failure 6 Are there any disconnected connectors No Replace the engine PCB User Check 1 Check the pap...

Страница 224: ...e problem solved after replacing the drum unit Yes Replace the drum unit Toner cartridge failure 4 Is the problem solved after replacing the toner cartridge Yes Replace the toner cartridge with a new one Scanner harness connection failure 5 Is the scanner harness connected securely Check if there is any play in the connection No Reconnect the connector correctly Main PCB failure 6 Are printing sig...

Страница 225: ... Clean both electrodes 3 Harness connection 4 Is the laser unit connected to the main PCB correctly No Connect the harness between the laser unit and the main PCB correctly High voltage power supply PCB failure 5 Is the problem solved after replacing the high voltage power supply PCB Yes Replace the high voltage power supply PCB Main PCB failure 6 Is the problem solved after replacing the main PCB...

Страница 226: ...ure roller Clean the pressure roller as follows 1 Set three or more sheets of paper in the paper cassette 2 Turn off the power switch of the printer 3 While holding down the Go switch press switch switch and then Set switch The LCD display shows TEST MENU 4 Press the Set switch and SINGLE TEST PRINT will appear on the LCD display 5 Press the switch and REPEAT TEST PRINT will appear on the LCD disp...

Страница 227: ... the drum surface dirty with toner in streaks Yes Replace the drum unit Scratch on the heat roller 5 Is the surface of the heat roller scratched Yes Replace the fixing unit NOTE If you print the same pattern continuously the drum will be worn and black vertical streaks will appear on the paper This problem may occur with noise due to the corona wire being dirty In that case clean the corona wire w...

Страница 228: ...Are the charge electrodes between the printer body and the drum unit dirty Yes Clean both electrodes 3 High voltage power supply PCB failure 5 Is the problem solved after replacing the high voltage power supply PCB Yes Replace the high voltage power supply PCB I 8 Black vertical streaks in a gray background Possible cause Step Check Result Remedy Ground contacts Translucent stain on the scanner wi...

Страница 229: ... electrodes at both sides 4 User Check 1 Try to wipe the scanner window with a soft cloth 2 The toner cartridge may be damaged Install a new toner cartridge 3 Check the printer s environment High temperature and high humidity conditions can cause this problem 4 Damp wet paper might be used Try to change to freshly unpacked paper User Check 1 Check the paper used meets the recommended paper specifi...

Страница 230: ...istration sensor normal No Reposition the sensor to the correct position I 12 Poor fixing Possible cause Step Check Result Remedy Print paper 1 Is thick paper of more than 43lb being used Yes Recommend to use the specified types of paper Toner sensing failure When printing is faint 2 Is the problem solved by replacing the drum unit or the toner cartridge Yes 1 Toner is empty 2 The toner sensing is...

Страница 231: ...o u t t e s t p r i n t o P r i n t o u t t e s t p r i n t o P r i n t o u t t e s t p r i n t o u t t e s t p r i n t o u t t e s t P r i n t o u t t e s t p r i n t o P r i n t o u t t e s t p r i n t o P r i n t o u t t e s t p r i n t o u t t e s t p r i n t o u t t e s t P r i n t o u t t e s t p r i n t o P r i n t o u t t e s t p r i n t o P r i n t o u t t e s t p r i n t o u t t e s t p ...

Страница 232: ...idge almost empty Yes Replace the toner cartridge with a new one Print paper 4 Is the problem solved after changing to specified freshly unpacked paper Yes Damp wet paper might be used Recommend to change freshly unpacked paper Environment 5 Does the problem still appear after the printer has warmed up Yes 1 Replace the drum unit 2 Advise the user of the specified print environment User Check 1 If...

Страница 233: ...ng at the surface of the photosensitive drum Fig 6 32 3 Wipe the surface of the photosensitive drum with a cotton swab until the dust or paper powder on the surface comes off Fig 6 33 CAUTION Do not wipe the surface of the photosensitive drum with something sharp ball point pen etc Use cleaning liquid which is a 50 50 mixture of ethyl alcohol and pure water Position of smudge on the drum 94mm inte...

Страница 234: ... No Clean contact electrode both on the drum unit and in the printer body 8 Fixing unit 3 Are the spots at 79mm intervals The problem is not solved after printing a few pages Yes 1 Check and clean the heat roller with a cloth dampened with alcohol 2 Replace the fixing unit High voltage power supply PCB failure 4 Is the problem solved after replacing the high voltage power supply PCB Yes Replace th...

Страница 235: ...Result Remedy Ground contacts Corona failure 1 Is the wire cleaner at its home position No Return the wire cleaner to its home position 2 Corona failure 2 Is the corona wire dirty Yes 1 Clean the corona wire 2 If the problem still appears after cleaning replace the drum unit 2 ...

Страница 236: ...toner cartridge Drum unit failure 4 Is the problem solved after replacing the drum unit Yes Replace the drum unit No Replace the high voltage power supply PCB NOTE The following cases increase the possibility of this problem Acid paper is being used The drum unit is at the end of its life There is dust or paper powder I 19 Hollow print Possible cause Step Check Result Remedy Print paper 1 Is thick...

Страница 237: ...HL 1850 1870N SERVICE MANUAL 6 51 No Refer and compare with I 15 ...

Страница 238: ...he high voltage power supply PCB Yes Replace the high voltage power supply PCB I 21 Horizontal lines Possible cause Step Check Result Remedy Ground contacts Paper feed roller 1 Are the feed roller shaft and the ground contact connected correctly No Check the connection between the shaft and the ground contact Also check the ground contact on the back of the feed roller Paper cassette contacts 2 Ar...

Страница 239: ...ing 1 Is thin paper such as 64g m2 used under the thick paper mode Yes 1 Change the current mode to the normal mode from the driver setting 2 Print 5 or 6 blank pages if this problem occurs Drum unit failure 2 Is the problem solved after replacing the drum unit Yes Replace the drum unit High voltage power supply PCB failure 3 Is the problem solved after replacing the high voltage power supply PCB ...

Страница 240: ...heck the paper used meets the recommended paper specifications A rough surfaced paper may cause the problem 2 The toner cartridge may be damaged Install a new toner cartridge 3 The drum unit may be damaged or may be nearly at the end of life Install a new drum unit ...

Страница 241: ... unit Fig 6 34 6 3 2 Printer body Paper cassette Fig 6 35 Drum Unit Paper Cassette 2 Wire cleaner 3 Charge 1 Photosensitive drum 7 Ground 5 Grid 5 Grid 3 Charge 1 Photosensitive drum 6 Transfer roller 6 Transfer roller 4 Development roller 4 Development roller 8 Cleaner 8 Cleaner ...

Страница 242: ... same port which is also connected to a mass storage device or scanner Remove all other devices and connect the port to the printer only Turn off the printer status monitor in the device options tab in the printer driver 6 If the print port is set as an ECP port change it to a normal port 7 Try printing the test page referring to 9 INSPECTION MODE in this Chapter 8 Try resetting the factory settin...

Страница 243: ...e to print such data under the printer specifications P 3 Unable to print full pages of a document with the MEMORY FULL message User Check 1 Press the Go switch on the control panel to print the data remaining in the printer 2 Reduce the complexity of your document or reduce the printer resolution 3 Expand the printer memory by adding a commercially available DIMM NOTE This problem may appear if t...

Страница 244: ... P 5 The printer sometimes prints a couple of characters and then ejects the page User Check For DOS environment only The application printer emulation setting and the printer s emulation do not match Check in the application software which printer you have selected to make sure the printer is set up correctly Remember that the printer emulates widely used printer selections HP LaserJet Brother BR...

Страница 245: ...r from the host operating system prompt with the command ping ipaddress where ipaddress is the print server IP address note that in some instances it can take up to two minutes for the print server to load its IP address after setting the IP address If a successful response is received then proceed to the UNIX TCP IP Windows NT LAN Server Windows98 95 Me Peer to Peer LPR Internet Printing or Web B...

Страница 246: ... different port 5 If you have a bridge or router located between the print server and host computer make sure that the device is set up to allow the print server to send and receive data from the host For example a bridge can be set up to only allow certain types of Ethernet addresses to pass through a process known as filtering therefore such a bridge must be configured to allow Brother print ser...

Страница 247: ...uivalent command Verify that the etc ethers file contains the correct Ethernet address and that the print server name matches the name in the etc hosts file 5 If you used bootp make sure that you started the bootp daemon on any UNIX workstation and bootp is enabled i e the is removed from the bootp entry in the etc bootptab file is correctly configured 6 Also verify that host computer and the prin...

Страница 248: ...e printer rp name of TEXT in your etc printcap file 10 If you are using Sun Solaris V2 4 or earlier there is a bug which causes long print jobs to fail when using a print server If you are having trouble printing long jobs over 1MB add the line mx 0 to your etc printcap file entry 8 5 Windows NT LAN Server TCP IP Troubleshooting If you are having trouble printing with Windows NT or LAN Server chec...

Страница 249: ... not displayed This happens on some Windows 95 98 Me NT 4 0 2000 computers Press the ALT and TAB keys to make it appear 2 Make sure that the print server is configured to be in the same workgroup or domain as the test of your computers It may take several minutes for the print server to appear in the network neighborhood 8 9 Internet Print TCP IP Troubleshooting 1 The first step in troubleshooting...

Страница 250: ... the print server name you used in PCONSOLE exactly matches the name that is configured in the print server and make sure it is defined as a Queue Server for the print queue 5 If you are running both 802 3 and Ethernet II frames on different file servers on your network there is a possibility that the print server may not make a connection to the desired file server Try forcing the frame type to t...

Страница 251: ... option For example for NC 4100h series network cards enter BRN_xxxxxx_P1_AT where xxxxxx is the last six digits of the MAC address of the NC 3000 series card For NC 2000 series network cards enter BRO_xxxxxx_P1_AT where xxxxxx is the last six digits of the MAC address of the NC 4100h network card 3 This method of printing requires that the printer supports PostScript If your printer does not supp...

Страница 252: ...ion 1st Square Prints a test sample page Prints a test print page when the NV RAM setting is OFF When NV_DEMO value is 0 2nd Square Prints the Print Configuration page and a font list 3rd Square Returns to the factory default settings 4th Square NVRAM hex dump mode Not used when the NV RAM setting is OFF when NV_DISPMAINT value is 0 5th Square Writes the main program 6th Square Not used 7th Square...

Страница 253: ...cked On entering this mode the LCD display shows the status of the respective sensors as shown in the figure below Left Right CTPEDSMRFGL2FRE Fig 6 37 There are 15 sensors to be checked The letters above represent the respective sensors and are displayed in the specific place on the LCD display when the sensor is ON and the black square box appears when the sensor is OFF Refer to the table in the ...

Страница 254: ...tected 7th Black square MP sensor OFF No paper is detected R ON DX cover is open 8th Black square DX cover sensor OFF DX cover is closed F ON The fixing unit cover is open 9th Black square The fixing unit cover sensor OFF The fixing unit cover is closed G ON Paper is detected 10th Black square Lower tray unit registration sensor OFF No paper is detected L ON Paper is detected 11th Black square Low...

Страница 255: ...HL 1850 1870N SERVICE MANUAL 6 69 ...

Страница 256: ...he Go switch and the Set switch Professional Menu mode See section 2 PROFESSIONAL MENU MODE in this Chapter 2 Power on and while holding down the Go switch press the switch once and then the Set switch Service Menu mode See section 3 SERVICE MENU MODE in this Chapter 3 Power on and press the specified switch es and others See section 4 OTHER HIDDEN FUNCTION MENUS in this Chapter ...

Страница 257: ...nu items using the switches To go back to a higher level select the exit menu in the same level using the switches Inputting a Value or Setting for a Professional Menu Mode Enter the required mode as explained above The setting appearing on the display is the current setting Select the required setting using the switches then press the Set switch The previous value remains if the Set switch is not...

Страница 258: ...CL font setting FONT LJ4 Disables the fonts below when selecting PCL font setting Atlanta Bermuda Script PC Brussels Copenhagen Germany Portugal Calgary San Diego US Roman FONT SELECT PRIMARY FONT Selects primary fonts in LaserJet emulation SECONDARY FONT Selects secondary fonts in LaserJet emulation IBM CHR SET MODE IBM E1H Esszet Places Esszet on E1h of IBM character set IBM E1H Beta Places Beta...

Страница 259: ... FUNCTIONS 7 4 ISR FONT SELECT ISRFONT DISABLE ISRFONT ENABLE Enables and disables to select Hebrew font BRO FONT SELECT BROBITM DISABLE BROBITM ENABLE Enables and disable the built in 10 12 pitch Brougham bitmap font ...

Страница 260: ...ITALIC SEL Uses the italic font to have italic as scalable font is selected exit FONT PAPER TRAY SIZE DEF PAPER LT Printers to be shipped to USA and Canada have the Letter size setting by default DEF PAPER A4 Printers to be shipped to the other area than USA and Canada have the A4 size setting by default PARALLEL MENU PARALLEL TIMING CDCC PSW H BUSY signal gets high when STROBE signal goes up This...

Страница 261: ...CHAPTER 7 HIDDEN FUNCTIONS 7 6 DRAM CHECK START START DRAM TEST Tests DRAM data ...

Страница 262: ...y data even with special codes BS QUOTEBIN ON Accepts the binary data with special codes PS IMAGE MASK PS IMAGEMSK OFF BS IMAGEMSK ON ON Makes print speed faster with an OS 2 driver PS CELL MODE PS CEIL FLOOR PS CEIL CEIL Modulates calculation diffusion of PostScript PS STATUS ECHO STATUS ECHO ON STATUS ECHO OFF ON Effects PS calculation BOISE ID MODE BOISE ID IEEE BOISE ID WIN95 Selects BOISE ID ...

Страница 263: ...GHT GREEN BACKLIGHT RED BACKLIGHT ORANGE exit Tests color of the backlight VIEWANGLE TEST VIEWANGLE 0 VIEWANGLE 1 VIEWANGLE 2 exit Tests view angle of the LCD display NV RAM DEBUG NV RAM DISPLAY NV RAM HEX PRINT exit Displays and prints out NVRAM data Users MUST NOT use this function JOB CANCEL TIME TIME OUT XXsec Selects time 1 to 255 seconds job cancel job becomes time out PSJAPANESE FONT JAPFON...

Страница 264: ...1PAGE SEL 1JOB1PAGE SX 1JOB1PAGE DX Select print by simplex or duplex when certain JOB which has only 1 page was sent Default is simplex PS FONT CACHE CLEAR CACHE OFF CLEAR CACHE ON Determine PS font cache to delete or not when the job is complete It deletes when command is ON exit MENU Exit the Professional Menu mode ...

Страница 265: ...er of the drum unit replacement PF KIT 1 CHANGE Displays the number of the PF kit 1 replacement PF KIT 2 CHANGE Displays the number of the PF kit 2 replacement FUSER CHANGE Displays the number of the fuser unit replacement LASER CHANGE Displays the number of the laser unit replacement COVERAGE Displays the average coverage when printing Letter size paper at 100 print coverage COVERAGE counter can ...

Страница 266: ...n order of newest to the oldest NOTE COVER OPEN and NVRAM ERROR are not displayed in the history If an error occurs consecutively it will be displayed only once DRUM LIFE Modify the drum unit life period Initial rate 16 000 pages LIFE PERIOD DRUM UNIT Modify the drum unit life expectancy reset rate Initial rate 20 000 pages PF KIT 1 Modify the PF kit 1 life period PF KIT 2 Modify the PF kit 2 life...

Страница 267: ...um unit remaining life counters PF KIT 1 PF KIT 2 Modify the PF kit remaining life counters FUSER UNIT Modify the fixing unit remaining life counters LASER UNIT Modify the laser unit remaining life counters CLEAR COVERAGE Initialize average coverage counter RESET COUNT CLEAR ERROR HIST Clear error histories ...

Страница 268: ...ressing Set switch Set Clear NVRAM This function is not normally used Go DRAM CHECK MODE Check DRAM Go Set GO TEST MODE Enters the inspection mode See section 9 Inspection Mode in CHAPTER 6 LINE TEST MODE Printer test mode For factory use Set with cover open ZLH HV CHECK For factory use 4 2 Drum Life Reset Function This function is used by the user when changing the new drum unit to clear the drum...

Страница 269: ...CHAPTER 7 HIDDEN FUNCTIONS 7 14 REPLACEMENT PARTS in CHAPTER 5 for more information about the periodical replacement parts ...

Страница 270: ...HL 1850 1870N SERVICE MANUAL 7 15 ...

Страница 271: ......

Страница 272: ...Appendix 1 Connection Diagram HL 1850 1870N A 1 ...

Страница 273: ...Appendix 2 Main PCB Circuit Diagram HL 1850 1870N 1 6 CODE LJ8453001 B512078CIR 1 6 A 2 NAME ...

Страница 274: ...Appendix 3 Main PCB Circuit Diagram HL 1850 1870N 2 6 CODE LJ8453001 B512078CIR 2 6 A 3 NAME ...

Страница 275: ...Appendix 4 Main PCB Circuit Diagram HL 1850 1870N 3 6 CODE LJ8453001 B512078CIR 3 6 A 4 NAME ...

Страница 276: ...Appendix 5 Main PCB Circuit Diagram HL 1850 1870N 4 6 CODE LJ8453001 B512078CIR 4 6 A 5 NAME ...

Страница 277: ...Appendix 6 Main PCB Circuit Diagram HL 1850 1870N 5 6 CODE LJ8453001 B512078CIR 5 6 A 6 NAME ...

Страница 278: ...Appendix 7 Main PCB Circuit Diagram HL 1850 1870N 6 6 CODE LJ8453001 B512078CIR 6 6 A 7 NAME ...

Страница 279: ...8 NAME B512079CIR 1 2 Straight Red 3 Pin PH Right Angle Red 6 Pin PH Right Angle White 5 Pin PH Straight White 2 Pin PH Red 5 Pin PH Right Angle Black 6 Pin PH Right Angle Right Angle White 3 Pin PH Right Angle White 4 Pin PH Right Angle Red 4 Pin PH Right Angle White 6 Pin ...

Страница 280: ...Appendix 9 Engine PCB Circuit Diagram HL 1850 1870N 2 2 CODE LJ8439001 A 9 NAME B512079CIR 2 2 Right Angle Red 9 Pin PH Straight White 9 Pin PH Straight Black 5 Pin PH ...

Страница 281: ...Appendix 10 Network Board PCB Circuit Diagram HL 1850 1870N CODE LJ8439001 A 10 NAME B512058CIR ...

Страница 282: ...Appendix 11 Low voltage Power Supply PCB Circuit Diagram 100V A 11 NAME Low voltage PS Circuit 100V ...

Страница 283: ...Appendix 12 Low voltage Power Supply PCB Circuit Diagram 200V A 12 NAME Low voltage PS Circuit 200V ...

Страница 284: ...Appendix 13 High voltage Power Supply PCB Circuit Diagram A 13 NAME High voltage PS Circuit ...

Страница 285: ... for year 2 2002 3 2003 ID for factory 9 Kariya Plant A Mie Brother C BIUK J Buji Nan Ling Factory 1 Printer Printed on the label attached on the rear of the main body Example U 5 2 6 8 2 A 2 1 1 1 1 0 1 2 Process unit Imprinted on the aluminum bag Drum unit with toner cartridge 2 A 1 1 J A 3 Drum unit Printed on the bar code label attached inside the drum unit A 2 9 1 0 0 1 0 4 YEAR MONTH DATE FA...

Страница 286: ...ed on the toner cartridge M 9 9 6 0 0 1 9 9 5 Laser unit On the laser unit 1 7 0 0 1 YEAR MONTH DATE FACTORY ID NO YEAR MONTH SERIAL NO PRODUCTION LOT NO LASER UNIT NO 7 LJ5986001 Laser Unit HE FACTORY ID NO FACTORY ID NO CARTRIDGE PRODUCTION INFO 1 Kariya Plant 2 Buji Nan Ling Factory TONER VOLUME PR2001069 ...

Страница 287: ...sted below No Parts Name Diameter Circumference 1 First Paper Feed Roller φ 13 8 mm 43 3 mm 2 Paper Feed Roller φ 14 0 mm 44 0 mm 3 Transfer Roller φ 15 20 mm 47 7 mm 4 Photosensitive Drum φ 29 97 mm 94 1 mm 5 Heat Roller φ 25 0 mm 78 5 mm 6 Pressure Roller φ 25 0 mm 78 5 mm 7 Development Roller φ 20 0 mm 39 0 mm ...

Страница 288: ... ppm Smaller size than A4 or Letter Media type setting Allmodels Transparency Up to 18 19 ppm Thin Paper Up to 18 19 ppm Plain paper 8 ppm after 5 min have passed Thick Paper 8 ppm after 30 sec have passed Thicker Bond Paper 4 ppm NOTE When a smaller size paper than A4 or Letter is printed the temperature on both edges of the fixing unit is much higher than the temperature on the center of the uni...

Страница 289: ...onfiguration page 1 Printing out the Print Configuration Page 1 Press the Set switch three times 2 Print the Print Configuration page The page counter is printed at the right upper in Print Configuration Refer to the figure below Sample for Europe Fig A 1 NOTE The descriptions printed in Print Configuration vary depending on the countries Page counter is printed here ...

Страница 290: ...nter after a new drum unit is replaced the drum unit life may be different from the drum counter For details on the difference between the drum unit life and drum counter refer to the drum unit life calculation below How to calculate drum unit life Printing time for 1 page job in discontinuous printing 12 seconds Page counter reduced by the number of drum rotations Time of motor rotation 12 sec Ex...

Страница 291: ...nits of 1 The hexadecimal value stored in NV RAM is printed Example 000000E0D0D0D0D0D 0 00 00 0E 0D 0D 0D 0D 0D 60 000 x 0 600 x 0 14 13 13 13 13 13 79 Value in units of 1 000 Page counter indicated by units of 1 000 pages Æ 0 99 pages 0 600 699 pages 6 100 199 pages 1 700 799 pages 7 200 299 pages 2 800 899 pages 8 300 399 pages 3 900 999 pages 9 400 499 pages 4 1 000 1 999 pages A 500 599 pages ...

Страница 292: ...inter Information in APPENDIX 18 To obtain the maintenance information you need to obtain and load the Maintenance Information utility which supplied on Service Databank by following the steps below 1 Download the Maintenance Information utility from the Printer Utility DB in Service Databank 2 Open the utility then select Decode the 4 byte data in the menu Fig A 3 3 Enter the 8 digit number as sh...

Страница 293: ... drum unit change toner cartridge change and paper jam Fig A 7 Note that each maintenance information is counted under the conditions below Information Conditions Drum unit change When drum unit life is 100 pages or more and the drum counter is reset Maximum counter 63 Toner cartridge change When the toner cartridge is replaced after a Toner Empty error is stored in NVRAM then warming up completes...

Страница 294: ...s you how to clear the problem such as The printer can t print or The printer prints garbage or incorrect fonts 1 When you start the program the Help dialog box shown below appears Fig A 8 2 Select the problem you have had then the specified window appears 3 Follow the instructions that appear on the PC screen If the problem cannot be solved start the Diagnostics tool to create a log file which sh...

Страница 295: ...heck if you can clear the problem using the Troubleshooting for printer won t print tool described in the previous section 1 When you start the program the dialog box shown below appears Follow the steps described in the box then click the OK button Fig A 9 2 The message below appears click the OK button if you want to check whether there is any incorrect data or not If you do not want to check it...

Страница 296: ...result that the printer reported and click the A B or C button depending on the result 5 The created log file is shown on the PC screen The software will ask whether you wish to print the log file or not Send the log file created with this tool to investigate the problem to the authorized service center ...

Страница 297: ... all models only when the printer is connected to a parallel port 1 When you start the program the dialog box shown below appears Fig A 12 2 Select the LPT port you are using and click the OK button 3 The dialog box below appears and indicates the printer information printer ID version drum unit life page counter and drum counter Fig A 13 NOTE For how to read the Maintenance Data shown in the dial...

Страница 298: ...00V to 300V when 5 000 pages are printed It is switched to 400V again when the toner cartridge is replaced following the TONER EMPTY error message Counted from the number of the drum rotation in non continuous printing Fixing temperature Transparency 170 C Thin paper 185 C Plain paper 208 C 195 C when printing using duplex function Thick paper 220 C Thicker Bond paper 220 C in non continuous print...

Страница 299: ...f the optional LT 500 Lower Tray Unit is installed onto the HL 1850 1870N printer it is necessary to exchange the cassette supplied with the LT 500 Unit with the upper cassette already fitted into the printer Install the cassette originally fitted in the printer into the LT 500 Unit Failure to do so will cause paper jams as the paper cannot be fed from the lower cassette to the printer body becaus...

Страница 300: ...ee solder NIHON GENMA DHB RMA3 NP303 This can be distinguish from the lead free identification sign LFH on the MAIN PCB ASSY REV However the solder side of the MAIN PCB ASSY and other PCBs are soldered using lead content solder use conventional lead content solder in the case of repair Since the reliability of soldering cannot be guaranteed if lead free solder and lead content solder are mixed tak...

Страница 301: ...on comes out then click OK A required file is developed in the folder ZLhe 2 Choose Start Program MS DOS Since the DOS window is opened move the BLF folder under the ZLhe folder by CD command How to input the command CD C ZLhe PIT BLF ENTER 3 Connect the CDCC cable to the printer then turn the printer power switch ON Wait until the printer LCD display turn green and READY message appears 4 Input f...

Страница 302: ...s in ERR CODE section READY message appears in the PIT2 status window In case of Abnormal end The error generated step appears in the PIT2 control window error code appears in ERR CODE section ERROR message appears in the PIT2 status window To release the error Input check then press ENTER 12 Turn the printer power switch OFF then disconnect the CDCC cable 13 In case of performing the rewriting wo...

Страница 303: ...APPENDIX A 32 ...

Отзывы: