background image

Brooks Automation

5. Operation

Part Number: 319430 Rev. A

Starting the IntelliXcap

Step

Action

5.

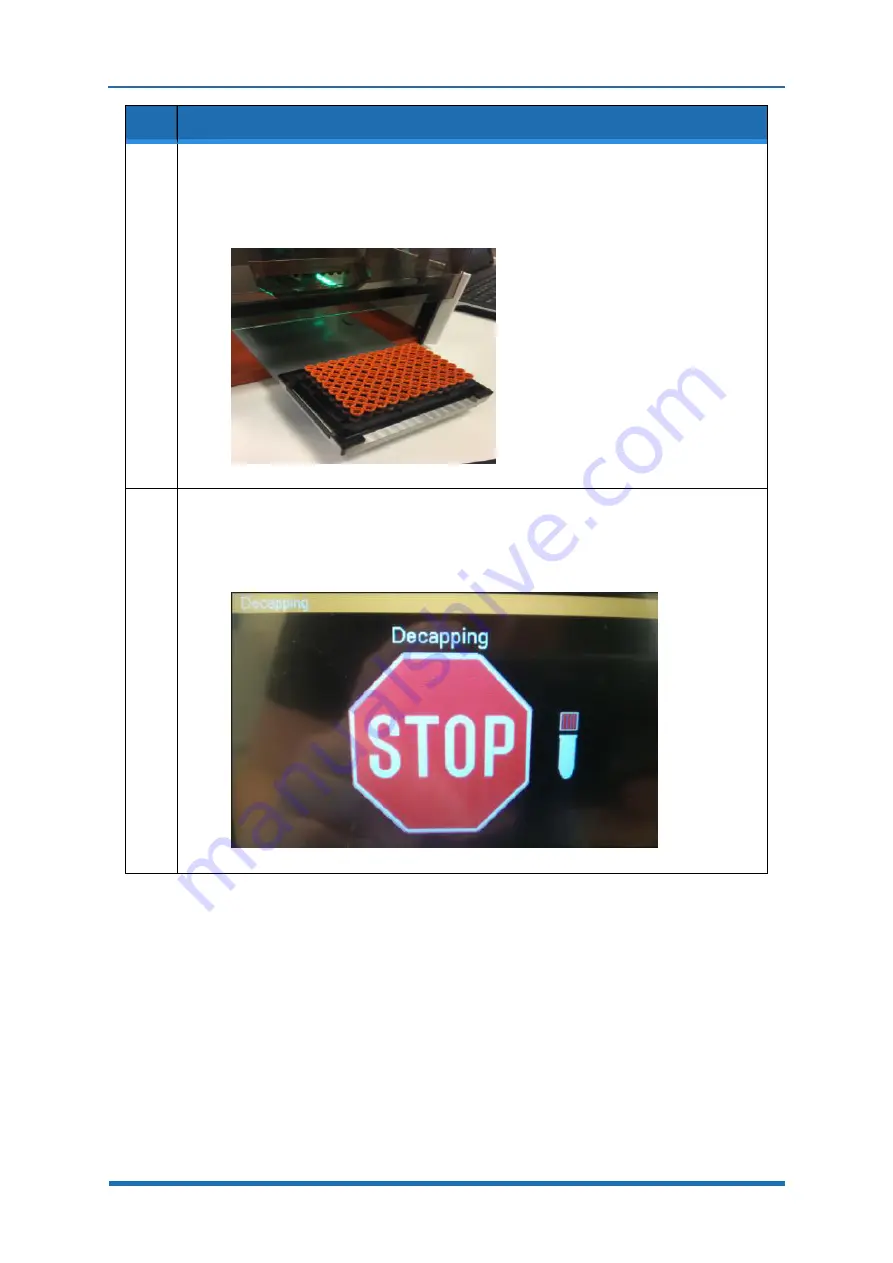
Place the correct rack for the cap-driver cartridge being used into the stage and press the start
button on the display.

Choose the

Start

button. The instrument confirms the height of the tubes and then starts de-

capping.

6.

When in use, the IntelliXcap displays the current process with a large

STOP

button display

indicating the unit is in use.

In case of need, you have the option to stop the current process by clicking the button on
screen or by pressing the E-Stop button located at the top of the unit.

Copyright © 2019, Brooks Automation, Inc.

24

Содержание IntelliXcap

Страница 1: ...IntelliXcap User Manual Part Number 319430 Rev A...

Страница 2: ...VAC 407 VacuTran VersaPort and WaferEngine are trademarks of Brooks Automation Inc AcuTran AquaTrap Asyst the Cool Solutions logo Crossing Automation Cryodyne Cryo Torr Fusion GOLDLink Guardian GUTS...

Страница 3: ...0 http www brooks com Europe 49 1804 CALL GUTS 49 1804 2255 4887 http www brooks com Japan 81 45 477 5980 http jp brooks com China 86 21 5131 7066 http cn brooks com Taiwan 886 3 5525225 http tw brook...

Страница 4: ...Technology Shanghai Limited 2nd Floor No 72 887 Zuchongzhi Road Zhangjiang Hi Tech Park Pudong Shanghai China 201203 Tel 86 21 5131 7070 Fax 86 21 5131 7068 Brooks Japan K K HEADQUARTERS Nisso Bldg N...

Страница 5: ...v A Revision History Part Number 319430 IntelliXcap User Manual Revision ECO Number Date Explanation of Changes Author Revision A EC108867 12 19 2018 Initial completion of the manual template A Kleen...

Страница 6: ...iXcap 48 11 46 8010 IntelliXcap 24 11 3 Specifications and Site Requirements 12 Specifications 12 Unit Software and Firmware 12 Site Requirements 12 Space Requirements 12 Environmental Requirements 14...

Страница 7: ...ev A Waste Disposal 32 7 Troubleshooting 33 Error Messages 33 Technical Support 39 Error Recovery 40 Manual Recovery 40 Appendix A Integrating the IntelliXcap 41 Appendix B Available Cartridges 42 Cop...

Страница 8: ...icable regulatory safety codes as well as the facility safety procedures safety equipment and contact information This product is intended for use by industrial customers and should be serviced only b...

Страница 9: ...level of hazard Danger indicates a hazardous situation which if not avoided will result in death or serious injury Danger signal word is white on a red background with an iconic exclamation point insi...

Страница 10: ...xample The following is an example of a Warning hazard alert Figure 1 1 Components of a Safety Alert Number Description 1 How to Avoid the Hazard 2 Source of Hazard and Severity 3 General Alert Icon 4...

Страница 11: ...Declaration of Conformity DoC The IntelliXcap meets the requirements of the European Union s Machinery Directive 2006 42 EC and 2014 30 EU as a completed machine In accordance with the Directive Broo...

Страница 12: ...ntrained or improperly equipped personnel performing this procedure may cause damage to the equipment l Only Brooks Automation trained personnel should perform this procedure l Personnel performing th...

Страница 13: ...nal injury l Do not operate the product without the protective covers in place Electrical Shock Hazard Contact with electrical power can cause death or serious personal injury l To avoid electrical sh...

Страница 14: ...tor can press the emergency stop function to cease all mechanical movement of the IntelliXcap if a hazardous situation arises that could cause personal injury or damage to the machine or equipment Whe...

Страница 15: ...automated door will close the status message will appear on the operator monitor Initializing please wait The safety door must be activated and tested before commissioning the machine for use NOTE At...

Страница 16: ...tube Using this Manual Read the Safety Chapter Failure to review the Safety chapter and follow the safety warnings can result in death or serious injury l All personnel involved with the operation or...

Страница 17: ...epts and terminology defined in the section are used throughout this document Users should read this section first before continuing with the manual Terminology Word Definition Caps Screw caps Cycle T...

Страница 18: ...2 Overview IntelliXcap Product Illustration Part Number 319430 Rev A 46 8011 IntelliXcap 48 46 8010 IntelliXcap 24 11 Copyright 2019 Brooks Automation Inc...

Страница 19: ...00 14 Table 3 1 Software and Firmware Site Requirements Space Requirements Ensure enough space is available to accommodate the ejected stage platform The machine has a square footprint and is regarde...

Страница 20: ...ntelliXcap 48 Specification IntelliXcap 96 1 System Height 386 2 mm 386 2 mm 320 mm 2 System Width 256 mm 256 mm 256 mm 3 System Depth 464 4 mm 464 4 mm 468 mm 4 Stage Height 31 7 mm 31 7 mm 31 7 mm 5...

Страница 21: ...level of the monochrome LCD to decrease from its original level of brightness Storage Humidity 10 to 70 RH Wet bulb temperature 39 C 102 F max no condensation Relative Humidity 10 to 90 RH Wet bulb te...

Страница 22: ...lt in damage to the equipment Parameter Specification Supply Voltage 100 120 VAC 1 N PE 220 240 VAC 1 N PE Use IEC 320 plugs only Ground must be connected at all times Maximum Power Consumption 500W I...

Страница 23: ...l Know the facility safety procedures safety equipment and contact information l Read and understand each procedure before performing it The system is supplied fully assembled from the manufacturer an...

Страница 24: ...the contents Report any missing or damaged items to Brooks Automation 2 Review this procedure and confirm that you have the proper items required to do the job 3 Review Site Requirements on page 12 fo...

Страница 25: ...board box the Manual and Factory Acceptance Test FAT are placed on the top of the inner box 3 Remove the foam supports The Power USB and serial cables are located in the Outer cardboard box 4 Remove t...

Страница 26: ...319430 Rev A Step Action 5 Open the inner box 6 With two people carefully lift the IntelliXcap system out of the inner Cardboard box and place on a flat surface able to hold 28KG 7 Remove the anti st...

Страница 27: ...ing both the door seen above and the stage seen to the left 9 Keep the original packing material in a dry low humidity location in case the IntelliXcap needs to be transported for service or repair Fo...

Страница 28: ...ss to all areas where intervention could be necessary during operation The settings must not be changed Only trained individuals should monitor the IntelliXcap while in use Read the Safety Chapter Fai...

Страница 29: ...ies from 20 40 seconds LED Indicators LED Color Definition Green Operation ready Main menu is displayed Green Flashing Operation in progress Orange Standby status Press button to leave standby Message...

Страница 30: ...le to the instrument from the back and to the electrical power socket 100 240VAC 2 Ensure that the door is free from obstructions and that there is nothing in front of the instrument Turn the IntelliX...

Страница 31: ...se the Start button The instrument confirms the height of the tubes and then starts de capping 6 When in use the IntelliXcap displays the current process with a large STOP button display indicating th...

Страница 32: ...s start 8 The instrument scans and detects the correct height of the tubes and begins the recapping process 9 Once the cartridge has reached the correct height the IntelliXcap proceeds automatically a...

Страница 33: ...preventative maintenance procedures and schedules provided here assume that the IntelliXcap is operating in a clean dry inert environment Any deviation from this basic environment will affect the sche...

Страница 34: ...Technical Support See Technical Support on page 1 Schedules and Procedures The service life of the IntelliXcap is 20 years of a daily 8 hour operation This is based on the presumption that all servic...

Страница 35: ...trained cleaning staff should tidy up and clean the IntelliXcap and its surroundings daily During this work the same requirements for the use of tools and personal protective equipment apply as for t...

Страница 36: ...and cap carriage 4 If necessary use isopropyl alcohol to disinfect and further clean surfaces Inspect Cartridge The cartridges used on the IntelliXcap have a limited life generally expected to be in t...

Страница 37: ...e must be replaced use the following procedure Step Action 1 Go to the Set Up Menu and select Cartridge Change 2 Press Continue The stage moves inside the unit and the cap driver cartridge is lowered...

Страница 38: ...t inserts on the sides of the stage s frame The stage with the cartridge moves inside the unit and the cap driver cartridge is collected and attached to the de capping head The head will carry out a r...

Страница 39: ...for you to schedule routine service The number of cycles remaining until the next warning displays is not shown The system will also count the cycles for each cartridge type If the user operates the I...

Страница 40: ...ssages Error Code Cause Corrective Action E100 Main Z operation timeout in homing operation Call service E101 Stage nest timeout in homing sequence in homing command Call service E102 Main Z operation...

Страница 41: ...ly screwed onto tubes Ensure tubes are seated properly in rack Ensure rack is properly seated in stage Verify selected tube rack combination with cartridge setup profile document Call service E115 Ope...

Страница 42: ...not been blocked or damaged Call service E124 Opening safety door operation timeout in cartridge load operation Check the door has not been blocked or damaged Call service E125 Main Z sequence timeou...

Страница 43: ...e the unit Run a decap recap cycle Call service E142 Object detected in cartridge eject sequence Remove any objects on the stage Call service E143 Object not detected in cartridge load sequence Ensure...

Страница 44: ...rvice E154 Timeout Close Tray sequence in close tray operation Call service E155 Timeout opening stage sequence in Open Tray operation Call service E156 Main Z operation timeout in init with caps oper...

Страница 45: ...nce in decap operation Call service E165 Timeout opening safety door during manual retry decap operation Check the door has not been bent out of shape and remove any object that is blocking operation...

Страница 46: ...288 2500 http kr brooks com Singapore 65 6464 1481 http www brooks com Please include the following information to the representative at time of issue Information Location Instructions Product Part N...

Страница 47: ...process Select the Initialization Restart button and start the IntelliXcap Table 7 1 Typical Errors Manual Recovery In any error situation you have the option to cancel the process You will be prompt...

Страница 48: ...ating Commands for the IntelliXcap vary depending on the version of Firmware being used to obtain the relevant command set or for additional support please contact Brooks technical support at BLSS Ser...

Страница 49: ...04 96 format cap driver cartridge with 96 individual cap drivers for FluidX Acoustic Tube Thread 48 8013 05 96 format cap driver cartridge with 96 individual cap drivers for Thermo Nunc Cryobank Matr...

Страница 50: ...48 format cap driver cartridge with 48 individual cap drivers for FluidX Non Jacket 2 0ml Greiner 2 0ml External Table 7 3 IntelliXcap 48 Part Number IntelliCartridges for IntelliXcap 24 Description...

Отзывы: