3-8
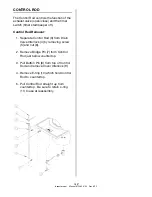
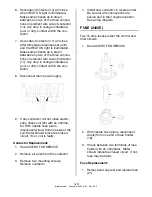
4. Remove capillary guard (18) from
inside cooking well.
5. Remove small nut (19) then large capil-
lary nut (20) from outside cooking well.
6. Pull control bulb (21) out of cooking
well then remove control from control
panel.
7. Insert control bulb as shown in picture
at right. Pull excess capillary (22) out
of cooking well. Bend in capillary must
be large and smooth as possible.
8. Install large capillary nut securely after
applying teflon tape on threads.
9. Install small capillary nut finger tight
then tighten 1/4 turn with a wrench.
DO NOT over tighten. Capillary may
collapse or be cut in two.
10. Reconnect wires then mount new con-
trol.
11. Replace capillary guard.
12. Return cooking oil to cooking well.
13. Cook a load and check for leaks.
14. Tighten smaller nut (19) if necessary.
broaster.com Manual #15460 8/02 Rev 7/14
Содержание 2004E
Страница 2: ......
Страница 8: ......
Страница 12: ......
Страница 21: ...2 9 MODEL 2400GH DOMESTIC MODEL 2400GHXP EXPORT broaster com Manual 15460 8 02 Rev 7 14 ...
Страница 22: ...2 10 MODEL 2400GHCE EU broaster com Manual 15460 8 02 Rev 7 14 1 2 2 1 2 1 ...
Страница 44: ......
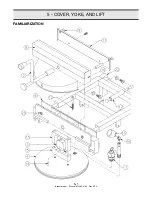
Страница 45: ...5 COVER YOKE AND LIFT 5 1 FAMILIARIZATION broaster com Manual 15460 8 02 Rev 9 14 ...
Страница 54: ......
Страница 81: ...9 9 This page intentionally left blank broaster com Manual 15460 8 02 Rev 3 16 ...
Страница 87: ...broaster com Manual 15460 8 02 SERVICE NOTES ...
Страница 88: ...broaster com Manual 15460 8 02 SERVICE NOTES ...
Страница 89: ...broaster com Manual 15460 8 02 SERVICE NOTES ...
Страница 90: ......
Страница 91: ......
Страница 92: ...Broaster Company 2855 Cranston Road Beloit WI 53511 3991 608 365 0193 broaster com ...


