


9
EN
• For even haircut make sure that the attachment
comb fits closely to the head.
• Slowly run the hair clipper through the hair, moving it
in different directions, make overlapping movements
to make sure that all areas of the hair on the head
are trimmed.
• Comb the hair along the direction of the growth to
make it easier to cut them with the clipper.
• For even haircut of wavy, thin or long hair, use the
comb to direct the hair to the blade block (1, 2).
• From time to time clean the attachment comb from
cut hair with the brush (13).
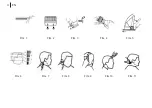
STEP ONE (FIG. 7, 8)
• Install the attachment comb (9 or 10). Switch the hair
clipper on by moving the switch (5) to the position
«I». Hold the hair clipper with the blades pointed
upwards. Start cutting from the hair growth edge.
Slowly move the hair clipper upwards. Cut the back
of the head area at the bottom and near the ears.
STEP TWO (FIG. 9)
•
Switch the hair clipper off, then set the attachment
comb (11), switch the hair clipper on and continue
cutting hair near top of the head.
STEP THREE (FIG. 8)
•
Switch the hair clipper off, set the attachment comb
(8 or 9) for shorter hair and cut hair on the temples.
Switch the hair clipper off, then set the attachment
comb (10 or 11), switch the hair clipper on and
continue cutting hair towards the top of the head.
STEP FOUR (FIG. 10)
• Cut the hair from the top of the head towards the
crown against the hair growth direction.
• Use the attachments (8 or 9) for short haircut
(3-6 mm). To leave slightly longer hair use the
attachments (10 or 11) (9-12 mm).
• To leave longer hair, take hair locks between your
fingers and cut it using the hair clipper. Lift the hair
locks with the comb and cut them along the comb.
• Comb the hair to reveal uneven locks.
STEP FIVE (FIG.11)
•
In the final stage of hair styling remove the installed
attachment comb (8, 9, 10, 11) from the clipper,
turn the blades of the clipper towards the hair and
trim hair on the temples and neck carefully. Before
creating the contour, comb the hair above ears.
Slightly bend back the person’s ear so it will not get
in the way of cutting hair. Do not press the clipper
strongly, there is danger of injuries or cuts when open
blades come in contact with skin.
• Note:
without using the attachment combs (8, 9,
10 or 11) for a short haircut you can change the
remaining hair length up to 3 mm, to change the
remaining hair length use the regulator (3) for the
length of the hair to be left (fig. 5).
Содержание BR3433
Страница 1: ...Instruction manual BR3433 Hair clipper BR3433 brayer ru...
Страница 2: ...EN 3 DE 12 RU 22 KZ 34...
Страница 4: ...4 EN FIG 1 FIG 2 FIG 3 FIG 4 FIG 5 FIG 6 FIG 7 FIG 8 FIG 9 FIG 10 FIG 11...
Страница 13: ...13 DE Abb 1 Abb 2 Abb 3 Abb 4 Abb 5 Abb 6 Abb 7 Abb 8 Abb 9 Abb 10 Abb 11...
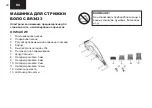
Страница 22: ...22 RU BR3433 1 2 3 4 5 0 I 6 7 8 3 9 6 10 9 11 12 12 13 RU...
Страница 23: ...23 RU P 1 P 2 P 3 P 4 P 5 P 6 P 7 P 8 P 9 P 10 P 11...
Страница 24: ...24 RU 80...
Страница 25: ...25 RU...
Страница 26: ...26 RU 3 60 1 2 1 2 1 2 1 1 2 2 1 1 1 2 1 2...
Страница 27: ...27 RU 8 9 10 11 8 9 10 11 2 3 3 8 3 3 1 2 3 3 1 12 12 1 2 3 5 I 30 1 2 5 0 8 9 10 11 1 2 4 8 9 10 11...
Страница 28: ...28 RU 1 2 8 9 10 11 8 3 9 6 10 9 11 12 6 11 12 1 2 13 7 8 9 10 5 I...
Страница 29: ...29 RU 9 11 8 8 9 10 11 10 8 9 3 6 10 11 9 12 11 8 9 10 11 8 9 10 11 3 3 5 5 0 4 1 2 13 1 2 3...
Страница 30: ...30 RU 0 8 9 10 11 4 13 13 1 2 1 2 4 4 8 9 10 11 1 2 12 1 2 8 9 10 11 6 12 1 1 2 4 3 1 4 1 5 1 220 240 50 60 15...
Страница 31: ...31 RU 3...
Страница 32: ...32 KZ BR3433 1 2 3 4 5 0 I 6 7 8 3 9 6 10 9 11 12 12 13 KZ...
Страница 33: ...33 KZ 1 2 3 4 5 6 7 8 9 10 11...
Страница 34: ...34 KZ 80...
Страница 35: ...35 KZ...
Страница 36: ...36 KZ 3 60 1 2 1 2 1 2 1 2 1 2 1 1 1 2 1 2 12...
Страница 37: ...37 KZ 8 9 10 11 2 3 3 8 3 3 1 2 3 3 1 1 2 12 3 5 I 30 1 2 5 0 8 9 10 11 1 2 4 8 9 10 11 8 9 10 11...
Страница 38: ...38 KZ 8 9 10 11 8 3 9 6 10 9 11 12 6 11 12 1 2 13 7 8 9 10 5 I...
Страница 39: ...39 KZ 9 11 8 8 9 10 11 10 8 9 3 6 10 11 9 12 11 8 9 10 11 8 9 10 11 3 3 5 5 0 4 1 2 13...
Страница 40: ...40 KZ 0 8 9 10 11 4 13 1 2 13 4 4 4 9 8 9 10 11 1 2 12 1 2 8 9 10 11 6 12 1 1 2 4 3 1 4 1 5 1 220 240 50 60 15...
Страница 41: ...41 KZ 3...
Страница 42: ......
Страница 44: ...brayer ru...