6
EN
• Do not leave the operating unit unattended.
• Clean the unit regularly.
•
Always unplug the clipper after you finish using it.
• For children safety reasons do not leave polyethylene
bags, used as a packaging, unattended and within
reach of children.
ATTENTION!
Do not allow children to play with polyethylene bags
or packaging film.
Danger of suffocation!
• The hair clipper is not intended for usage by children.
• Do not leave children unattended to prevent using
the unit as a toy.
• Do not allow children to touch the blades or the body
of the clipper while the clipper is running.
• Be especially careful if children or disabled persons
are near the operating unit.
• During the unit operation and breaks between
operation cycles, place the unit out of reach of
children.
• The unit is not intended to be used by people with
physical, sensory or mental disabilities (including
children) or by persons lacking experience or
knowledge if they are not under supervision of a
person who is responsible for their safety or if they
are not instructed by this person on the usage of the
unit.
• From time to time check the power cord integrity.
• If the power cord is damaged, it should be replaced
by the manufacturer, a maintenance service or
similar qualified personnel to avoid danger.
• Do not repair the unit by yourself. Do not dismantle
the unit by yourself. If any malfunction is detected,
and after the unit was dropped, unplug it and apply to
the service center.
• To avoid damages, transport the unit in the original
package.
• Keep the unit in a dry cool place out of reach of
children and disabled persons.
THE UNIT IS INTENDED FOR HOUSEHOLD USE
ONLY, DO NOT USE THE UNIT FOR COMMERCIAL
OR LABORATORY PURPOSES.
BEFORE THE FIRST USE
After the unit’s transportation or storage at negative
temperature, unpack it and wait for 3 hours before
using it.
• Unpack the unit and remove all the packaging
materials.
• Keep the original package.
• Read the safety measures and operating
recommendations.
• Check the delivery set.
• Examine the unit for damages, in case of damage do
not plug it into the mains.
•
Make sure that specified specifications of power
supply voltage of the power adapter correspond to
Содержание BR3433
Страница 1: ...Instruction manual BR3433 Hair clipper BR3433 brayer ru...
Страница 2: ...EN 3 DE 12 RU 22 KZ 34...
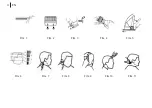
Страница 4: ...4 EN FIG 1 FIG 2 FIG 3 FIG 4 FIG 5 FIG 6 FIG 7 FIG 8 FIG 9 FIG 10 FIG 11...
Страница 13: ...13 DE Abb 1 Abb 2 Abb 3 Abb 4 Abb 5 Abb 6 Abb 7 Abb 8 Abb 9 Abb 10 Abb 11...
Страница 22: ...22 RU BR3433 1 2 3 4 5 0 I 6 7 8 3 9 6 10 9 11 12 12 13 RU...
Страница 23: ...23 RU P 1 P 2 P 3 P 4 P 5 P 6 P 7 P 8 P 9 P 10 P 11...
Страница 24: ...24 RU 80...
Страница 25: ...25 RU...
Страница 26: ...26 RU 3 60 1 2 1 2 1 2 1 1 2 2 1 1 1 2 1 2...
Страница 27: ...27 RU 8 9 10 11 8 9 10 11 2 3 3 8 3 3 1 2 3 3 1 12 12 1 2 3 5 I 30 1 2 5 0 8 9 10 11 1 2 4 8 9 10 11...
Страница 28: ...28 RU 1 2 8 9 10 11 8 3 9 6 10 9 11 12 6 11 12 1 2 13 7 8 9 10 5 I...
Страница 29: ...29 RU 9 11 8 8 9 10 11 10 8 9 3 6 10 11 9 12 11 8 9 10 11 8 9 10 11 3 3 5 5 0 4 1 2 13 1 2 3...
Страница 30: ...30 RU 0 8 9 10 11 4 13 13 1 2 1 2 4 4 8 9 10 11 1 2 12 1 2 8 9 10 11 6 12 1 1 2 4 3 1 4 1 5 1 220 240 50 60 15...
Страница 31: ...31 RU 3...
Страница 32: ...32 KZ BR3433 1 2 3 4 5 0 I 6 7 8 3 9 6 10 9 11 12 12 13 KZ...
Страница 33: ...33 KZ 1 2 3 4 5 6 7 8 9 10 11...
Страница 34: ...34 KZ 80...
Страница 35: ...35 KZ...
Страница 36: ...36 KZ 3 60 1 2 1 2 1 2 1 2 1 2 1 1 1 2 1 2 12...
Страница 37: ...37 KZ 8 9 10 11 2 3 3 8 3 3 1 2 3 3 1 1 2 12 3 5 I 30 1 2 5 0 8 9 10 11 1 2 4 8 9 10 11 8 9 10 11...
Страница 38: ...38 KZ 8 9 10 11 8 3 9 6 10 9 11 12 6 11 12 1 2 13 7 8 9 10 5 I...
Страница 39: ...39 KZ 9 11 8 8 9 10 11 10 8 9 3 6 10 11 9 12 11 8 9 10 11 8 9 10 11 3 3 5 5 0 4 1 2 13...
Страница 40: ...40 KZ 0 8 9 10 11 4 13 1 2 13 4 4 4 9 8 9 10 11 1 2 12 1 2 8 9 10 11 6 12 1 1 2 4 3 1 4 1 5 1 220 240 50 60 15...
Страница 41: ...41 KZ 3...
Страница 42: ......
Страница 44: ...brayer ru...

