background image

30

RU

ЧИСТКА И УХОД 

• 

Выключите машинку для стрижки после её 

использования, установив выключатель питания в 

положение «0» и выньте вилку шнура питания из 

электрической розетки.

• 

Снимите установленную насадку-расчёску (8, 9, 

10 или 11) (рис. 4) и очистите её от волос, исполь

-

зуя щёточку (13). 

• 

Используя щёточку (13) очистите лезвия (1, 2). 

Запрещается промывать лезвия (1, 2) под струёй 

воды. 

• 

Корпус (4) машинки для стрижки протирайте мяг

-

кой слегка влажной тканью, после чего вытрите 

насухо. 

• 

Запрещается использовать для чистки корпуса (4) 

машинки, насадок-расчёсок (8, 9, 10, 11) абразив

-

ные чистящие средства или растворители. 

• 

Запрещается погружать машинку для стрижки, 

шнур питания и вилку шнура питания в воду или 

любые другие жидкости. 

• 

После каждого использования смазывайте лезвия 

(1, 2) смазочным маслом (12). 

ХРАНЕНИЕ 

• 

Прежде чем убрать набор для стрижки на хране

-

ние, произведите чистку корпуса машинки, лезвий 

(1, 2) и насадок-расчёсок (8, 9, 10, 11).

• 

Смажьте блок лезвий (6) смазочным маслом (12). 

• 

Храните набор для стрижки в сухом прохладном 

месте, недоступном для детей и людей с ограни

-

ченными возможностями. 

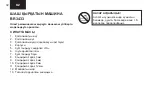
КОМПЛЕКТ ПОСТАВКИ 

1. 

Машинка для стрижки — 1 шт. 

2. 

Насадки-расчёски — 4 шт.  

3. 

Смазочное масло — 1 шт. 

4. 

Щёточка для чистки — 1 шт. 

5. 

Инструкция — 1 шт. 

ТЕХНИЧЕСКИЕ ХАРАКТЕРИСТИКИ 

• 

Электропитание: 220-240 В ~50/60 Гц 

• 

Номинальная потребляемая мощность: 15 Вт 

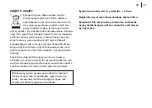
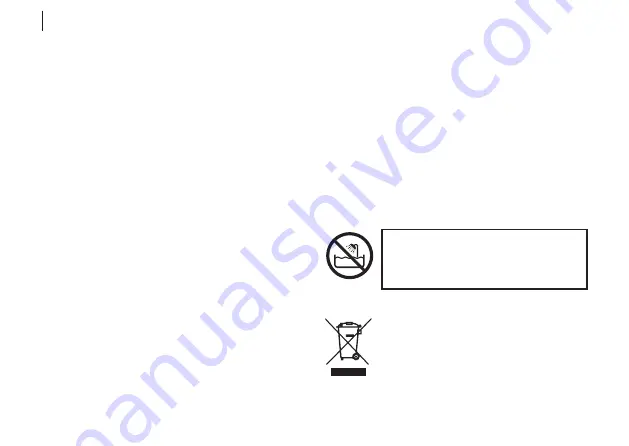
ВНИМАНИЕ! 

Не использовать прибор вблизи воды в 

ванных комнатах, душевых, бассейнах 

и т.д.

УТИЛИЗАЦИЯ

Чтобы предотвратить возможный вред 

окружающей среде или здоровью 

людей от неконтролируемой утилизации 

отходов, после окончания срока службы 

устройства или элементов питания (если 

входят в комплект), не выбрасывайте их вместе с 

обычными бытовыми отходами, передайте прибор 

Содержание BR3433

Страница 1: ...Instruction manual BR3433 Hair clipper BR3433 brayer ru...

Страница 2: ...EN 3 DE 12 RU 22 KZ 34...

Страница 3: ...djustable blade 3 Adjustable blade shifter 4 Body 5 Power switch 0 I 6 Hanging loop 7 Power cord 8 3 mm attachment comb 9 6 mm attachment comb 10 9 mm attachment comb 11 12 mm attachment comb 12 Lubri...

Страница 4: ...4 EN FIG 1 FIG 2 FIG 3 FIG 4 FIG 5 FIG 6 FIG 7 FIG 8 FIG 9 FIG 10 FIG 11...

Страница 5: ...ater unplug it immediately and only then you can take the hair clipper out of water Apply to the service center for testing or repairing the unit To unplug the unit do not pull the power cord take the...

Страница 6: ...ble for their safety or if they are not instructed by this person on the usage of the unit From time to time check the power cord integrity If the power cord is damaged it should be replaced by the ma...

Страница 7: ...clipper For lubricating the blades use the oil 14 supplied with the unit or the oil intended for similar devices Do not use vegetable oil or oil that contains solvents Solvents will evaporate and the...

Страница 8: ...combs which leave shorter hair part of the attachment until locking Before starting the haircut make sure that the attachment is securely fixed To remove the attachment comb 8 9 10 or 11 press the lat...

Страница 9: ...and cut hair on the temples Switch the hair clipper off then set the attachment comb 10 or 11 switch the hair clipper on and continue cutting hair towards the top of the head STEP FOUR FIG 10 Cut the...

Страница 10: ...e attachment combs 8 9 10 11 Do not immerse the hair clipper the power cord and the power plug into water or any other liquids Lubricate the blade block 1 2 after every use with the lubricating oil 12...

Страница 11: ...cling of this product apply to a local municipal administration a disposal service or to the shop where you purchased this product The manufacturer preserves the right to change design and specificati...

Страница 12: ...inge 2 Bewegliche Klinge 3 Schieberegler f r bewegliche Klinge 4 Geh use 5 Netzschalter I 0 6 Aufh nge se 7 Netzkabel 8 Kammaufsatz 3 mm 9 Kammaufsatz 6 mm 10 Kammaufsatz 9 mm 11 Kammaufsatz 12 mm 12...

Страница 13: ...13 DE Abb 1 Abb 2 Abb 3 Abb 4 Abb 5 Abb 6 Abb 7 Abb 8 Abb 9 Abb 10 Abb 11...

Страница 14: ...iff f r das Ger t verwendet werden Benutzen Sie die Haarschneidemaschine nicht in unmittelbarer N he von einer K chensp le in Badezimmern in der N he von Schwimmbecken oder anderen mit Wasser gef llte...

Страница 15: ...tickungsgefahr Die Haarschneidemaschine ist nicht f r Kinder bestimmt Beaufsichtigen Sie Kinder damit sie das Ger t als Spielzeug nicht benutzen Kinder d rfen die Klingen w hrend des Betriebs der Masc...

Страница 16: ...en wenn es besch digt ist schlie en Sie es ans Stromnetz nicht an Vergewissern Sie sich dass die angegebenen Net zadapterversorgungsspannungsparameter und die Stromnetzparameter bereinstimmen Beim 60...

Страница 17: ...sich dass die Haarschneidemaschine st rungsfrei Verwenden Sie das mitgelieferte 12 oder f r hnliche Ger te vorgesehene l Verwenden Sie keine pflanzlichen oder L sungsmittel enthaltenden le um die Kli...

Страница 18: ...11 8 3 mm 9 6 mm 10 9 mm 11 12 mm Abbildung 6 zeigt welche Kammaufs tze f r die Verwendung auf verschiedenen Bereichen des Kopfhaares empfohlen werden Um die Haarschneidemaschine besser zu beherrsche...

Страница 19: ...ie Aufs tze 10 oder 11 von 9 bis 12 mm f r etwas l ngeres Haar F r l ngeres Haar dr cken Sie die Haarstr hnen zwischen den Fingern zusammen und schneiden Sie diese mit der Haarschneidemaschine Heben S...

Страница 20: ...chneidemaschinengeh use 4 mit einem weichen leicht angefeuchteten Tuch ab danach trocknen Sie es ab Verwenden Sie keine Scheueroder L sungsmittel um das Haarschneidemaschinengeh use 4 den Netzadapter...

Страница 21: ...ntsorgen Weitere Informationen zur Entsorgung dieses Produktes erhalten Sie bei Ihrer lokalen Stadtverwaltung einem Abfallentsorgungsdienst oder beim Gesch ft wo Sie dieses Produkt gekauft haben ACHTU...

Страница 22: ...22 RU BR3433 1 2 3 4 5 0 I 6 7 8 3 9 6 10 9 11 12 12 13 RU...

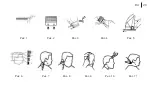
Страница 23: ...23 RU P 1 P 2 P 3 P 4 P 5 P 6 P 7 P 8 P 9 P 10 P 11...

Страница 24: ...24 RU 80...

Страница 25: ...25 RU...

Страница 26: ...26 RU 3 60 1 2 1 2 1 2 1 1 2 2 1 1 1 2 1 2...

Страница 27: ...27 RU 8 9 10 11 8 9 10 11 2 3 3 8 3 3 1 2 3 3 1 12 12 1 2 3 5 I 30 1 2 5 0 8 9 10 11 1 2 4 8 9 10 11...

Страница 28: ...28 RU 1 2 8 9 10 11 8 3 9 6 10 9 11 12 6 11 12 1 2 13 7 8 9 10 5 I...

Страница 29: ...29 RU 9 11 8 8 9 10 11 10 8 9 3 6 10 11 9 12 11 8 9 10 11 8 9 10 11 3 3 5 5 0 4 1 2 13 1 2 3...

Страница 30: ...30 RU 0 8 9 10 11 4 13 13 1 2 1 2 4 4 8 9 10 11 1 2 12 1 2 8 9 10 11 6 12 1 1 2 4 3 1 4 1 5 1 220 240 50 60 15...

Страница 31: ...31 RU 3...

Страница 32: ...32 KZ BR3433 1 2 3 4 5 0 I 6 7 8 3 9 6 10 9 11 12 12 13 KZ...

Страница 33: ...33 KZ 1 2 3 4 5 6 7 8 9 10 11...

Страница 34: ...34 KZ 80...

Страница 35: ...35 KZ...

Страница 36: ...36 KZ 3 60 1 2 1 2 1 2 1 2 1 2 1 1 1 2 1 2 12...

Страница 37: ...37 KZ 8 9 10 11 2 3 3 8 3 3 1 2 3 3 1 1 2 12 3 5 I 30 1 2 5 0 8 9 10 11 1 2 4 8 9 10 11 8 9 10 11...

Страница 38: ...38 KZ 8 9 10 11 8 3 9 6 10 9 11 12 6 11 12 1 2 13 7 8 9 10 5 I...

Страница 39: ...39 KZ 9 11 8 8 9 10 11 10 8 9 3 6 10 11 9 12 11 8 9 10 11 8 9 10 11 3 3 5 5 0 4 1 2 13...

Страница 40: ...40 KZ 0 8 9 10 11 4 13 1 2 13 4 4 4 9 8 9 10 11 1 2 12 1 2 8 9 10 11 6 12 1 1 2 4 3 1 4 1 5 1 220 240 50 60 15...

Страница 41: ...41 KZ 3...

Страница 42: ......

Страница 43: ...Made in China Hergestellt f r Ruste GmbH Berggasse 18 18 1090 Wien Osterreich Produced for Ruste GmbH Berggasse 18 18 1090 Vienna Austria 18 18 1090 143912 1 7 495 297 50 20 e mail info brayer su...

Страница 44: ...brayer ru...
Отзывы: