Basic operation
en
19
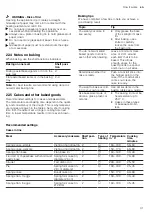
Power level
Cooking method
Examples
1-2
Melting
Butter, chocolate
2-3
Boiling
Rice, béchamel sauce and vegetable
ragout
4-5
Boiling
Potatoes, pasta, vegetables
4-5
Searing
Ragout, roast joint
5
Steaming
Fish
2-3-4-5
Warming up and keeping the temper-
ature of the food
Ready meals
6-7-8
Frying
Fillet, steak, börek
9
Boiling and frying
Meat
11 Basic operation
11.1 Switching on the appliance
▶
Turn the function selector to any position other than
the "Off" position .
a
The appliance is switched on.
11.2 Switching off the appliance
▶
Turn the function selector to the "Off" position .
a
The appliance is switched off.
11.3 Types of heating and temperature
1.
Use the function selector to set the type of heating.
2.
Use the temperature selector to set the temperature
or grill setting.
a
The appliance starts heating after a few seconds.
3.
When the dish is ready, switch off the appliance.
Tip:
The most suitable type of heating for your food
can be found in the description of the types of heating.
Changing the type of heating
You can change the type of heating at any time.
▶
Use the function selector to set the required type of
heating.
Changing the temperature
You can change the temperature at any time.
▶
Turn the temperature selector to set the desired
temperature.
12 Time-setting options
Your appliance features time-setting options that you
can use to set the cooking time and the timer.
12.1 Timer
The timer can be used as a kitchen timer.
The timer runs alongside other settings. The timer can
be set at any time, even if the appliance is switched off.
Setting the timer
The timer can be set up to 120 minutes regardless of
whether the appliance is on or off. The timer has its
own audible signal so that you can tell whether it is the
timer or a cooking time which has elapsed.
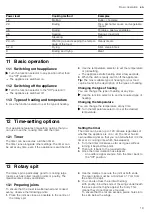
1.
Turn the timer clockwise as far as it goes without
turning it beyond this point.
2.
Then turn it back to the required time.
3.
Once the timer duration has elapsed
‒
An audible signal sounds. Turn the timer back to
the "Off" position.
13 Rotary spit
The rotary spit is particularly good for cooking large
roasts, such as rolled roasting joints or poultry. The
meat becomes crispy and brown.
13.1 Preparing joints
To ensure that the roast is well-browned and cooked
evenly, observe the following points:
1.
Place the joint as close as possible to the centre of
the rotary spit.
2.
Use the clamps to secure the joint at both ends.
The rear clamp must be a minimum of 7 cm from
the end of the spit.
3.
You can also truss the joint with string.
With poultry, bind the ends of the wings underneath
the back and the thighs against the body. This
means they do not become too dark.
To ensure that the fat can escape, pierce holes into
the skin below the wings.

