background image

en

        Tested for you in our cooking studio

40

Shiny roasting dishes made from stainless steel or 

aluminium reflect heat like a mirror and are therefore 

not particularly suitable. The poultry, meat and fish 

cooks slower and does not brown so well. Use a higher 

temperature and/or a longer cooking time.
Observe the manufacturer's instructions for your 

roasting cookware.

Uncovered cookware


To cook poultry, meat and fish, it is best to use a deep 

roasting tin. Place the tin onto the wire rack. If you do 

not have any suitable cookware, use the universal pan.

Covered cookware


When cooking with covered cookware, the cooking 

compartment remains considerably cleaner. Ensure that 

the lid fits well and closes properly. Place the cookware 

onto the wire rack.
Poultry, meat and fish can also become crispy in a 

covered roasting dish. Simply use a roasting dish with a 

glass lid and set a higher temperature.

Grilling

Keep the appliance door closed when using the grill. 

Never grill with the appliance door open.
Place the food to be grilled on the wire rack. In addition, 

slide the universal pan in at least one shelf position 

lower, with the slanted edge facing the appliance door. 

Any dripping fat will be caught.
When grilling, try wherever possible to use pieces of 

food which are of a similar thickness and weight. This 

will allow them to brown evenly and remain succulent 

and juicy. Place the food to be grilled directly onto the 

wire rack.
Use tongs to turn the pieces of food you are grilling. If 

you pierce the meat with a fork, the juices will run out 

and it will become dry.
Do not add salt to the meat until it has been grilled. Salt 

draws water from the meat.

Notes

The grill element switches itself on and off 

repeatedly; this is normal. The grill setting 

determines how frequently this occurs.

Smoke may be produced when grilling.

When you are using the grill, do not insert the baking 

tray or universal pan into the cooking compartment 

any higher than shelf position 3. The high 

temperatures at the top of the cooking compartment 

can warp accessories, which may damage the 

cooking compartment when removed.

Meat thermometer

Depending on your appliance's features, you may have 

a meat thermometer. You can cook accurately using a 

meat thermometer. Read important notes on using the 

meat thermometer in the corresponding chapter. There, 

you can find notes on inserting the meat thermometer, 

the possible heating types and additional information. 

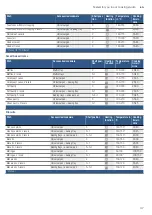
Recommended setting values

The setting values are based on the assumption that 

unstuffed, chilled, ready-to-roast poultry, meat or fish is 

placed into a cold cooking compartment.

In the table, you can find specifications for poultry, meat 

and fish with default values for the weight. If you wish to 

prepare heavier poultry, meat or fish, always use the 

lower temperature. If roasting several joints, use the 

weight of the heaviest piece as a basis for determining 

the cooking time. The individual pieces should be 

approximately equal in size.
The larger the poultry, meat or fish is, the lower the 

cooking temperature and the longer the cooking time.
Turn the poultry, meat and fish after approx. 

^

 to 

Z

 of 

the indicated time.

Poultry

When cooking duck or goose, pierce the skin on the 

underside of the wings. This allows the fat to run out.
If using duck breast, score the skin. Do not turn duck 

breasts.
Add some liquid to the poultry in the dish. Cover the 

base of the ovenware with approx. 1-2 cm of liquid.
When you turn poultry, ensure that the breast side or 

the skin side is underneath at first.
Poultry will turn out particularly crispy and brown if you 

baste it towards the end of the roasting time with butter, 

salted water or orange juice.

Meat

Baste lean meat with fat as required or cover it with 

strips of bacon.
When roasting, add a little liquid if the meat is lean. A 

covering of approx. 

^

 cm depth should be applied to 

the base of any glass cookware.
Score the rind crosswise. If you turn the joint when 

cooking, ensure that the rind is underneath at first.
When the joint is ready, turn off the oven and allow it to 

rest for another 10 minutes in the cooking 

compartment. This allows the meat juices to be better 

distributed. Wrap the joint in aluminium foil if necessary. 

The recommended resting time is not included in the 

cooking time indicated.
It is more convenient to roast and braise meat in 

cookware. You can take the joint out of the cooking 

compartment more easily in the cookware, and prepare 

the sauce in the cookware itself.
The quantity of liquid is dependent on the type of meat, 

the cookware material and also on whether or not a lid 

is used. If preparing meat in an enamelled or dark metal 

roasting dish, it will need a little more liquid than if 

cooked in glass cookware.
The steam evaporates in the cookware when roasting. 

Carefully pour in more liquid if required.
The distance between the meat and the lid should be at 

least 3 cm. The meat may rise.
If necessary, braise the meat first by searing it. Add 

water, wine, vinegar or a similar liquid to the braising 

liquid. A covering approx. 1-2 cm deep should be 

applied to the base of the cookware.

Содержание HLL09.020U

Страница 1: ...3FHJTUFS RXU QHZ GHYLFH RQ 0 RVFK QRZ DQG JHW IUHH EHQHILWV CPTDI IPNF DPN XFMDPNF en Instruction manual Free standing cooker Free standing cooker HLL09 020U ...

Страница 2: ......

Страница 3: ... options 20 Programming the cooking time 20 The kitchen timer 20 v PowerBoost function 21 Activation 21 Deactivation 21 A Childproof lock 22 Activating and deactivating the childproof lock 22 Childproof lock 22 b Automatic safety cut out 22 Q Basic settings 23 To access the basic settings 24 t Cookware check 24 h Power manager 25 1 Operating the appliance 25 Switching the appliance on and off 25 S...

Страница 4: ...ed Keep children below the age of 8 years old at a safe distance from the appliance and power cable We advise that you exercise caution using or standing near an induction hob while it is in operation if you wear a pacemaker or a similar medical device Consult your doctor or the device manufacturer concerning its conformity or any possible incompatibilities Always slide accessories into the cookin...

Страница 5: ...isk of scalding The accessible parts become hot during operation Never touch the hot parts Keep children at a safe distance Risk of scalding When you open the appliance door hot steam can escape Steam may not be visible depending on its temperature When opening do not stand too close to the appliance Open the appliance door carefully Keep children away Risk of scalding Water in a hot cooking compa...

Страница 6: ...reaseproof paper or ovenware on the cooking compartment floor do not place accessories on the cooking compartment floor Do not cover the cooking compartment floor with any sort of foil or greaseproof paper Do not place ovenware on the cooking compartment floor if a temperature of over 50 ºC has been set This will cause heat to accumulate The baking and roasting times will no longer be correct and ...

Страница 7: ...will go Carrying the appliance do not carry or hold the appliance by the door handle The door handle cannot support the weight of the appliance and could break Grilling do not insert the baking tray or universal pan higher than level 3 when grilling The high heat distorts it and the enamel may be damaged when it is removed At level 4 and 5 only grill directly on the wire rack Damage to the plinth ...

Страница 8: ...endly manner fInduction cooking InductioncookingAdvantages of induction cooking Induction cooking is very different from traditional cooking methods as heat builds up directly in the item of cookware This offers numerous advantages Saves time when boiling and frying Saves energy Easier to care for and clean Spilled food does not burn on as quickly Heat control and safety the hob increases or decre...

Страница 9: ...is may impair the heat supply Absence of pan or unsuitable size If no pan is placed on the selected hotplate or if it is made of unsuitable material or is not the correct size the power level displayed on the hotplate indicator will flash Place a suitable pan on the hotplate to stop the flashing If this takes more than 90 seconds the hotplate will switch off automatically Empty pans or those with ...

Страница 10: ...ed electrician if this is necessary Spare mains cables can be ordered from our after sales service No power strips multi way connectors or extension cables are used If using a residual current device only use one that bears the mark z The presence of this mark is the only way to be sure that it fulfils all the applicable regulations The mains plug can be accessed at all times The mains cable is no...

Страница 11: ...rder to avoid damaging the appliance Place cardboard or similar between the front and rear side to prevent knocks against the inside of the glass door Secure the door and if available the top cover to the appliance sides using adhesive tape Keep the original appliance packaging Only transport the appliance in the original packaging Observe the transport arrows on the packaging If the original pack...

Страница 12: ...Note Depending on the appliance model individual details and colours may differ General information The design depends on the respective appliance model Cooking area Here is an overview of the control panel The design depends on the respective appliance model Explanations 1 Hob 2 Control panel 3 Cooling fan 4 Oven door 5 Plinth drawer Optional available for some appliances Details may vary dependi...

Страница 13: ...e Display œ Low temperature If you remove the cookware from the hotplate during cooking the residual heat indicator and the selected heat setting will flash alternately When the hotplate is switched off the residual heat indicator will light up Even after the hob has been switched off the residual heat indicator will stay lit for as long as the hotplate is still warm Control panel Details may vary...

Страница 14: ... the heat from the ring shaped heating element in the back panel around the cooking compartment This heating function is used to measure both the energy consumption in air recirculation mode and the energy efficiency class Pizza setting For cooking pizza and dishes that require a lot of heat from underneath The bottom heating element and the ring heating element in the back panel heat up Bottom he...

Страница 15: ...a certain period afterwards _Accessories AccessoriesYour appliance is accompanied by a range of accessories Here you can find an overview of the accessories included and information on how to use them correctly Accessories included Your appliance is equipped with the following accessories Only use genuine accessories They are specially adapted for your appliance You can buy accessories from the af...

Страница 16: ...34 Optional accessories Wire rack For cookware cake tins and ovenproof dishes and for roasts and grilled food Baking tray For tray bakes and small baked items Universal pan For moist cakes baked items frozen food and large roasts It can be used to catch dripping fat when you are grilling directly on the wire rack Wire insert For meat poultry and fish For inserting into the universal pan to catch d...

Страница 17: ...ngs and cooking times for various meals Switching the hob on and off The main switch is used to switch the hob on and off To switch on Touch the symbol An audible signal sounds The indicator next to the main switch and the hotplate indicators light up The hob is ready to use To switch off Touch the symbol until the indicator goes out All hotplates are switched off The residual heat indicator remai...

Страница 18: ... up puree cream soups and thick sauces stir occasionally Set heat setting 8 to 9 for preheating When cooking with the lid on turn the heat setting down as soon as steam escapes between the lid and the cookware Steam does not need to escape for a good cooking result After cooking keep the lid on the cookware until you serve the food To cook with the pressure cooker observe the manufacturer s instru...

Страница 19: ...ing frying with little oil Escalope plain or breaded 6 7 6 10 Escalope frozen 6 7 6 12 Chop plain or breaded 6 7 8 12 Steak 3 cm thick 7 8 8 12 Poultry breast 2 cm thick 5 6 10 20 Poultry breast frozen 5 6 10 30 Rissoles 3 cm thick 4 5 20 30 Hamburgers 2 cm thick 6 7 10 20 Fish and fish fillet plain 5 6 8 20 Fish and fish fillet breaded 6 7 8 20 Fish breaded and frozen e g fish fingers 6 7 8 15 Sc...

Страница 20: ... use the or A symbols to change the cooking time or set the time to Once the time has elapsed The hotplate switches off A beep sounds and in the time program function display appears for 10 seconds The Ú indicator on the hotplate lights up Pressing the 0 symbol turns off the indicators and stops the beeping Notes If a cooking time was programmed for several hotplates the time information for the s...

Страница 21: ...ol turns off the indicators and stops the beeping vPowerBoost function PowerBoostfunctionThe PowerBoost function enables you to heat up large quantities of water faster than when using heat setting Š The function can be used by any hotplate provided that no other hotplates are switched on Otherwise and Š will flash in the heat setting display Activation 1 Select a hotplate 2 Touch the boostG symbo...

Страница 22: ...ction the childproof lock automatically activates when a hob is switched off Switching on and off You can find out how to switch the automatic childproof lock on in the Basic settings section bAutomatic safety cut out Automaticsafetycut outIf a hotplate operates for an extended period and no settings are changed the automatic safety shut off is activated The hotplate stops heating and the residual...

Страница 23: ...0 seconds 1 minute ˆ Power management function Limiting the total power of the hob The available settings depend on the maximum power of the hob Deactivated Maximum power of the hob 1000 W minimum power 1500 W 3000 W recommended for 13 A 3500 W recommended for 16 A 4000 W 4500 W recommended for 20 A Š or Š Maximum power of the hob Š Time for selecting the cooking zone Unlimited The hotplate that w...

Страница 24: ...setting 3 Touch the or A symbol A will flash on the hotplate display The function has now been enabled After 20 seconds the quality and speed of the cooking process will appear in the hotplate display Check the result using the following table To activate the function again select the or A symbol Notes If the diameter of the hotplate used is much smaller than the diameter of the cookware only the ...

Страница 25: ...lready learnt about the controls and how they work Now we will explain how to apply settings on your appliance Switching the appliance on and off Use the function selector to switch the appliance on or off Turning the function selector to any position other than the Off position switches on the appliance To switch off the appliance always turn the function selector to the Off position Setting the ...

Страница 26: ...rp or abrasive cleaning agents cleaning agent with a high alcohol content scouring pads high pressure cleaners or steam jets Do not clean individual parts in the dishwasher Wash new sponges thoroughly before first use Warning Risk of burns The appliance becomes very hot Never touch the interior surfaces of the cooking compartment or the heating elements Always allow the appliance to cool down Keep...

Страница 27: ...ry Cover the blade again after cleaning Replace damaged blades immediately Zone Cleaning agent Optional available for some appliances depending on the appliance model Glass hob depending on appli ance model Care Protective care products for glass Cleaning Cleaning agents for glass Follow the cleaning instructions on the packag ing Glass scraper for stubborn dirt Remove the protective cover and cle...

Страница 28: ...compartment after each use This will ensure that dirt cannot be baked on Always remove flecks of limescale grease starch and albumin e g egg white immediately Use the universal pan for baking very moist cakes Use suitable ovenware for roasting e g a roasting dish Accessories Hot soapy water Soak and then clean with a dish cloth or a brush Aluminium baking tray depending on appliance model Dry with...

Страница 29: ...iancedoorWith good care and cleaning your appliance will retain its appearance and remain fully functional for a long time to come This will tell you how to remove the appliance door and clean it Detaching and attaching the oven door For cleaning purposes and to remove the door panels you can detach the oven door The oven door hinges each have a locking lever When the locking levers are closed fig...

Страница 30: ...lean the panels with glass cleaner and a soft cloth Warning Risk of injury Scratched glass in the appliance door may develop into a crack Do not use a glass scraper sharp or abrasive cleaning aids or detergents Installation During installation make sure that the lettering top right is upside down at the bottom left 1 Insert the panel at an angle towards the back fig A 2 Insert the top panel at an ...

Страница 31: ...he cooking method High pitched whistling noises May occur if two hotplates are used at the highest heat setting at the same time The whistling noises disappear or become quieter when the heat setting is reduced Fan noise The hob is equipped with a fan that automatically switches on at high temperatures The fan may continue to run even after you have switched off the hob if the temperature detected...

Страница 32: ...sing a special glass ceramic cleaning agent produces the best results We advise against using harsh or abrasive cleaning agents dish water detergent concentrated or scouring pads You can find more information on cleaning and caring for your hob in the section on Cleaning ...

Страница 33: ...e displays A fault has occurred in the electronics To acknowledge the fault cover the control panel with your hand ƒ The electronics have overheated and have switched off the corresponding hotplate Wait until the electronics have cooled down sufficiently Then touch any symbol on the hob The electronics have overheated and have switched off all hotplates heat setting and acous tic signal There is a...

Страница 34: ...aling ring If the glass cover has a sealing ring put it back in place before screwing the cover back on 5 Remove the tea towel and switch on the circuit breaker 4Customer service CustomerserviceOur after sales service is there for you if your appliance needs to be repaired We will always find an appropriate solution also in order to avoid after sales personnel having to make unnecessary visits E n...

Страница 35: ...d after the settings tables Remove any accessories that are not being used from the cooking compartment This will allow you to achieve optimal cooking results while saving energy Gentle hot air heating function Gentle hot air is an intelligent heating function that allows you to gently cook meat fish and baked items The appliance optimally controls the supply of energy to the cooking compartment T...

Страница 36: ...re can cause damage to the enamel Some food turns out better if it is baked in several stages These dishes are indicated in the table The setting values for bread dough apply to both dough placed on a baking tray and dough placed in a loaf tin Cakes in tins Cakes on trays Dish Accessories cookware Shelf posi tion Heating function Tempera ture in C Cooking time in mins Sponge cake simple Vienna rin...

Страница 37: ...y 3 levels Baking trays universal pan 5 3 1 170 190 30 45 Choux pastry Universal pan 3 190 210 35 50 Choux pastry 2 levels Universal pan baking tray 3 1 190 210 35 45 Dish Accessories cookware Shelf position Heating function Temperature in C Cooking time in mins Viennese whirls Universal pan 3 140 150 30 40 Viennese whirls 2 levels Universal pan baking tray 3 1 140 150 30 45 Viennese whirls 3 leve...

Страница 38: ...200 20 25 Pizza frozen deep pan x 2 Universal pan wire rack 3 1 170 190 20 30 Mini pizzas Universal pan 3 190 210 10 20 Savoury cakes in a tin 28 cm springform cake tin 2 170 190 40 50 Quiche Tart dish or tin 2 190 210 35 45 Tart Ovenproof dish 2 170 190 55 65 Empanadas Universal pan 3 180 190 35 45 Börek Universal pan 2 220 240 30 40 Preheat You want to find out whether the baked item is complete...

Страница 39: ...okware fits in the cooking compartment The baked item is too light on top and too dark underneath Bake the cake one level higher in the oven the next time The baked item is too dark on top and too light underneath Bake the cake one level lower in the oven the next time Select a lower temperature and extend the baking time The baked item is too dark in a tin or loaf tin Place the baking tray in the...

Страница 40: ...ded setting values The setting values are based on the assumption that unstuffed chilled ready to roast poultry meat or fish is placed into a cold cooking compartment In the table you can find specifications for poultry meat and fish with default values for the weight If you wish to prepare heavier poultry meat or fish always use the lower temperature If roasting several joints use the weight of t...

Страница 41: ... rack 2 7 180 200 90 100 Dish Accessories cookware Shelf posi tion Heating function Step Tempera ture in C Cooking time in mins Joint of pork without rind e g neck 1 5 kg Cookware uncovered 1 7 180 200 140 160 Joint of pork with rind e g shoulder 2 kg Cookware uncovered 1 7 170 190 190 200 Pork tenderloin steak 1 5 kg Cookware uncovered 2 190 210 130 140 Pork steaks 2 cm thick Wire rack 4 3 20 25 ...

Страница 42: ...ecial accessory The roast is too dark and the crack ling is burned in places and or the roast is too dry Check the shelf position and temperature Select a lower temperature the next time and reduce the roasting time if necessary The crackling is too thin Increase the temperature or switch on the grill briefly at the end of the roasting time The roast looks good but the juices are burnt Next time u...

Страница 43: ...e the dried food from the paper immediately In the table you will find settings for drying various foodstuffs The temperature and drying time are dependent on the type moisture ripeness and thickness of the food The longer you leave the food to be dried the better it will be preserved The more thinly you slice the food the more quickly it will dry and the more flavour it will retain For this reaso...

Страница 44: ...0 180 C Preserving Fruit After approx 40 to 50 minutes small bubbles begin to form at short intervals Switch off the oven After 25 to 35 minutes of residual heat remove the preserving jars from the cooking compartment If they are allowed to cool for longer in the cooking compartment germs could multiply promoting acidification of the preserved fruit Vegetables As soon as bubbles begin to form in t...

Страница 45: ...tings table are intended as a guide only Defrosting For defrosting frozen fruit vegetables and baked items Poultry meat and fish should ideally be defrosted in the refrigerator Not suitable for cream cakes or cream gateaux Use the following shelf positions when defrosting 1 wire rack Position 2 2 wire racks Positions 3 1 Tip Food that has been frozen flat or in portions defrosts more quickly than ...

Страница 46: ... Also slide in the universal pan The liquid will be caught and the cooking compartment stays cleaner Baking Grilling 2 1 Dish Accessories cookware Shelf posi tion Heating function Temperature in C Cooking time in mins Viennese whirls Universal pan 3 140 150 25 35 Viennese whirls 2 levels Universal pan baking tray 3 1 140 150 30 45 Viennese whirls 3 levels Baking trays universal pan 5 3 1 130 140 3...

Страница 47: ...6 ...

Страница 48: ...QQMJBODFT 4FSWJDF UHH DQG HDV UHJLVWUDWLRQ DOVR RQ PRELOH SKRQHV XXX CPTDI IPNF DPN XFMDPNF PPLJOH GPS IFMQ PV MM GJOE JU IFSF SHUW DGYLFH IRU RXU RVFK KRPH DSSOLDQFHV QHHG KHOS ZLWK SUREOHPV RU D UHSDLU IURP RVFK H SHUWV LQG RXW HYHU WKLQJ DERXW WKH PDQ ZD V RVFK FDQ VXSSRUW RX XXX CPTDI IPNF DPN TFSWJDF POUBDU EBUB PG BMM DPVOUSJFT BSF MJTUFE JO UIF BUUBDIFE TFSWJDF EJSFDUPSZ 3PCFSU PTDI BVTHFSÉ...

Отзывы: