background image

Magnetics that count

BOGEN Magnetics GmbH

 · Potsdamer Straße 12 - 13 · 14163 Berlin · Germany 

Fon +49 (0) 30 81 00 02 - 0 · Fax +49 (0) 30 81 00 02 - 60 · [email protected] · www.bogen-magnetics.com

AKS17 ins

tallation and oper

ation ins

truction manual (2021/06/16)

8/14

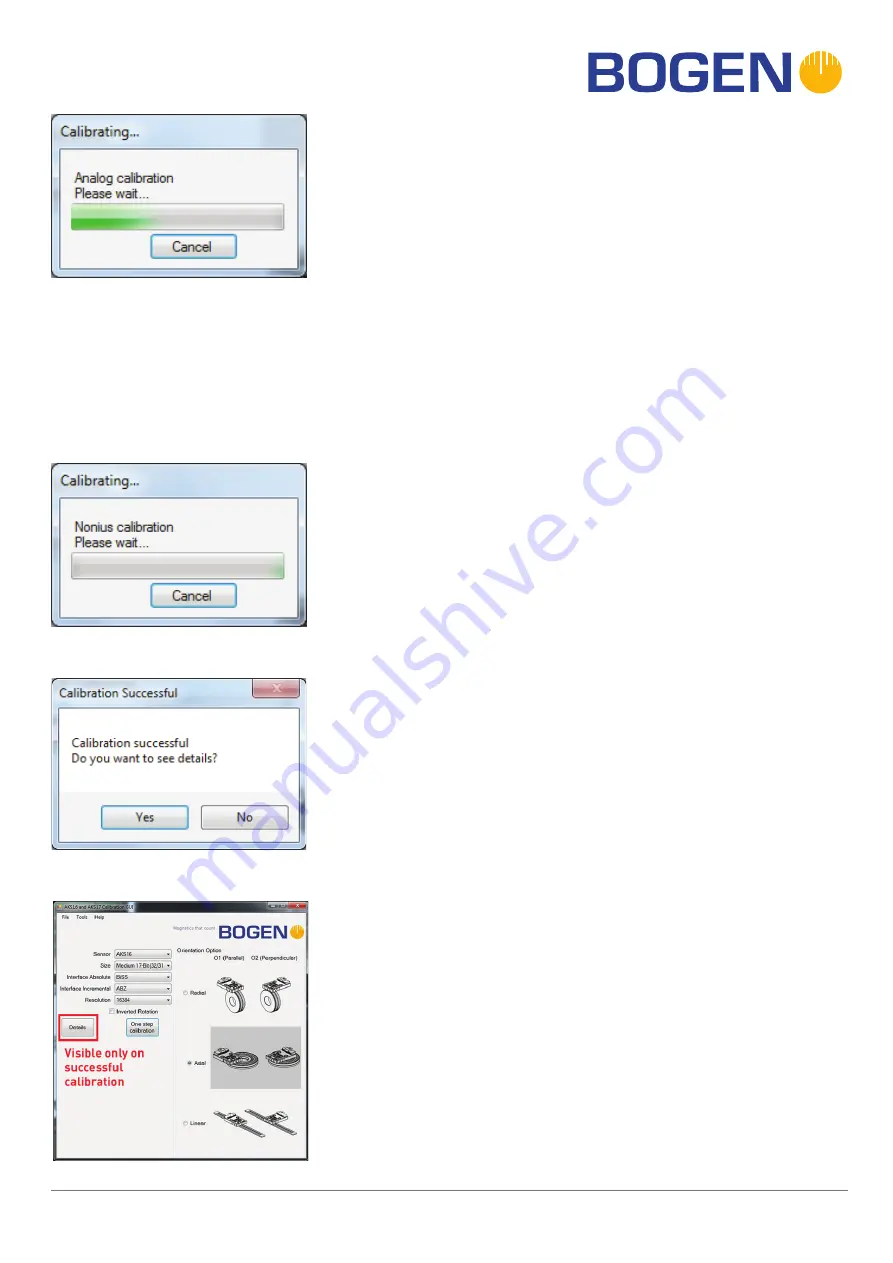
The next step is the nonius calibration where the sensor uses the 

calibrated analog parameters to read out the sensor. If the read 

out results contain values that are out of range, the calibration 

considered to be failed and has to be done again. In case of linear 

calibration the user will be prompt with a count down window on the 

nonius calibration.
The user can continue and save in case of bad nonius calibration (not 

recommended but available for extreme situations).

Afterwards the program starts the automatic calibration operation and 

interacts and shows the user the current process.
In analog calibration the user will be prompt to adjust the current 

X-Y-position or to verify the air gap between the sensor and the scale 

or both if needed. In case of linear calibration the user will be prompt 

with the countdown window on every iteration.
The user has to move the magnetic target during the calibration 

process. In linear application the user can move the scale in a user-

defined direction after the countdown is over. The duration of the 

movement depends on the “Calibration Setup”.
Depending on the result of the analog calibration the user has the 

choice to repeat the calibration or to continue without adjusting the 

current position (not recommended but possible). 

If the calibration has been successful the user will be informed about 

this. Now the user has the choice if he wants to see details or not. The 

details contain several calibration charts as seen on page 8.

A “Details” button will be visible after calibration is finished. After 

pressing this button a new window will be shown. It contains all 

calibration information details (for more information on details please 

refer to “Details” section).
Disconnect the cables from the PC, programmer AKS17 and sensing 

head. The sensing head is now ready for use. Connect the sensing 

head with your devices or power unit as desired for your application.

Содержание AKS16

Страница 1: ...ntent Safety Instructions 2 Electromagnetic Compatibility 3 Intended Use 3 Function and Properties 3 Assembly and Installation 4 Programming Device 4 Configuring the AKS17 Sensing Head 6 Protocol Data...

Страница 2: ...ems such as airplanes etc Risk of pinching There is a risk of getting pinched between the sensing head and the magnetic tape This can lead to injury or mechanical damage Avoid getting with your limbs...

Страница 3: ...f magnetic scales and sensing heads capable of non contact position detection for linear and rotary applications Fields of deployment capital equipment automation medical engineering electrical engine...

Страница 4: ...all or vice versa is a count for the period counter up down counter If signal A is preceding signal B the counter increases If signal B is preceding signal A the counter decreases The Z pulse appears...

Страница 5: ...re the parameters of an AKS17 sensing head can be changed for a successful calibration The software sets the sensing head parameters for the correct master nonius periods 128 127 120 256 255 240 512 5...

Страница 6: ...tory on your Windows PC To install the driver execute the specific program USB_Adapter_00052040_Driver exe Connecting the device for the calibration setup Mount the sensing head correctly per mechanic...

Страница 7: ...OGEN calibration software AKS16 and AKS17 CalibrationGUI Choose AKS17 from the Sensor combo box Choose the desired sensor parameters see technical data sheet for full listing of sensor parameters Plea...

Страница 8: ...scale or both if needed In case of linear calibration the user will be prompt with the countdown window on every iteration The user has to move the magnetic target during the calibration process In l...

Страница 9: ...circle is red and in the textbox to the right the user can see the corresponding error message 3 Nonius calibration Max and Min represent the maximum and minimum percentage value from result regardin...

Страница 10: ...ion to be 1050 Ticks Now the user can enter 239194 Current Position Resolution mod Resolution in the Desired Offset and then click Set The software automatically calculates the smallest possible offse...

Страница 11: ...The sensor should be connected to the PC before saving or loading configurations The connected sensor serial number the product order code and parameter descriptions can be found under Help then Prod...

Страница 12: ...er can freely disconnect the cables and reconnect a new sensor if desired Q How can I choose calibration duration A Calibration duration represents a time variable The duration should cover at least f...

Страница 13: ...e it is recommended to repeat the calibration with higher velocity or higher duration and cover all the scale Calibration failed invalid calibration data cycle count Very noisy environment Please make...

Страница 14: ...manual Rev 1 4 2021 06 16 14 14 EU Declaration of Conformity Acc to EU regulation for Electromagnetic Compatibility 2004 108 EU European Standard for Electromagnetic Compatibility EN 61326 1 2006 EMC...

Отзывы: